Help us improve your experience.

Let us know what you think.

Do you have time for a two-minute survey?


Import a Floorplan

Import a floorplan that you've created in software such as Ekahau or iBwave.

To import a floorplan:
  1. From the left menu of the Juniper Mist portal, select Location > Live View.
  2. Select the site.
  3. Click Import Floorplans (near the top right corner of the page).
  4. At the bottom of the dialog box, click More Options, and then select the import options that you want to enable.
    Table 1: Import Options
    Option Description
    Include floorplans with unmatched APs

    When this option is selected, the import includes all floorplans in the file, even if they include APs that are not adopted or claimed into your organization.

    Import AP height

    When this option is selected, the import includes any information that the floorplan contains about AP height.

    If you don’t import this data, you’ll need to enter it in the device details. AP height is a required attribute for location accuracy.

    Import AP orientation

    When this option is selected, the import includes any information that the floorplan contains about AP orientation. AP orientation refers to the placement of the AP based on the direction in which the AP LED is facing.

    If you don’t import this data, you’ll need to enter it in the device details. AP orientation is a required attribute for location accuracy.

  5. Under Floorplan Definition, click the button to import the file.
  6. Click Saveat the top-right corner of the page.
  7. Review the floorplan to ensure that it depicts accurate information about the position, height, and orientation of each AP.
  8. If you need to make changes, click Setup Floorplan, and then make changes as needed.
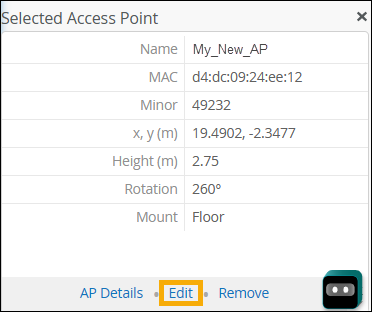
    • To edit the position—Manually drag the AP to the correct position. You can also click the AP, click Edit, and enter the X position and the Y position.

      cropped image of the floorplan screen, focusing on the Select Access Point section and the Edit button
    • To edit the height—Click the AP, click Edit, and then enter the height (in meters).

    • To change the orientation—Click the AP and drag the green dot so that it represents the physical orientation of the LED on the AP. You can also click the Edit button in the Selected Access Point section, and then enter the Rotation in degrees.
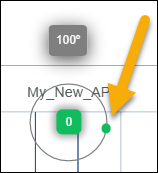
      cropped image of the floorplan, focusing on the green dot for orientation
    Note:

    To visualize the concept of orientation, mentally draw a line from the Juniper Mist logo through the LED to an endpoint such as the nearest wall. The green dot needs to align with that imaginary path.