Configuring RF Templates
Use radio frequency templates to create a re-usable group of radio settings that you can attach to one or more sites in your organization for the benefit of scale and uniformity. Settings include those for radio operations for the dual or tri-band radio, channel selection and width, transmission power, and antenna gain.
- To open the RF Templates configuration page, select Organization | Wireless > RF Templates from the Mist menu.
- To attach a RF Template to a given site, select Organization | Admin > Site Configuration from the Mist menu and then scroll down to the Access Points section.
The exact options you see depend on the Access Point (AP) you're configuring, for example whether it's an indoor or outdoor model, and the country you have selected.

Note that you can configure radio settings in four different places in the Mist dashboard, with the main difference being scope:
- RF Templates—The configuration settings here can be applied as a group to any sites in the organization
- Device Profiles—The configuration settings here can be applied to the APs included in the device profile, APs included in the attached WLAN, and/or APs included in the attached WLAN Template
- Radio Management—The configuration settings here apply to a given radio band and a given site
- Access Points—The configuration settings here apply directly to a given AP, which you access from the Access Point list
When the same configuration exists in more than one place, the order of precedence goes from broadest to narrowest. As such, settings made in an RF template that is applied to a site take precedence over those from a device profile, although you can override them on a case-by-case basis. Likewise, settings made in a device profile take precedence over those made in the Radio Management page, and those in the Radio Management page take precedence over those made directly to a given AP. In each case, whenever Mist detects a conflict, you are give the chance to over-ride the prevailing setting with the narrower one.
RF Templates Options
Because different countries have different regulations regarding Wi-Fi radio bands, when you select a country in the Country field, it may effect the radio configuration options that are available. For example, AP47 supports standard power, but since standard power is not permitted in all countries, the option will not appear on the page unless the country selected is the United States, Canada, the United Kingdom, or Saudi Arabia.
Figure 1 shows an example of how selecting a country can affect the radio channels that are available. See Regulations Enabling 6 GHz Wi-Fi for more information.
- Template Name—This is the name that appears in the templates list on the RF Templates page.
- Country—Your selection here determines which radio channels, and which power level defaults, are available for configuration.
- Antenna Mode—For Juniper AP model 36M, you can designate the
device to use an Internal or External antenna.
- For the 2.4 GHz and the 6 GHz radio bands, selecting External and the AP36M sets the AP to use its default radio gains (the configurable External Antenna Gain field disappears).
- For the 5 GHz radio band, selecting Internal and the AP36M sets the AP to use its default radio gains (the configurable External Antenna Gain field disappears).
2.4 GHz Settings | 5 GHz Settings | 6 GHz Settings
The Default Settings drop-down can also affect the configuration options you see. Choosing an outdoor model AP, for example, will expose the option for setting antenna gains. If you then configure the antenna gain or any other settings for the selected AP, those settings will be globally attached to that model AP. If no AP(s) are selected from the Default Settings drop down, then the configuration is applied to all APs.
-
Enabled/Disabled—Turn on or off the given radio band for all APs specified in the template.
- Auto—RRM will automatically disable the 2.4 GHz band
radio if, according to coverage and capacity analysis, it is found not to be needed. In
addition,
- For APs that have dual-band or tri-band radios, Auto will use RRM data to automatically convert the 2.4-GHz radio to 5-GHz or 6-GHz, when beneficial.
- For APs such as AP12 and AP33 that don't support auto-conversion, choosing
Auto allows RRM to turn off the 2.4-GHz radio in favor of dual 5-GHz bands,
or 5-GHz and 6-GHz when beneficial. Figure 2: Auto Conversion and RRM
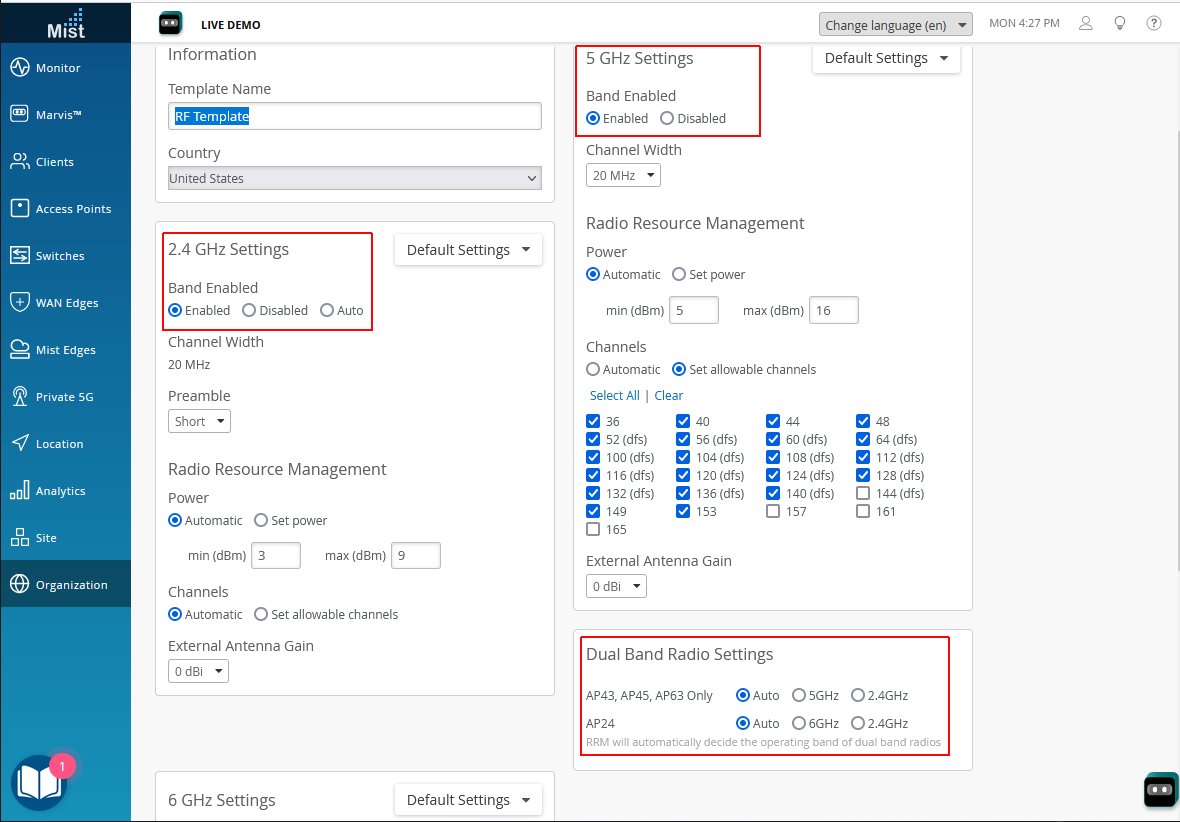
- Channel Width—For the 5-GHz and 6-GHz radio bands, you can set the channel width for all APs (the 2.4-GHz radio uses a fixed-width 20 MHz band).
- Preamble— (2.4 GHz only) Preamble is a set of bits within a packet header that
synchronize transmission signals between a sender and receiver. The preamble is sent from
the AP to the client. The options for Preamble are as follows:
-
Unconfigured—No additional header is added to synchronize transmission signals between sender and receiver (the preamble will not be sent from the AP to the client).
- Short —Default. 2.4-GHz radio band only. Can be faster, but requires clients with the "Short Preamble" bit set in their association request (not all do). Disable if you're getting association failures such as "client does not support short preamble".
-
Long—Slower, but widely supported.
-
Auto—Slower, but widely supported.
-
- Power—Maximum allowed transmit power for a given radio band per transmit chain. See Transmit Power Notation for Juniper APs and Standard Power, Low Power, and AFC for more information.
- Channels—For the 5-GHz and 6-GHz radio bands, you can set the available channel selection. When set to automatic, all allowed channels in the country are available. For 6 GHz, the preferred scan channels (PSC) are country specific.
- External Antenna Gain—Use this setting, as needed, to prevent the
combination of AP and antenna from exceeding the regulatory maximum. This option does not
appear for internal APs.
-
The gain depends on the AP model and antenna used. For example, an AP43E can support a directional antenna with up to 8 dBi gain on the 2.4-GHz band and up to 10 dBi gain on the 5-GHz band.
-
Although the Mist dashboard supports gain increments of 1 dBm, we recommend that you take the median value indicated in your site survey, and then bracket it in a range of +/-3 dBm.
-
See Antenna Mode.
-
-
Antenna Beam Pattern—This option is not available for the 2.4 GHz band.
- When AP66D is selected, you can choose a beam pattern of Wide, which is 90° x 90° left and right of center, Medium, which is 30° x 90°, or Narrow, which is 30° x 30°. The default is Wide.
Push Your Changes to the APs
After making changes to the power or channel settings, you need to push the updates to the relevant APs:
-
Save your RF Template updates.
-
Go to the Site > Radio Management page.
-
Click the Optimize now button in the top right corner for each modified band (2.4-GHz, 5-GHz, and 6GHz).
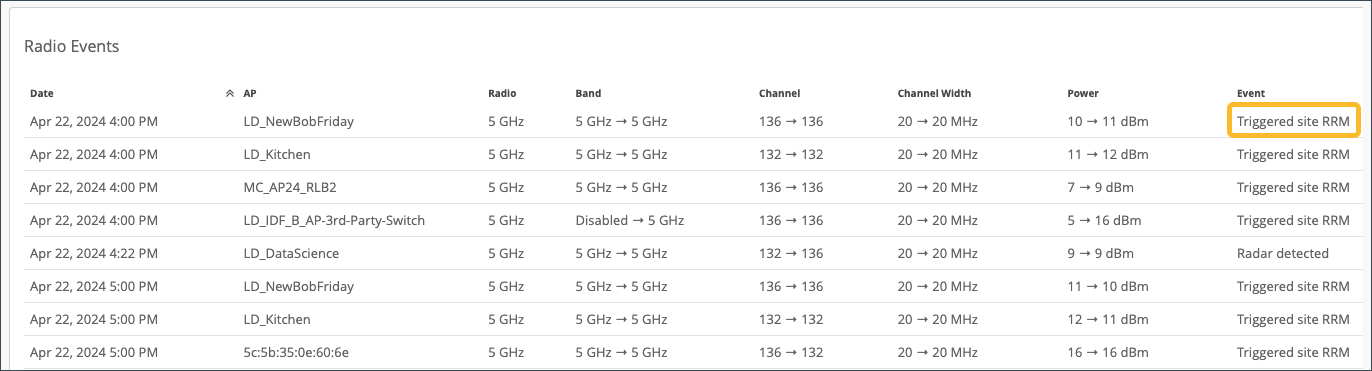
- Verify your changes, on the Mist menu: click Site > Radio
Management and scroll down the page that appears to the Radio Events
section. Look for events labeled Triggered site RRM.