Dynamic and Manual Packet Captures
When investigating communication failures between the client and the access point (AP), you can use the Juniper Mist™ portal to get dynamic and manual packet captures.
Mist does not collect or store any payload data from packets capture. Only transmission and connection data are used.
Dynamic Packet Captures
Which Events Trigger Dynamic Packet Captures?
Whenever a connection failure occurs between the wireless client and an AP (AP), it automatically triggers a short-term dynamic packet capture.
These events include:
-
DHCP Timeout—When the client sends a broadcast discover packet but does not receive an offer packet from server.
-
DHCP Denied—When the server sends a DHCP NAK, indicating that the IP address might already be in use.
-
DHCP Terminated—When the Client does not proceed with DHCP request for the offer provided by the server.
-
Authorization Failure—This type of failure could be caused due to various reasons. Examples include MIC failure, RADIUS server not responding, Access-Reject from RADIUS server, client failing to complete the auth process, and so on.
-
11r FBT Failure—This type of failure is caused due to client failing 11r roam.
-
OKC Auth Failure—This type of failure is caused due to client failing OKC roam.
-
Association Failure—This type of failure could be caused due to transmission failures or an invalid PMKID included by the client during association request.
Finding the Packet Captures
Dynamic packet captures are saved to the cloud. You can download these files from the Insights page.
Video Demo
Anyone who's ever looked at WAN PCAPs know how maddening that can be. Literally everyone at the branch accessing the internet is sending traffic on the WAN. Looking at any particular message sequence will most likely involve combining several PCAPs.
This can be time-consuming and frustrating. However, with Juniper Dynamic Packet Capture, now extended to the WAN, MIST automatically captures all the messages when an incident occurs. You no longer need to grab a bunch of PCAPs to combine them and hope you caught what you were looking for, and there's no need to recreate the issue.
Juniper MIST captures the packets while the issue is occurring, so you have the raw data right away. This drastically reduces MTTR as you no longer need to sort through a mountain of messages to find the ones related to your incident. That's WAN Assurance Dynamic PCAP in 60 seconds.
Example
This example shows how easily you can find dynamic packet captures on the Insights page.
From the left menu, select Monitor > Service Levels.
Click the Insights button to view the Insights page.
Scroll down to the Events section and click the applicable tab.
Paperclip icons indicate the events with dynamic packet captures.
Click an event to see more details on the right side of the screen.
Below the details, click Download Packet Capture.
Manual Packet Captures
For manual packet captures, go to Site > Packet Captures, where you can:
-
Choose which network type to capture packets from: wired, wireless, or WAN.
Note:Wired packet capture applies to the wired ports of APs (not the switch ports). The switch must be running a CloudX version of Junos for it to appear in the Add Switch + selection window. WAN packet captures support Session Smart Router and SRX WAN edge device ports.
-
Restrict the packet capture to specific clients, WLANs, APs, or wireless bands.
-
Configure the number of packets captured, packet size in bytes, and the duration of the capture session.
-
Configure other capture parameters such as header inclusion and capture filters. See Table 1 for details.
After downloading the packet capture to your computer, follow the steps below to view the data in Wireshark.
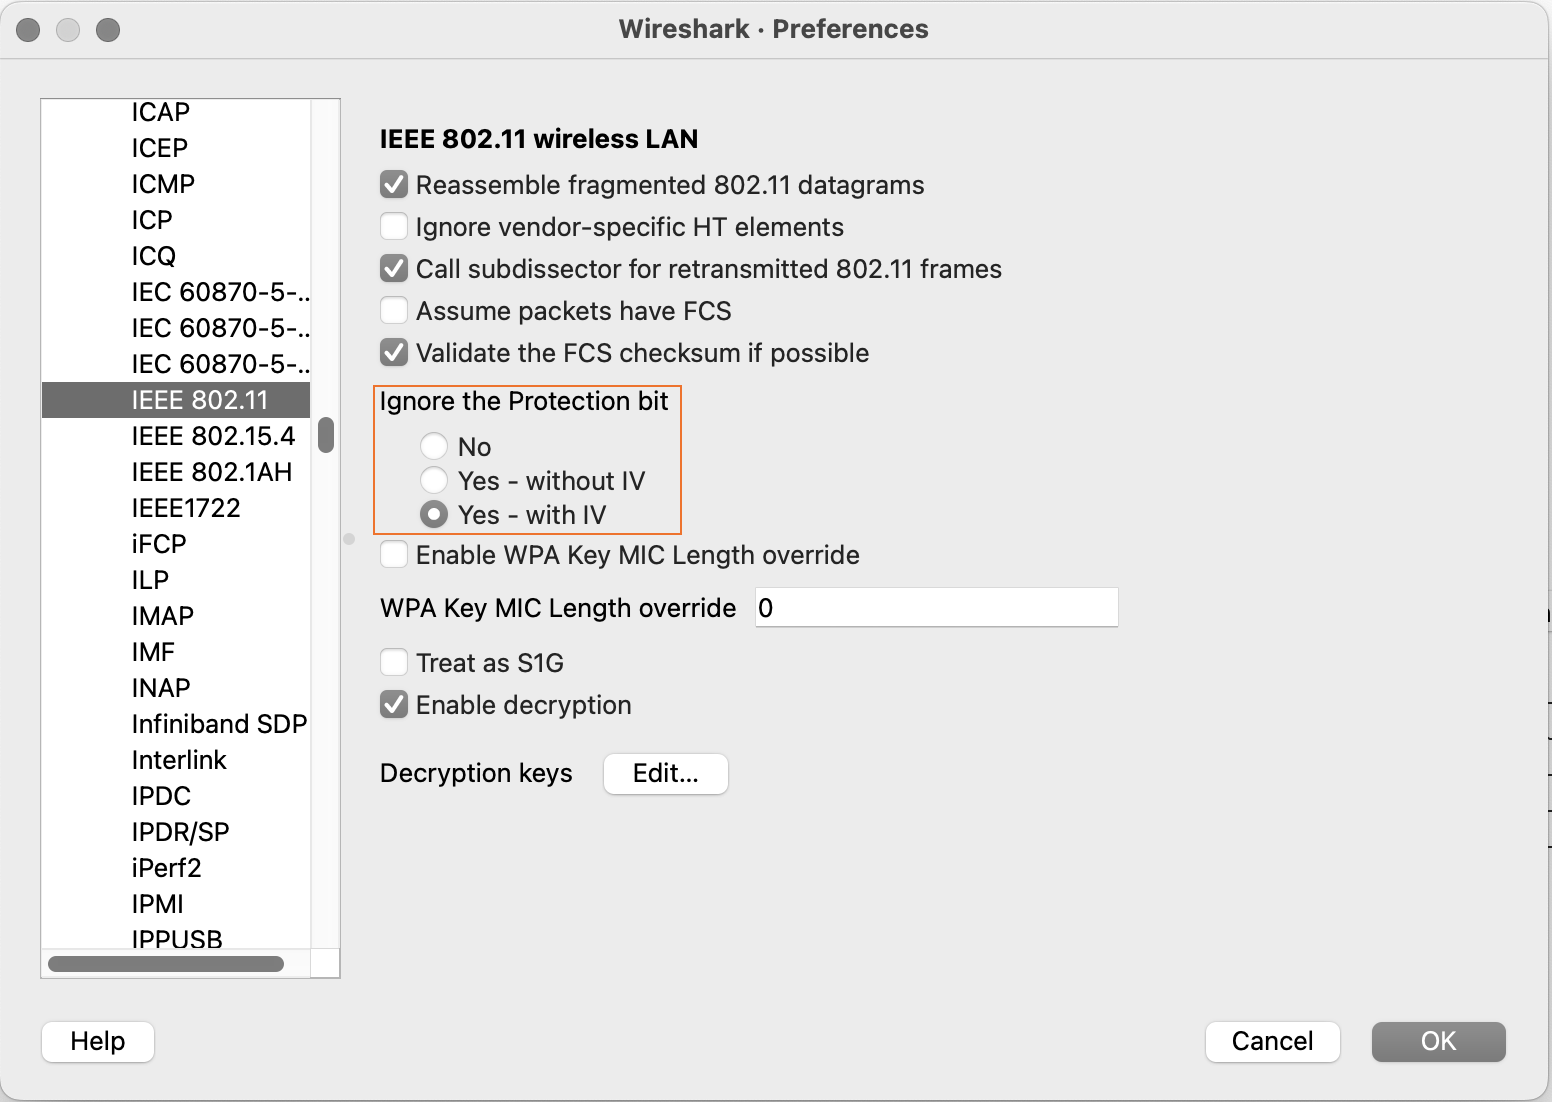
Configure IEEE 802.11 on Wireshark
Packet inspection requires Wireshark. See https://www.wireshark.org for the download file and related information.
To configure Wireshark to view packets captured from the Juniper Mist portal, follow the steps below:
-
In the Preferences window, expand the Protocols menu
option and scroll down to IEEE 802.11.
-
Select Yes - with IV and then click
OK, as shown in the following
image:
-
Select Yes - with IV and then click
OK, as shown in the following
image:
View Wireless Packet Captures in Wireshark
You can capture packets from both your wired and wireless networks. The following configuration regards wireless packet, for which you can see:
-
Wireless channel information
-
Wireless data rate
-
Received signal strength indicator (RSSI)
To accomplish this task, you must download and install the Wireshark application on your computer. In a browser, navigate to https://www.wireshark.org for Wireshark application downloads and detailed information about Wireshark. For additional information about Wireshark, see https://www.wireshark.org/docs/.
This topic provides minimal guidance about how to configure Wireshark for use in examining wireless packet captures gathered from the Juniper Mist portal.
Manual Packet Capture Options
| Option Name | Option Function | Usage Notes | Firmware Notes |
|---|---|---|---|
| Capture | This feature includes packet headers with the packet data. | Packet capture works by buffering packets locally on the device, which has limited space available. By default, Mist truncates header data from the captured packets to reduce the size of capture files while still providing the most relevant information. | – |
| Local Capture | This capture is local only and is not streamed to the Mist portal. | Earlier AP firmware did not support live streaming packet captures to the Juniper Mist portal. | Required for AP firmware versions before 0.10.x |
| Canned Filters | These filters are based on the type of packet capture that you're performing. | The filters available in the list change depending on whether you're capturing wireless, wired, WAN, or Mist Edge packets. For example, beacon frames (Beacons) are only available for wireless packet captures. | – |
| Advanced Filters | Use this option to apply your own filters by using
tcpdump syntax. |
0.10.x or later | |
| Expression Builder | This interactive tool builds custom filters in
tcpdump syntax for use in the capture
session. |
You can let the builder start the filter entry and then add to or delete from the entry manually. | 0.10.x or later |