View Your Installed Base
If you integrated your Juniper Account with your Juniper Mist™ organization, the Inventory page includes details about your Juniper products.
The devices must be assigned to the specified account, must have an active support contract, and must be compatible with Juniper Mist.
Before You Begin
You must first link your Juniper account to Mist organization. See Integrate Your Juniper Account.
- Go to the Installed Base Table
- Select the Details to Show
- Find a Device in the Table
- View Device Details
- Download the Information
Go to the Installed Base Table
Select Organization > Inventory, and then select Installed Base.
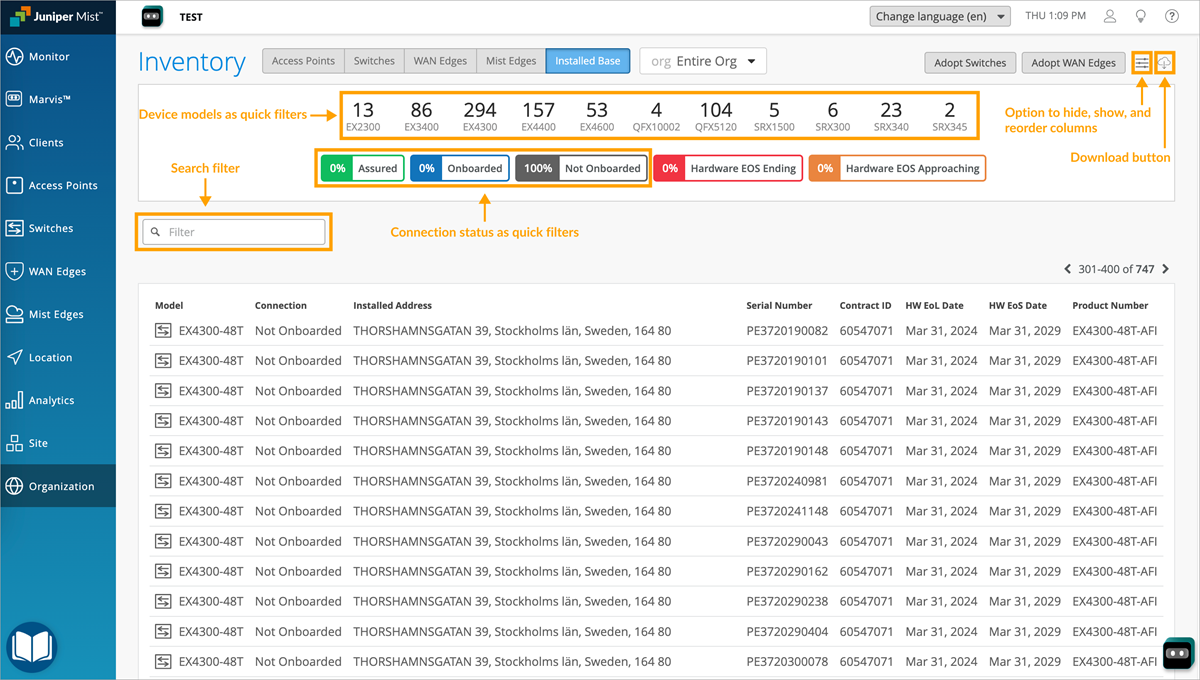
This table displays device-specific details (known to Juniper through the sale and maintenance of the device) along with the status information collected from the installed devices.
At the top of the page, summary tiles high-level information.
-
Device model
-
Connection status
-
Assured—Percentage of devices onboarded to Mist to the Wired or WAN Assurance experience.
-
Onboarded—Percentage of devices onboarded to Mist to the Juniper Support Insights experience.
-
Not onboarded—Percentage of devices currently not onboarded to Mist.
-
-
Hardware EOS status:
-
Hardware EOS Ending—Percentage of devices whose hardware EOS dates are in the immediate future (in less than 3 months).
-
Hardware EOS Approaching—Percentage of devices that are approaching their hardware EOS dates (in 3 to 6 months).
-
Select the Details to Show
To hide, show, and reorder the columns in the table, use the Table Settings button at the top right corner of the Inventory page.

When you click the button, the Table Settings window appears. It displays all the available columns.
Make your changes, as described below. When you close the Table Settings window, your changes appear in the Installed Base table.
-
Show or hide columns. Select or clear the check boxes to show or hide columns in the Inventory Base table.
In this example, five column options are selected. The Installed Base table will show the address of the device, the serial number, the service contract number, the End of Life date, and the End of Service date. Other details will not appear in the table.
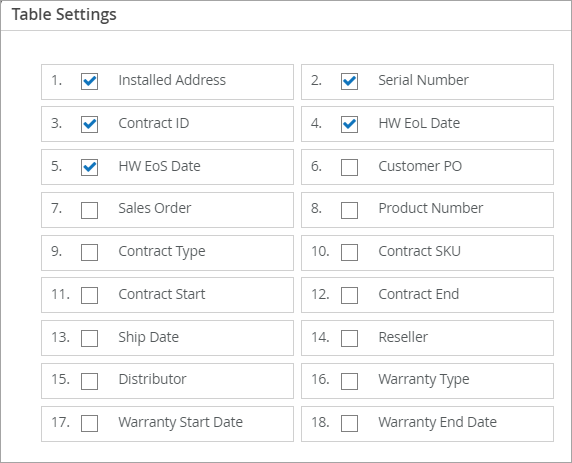
The columns include:
-
Connection—The device status:
-
Assured—Indicates that the device has been onboarded to Mist to the Wired or WAN Assurance experience.
-
Onboarded—Indicates that the device has been onboarded to Mist to the Juniper Support Insights experience.
-
Not Onboarded—Indicates that the device is currently not onboarded to Mist.
-
-
Model—The device model. Example: EX2300-24P.
-
Installed Address—Device location address, as maintained by Juniper support services.
-
Serial Number—The device serial number, which is a unique ID mapped to the device.
-
Contract ID—The service contract document number associated with the device.
-
HW EoL Date—The date on which the device reaches end of life.
-
HW EoS Date—The date on which the device reaches end of support.
-
Customer PO—The purchase order number associated with the device. Multiple devices can have the same purchase order number.
-
Sales Order—The sales order number associated with the device. Multiple devices can have the same sales order number.
-
Product Number—The part number (stock keeping unit) associated with the device.
-
Contract Type—The type of active support coverage provided for the device. Example: Maintenance.
-
Contract SKU—The stock keeping unit (SKU) assigned to the active support coverage associated with the device.
-
Contract Start—The date on which the support contract begins.
-
Contract End— The date on which the support contract ends.
-
Ship Date— Date on which the device was shipped to your company's site.
-
Reseller—Name of the reseller through which your company acquired the device.
-
Distributor—Name of the distributor through which your company acquired the device.
-
Warranty Type—The warranty type associated with the device. Example: Standard Hardware Warranty.
-
Warranty Start Date—The date on which the device warranty becomes active.
-
Warranty End Date—The date on which the device warranty expires.
-
-
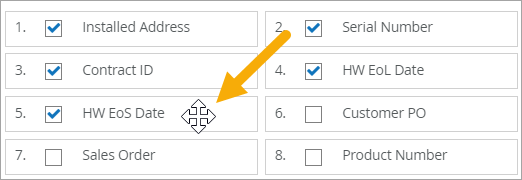
Change the column order. Drag boxes up or down to change the order of the columns in the Inventory Base table.
In this example, the mouse is hovering over the HW EoS Date option. This column is now numbered 5, meaning that it is the fifth column in the Installed Base table. As you drag your mouse up or down, the other column options reposition themselves. When you release the mouse, the new column numbers appear.
Find a Device in the Table
Use the filter buttons and the filter box to find a device.
-
Filter buttons. The buttons above the table show summary information and also act as filters. Click a button to filter by device model or status. For example, click the EX2300 button to show only those devices in the Installed Base table. Click the % Onboarded button to show only the onboarded devices.

-
Filter box. To filter the table by using keywords, start typing in the Filter box. For example, enter a contract number or serial number to show only the matching device in the Installed Base table.
Note:To see all available details that you can filter by, click the Table Settings button at the top right corner of the Inventory page. The Table Settings window shows all available details that can be displayed in the table. For more information, see the Select the Details to Show section of this topic.
View Device Details
Click a device to go to the device details page. This page provides information about the device, relevant security advisories, and bugs. For more information, see Device Details for Installed Base.
Download the Information
To download all the information from the Installed Base table, click the Download button. The data is downloaded into a CSV (Comma-Separated Values) file.