Marvis Windows Client
Complete the preinstallation tasks, and then choose the method that you want to use to install the Marvis client on your Windows device.
The Marvis client for Windows provides detailed visibility into how your Windows device interacts with the wireless network. The Marvis client helps optimize network performance, streamline troubleshooting, and enhance overall user experience by offering insights into device connectivity and performance.
Marvis Windows Client Installation Overview
You can download the Marvis client for Windows (marvisclient-installer.msi file) from the Juniper Mist portal.
To download the .msi file from the Juniper Mist portal:
Select Organization > Admin > Mobile SDK from the left menu.
Click Marvis Client at the top of the Mobile SDK page.
Under Windows, select the app version, and then click Download Installer.
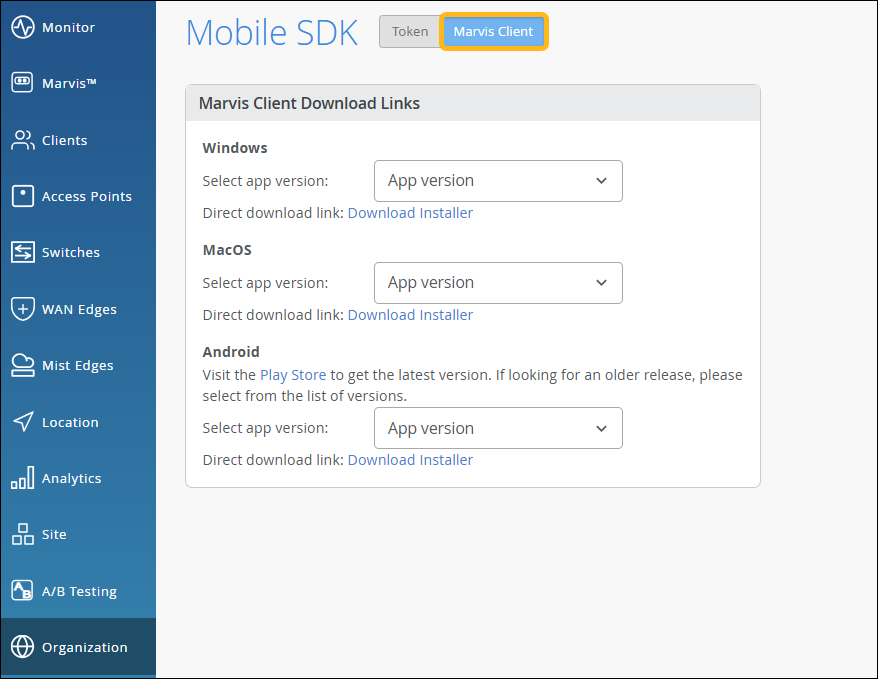
Extract the marvisclient-installer.msi file from marvisclient-installer.zip.
Save the .msi file in a folder on your device.
Installation Options for the Marvis Windows Client
You can use any of the following installation options:
Prerequisites
Before you begin, you'll need to have:
-
.Net Framework Runtime (4.6.2 or above) installed on your device.
Note:You can opt to install these applications later after installing the Marvis Windows client. However, installing the application later requires you to restart the device.
-
The secret token or QR code to onboard the Marvis client.
Select Organization > Admin > Mobile SDK from the left menu.
Click Token at the top of the Mobile SDK page.
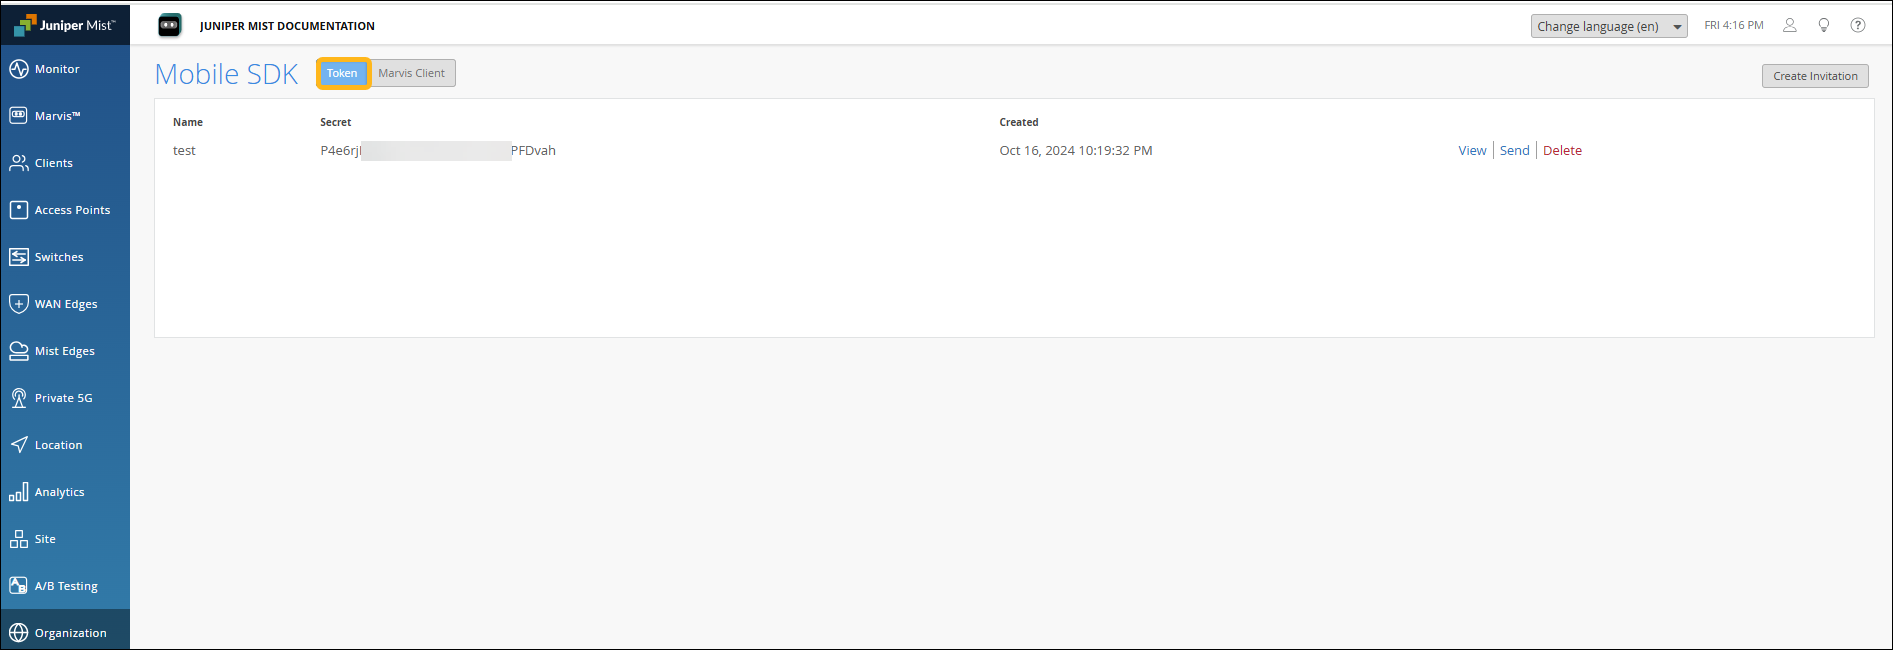
Create a new token, or use an existing token:
For a new token—Click Create Invitation. Enter a name for this invitation, and then click Create. When the token appears on the page, click View to see the QR code.
For an existing token—Refer to the token names to find the one that you want to use. Click the View link on the right side of the page to see the QR code.
Note: To obtain the secret token using API, see https://api.mist.com/api/v1/docs/Org#sdk-invite. -
Windows 10 or a later release running on the devices
-
Location services enabled to allow Marvis client to collect Wi-Fi telemetry from the client device
Location services in this context refer to the device-level location settings available on Windows. Note that client real-time location services are not supported on Windows devices.
Note:On devices running Windows 11, version 24H2 and later, the Marvis client can obtain the BSSID of the wireless network only if location services are enabled. Disabling location services causes the Marvis client to switch to the Sleeping state.
This behavior is different In Windows 11 versions earlier than 24H2. In those versions, the status of the location services does not impact the state of the Marvis client. The Marvis client fetches the BSSID of the wireless network irrespective of the location services being enabled or disabled. The Marvis client remains in the Connected state when location services are enabled or disabled.
Operational Modes
The Marvis client operates in the following modes:
-
Onboarding mode—Default mode when you install the Marvis client app using the GUI method. In this mode, you can onboard devices through a NAC portal.
-
Telemetry mode—Mode when you install the Marvis client app using the CLI method. This mode is the standard operational mode for live environments.
Configure Marvis Client for Onboarding
You can use the Marvis Client app to onboard devices to the Juniper Mist Access Assurance network through a custom Network Access Control (NAC) portal. For more information, see Client Onboarding Through a NAC Portal Using the Marvis Client App.
Configure Marvis Windows Client to Operate in Telemetry Mode
To enable the Marvis client to operate in Telemetry mode, you must install the Marvis Windows client using the CLI method.
Install the Marvis Windows Client (GUI Method)
-
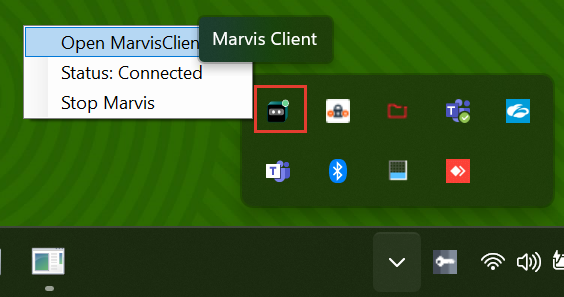
Click the Marvis icon in the system tray to open the Marvis
client
app. To
see
the menu, right-click the icon.
Install the Marvis Windows Client (CLI Method)
You can use the CLI method to install the Marvis client app if you want to make some advanced customization during installation.
Install the Marvis Windows Client (Configuration File Method)
Deploy the Marvis Client on Windows Devices Using an MDM
- Deploy the Marvis Windows Client Using the Intune MDM
- Deploy the Marvis Windows Client Using the SOTI MDM
You can deploy the Marvis client on Windows devices by using the SOTI or Intune mobile device management (MDM) solution. Before you begin, verify that all devices have the appropriate MDM profiles and permissions assigned.
You can refer to the following topics for information about enrolling and managing devices using MDMs:
Deploy the Marvis Windows Client Using the Intune MDM
To deploy the Marvis client using the Intune MDM:
Enroll the target device in Intune.
Add the .msi installer as a Windows LOB (Line of Business) app in the Intune portal.
Configure the necessary policies and include the following post-installation script:
MOBILE_SDK_SECRET="<ADD_YOUR_SECRET_TOKEN_HERE>" MIST_BATTERY_SAVING="<standard/low/high>" MIST_UI_ENABLED="<false/true>"
Refer to Table 1 for details about the parameters.
Depending on your policy type (mandatory or suggested), the Marvis client app is either directly installed or appears in the company portal as an optional app that you can install.
Verify the installation status on the MDM portal to confirm that the deployment is successful.
- Upgrade the Marvis Windows Client in Intune
- Update the Marvis Windows Client Configuration in Intune
- Uninstall the Marvis Windows Client Using the Intune MDM
Upgrade the Marvis Windows Client in Intune
To upgrade to a newer version of the Marvis client, replace the existing .msi file with the latest version in the Intune portal. The post-installation script does not require any changes. It might take some time for the updates to reflect on the Intune portal.
Update the Marvis Windows Client Configuration in Intune
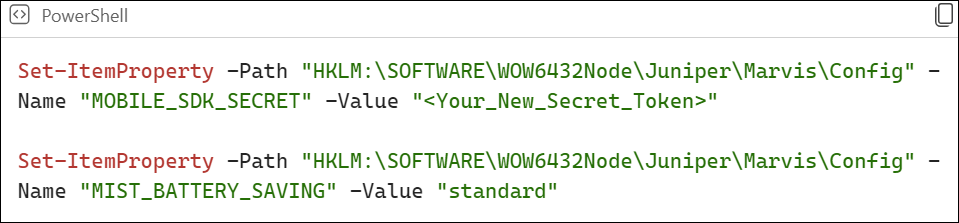
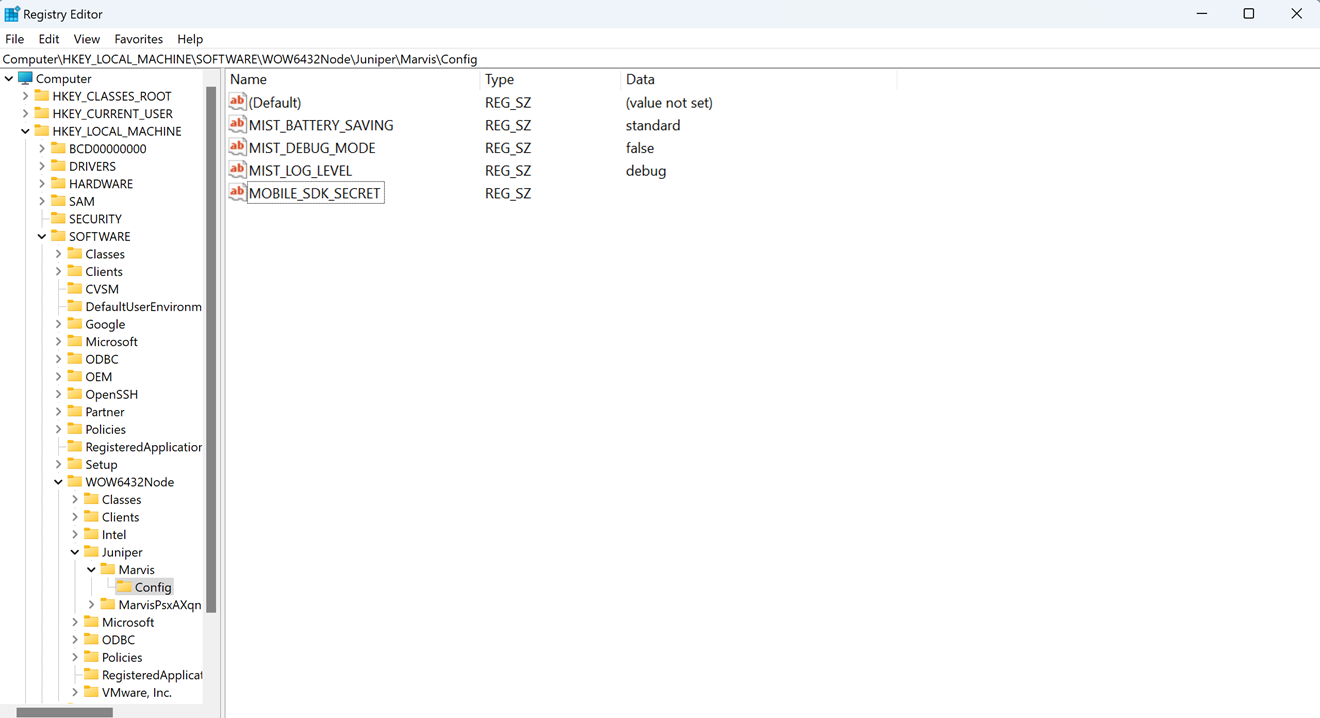
To update the Marvis client configuration parameters, you can change the registry values on the target devices and restart the system. This method enables you to update configurations without reinstallation. Make configuration script updates and registry adjustments cautiously to customize app functionality and user experience.
Update the Marvis client configuration values under the following registry path:
Path: HKEY_LOCAL_MACHINE\SOFTWARE\WOW6432Node\Juniper\Marvis\Config
Values: MOBILE_SDK_SECRET, MIST_BATTERY_SAVING
Refer Table 1 for details about the parameters.
Note:You cannot update the MIST_UI_ENABLED parameter through the registry after the Marvis client is installed.
Create a registry update script. Use PowerShell to update the registry values as shown:
Some configuration changes might require restarting the device. If needed, include the restart command at the end of the script:
Restart-Service -Name "MarvisClient" -Force
Deploy the registry update script.
Navigate to Device Configuration > Scripts to assign the script to the device group.
Uninstall the Marvis Windows Client Using the Intune MDM
To uninstall the Marvis client:
Revoke the application assignment in Intune. Remove the policy that enforces Marvis client installation for the target devices.
Create a script using the CLEAN=true parameter to remove the Marvis client completely:
msiexec /x marvis-installer.msi CLEAN=true /quiet /norestart
Deploy the uninstallation script. Use Device Configuration > Scripts and assign the PowerShell script to the device group.
Note:After the uninstallation is complete, ensure to remove the devices from the Uninstall rule to avoid conflicts during future installations.
Deploy the Marvis Windows Client Using the SOTI MDM
To deploy the Marvis client using the SOTI MDM:
Ensure that the target Windows device is enrolled in SOTI MobiControl and is connected to the management console.
Upload the .msi installer for the Marvis client:
Navigate to Add Applications in SOTI MobiControl and select Enterprise Apps > Windows.
Select and upload the .msi installer for the Marvis client to the SOTI server.
Assign the Marvis client app to the appropriate devices or device groups within SOTI. Based on the deployment settings, the application is automatically installed or is available on demand.
Create a separate Script Job in SOTI with the required environment variables for configuration.
- Upgrade the Marvis Windows Client in SOTI
- Update the Marvis Windows Client Configuration in SOTI
- Uninstall the Marvis Windows Client Using the SOTI MDM
Upgrade the Marvis Windows Client in SOTI
To upgrade the Marvis client in SOTI:
Replace the current .msi installer for the Marvis client with the updated installer in SOTI.
Reassign the application.
The policy will push the updated installer to devices according to the assignment.
Update the Marvis Windows Client Configuration in SOTI
You can apply configuration updates directly through registry edits:
Update the Marvis client configuration values under the following registry path:
Path: HKEY_LOCAL_MACHINE\SOFTWARE\WOW6432Node\Juniper\Marvis\Config
Values: MOBILE_SDK_SECRET, MIST_BATTERY_SAVING, MIST_UI_ENABLED
Create a registry update script. Use PowerShell to update the registry values as shown:
Some configuration changes might require a system restart. If needed, include the restart command at the end of the script:
Restart-Service -Name "MarvisClient" -Force
Deploy the registry update script. Use the Jobs feature to deploy this PowerShell script to the target devices.
Uninstall the Marvis Windows Client Using the SOTI MDM
To uninstall the Marvis client:
Revoke the application assignment in SOTI. Remove the policy that enforces Marvis client installation for the target devices.
Create a script using the CLEAN=true parameter to remove the Marvis client completely:
msiexec /x marvis-installer.msi CLEAN=true /quiet /norestart
Deploy the uninstallation script. Use the Jobs feature to deploy this PowerShell script to the target devices.
Note:After you've uninstalled the client, ensure to remove the devices from the Uninstall rule to avoid conflicts during future installations.
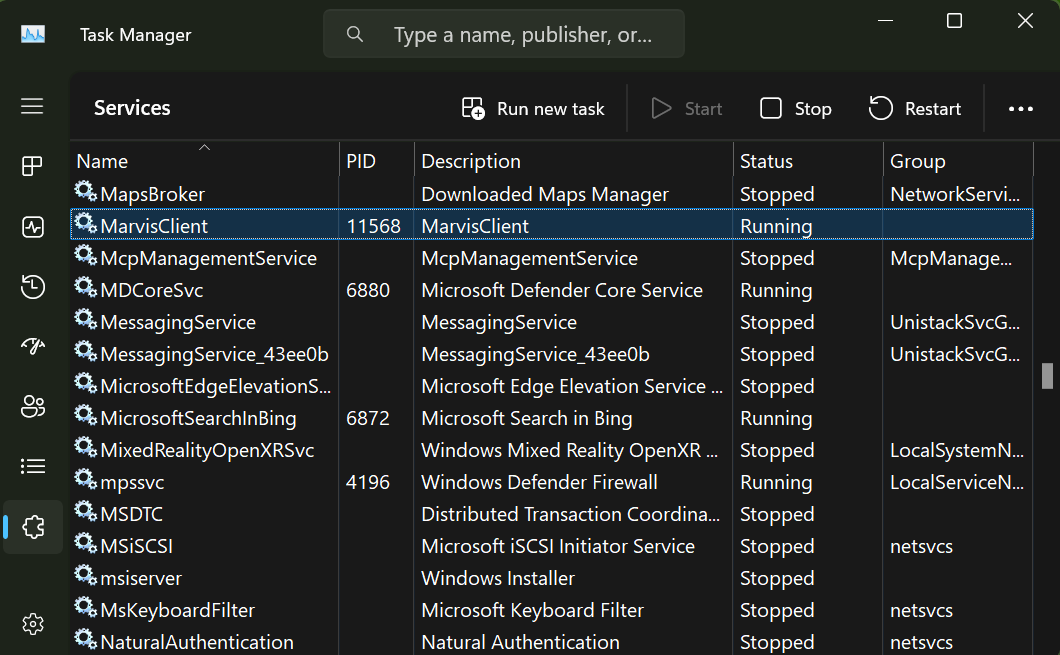
Verify the Marvis Client Installation for Windows
-
Verify services:
Open Task Manager and navigate to the Services tab. Alternatively, you can use the Windows Service Manager (compmgmt.msc).
Verify that the MarvisClient service is running.
-
Verify files and system registry:
Verify that the files are located in the C:/Program Files(x86)/Juniper Networks/Mist/Marvis folder.

Navigate to the system registry and verify that the configuration variables are listed under HKEY_LOCAL_MACHINE\SOFTWARE\WOW6432Node\Juniper\Marvis\Config.
-
Verify that the Marvis client icon is displayed in the startup folder C:\ProgramData\Microsoft\Windows\Start Menu\Programs\StartUp.
Connection States
The Marvis client status is indicated by the following visual indicators and connection states. Note that you can view these states only if the Marvis client is in Telemetry mode.

-
Disconnected—Client is not connected to the Juniper Mist cloud.
-
Connected—Client is connected to the Juniper Mist cloud.
-
Sleep —Client is connected to the Juniper Mist cloud through a non-Juniper AP.
View Logs in the Marvis Windows Client
-
Info—General information
-
Error—Critical issues
-
Debug—Detailed data that you can use to debug issues
-
Click the hamburger icon, select About, and then tap the version number 7
times.
You'll see the Logs option listed in the menu.

-
Select Logs. You can select the type of information
you want to view by selecting an option from the Log Level
drop-down list.
You'll see recent logs based on the selected log level.
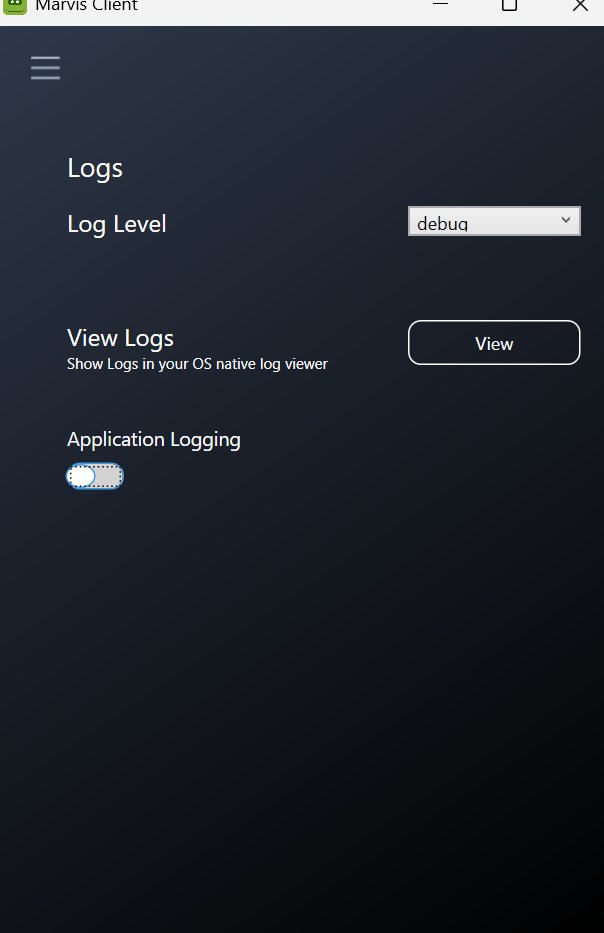
You can click the Copy button to copy the log details and send the data to the support team for troubleshooting.
Uninstall the Marvis Windows Client
You uninstall the Marvis client only when you make major changes, such as name changes or file path location changes. Minor updates or change in organization do not require that you uninstall the Marvis client.
To uninstall the Marvis client:
- Navigate to Settings > Apps on your device.
- Search for MarvisClient from the list of applications.
- Click … and select Uninstall.
The Marvis client will be uninstalled from your device.
Uninstalling the client might not remove all log files and folders. You can choose to delete the files manually if required. To completely remove Marvis client along with all the logs and configuration files, use the following command:
msiexec.exe /x marvisclient-installer.msi /quiet /L*v uninstall.log CLEAN=true"`