Client Onboarding Through a NAC Portal Using the Marvis Client App
Onboard your device to the Juniper Mist Access Assurance network securely by using Wi-Fi client certificates provisioned by the NAC onboarding portal through the Marvis Client app.
Onboarding a device through a Network Access Control (NAC) portal enables provisioning of Wi-Fi client certificates through the Marvis client app. The onboarding process uses the Onboard Mist Certificate Authority, which enables issuing of EAP-TLS client certificates to devices. These certificates are used by clients to authenticate to the Juniper Mist Access Assurance network using EAP-TLS (Extensible Authentication Protocol - Transport Layer Security).
The Marvis client app can be pre-installed on devices or downloaded directly from the NAC Onboarding Portal. The end user needs to authenticate to the NAC Onboarding Portal using their SSO credentials (Azure AD, Okta).
On successful authentication, the NAC portal (integrated with the enterprise IdP) provisions a device-bound X.509 client certificate and delivers a preconfigured Wi-Fi network profile, which should be installed within the Marvis Client app. Once the profile is installed, the app enables the device to seamlessly connect to the designated secure SSID using EAP-TLS.
This onboarding process eliminates manual PKI distribution and SSID configuration, while enforcing enterprise network access policies for unmanaged devices in a BYOD environment.
Benefits of Client Onboarding Through a NAC Portal
Onboarding a client through a NAC portal using the Marvis client app ensures secure, seamless, and password-less access to your organization’s Wi-Fi network. Traditional Wi-Fi connections using usernames and passwords are vulnerable to misuse, leaks, and manual errors. The NAC onboarding portal eliminates these risks by using certificate-based authentication issued only after validating your identity through your organization’s Single Sign-On (SSO) system.
In addition to ease of use, onboarding provides enterprise-grade security for BYOD (Bring Your Own Device), guests, and contractors, eliminating the need for IT intervention for every connection.
Onboarding a device to a NAC portal using the Marvis client app provides the following benefits:
-
A unique digital certificate tied to your identity and device.
-
Automatic installation of a secure Wi-Fi profile, requiring no manual setup.
-
Access governed by zero trust network policies defined in the Juniper Mist cloud.
You can onboard Android, Windows, macOS, and iOS devices. Onboarding is supported on devices running:
-
Windows—Release 10 or 11
-
macOS—Sonoma (version 14) and later releases
-
Android—Android 12+
-
iOS—16 and later release
Before You Begin
Before proceeding to onboard a device, ensure to
-
Obtain and activate a Juniper Mist™ Access Assurance subscription. For information about subscription management, see the Juniper Mist Management Guide.
-
Enable onboarding:
From the left menu of the Juniper Mist portal, select Organization >Access>Certificates.
The Certificate Authorities page appears.
Click the settings icon on the upper-right corner of the page and select Onboard CA Configuration.
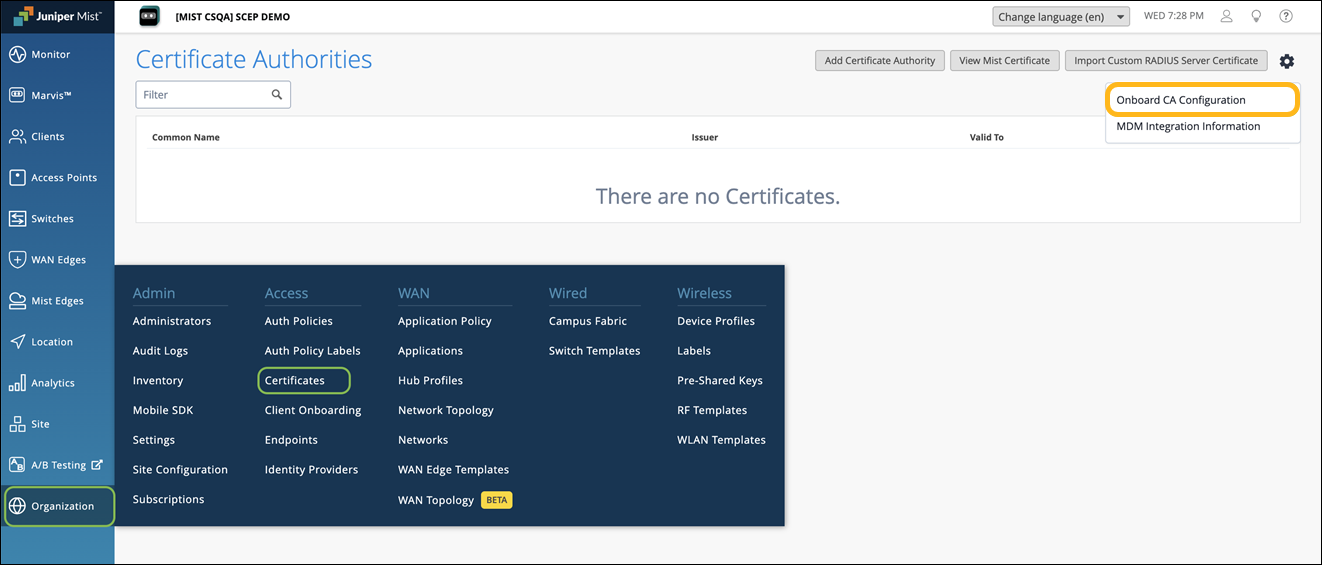
In the Onboard CA Configuration dialog box, select Active and click OK to enable the built-in CA to issue the client certificates.

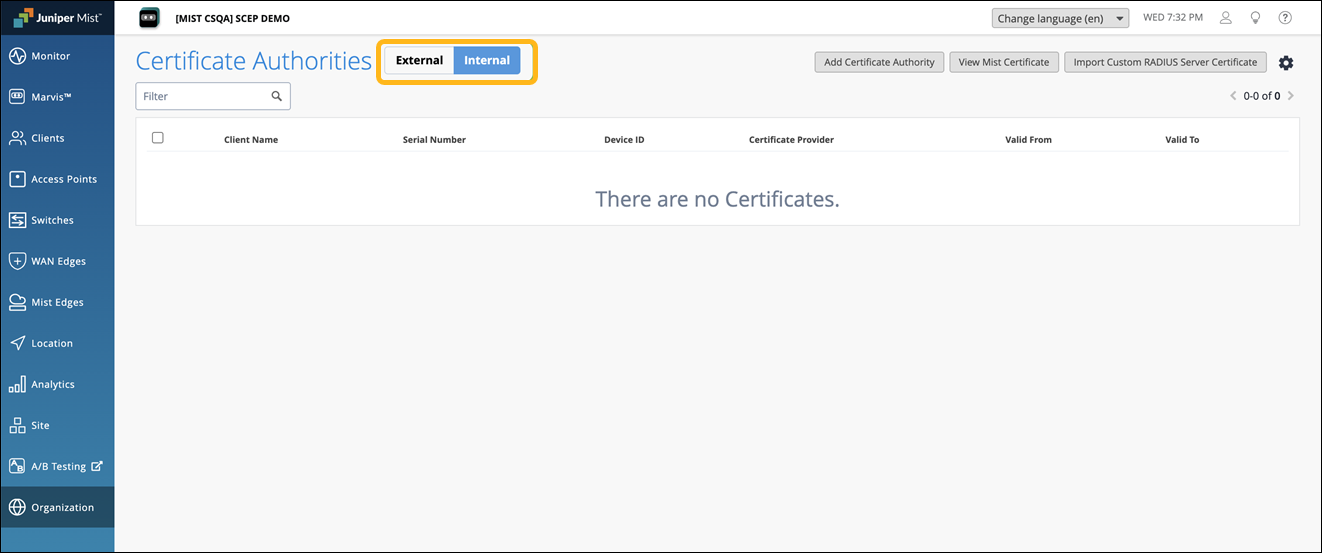
When the Onboard CA Configuration is activated, you’ll see the following tabs displayed:
External—Displays the details of the external CAs.
Internal— Displays the details of client certificates issued by the built-in CA through the NAC portal or MDM.
-
Ensure that you have an IdP account with app integration capability. Your IdP can be any provider that supports SAML 2.0 integrations. Examples include Azure, Google, and Okta.
In this topic, we show you how to create a NAC portal and integrate it with Microsoft Azure and Okta.
How to Set Up a NAC Portal and Integrate It with Microsoft Azure
Setting up a NAC onboarding portal and integrating it with Azure involves the following steps:
- Create a NAC Portal and Integrate It with Azure
- Download the Marvis Client App and Wi-Fi Profile
- Verify Client Connectivity to the Network
Create a NAC Portal and Integrate It with Azure
Ensure that the onboard CA configuration is enabled on the Certificates page. See Before you Begin.
Create a NAC portal. When you create the portal, a NAC portal URL will be generated for users to access using SSO.
From the left menu of the Juniper Mist portal, select Organization>Client Onboarding, and select the NAC tab.
Click Add NAC Onboarding Portal at the top-right corner of the Client Onboarding page.
In the Add NAC Onboarding Portal page, provide a name and click Create.

The Edit NAC Onboarding portal page displays.
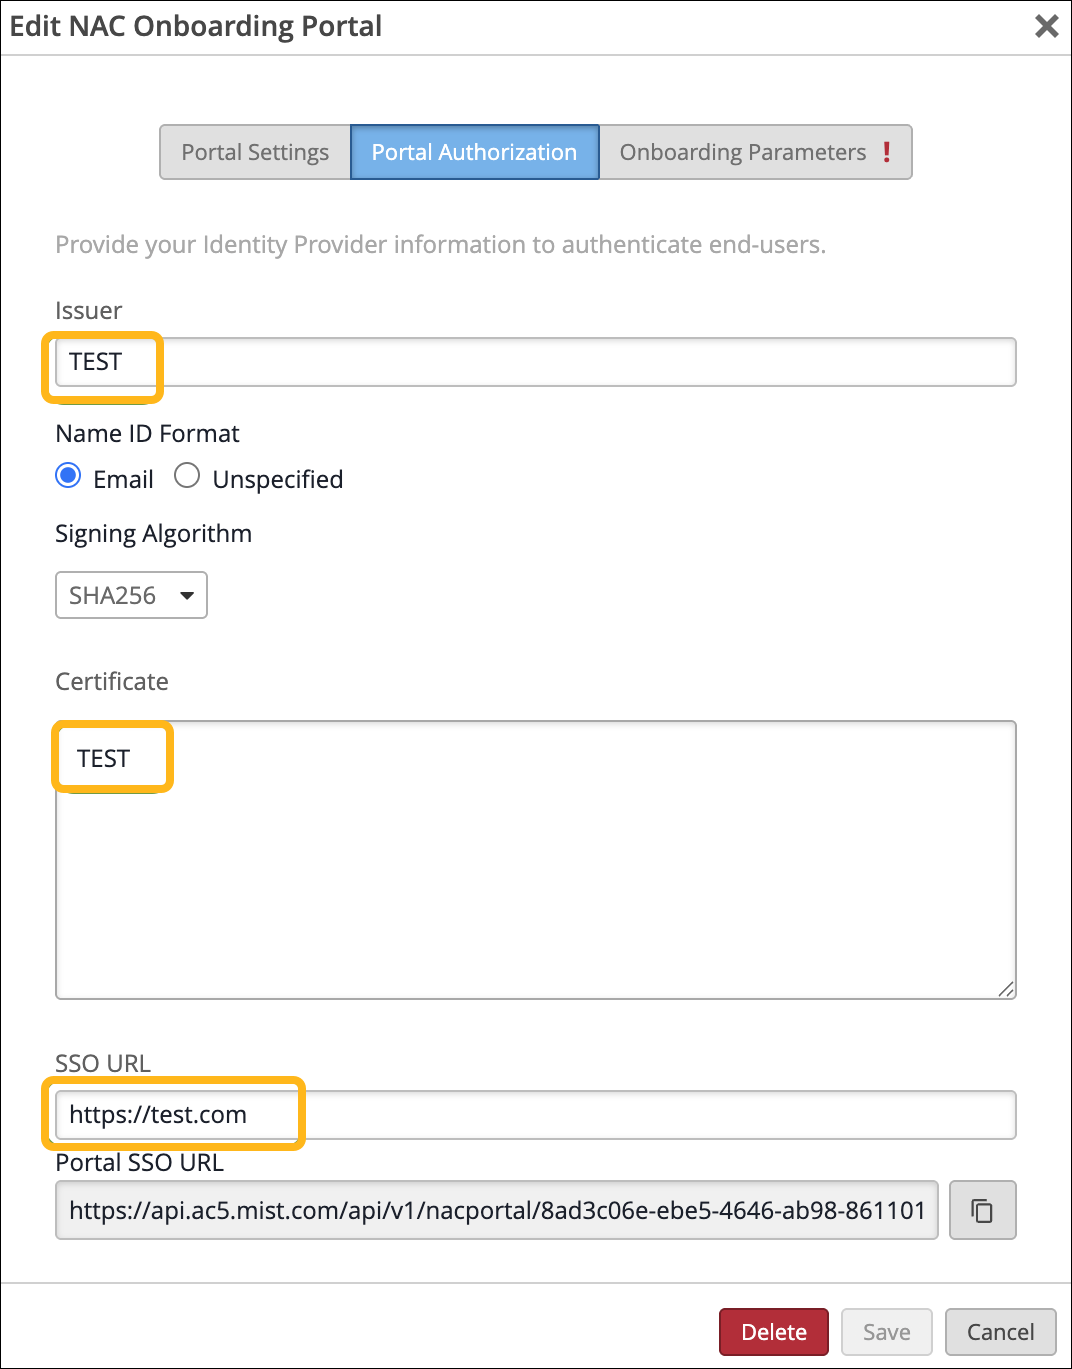
Select the Portal Authorization tab:
Enter placeholder values for Issuer, Certificate, and SSO URL. These values will later be replaced with actual values from the IdP.
Copy the SSO Portal URL to use later.
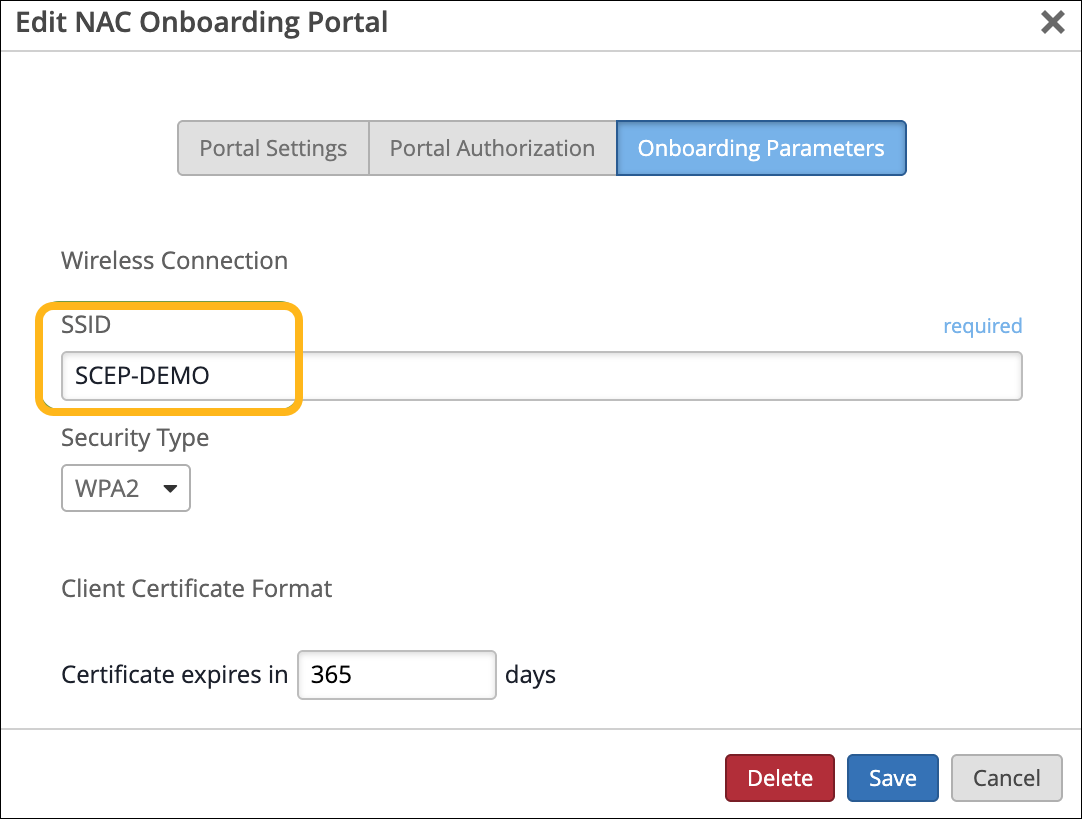
Select the Onboarding Parameters tab and configure the following:
Enter the SSID name to be provisioned.
Select the Security Type as WPA2 or WPA3 Enterprise.
Set the number of days after which the client certificate will expire. The value can range from 1-1825 days (up to 5 years).
Configure SSO and integrate the NAC portal with Microsoft Azure:
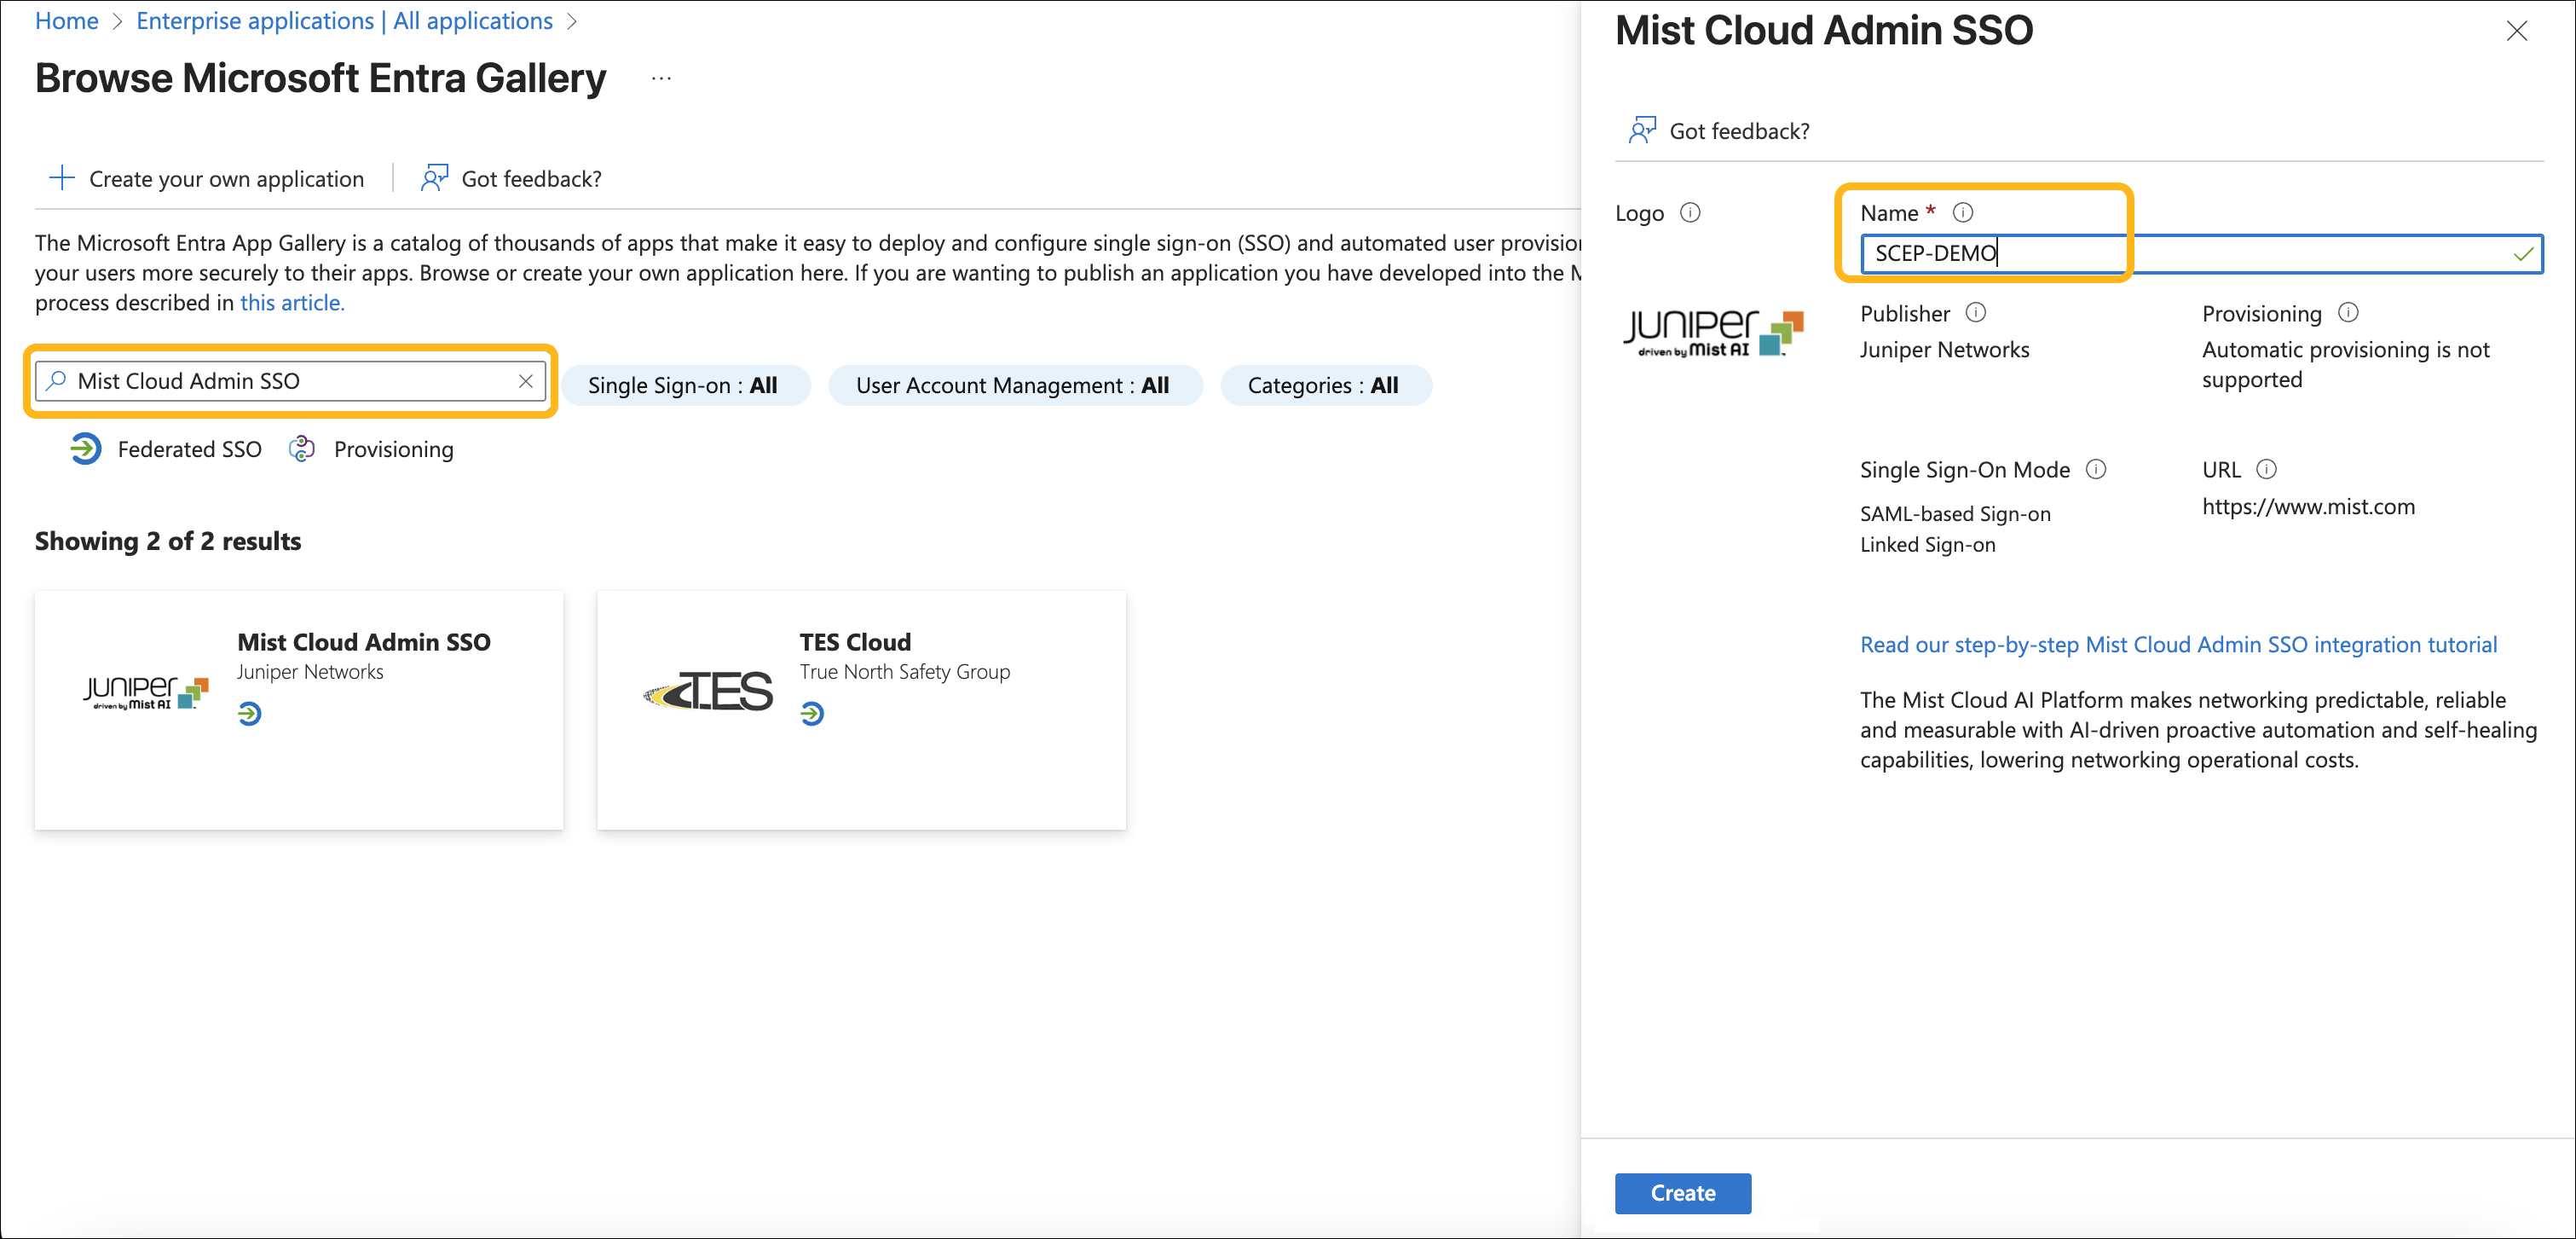
Log into the Azure portal. Navigate to Enterprise Applications and click New Application.
In the Browse Microsoft Entra Gallery section, type Mist Cloud Admin SSO in the search box.
Select Mist Cloud Admin SSO from the results panel. Provide a name for the application and click Create.
Open the application and click Set up Single Sign-On.
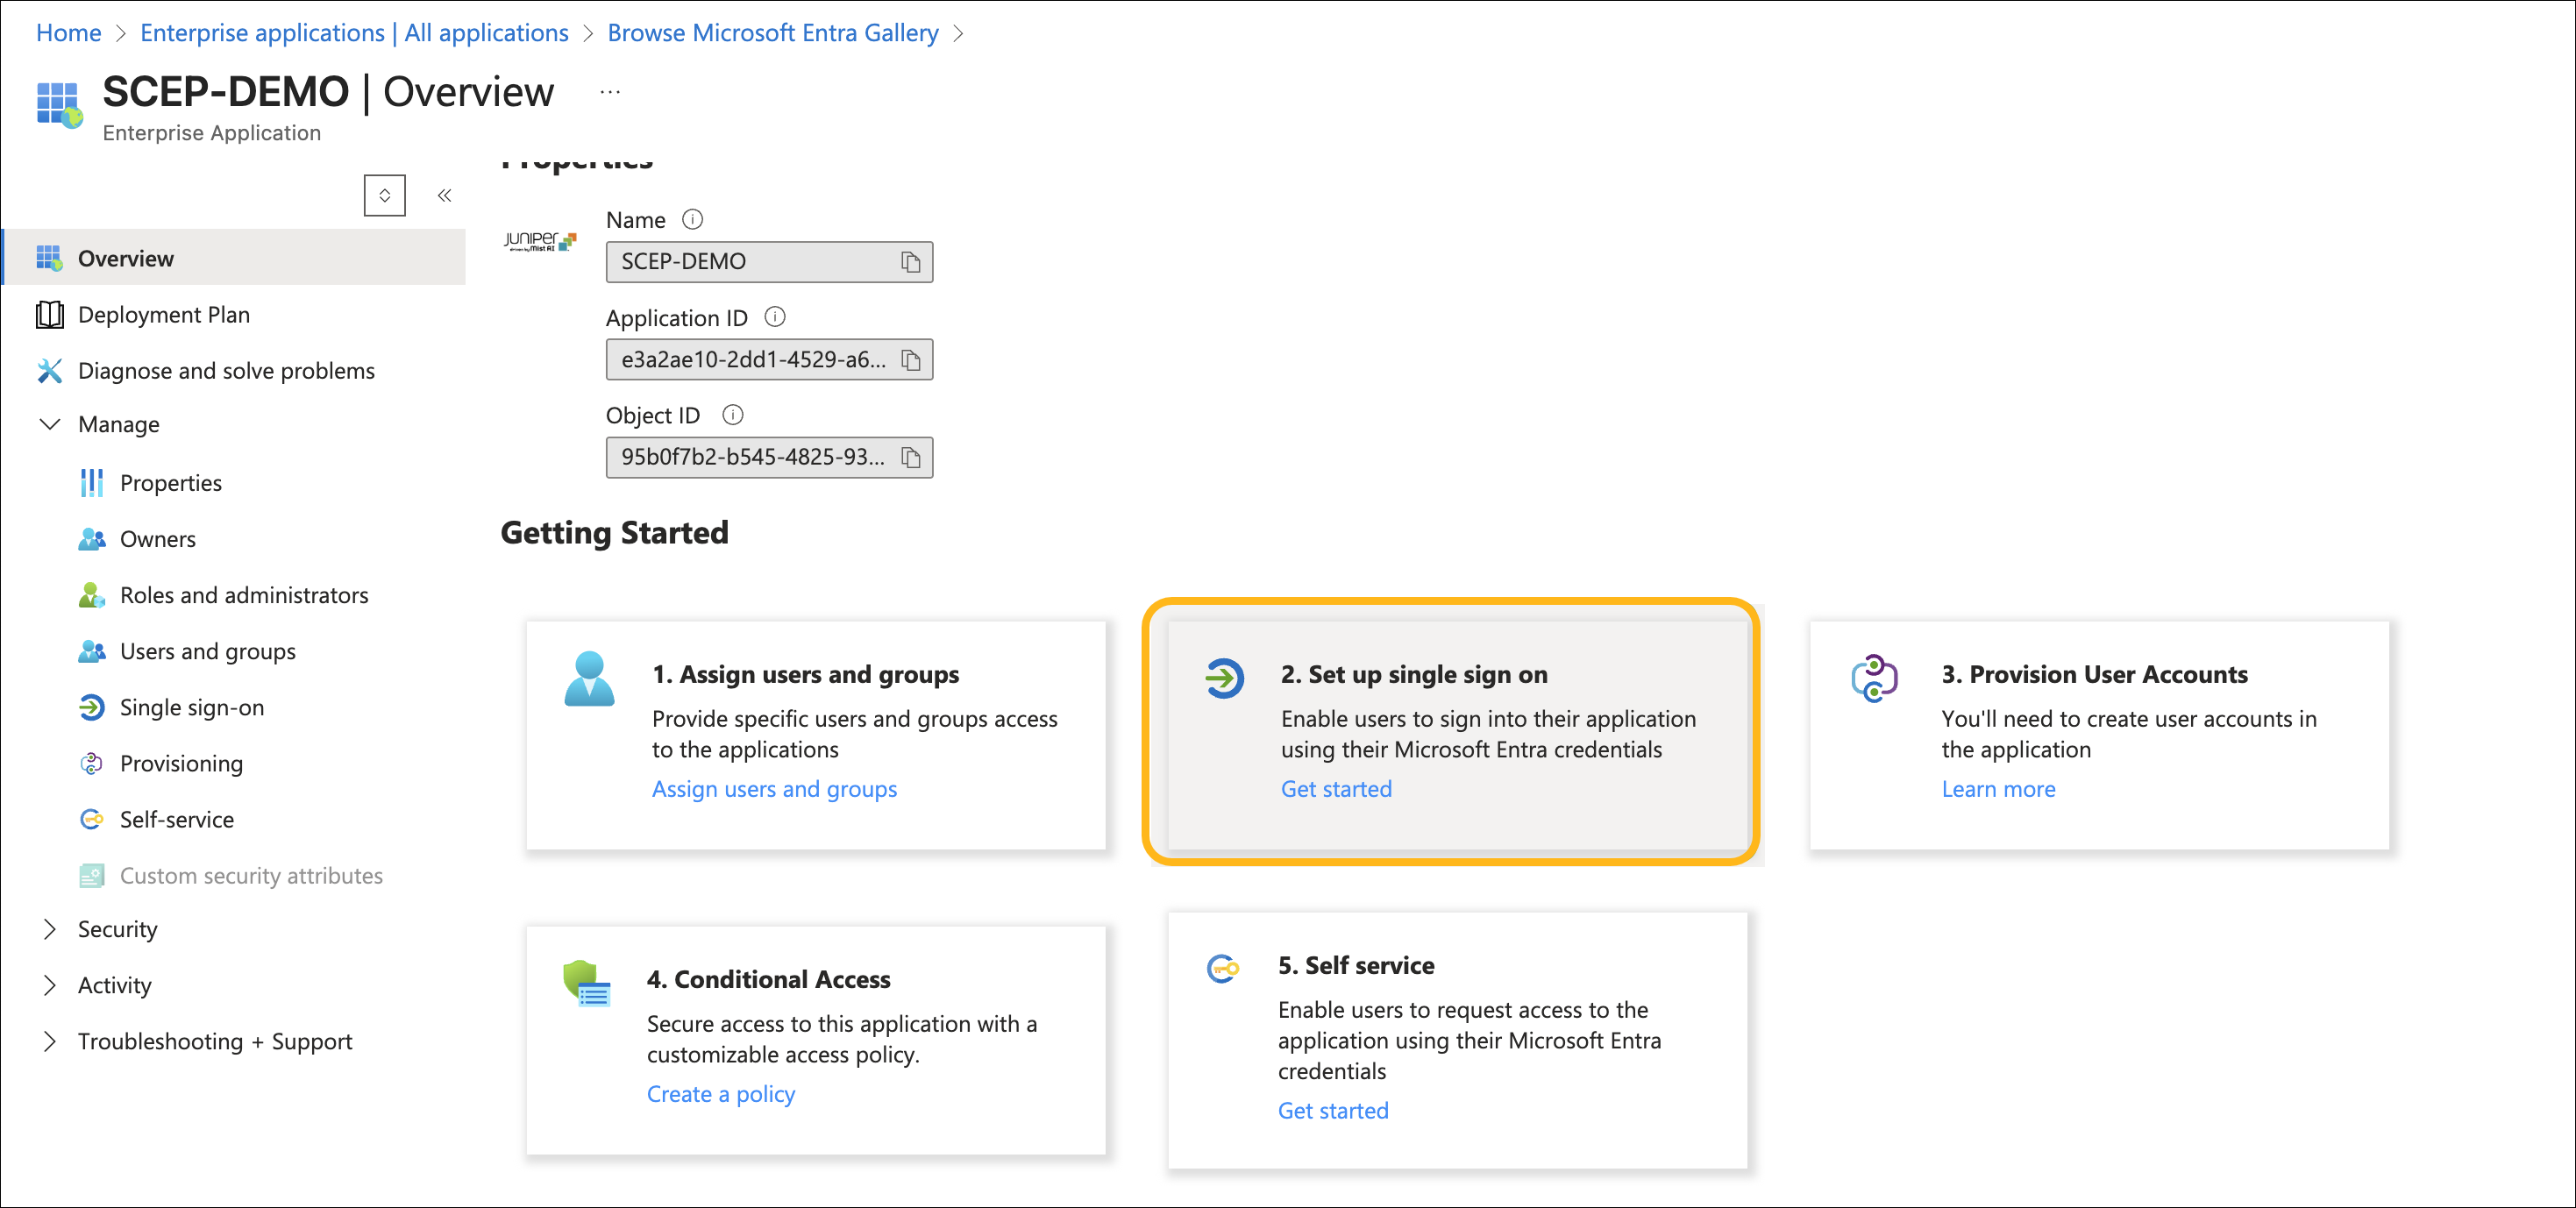
Select SAML as the SSO method.
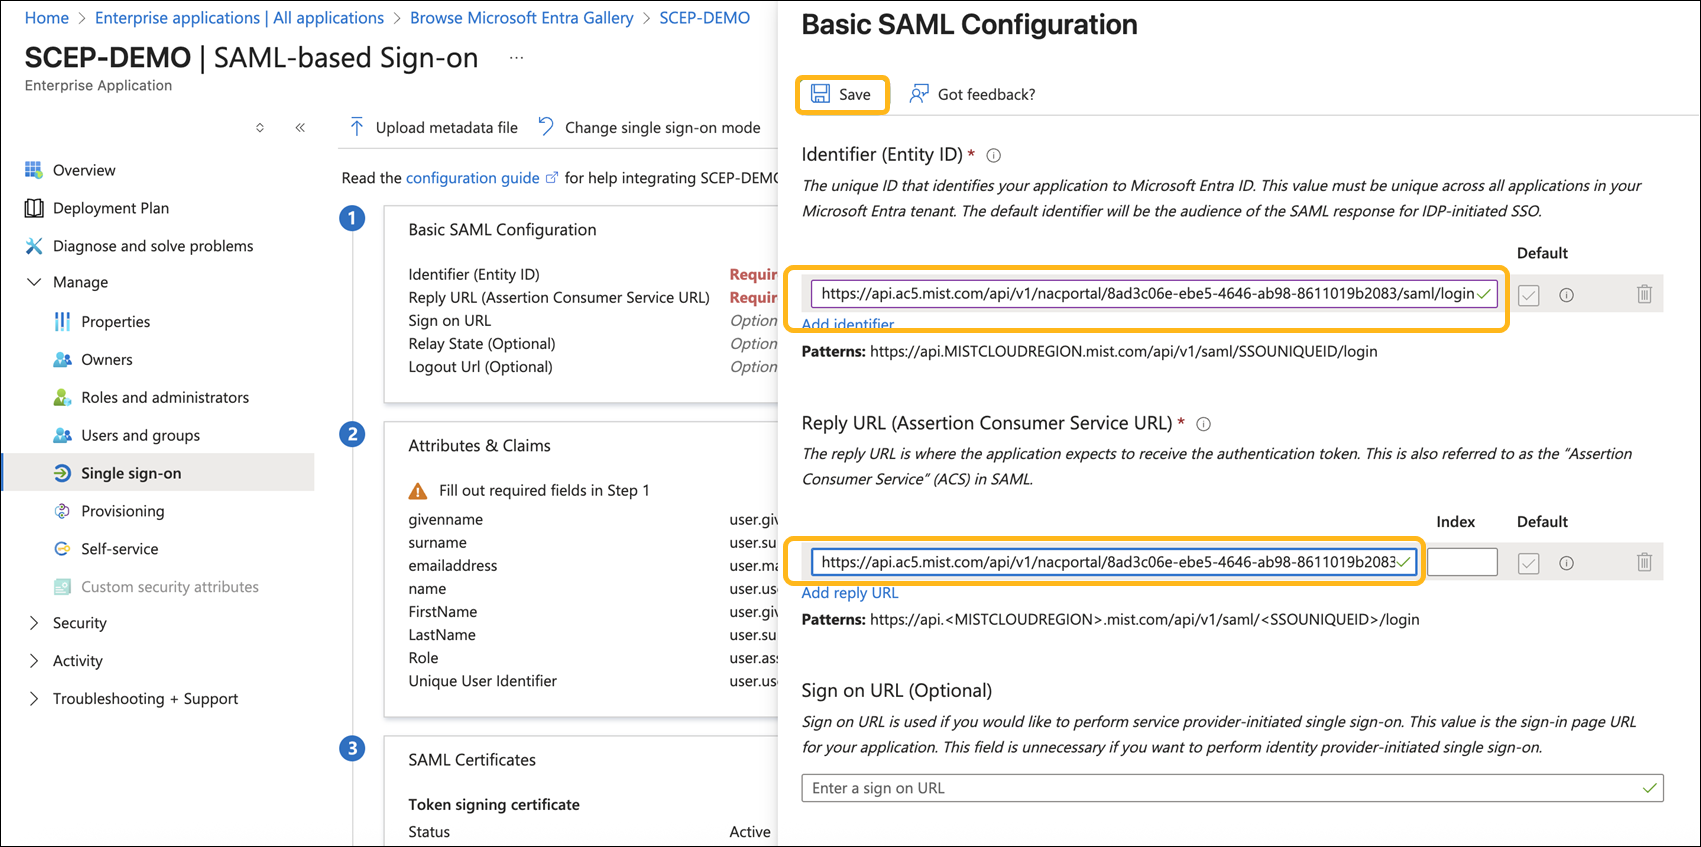
Click Edit Basic SAML Configuration.
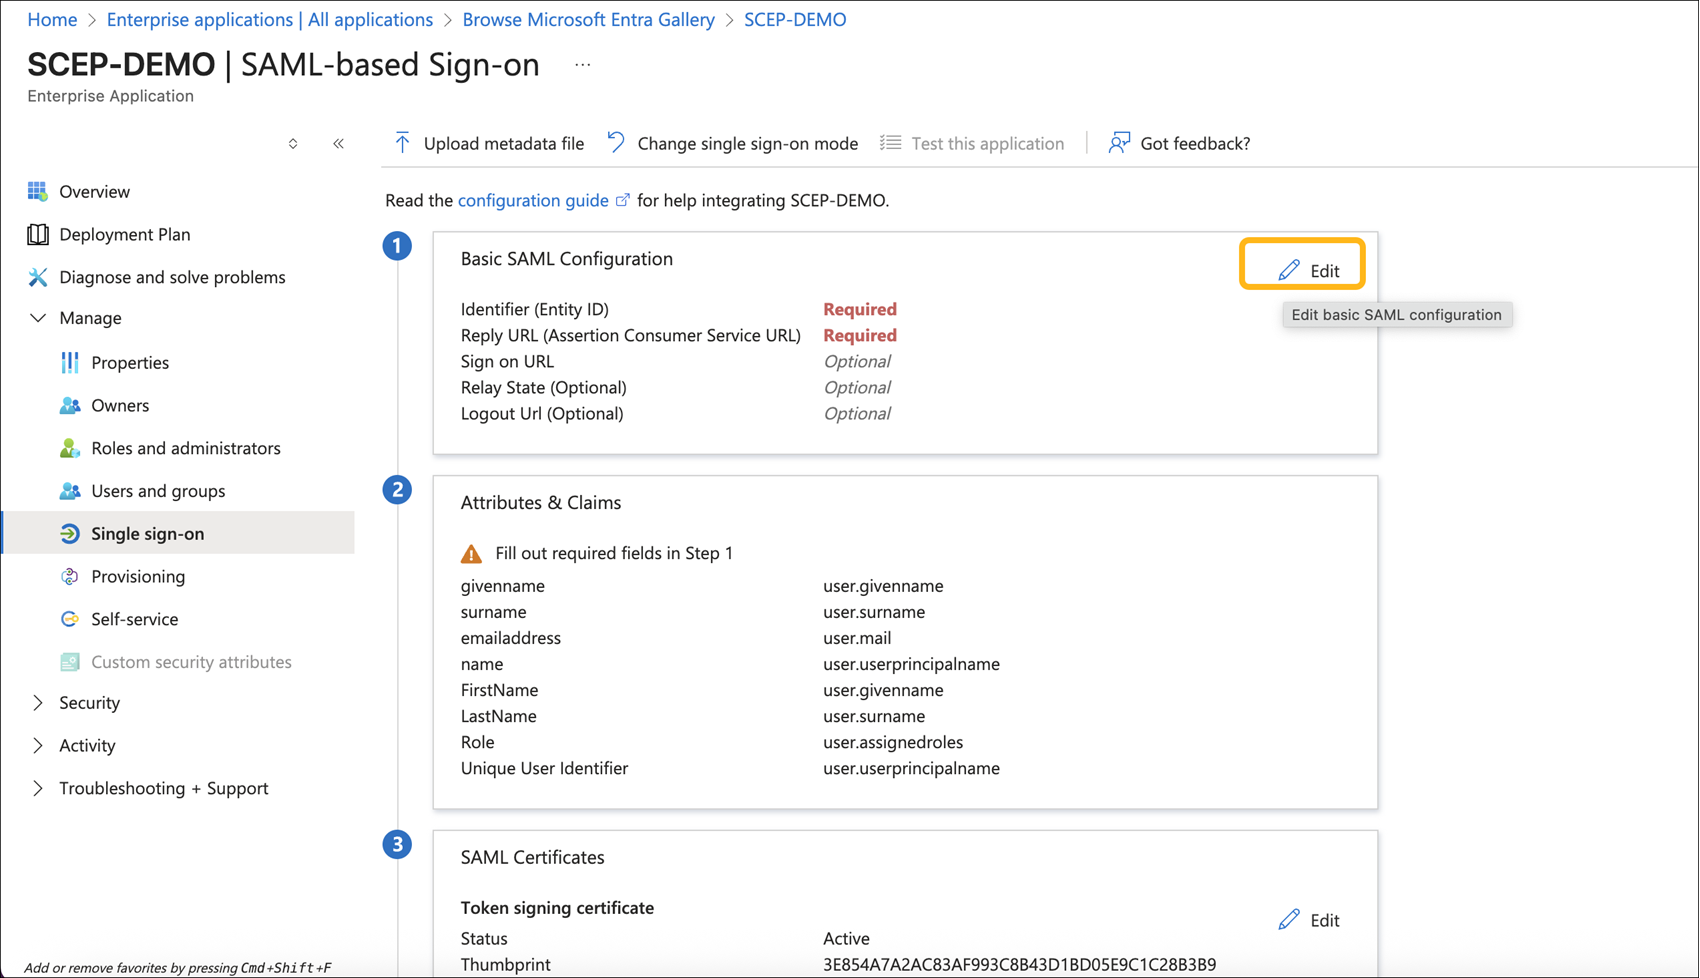
In the SAML configuration page, set the Identifier and Reply URL to the Portal SSO URL copied earlier from the NAC Onboarding Portal. Click Save.
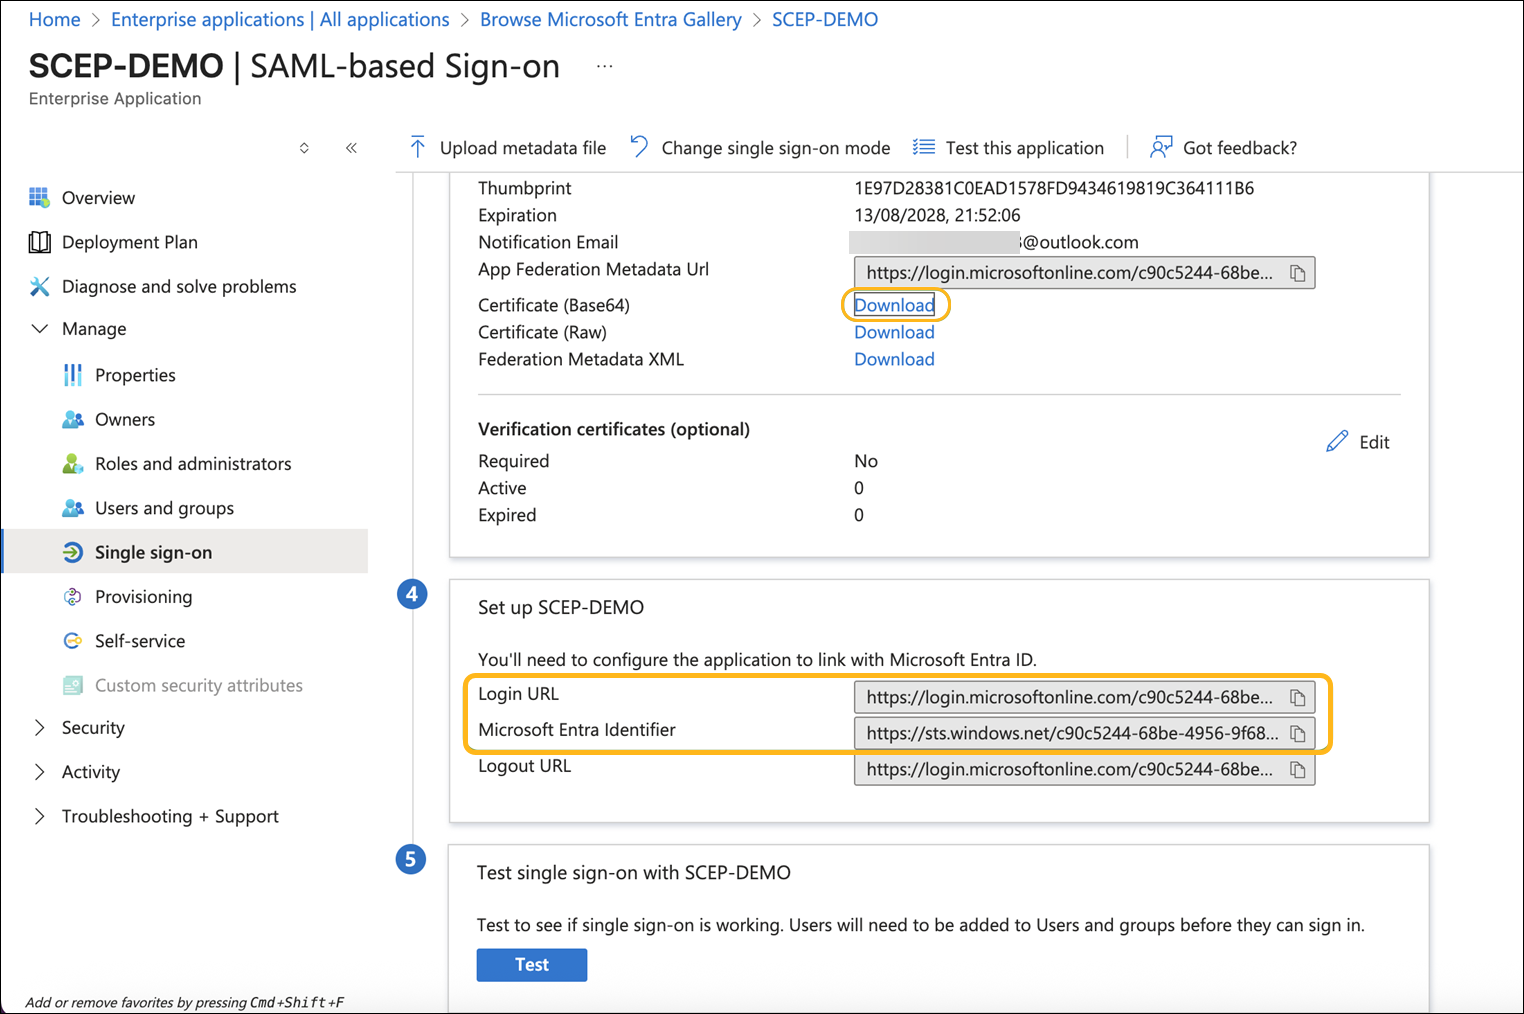
Download the Certificate (Base64) and copy the Login URL and Microsoft Entra Identifier.
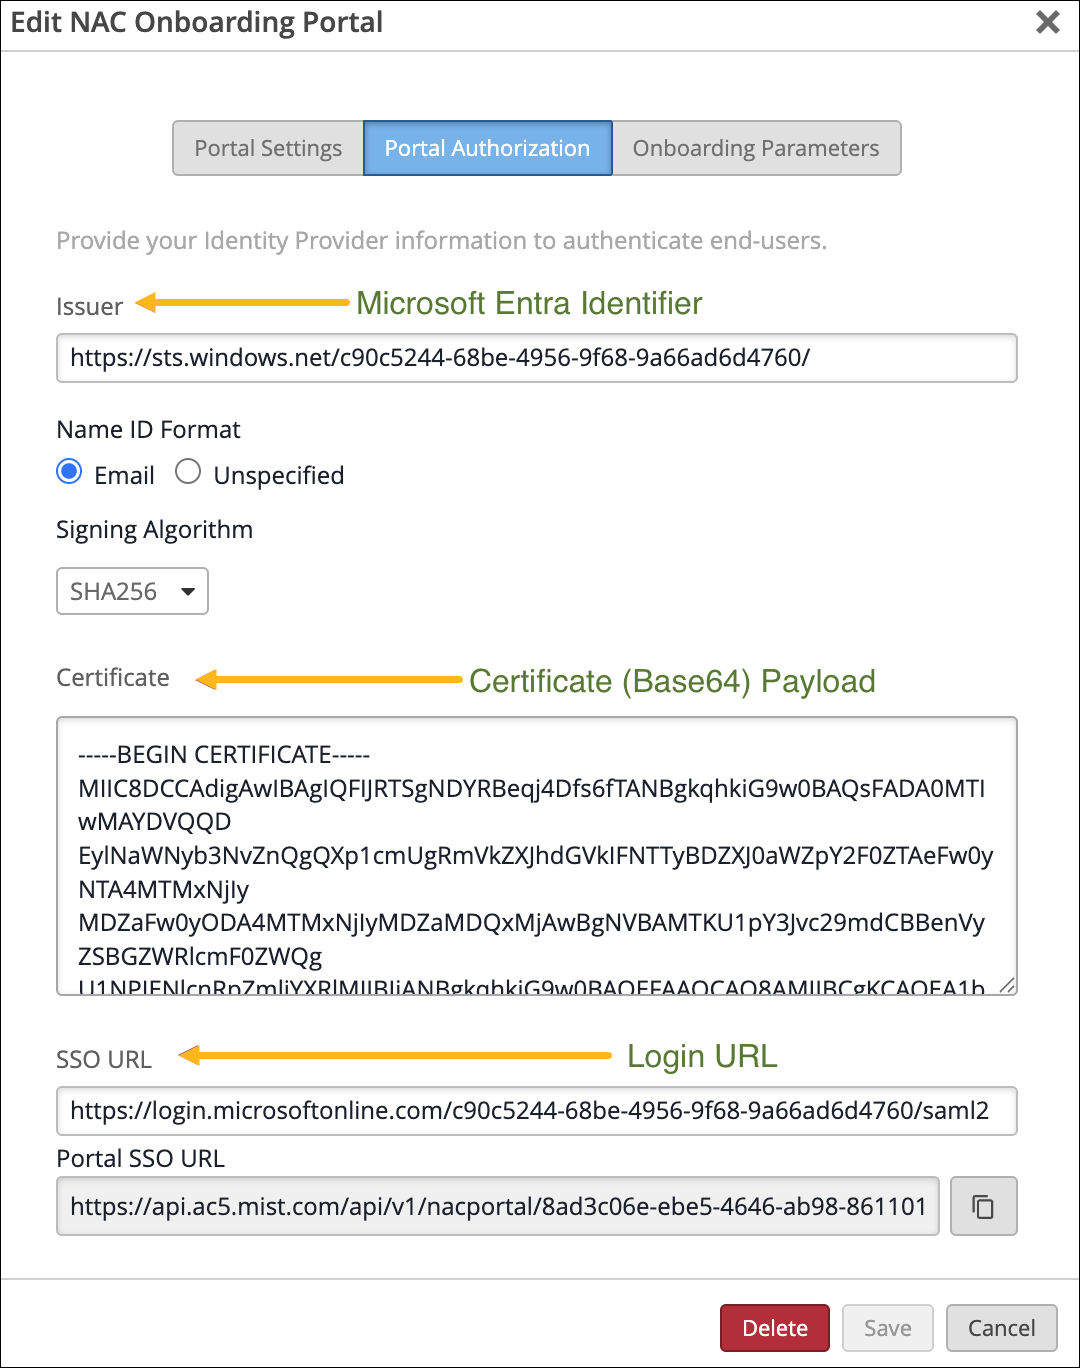
In the Juniper Mist portal, go to the Portal Authorization tab for your NAC Onboarding Portal:
Replace Issuer with the Microsoft Entra Identifier.
Replace Certificate with the payload from the downloaded Base64 certificate.
Replace SSO URL with the Login URL.
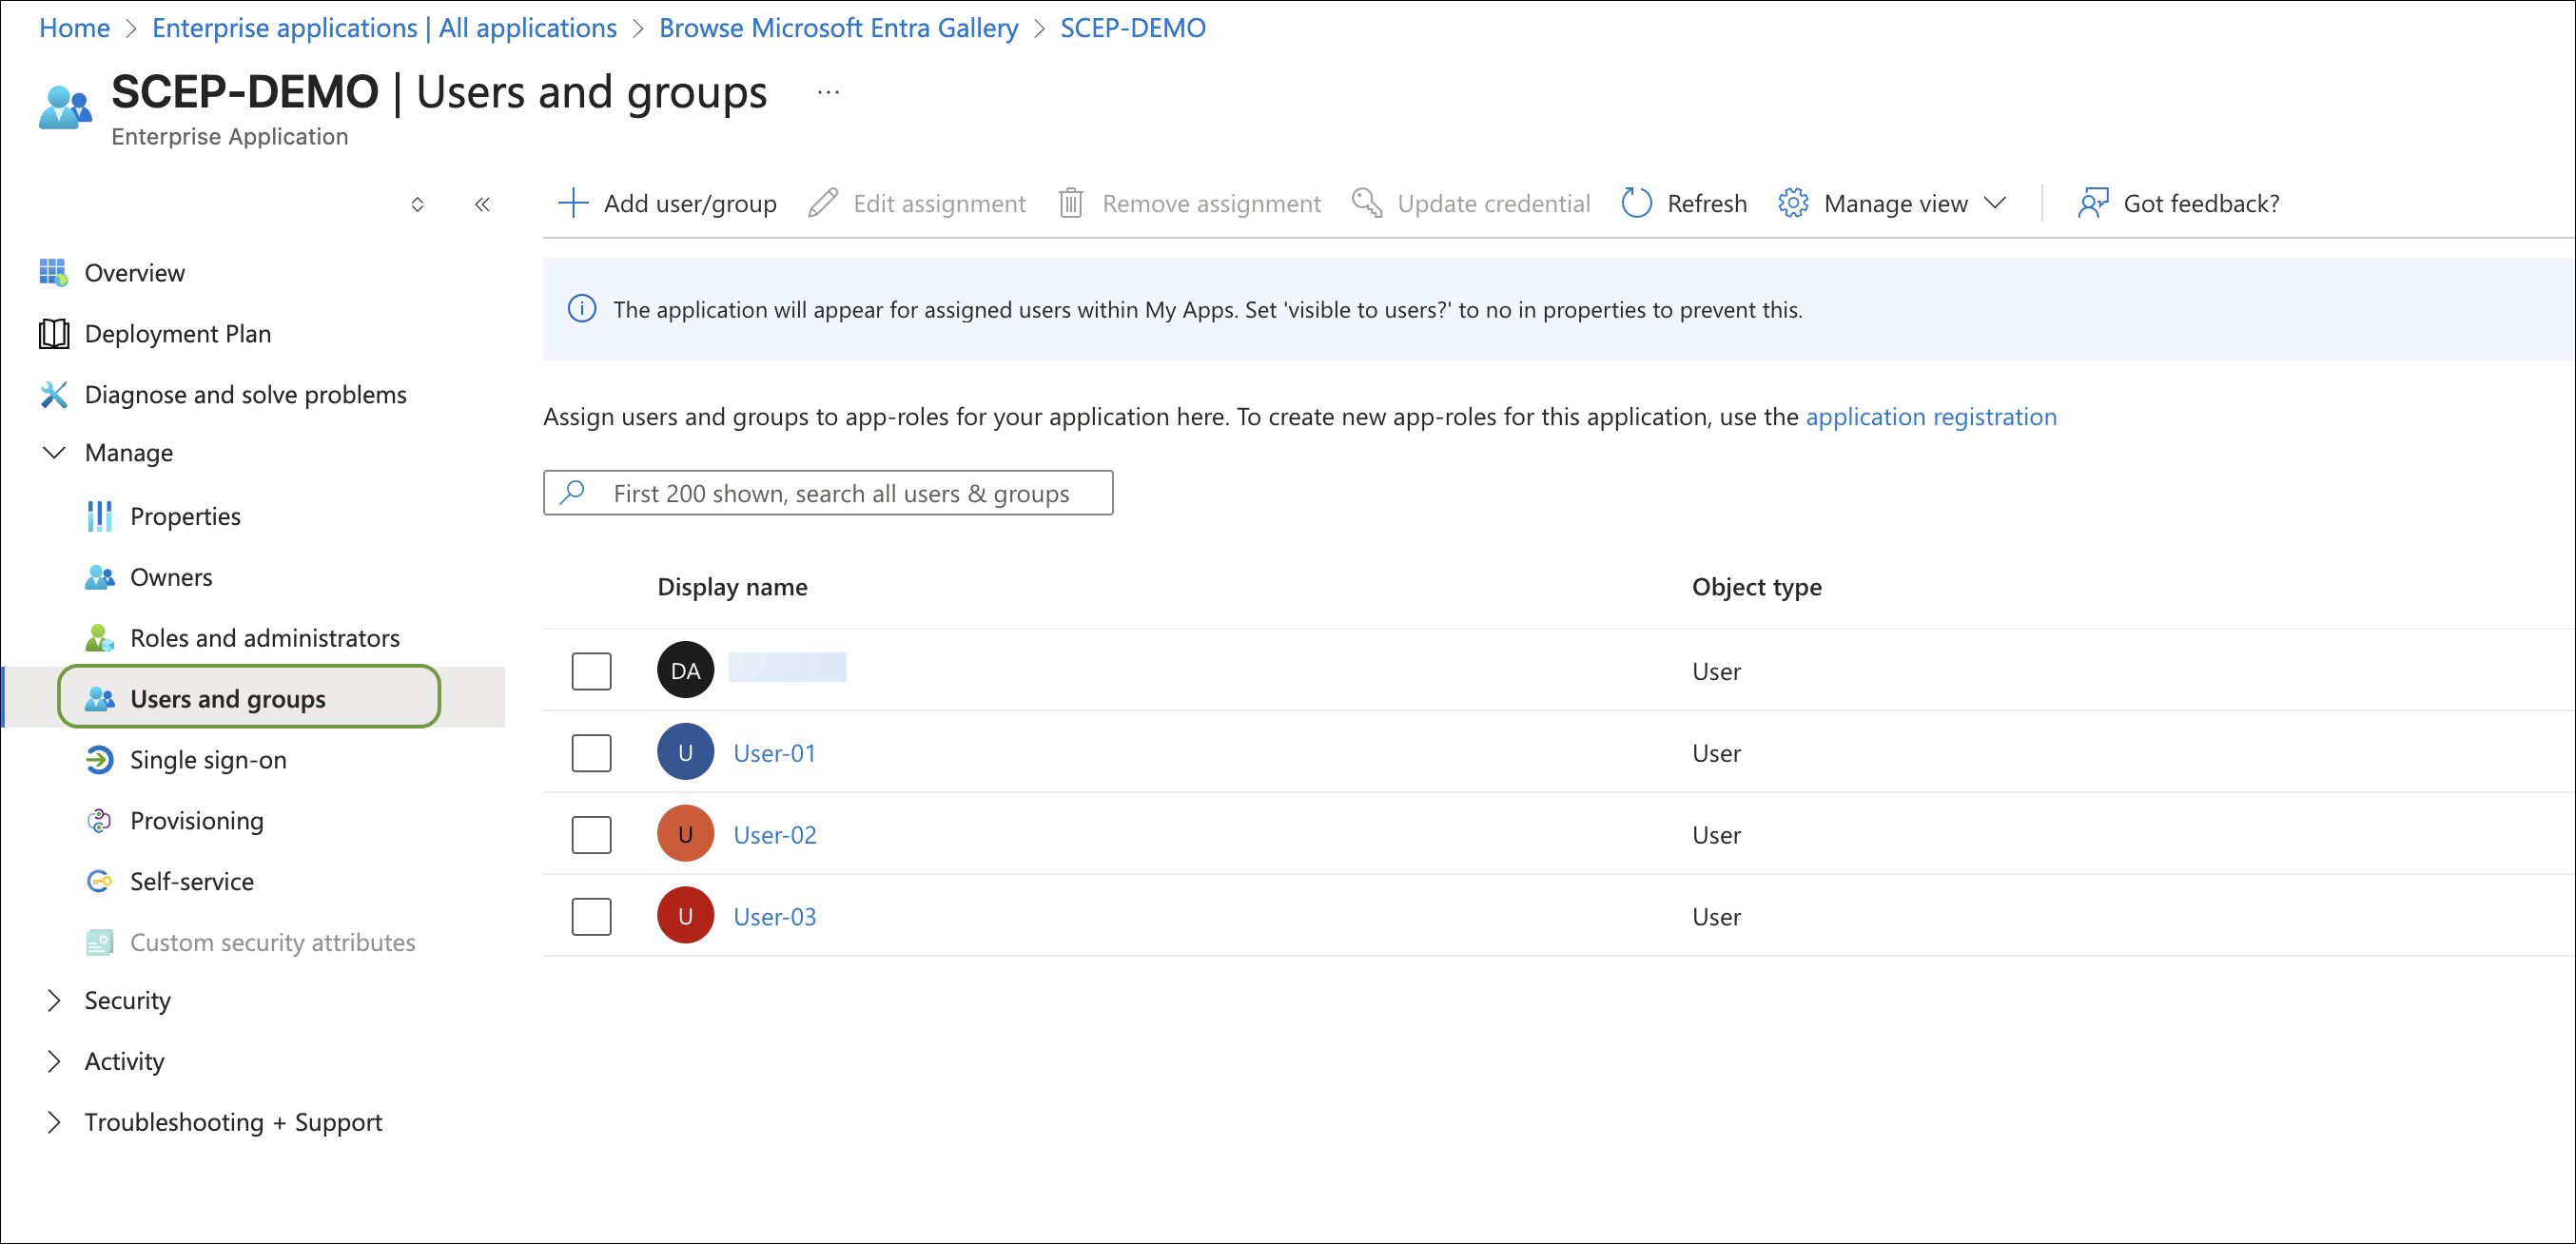
Assign users and groups to the Azure application to enable them to access the portal.
Download the Marvis Client App and Wi-Fi Profile
After you configure the NAC portal and integrate it with Azure, users can log in to the NAC portal using Azure SSO and install the Wi-Fi profile through the Marvis client app. We've used a macOS device as an example here.
On a macOS device, access the NAC Portal using the URL listed under the Portal Settings tab of the NAC Onboarding Portal and sign in using your Azure SSO credentials.
After a successful authentication, the following page displays.

Click Download and Install App to install the Marvis client app.
If your device is running Windows or macOS, the app is downloaded automatically and you can install the app once the download process is complete.
For Android and iOS, you will be redirected to the Google or Apple Play Store to download the app.
After you install the Marvis client app (or if you have installed the app already), switch to the NAC portal page and click Already have the app? to install the profile.
You will be redirected to the Marvis client app to install the Wi-Fi profile.
Click Install, and then navigate to Settings>General > Device Management on your device and complete the profile installation.
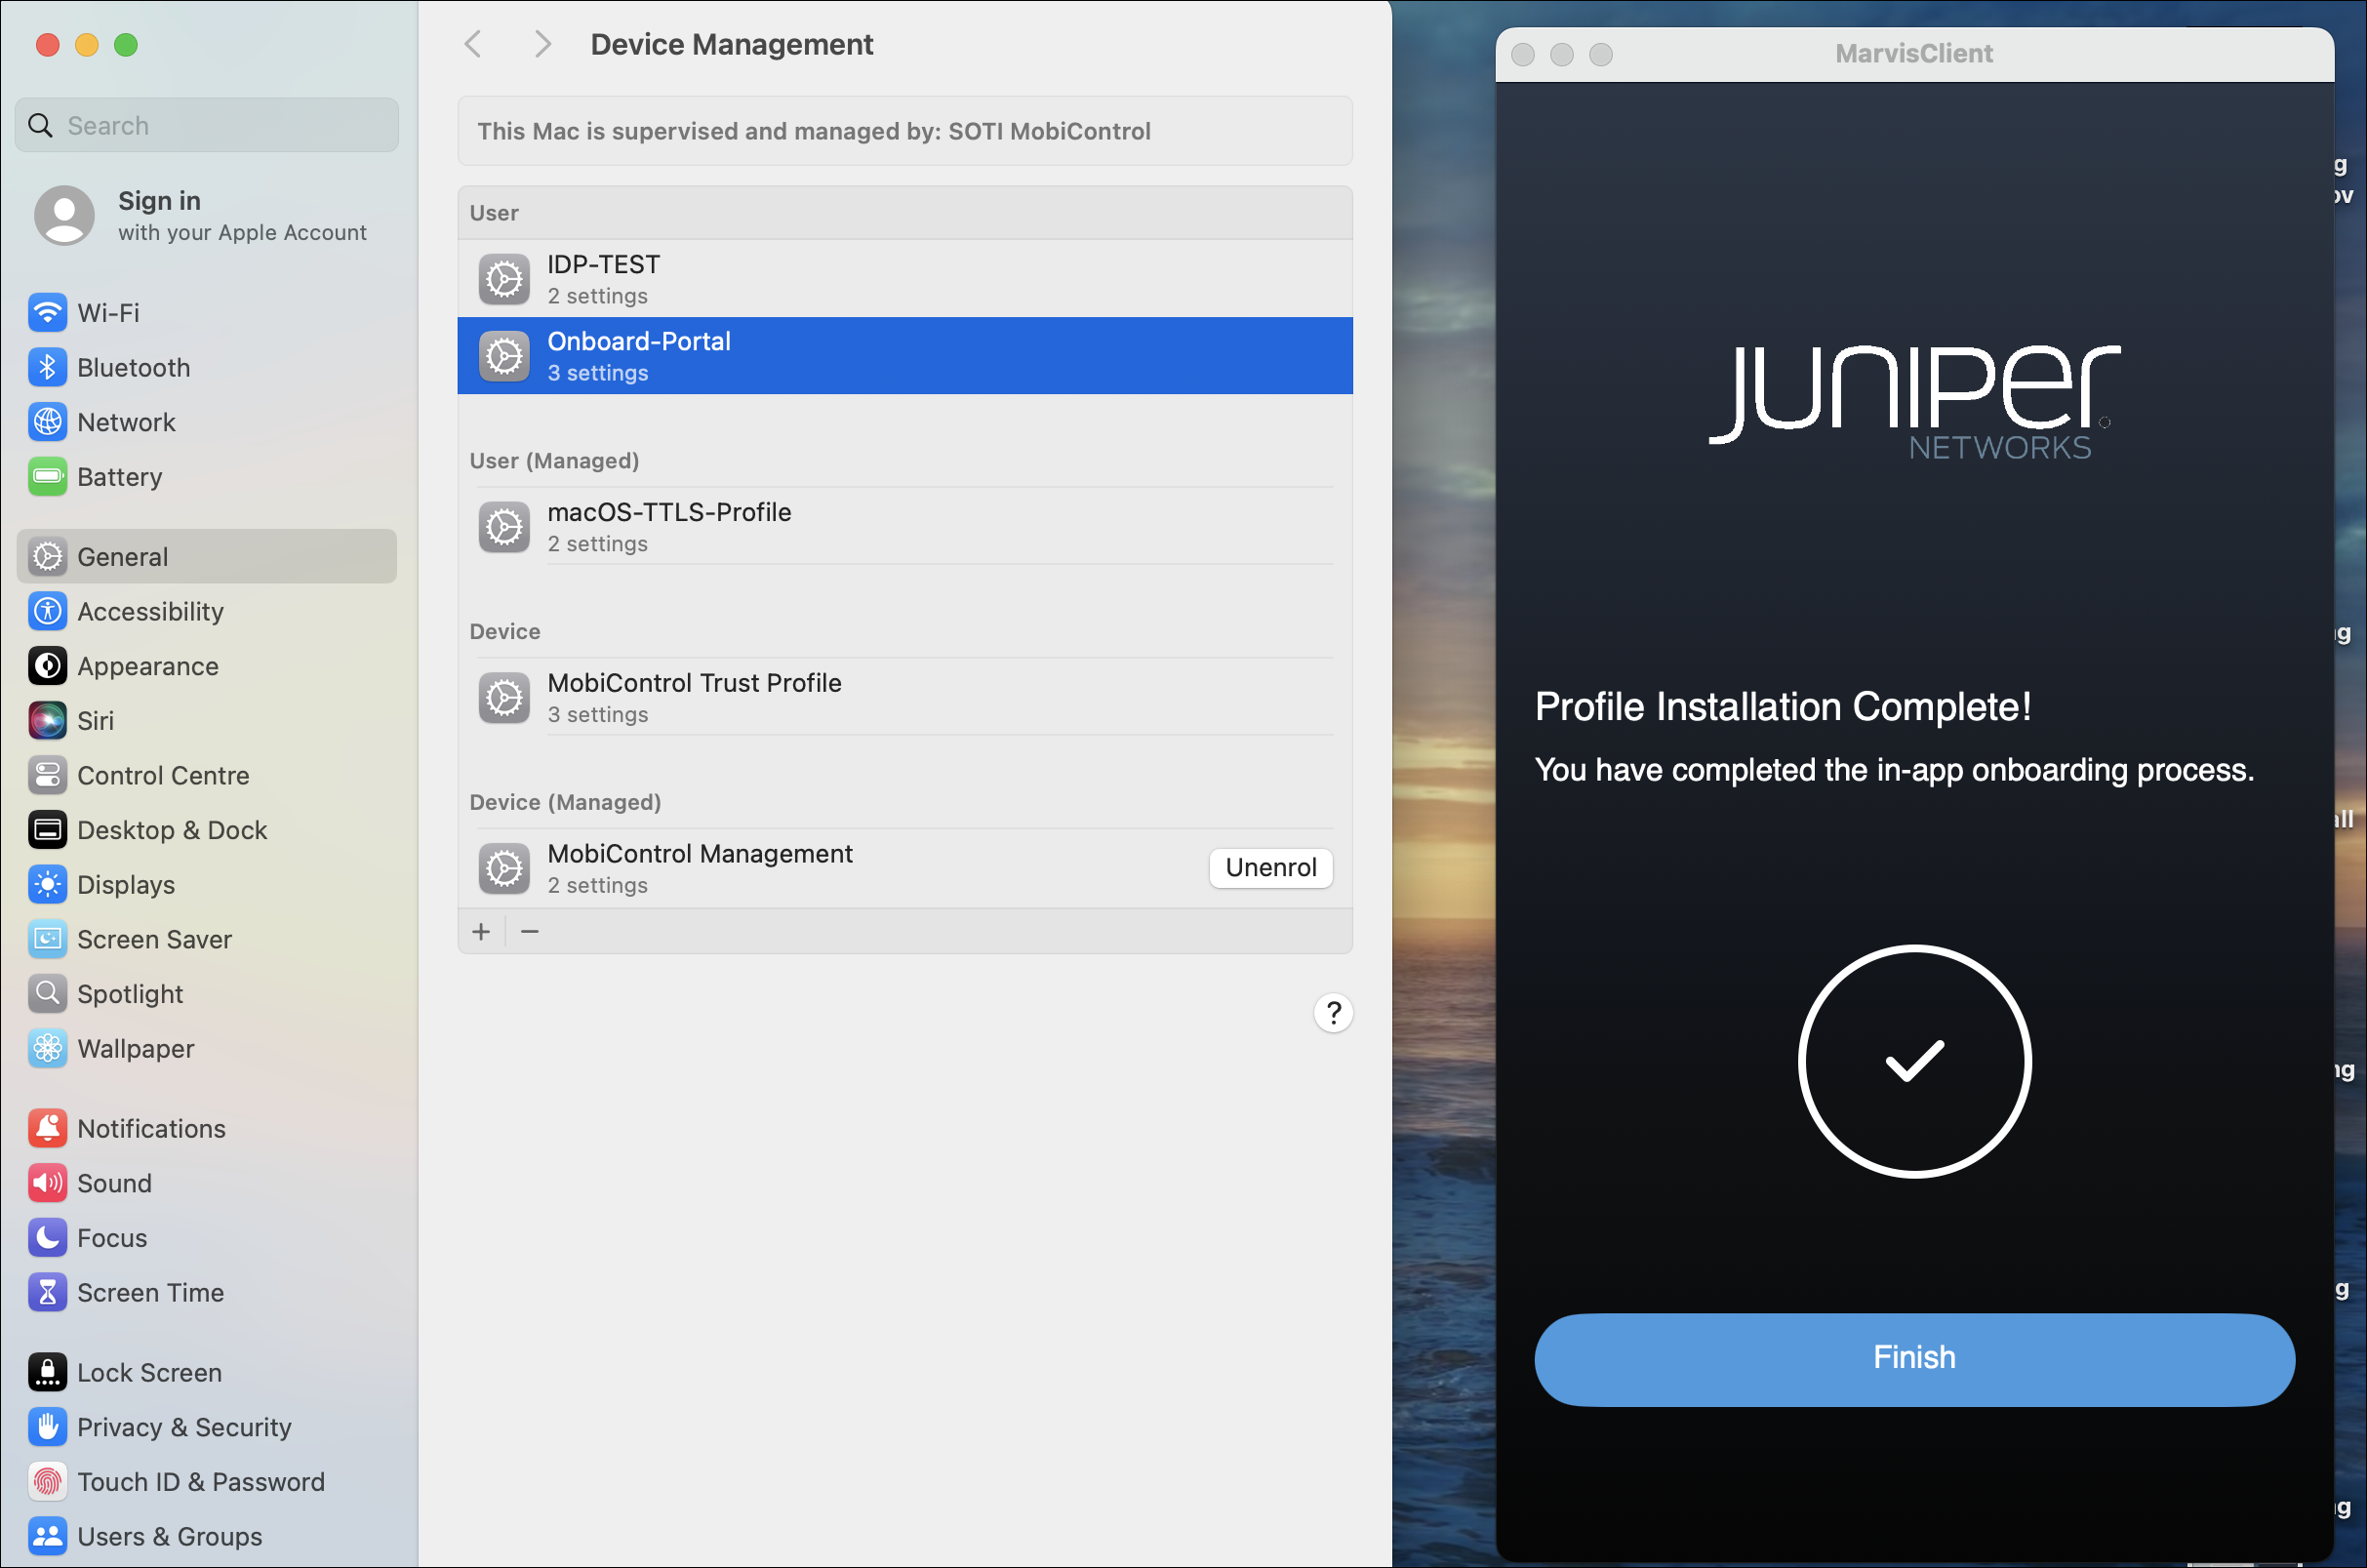
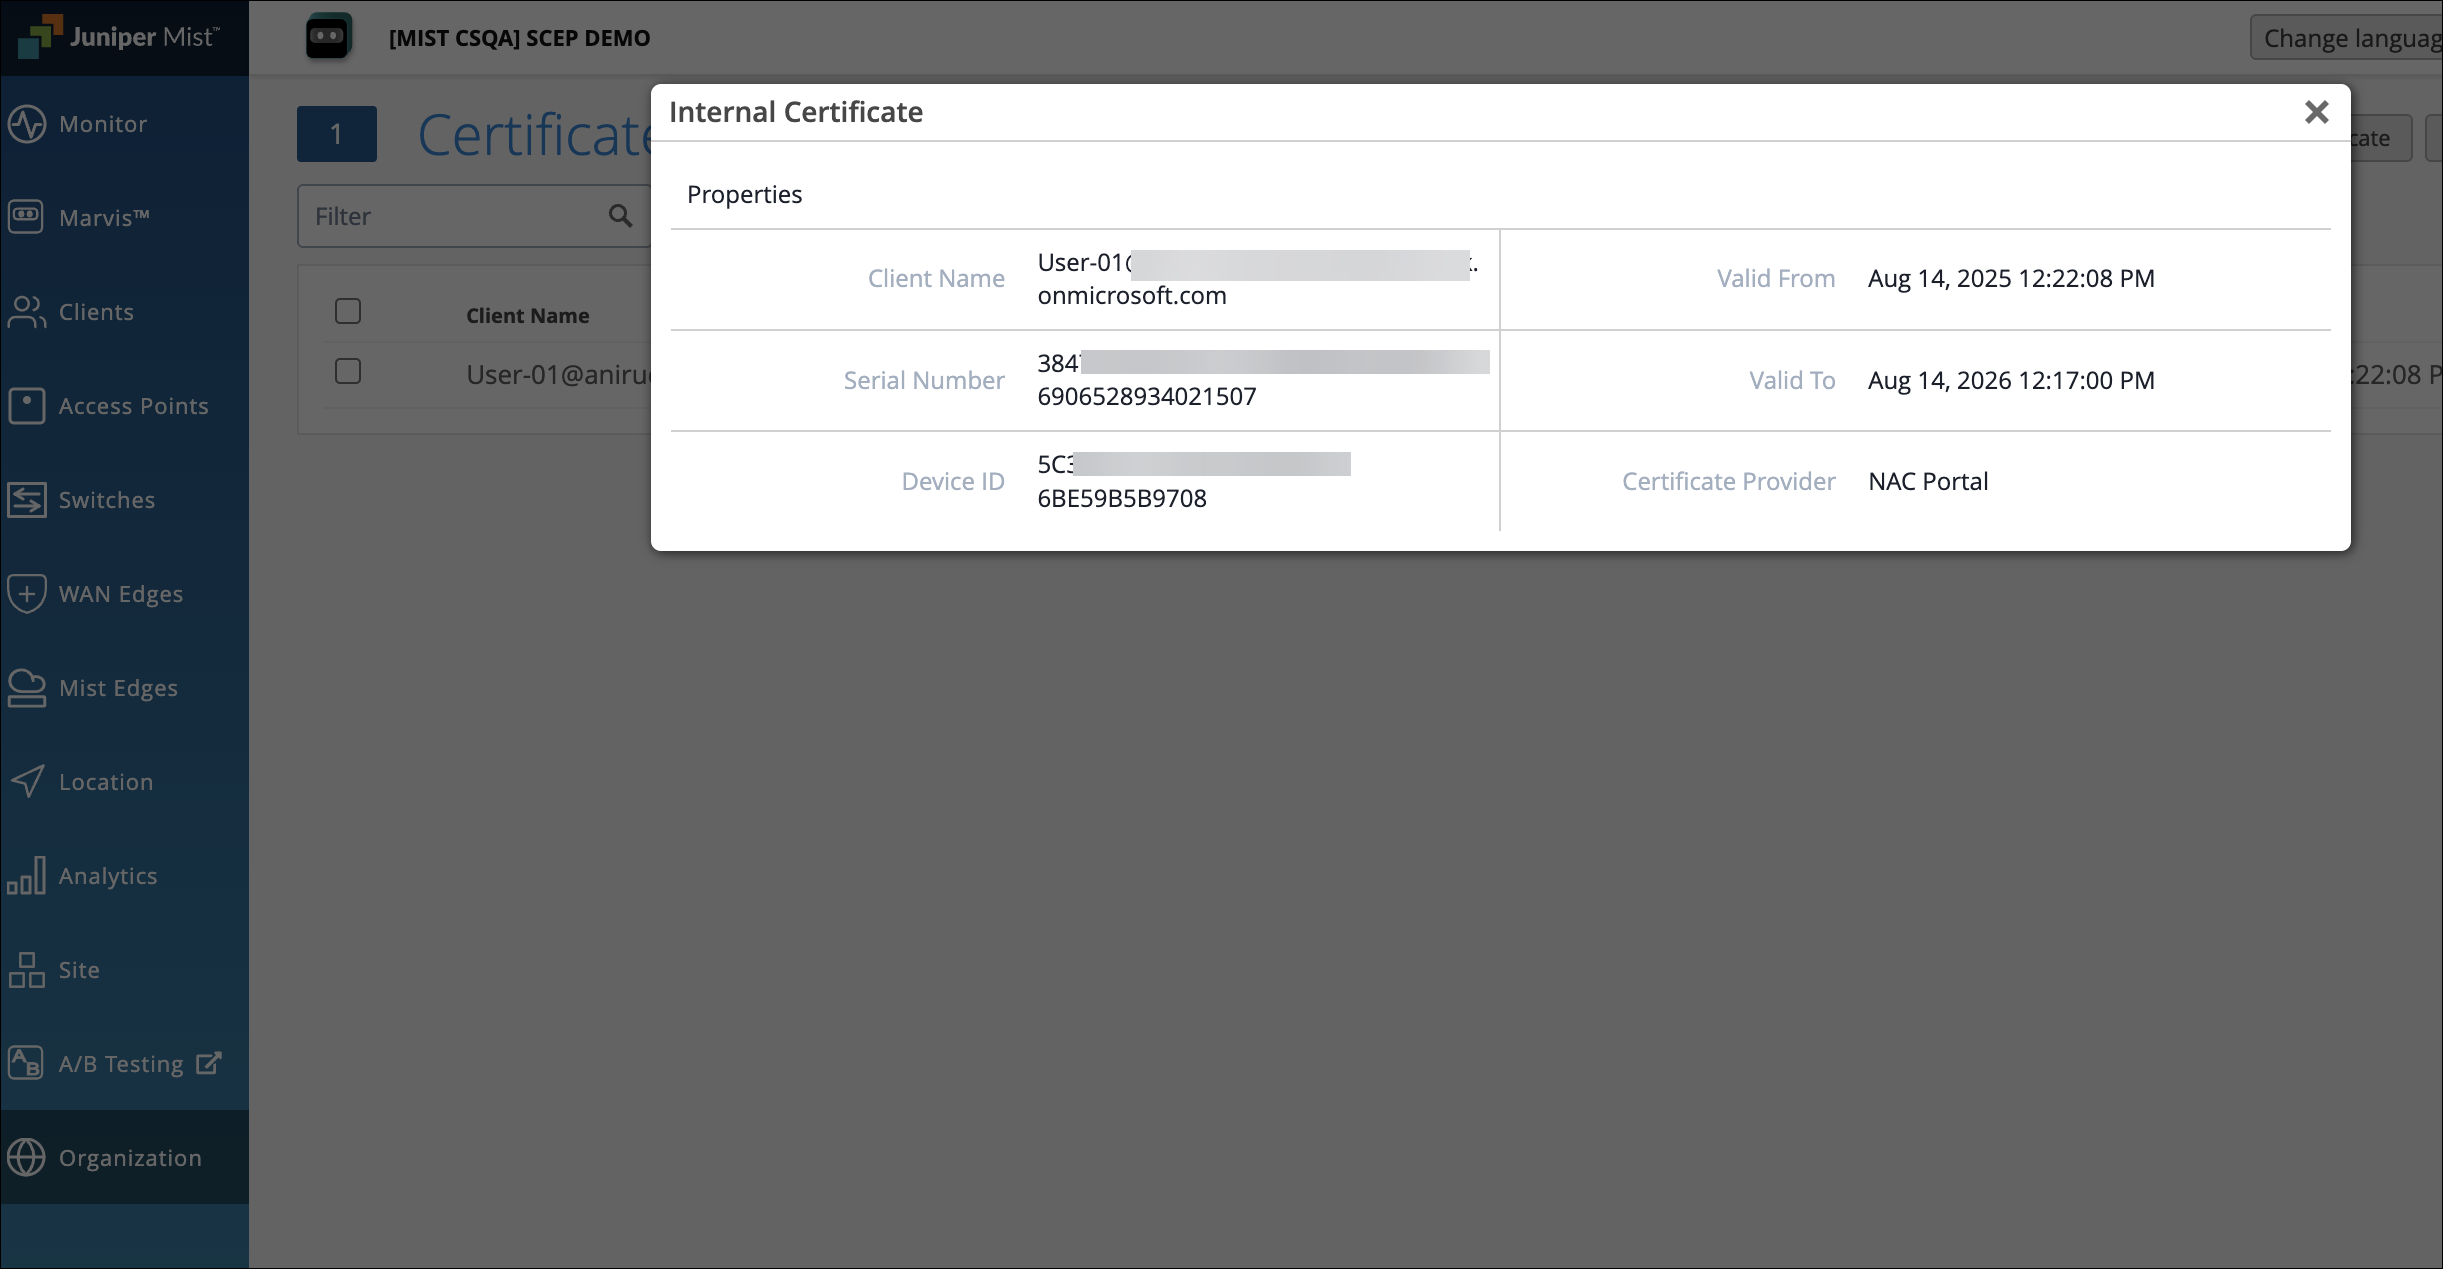
On the Juniper Mist portal, open the Certificates page and verify the client-issued certificate details under the Internal section.
Verify Client Connectivity to the Network
Verify that the device connects to the Access Assurance network through the client certificate provisioned through the Marvis client app.
From the left menu of the Juniper Mist portal, select Organization> Access>Auth Policies and configure the required authentication policy rules for the device.

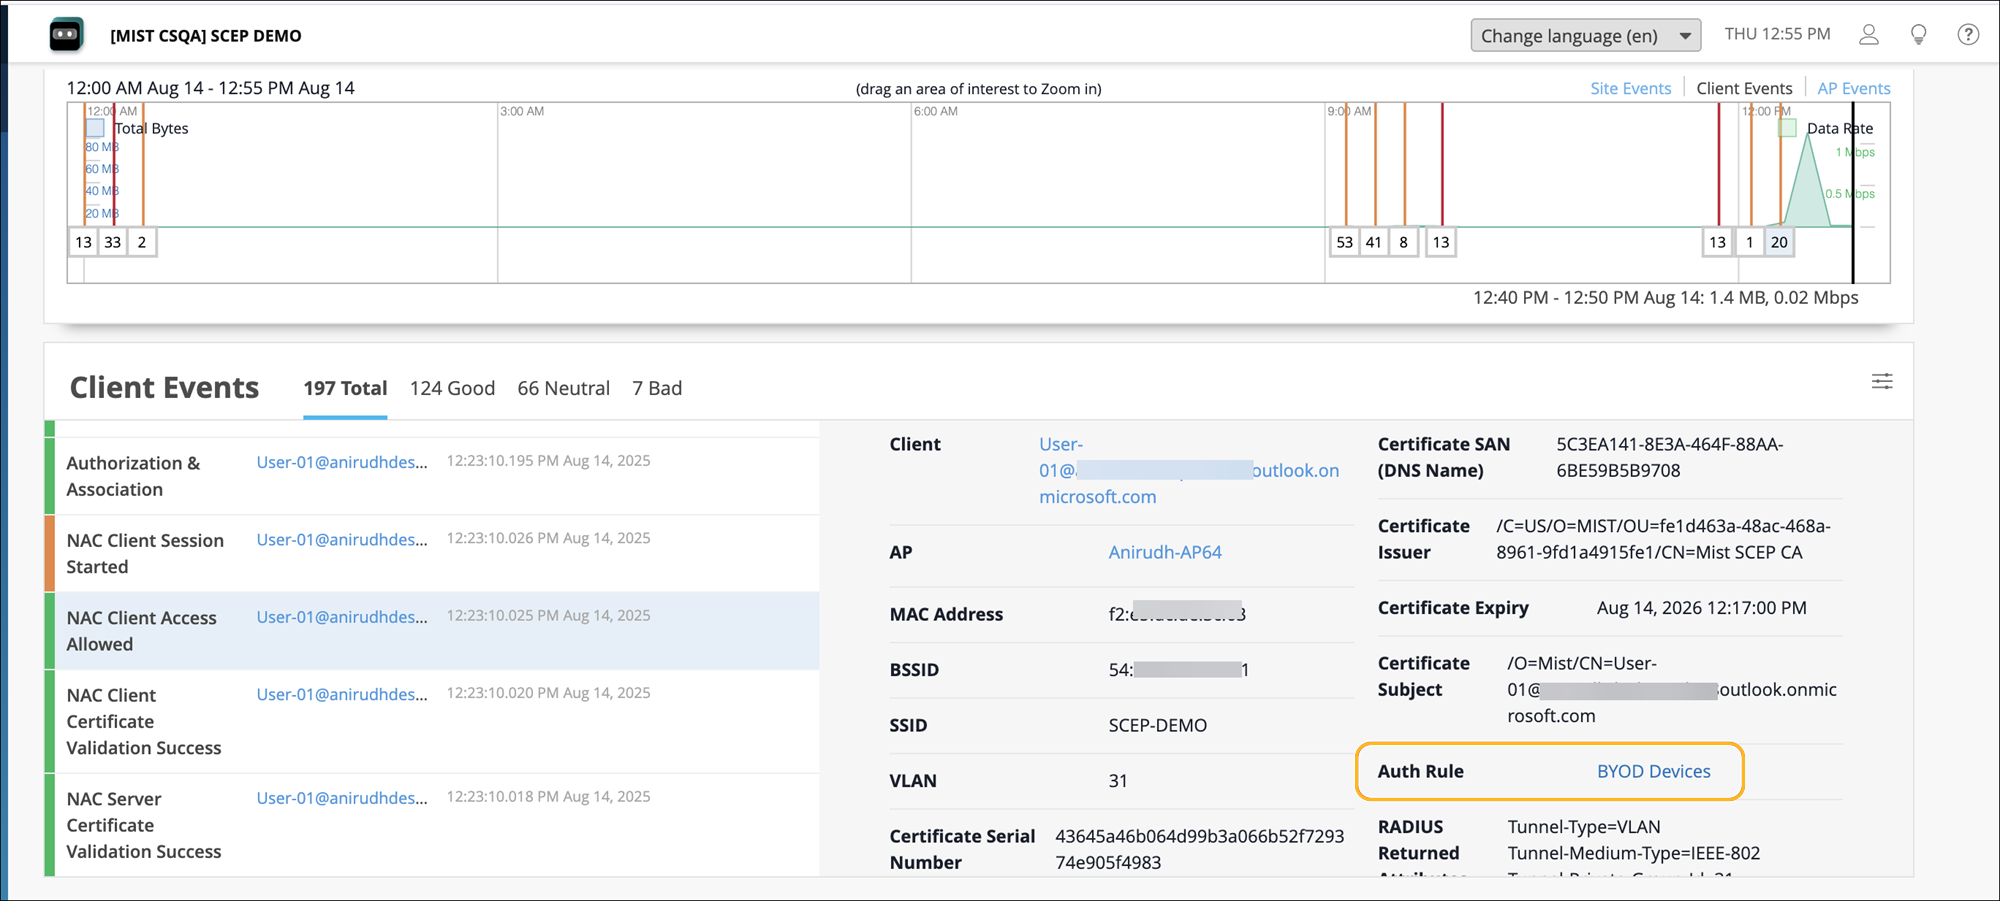
Connect the device to the network and confirm successful authentication.
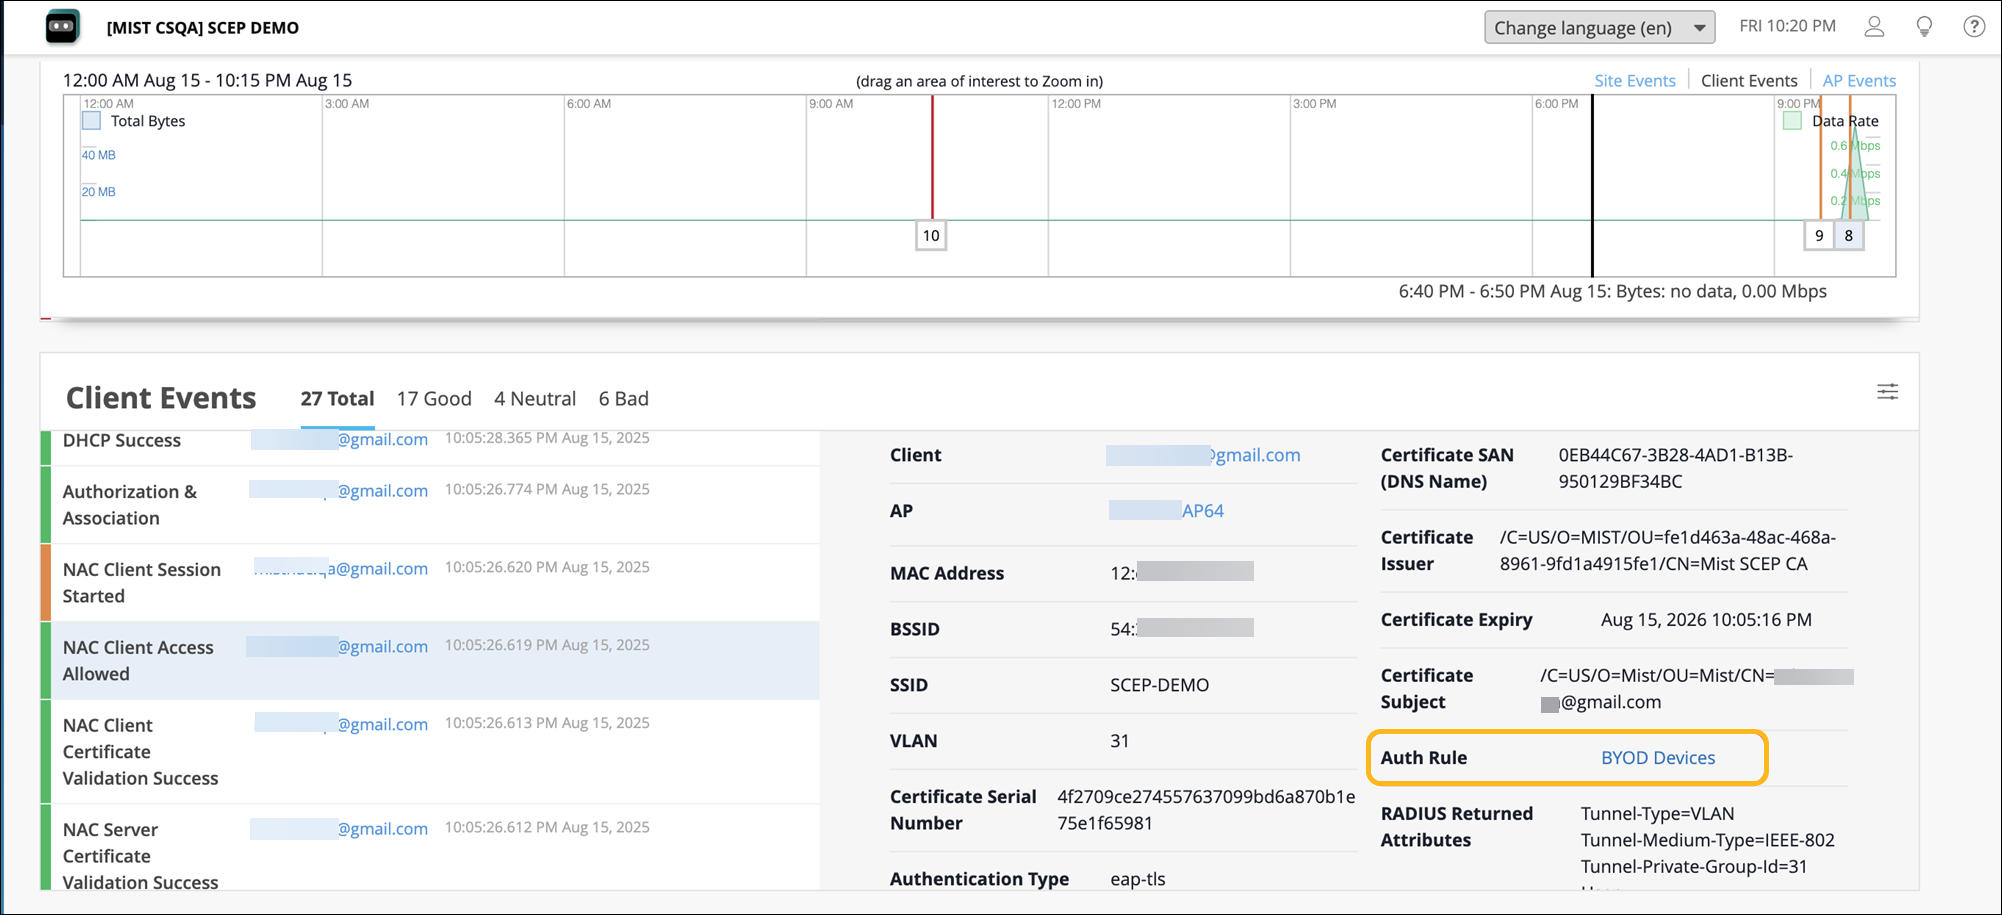
Navigate to the Monitor>Service Levels>Insights page and go to the Client Events section. Verify the NAC Client authentication events.
How to Set Up a NAC Portal and Integrate It with Okta
Setting up a NAC onboarding portal and integrating it with Okta involves the following steps:
- Create a NAC Portal and Integrate It with Okta
- Download the Marvis Client App and Wi-Fi Profile
- Verify Client Connectivity to the Network
Create a NAC Portal and Integrate It with Okta
Ensure that the onboard CA configuration is enabled on the Certificates page. See Before you Begin.
Create a NAC portal. When you create the portal, a NAC portal URL will be generated for users to access using SSO.
From the left menu of the Juniper Mist portal, select Organization>Client Onboarding, and select the NAC tab.
Click Add NAC Onboarding Portal at the top-right corner of the Client Onboarding page.
In the Add NAC Onboarding Portal page, provide a name and click Create.
Select the Portal Authorization tab:
Enter placeholder values for Issuer, Certificate, and SSO URL. These values will later be replaced with actual values from the IdP.
Copy the SSO Portal URL to use later.
Select the Onboarding Parameters tab and configure the following:
Enter the SSID name to be provisioned.
Select the Security Type as WPA2 or WPA3 Enterprise.
Set the number of days after which the client certificate will expire. The value can range from 1-1825 days (up to 5 years).
Configure SSO and integrate the NAC portal with Okta:
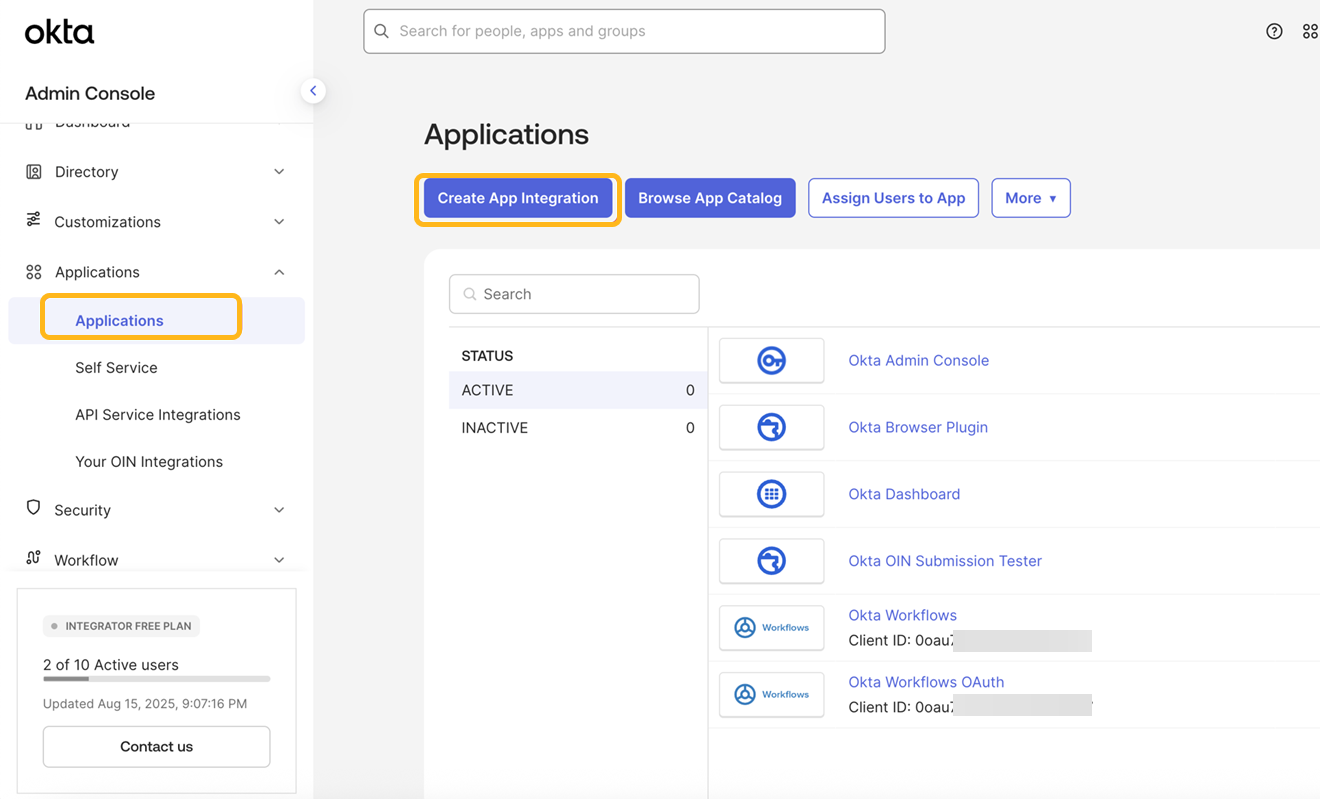
Log in to the Okta administration console and navigate to the Applications page.
Click Create App Integration.
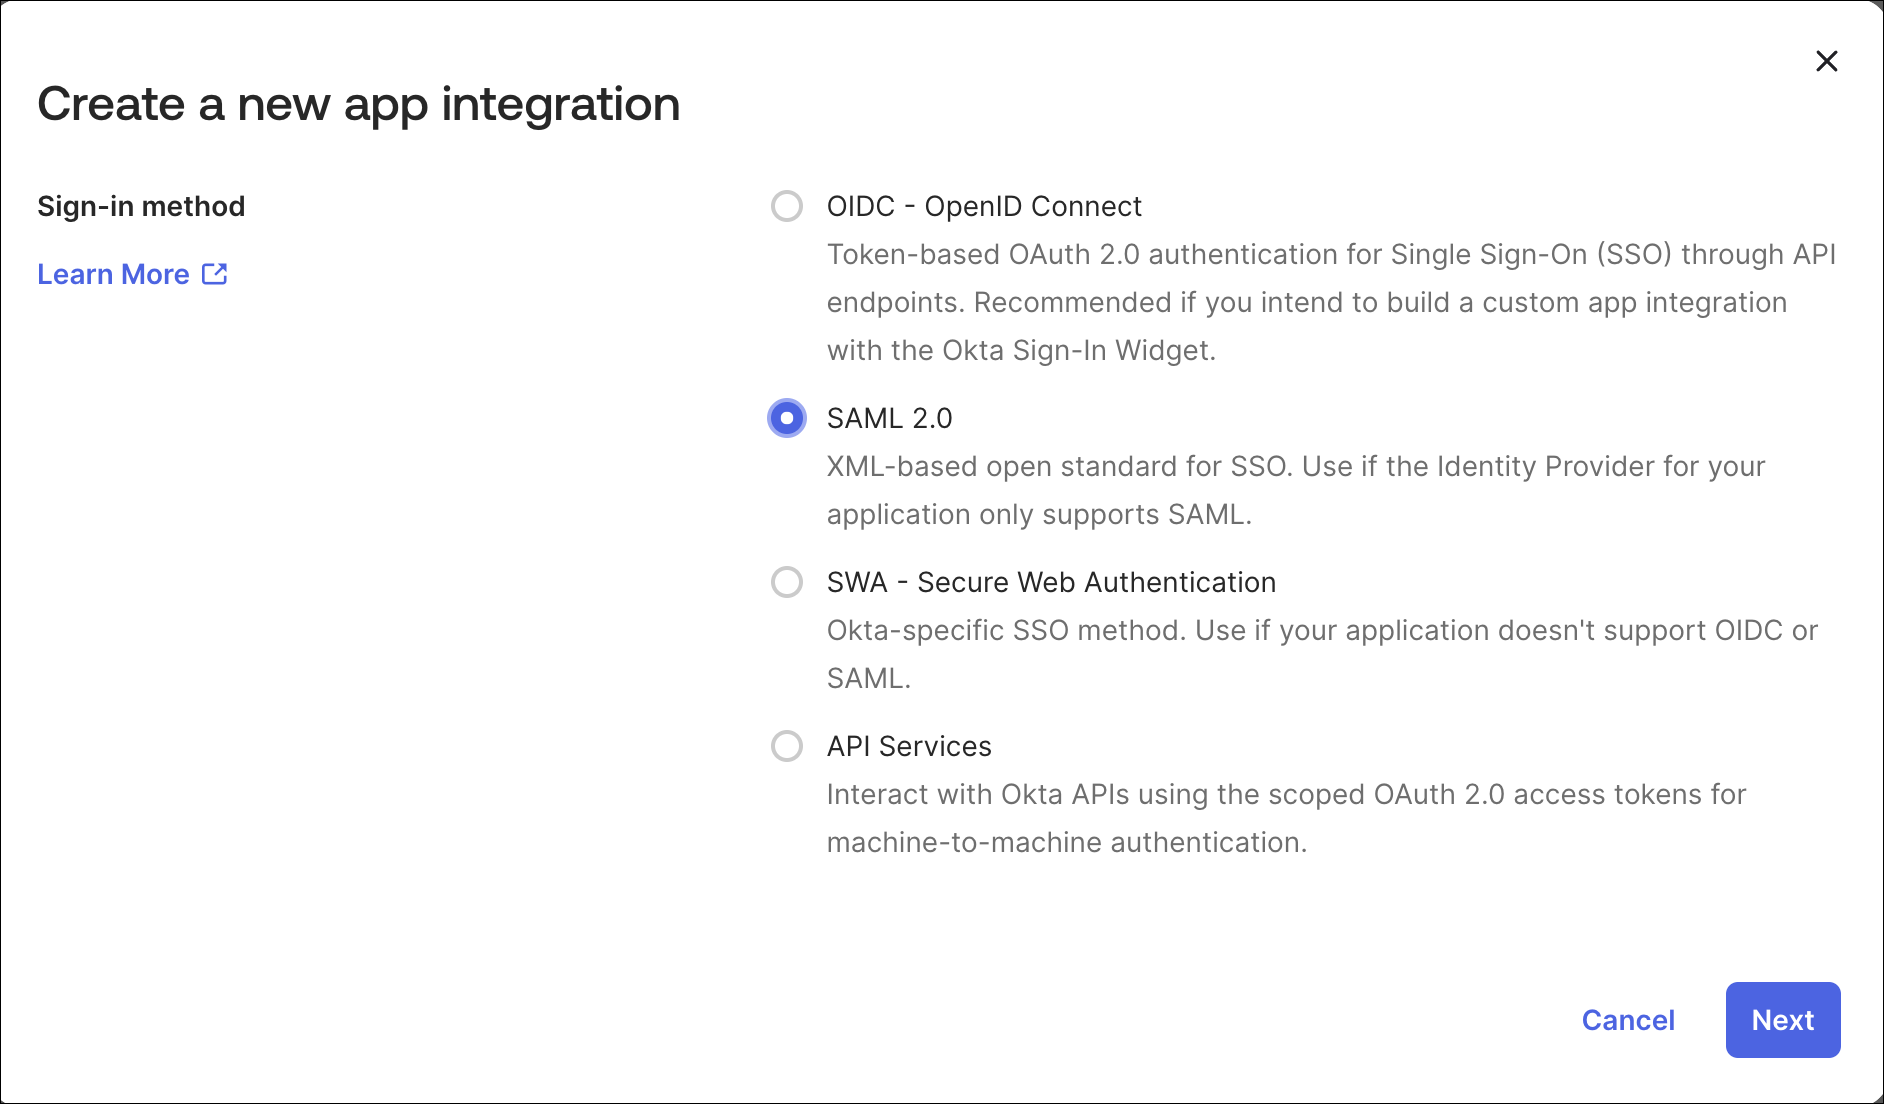
Select SAML 2.0 as the Sign-in method and click Next.
Enter an app name and click Next.

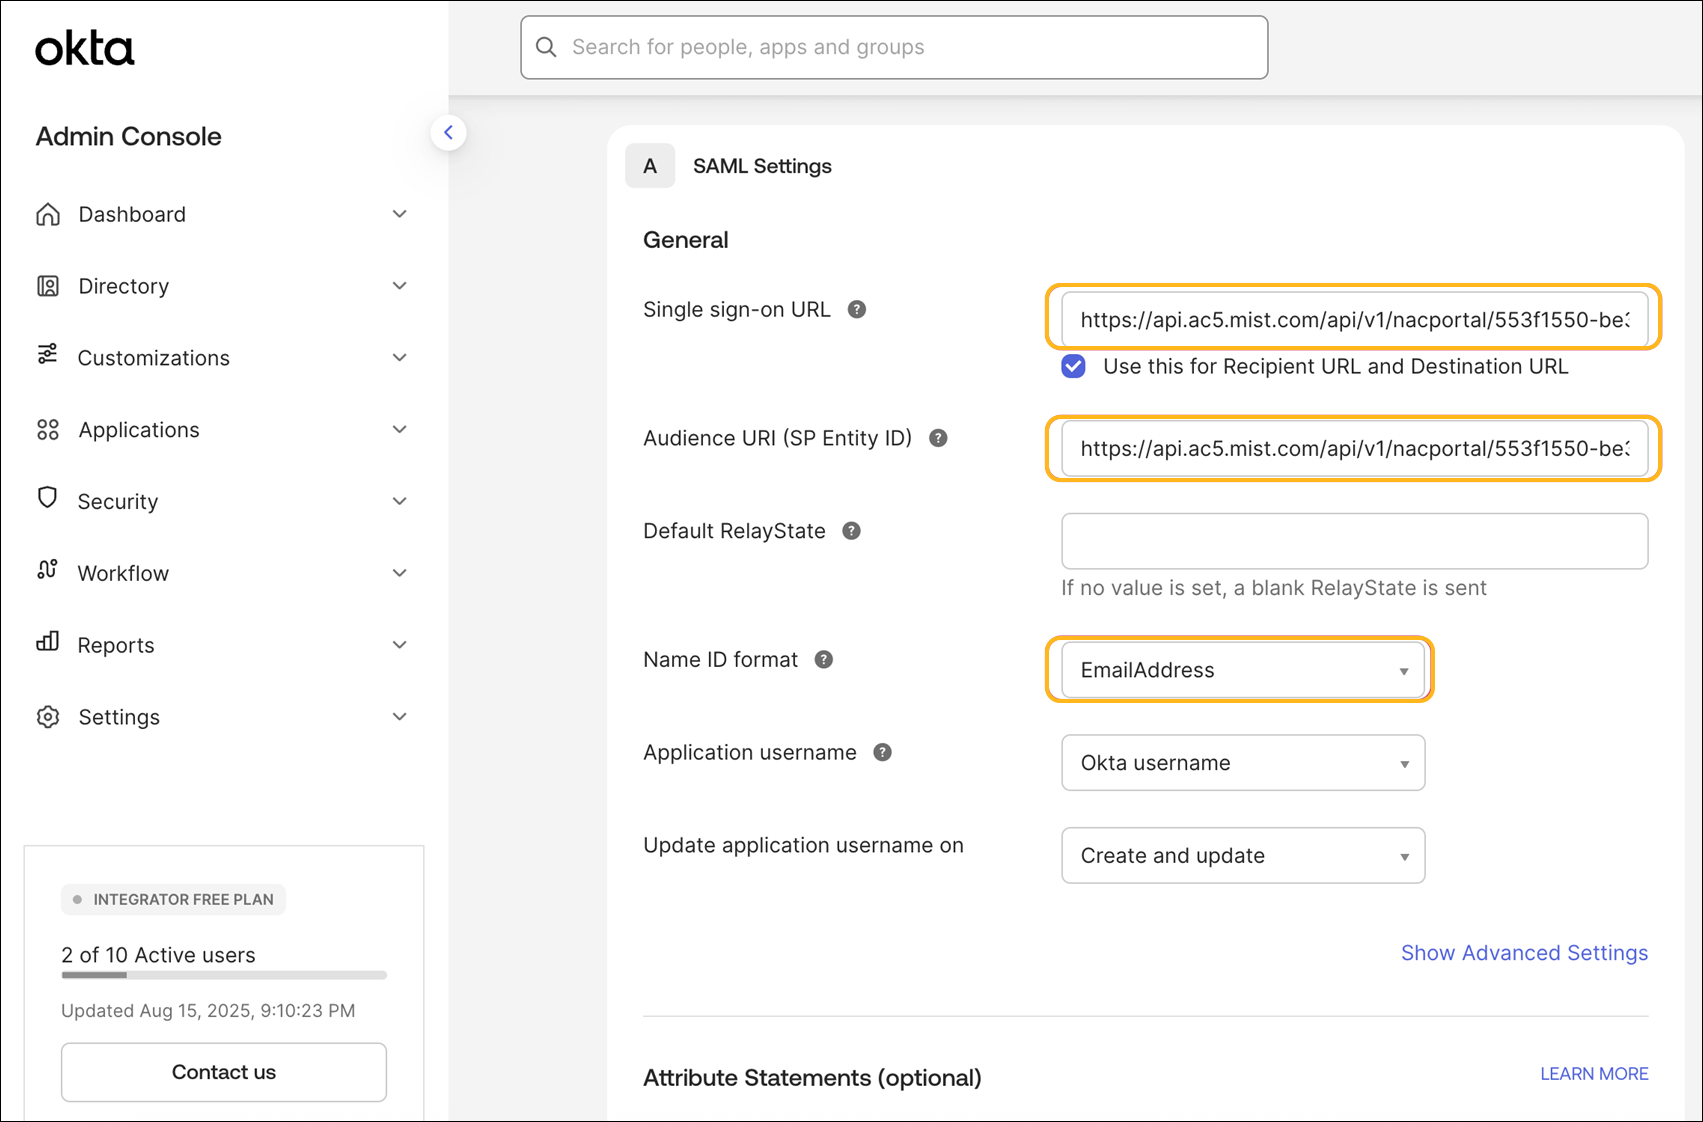
Paste the Portal SSO URL that you copied earlier to the Single Sign On URL and Audience URL fields under SAML Settings. Set the Name ID format to EmailAddress, click Next, and then click Finish.
You will be redirected to the app in edit mode.
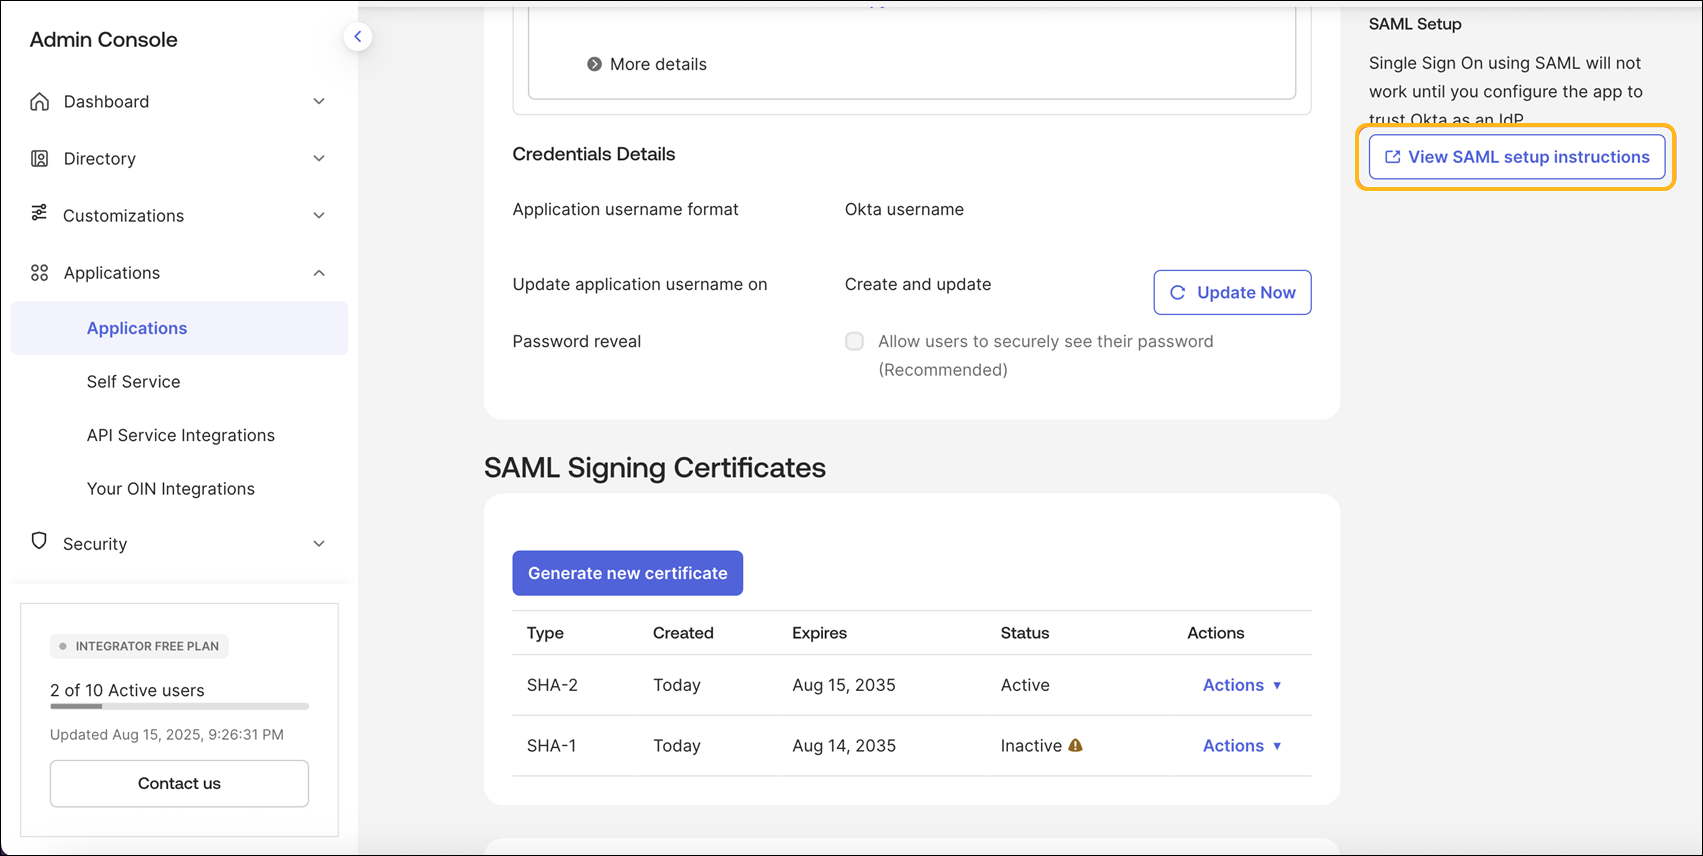
Scroll down and click View SAML setup instructions.
Copy the Identity Provider Single Sign-On URL, Identity Provider Issuer, and X.509 Certificate.
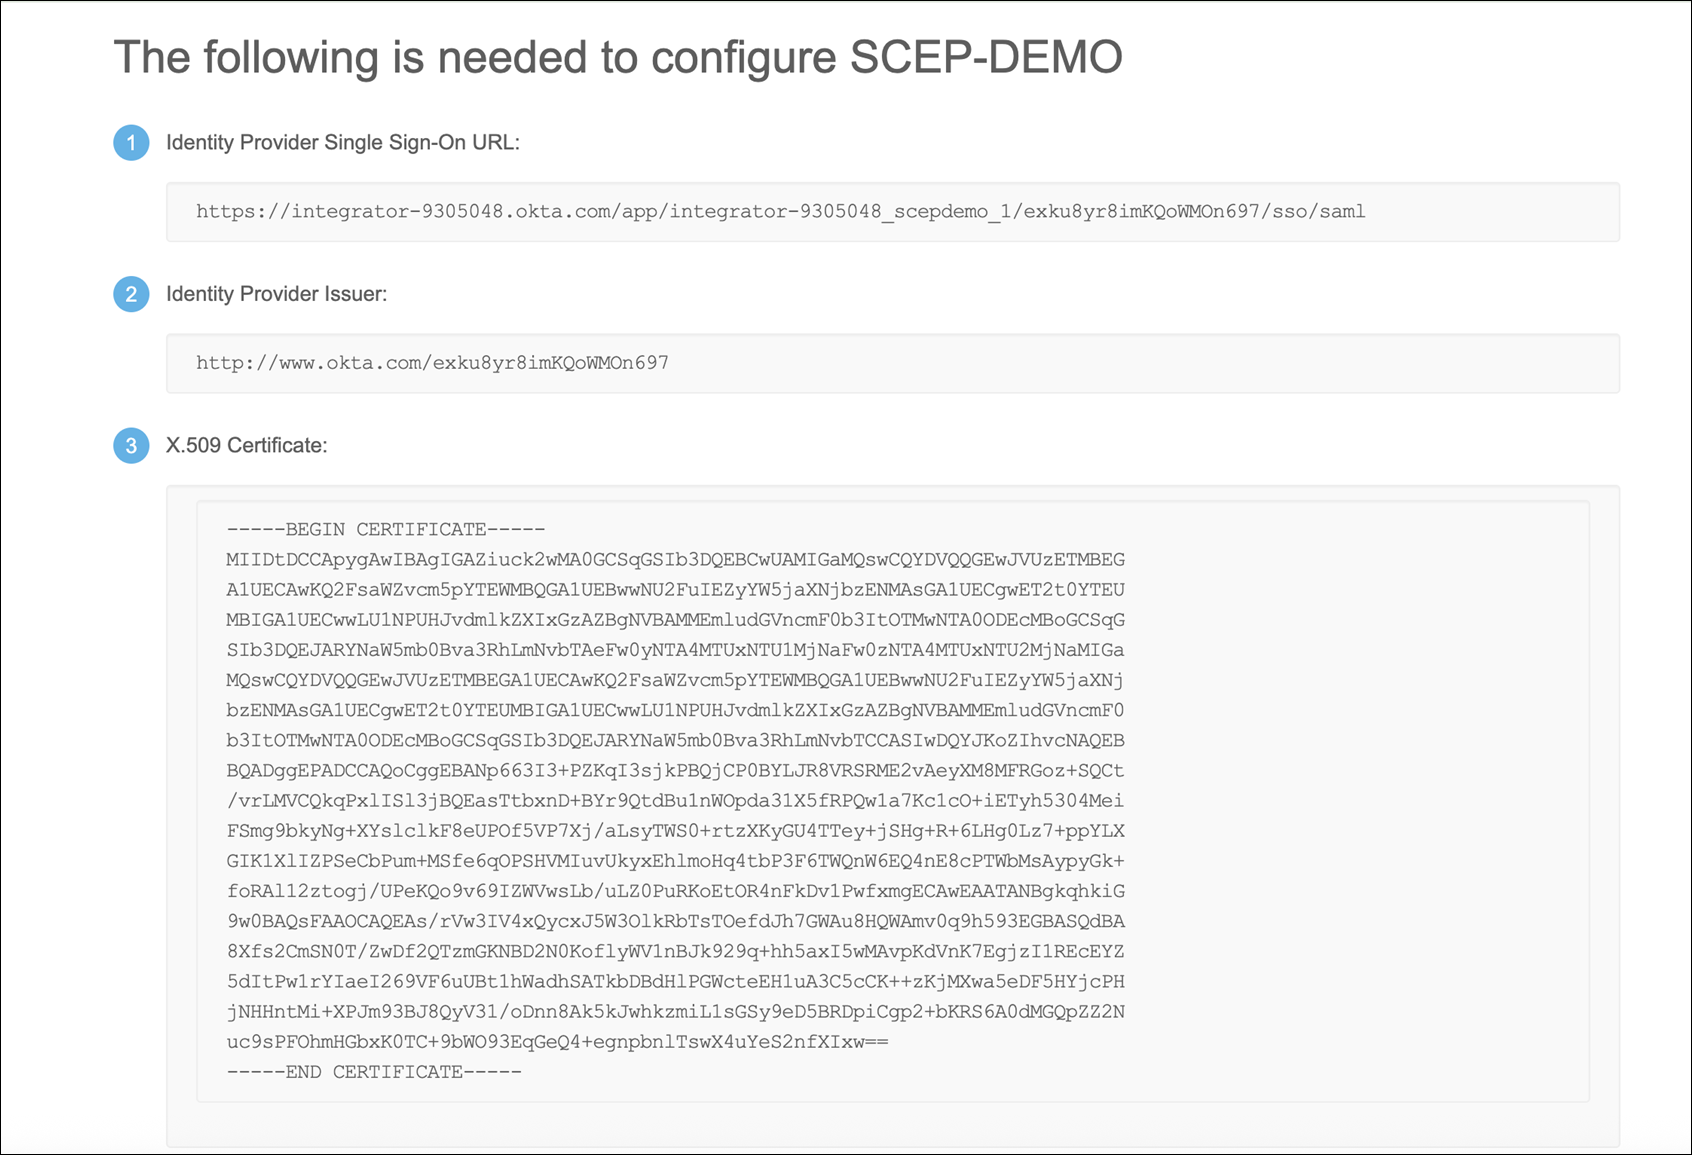
Switch to the Juniper Mist portal and go to the Portal Authorization Settings tab of the Edit NAC Onboarding Portal page. Paste the information that you copied in the previous step in the following fields:
Issuer—Identity Provider Issuer
SSO URL—Identity Provider Single Sign-On URL
Certificate—X.509 Certificate

Click Save.
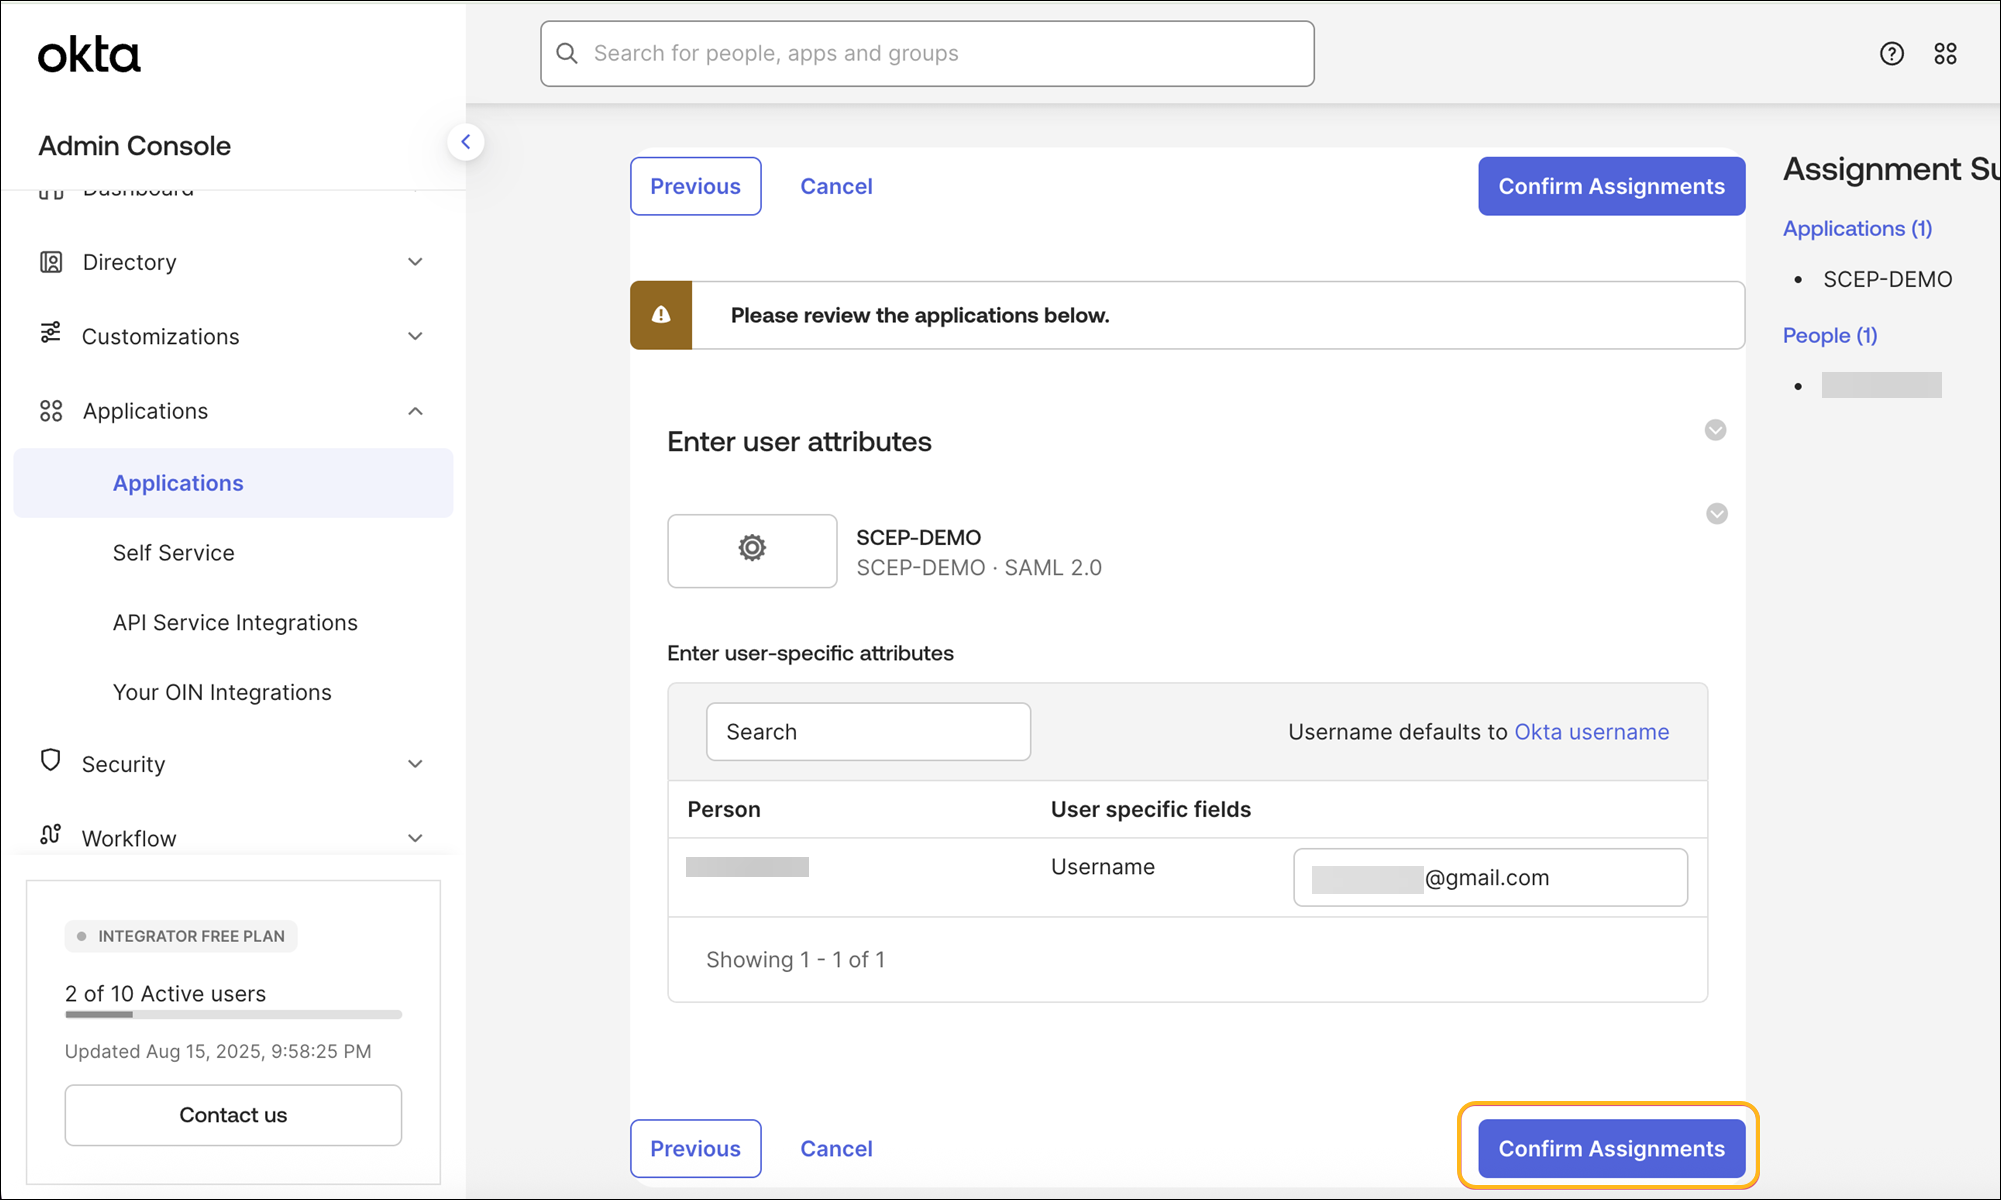
Go to Applications>Assign Users to App and assign users.
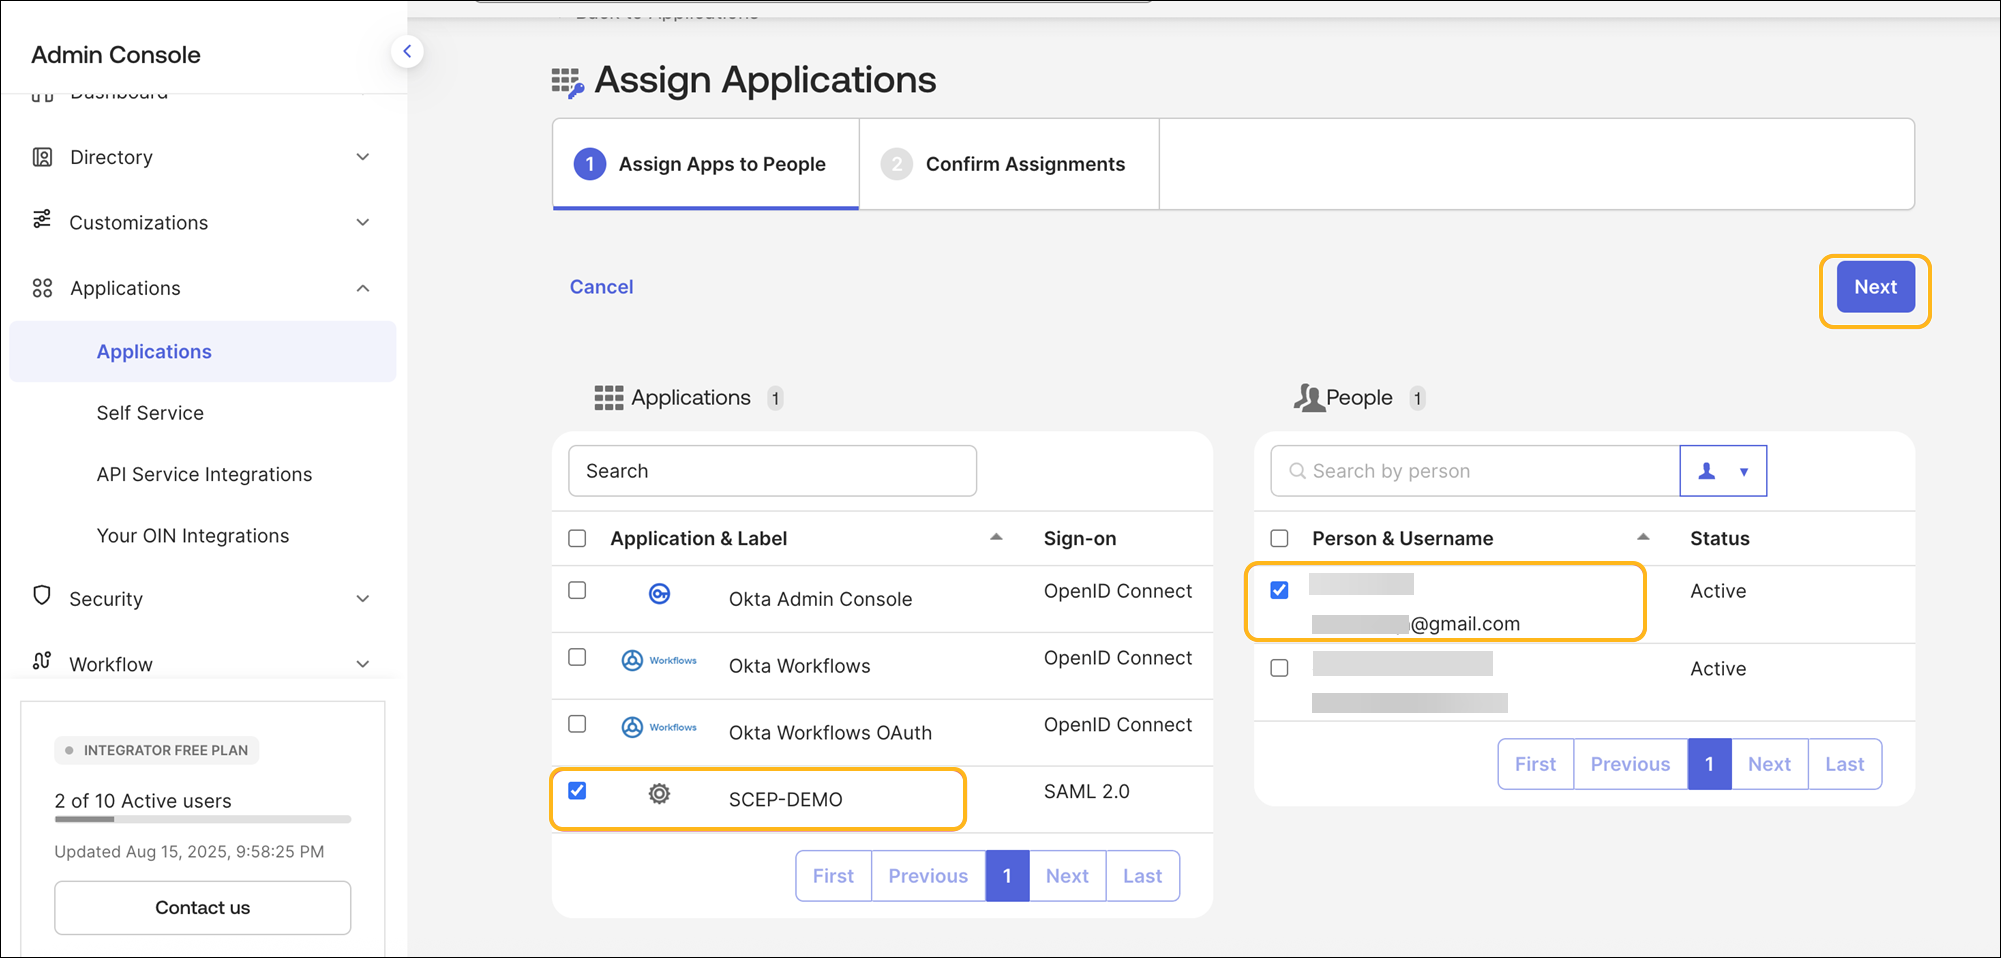
Select the user and the application, then click Next.
Click Confirm Assignments.
Download the Marvis Client App and Wi-Fi Profile
After you configure the NAC portal and integrate it with Okta, users can log in to the NAC portal using Okta SSO and install the Wi-Fi profile through the Marvis client app. We've used an iOS device as an example here.
On your iOS device, access the NAC Portal URL listed under the Portal Settings tab of the Edit NAC Onboarding Portal page and sign in using your Okta SSO credentials.
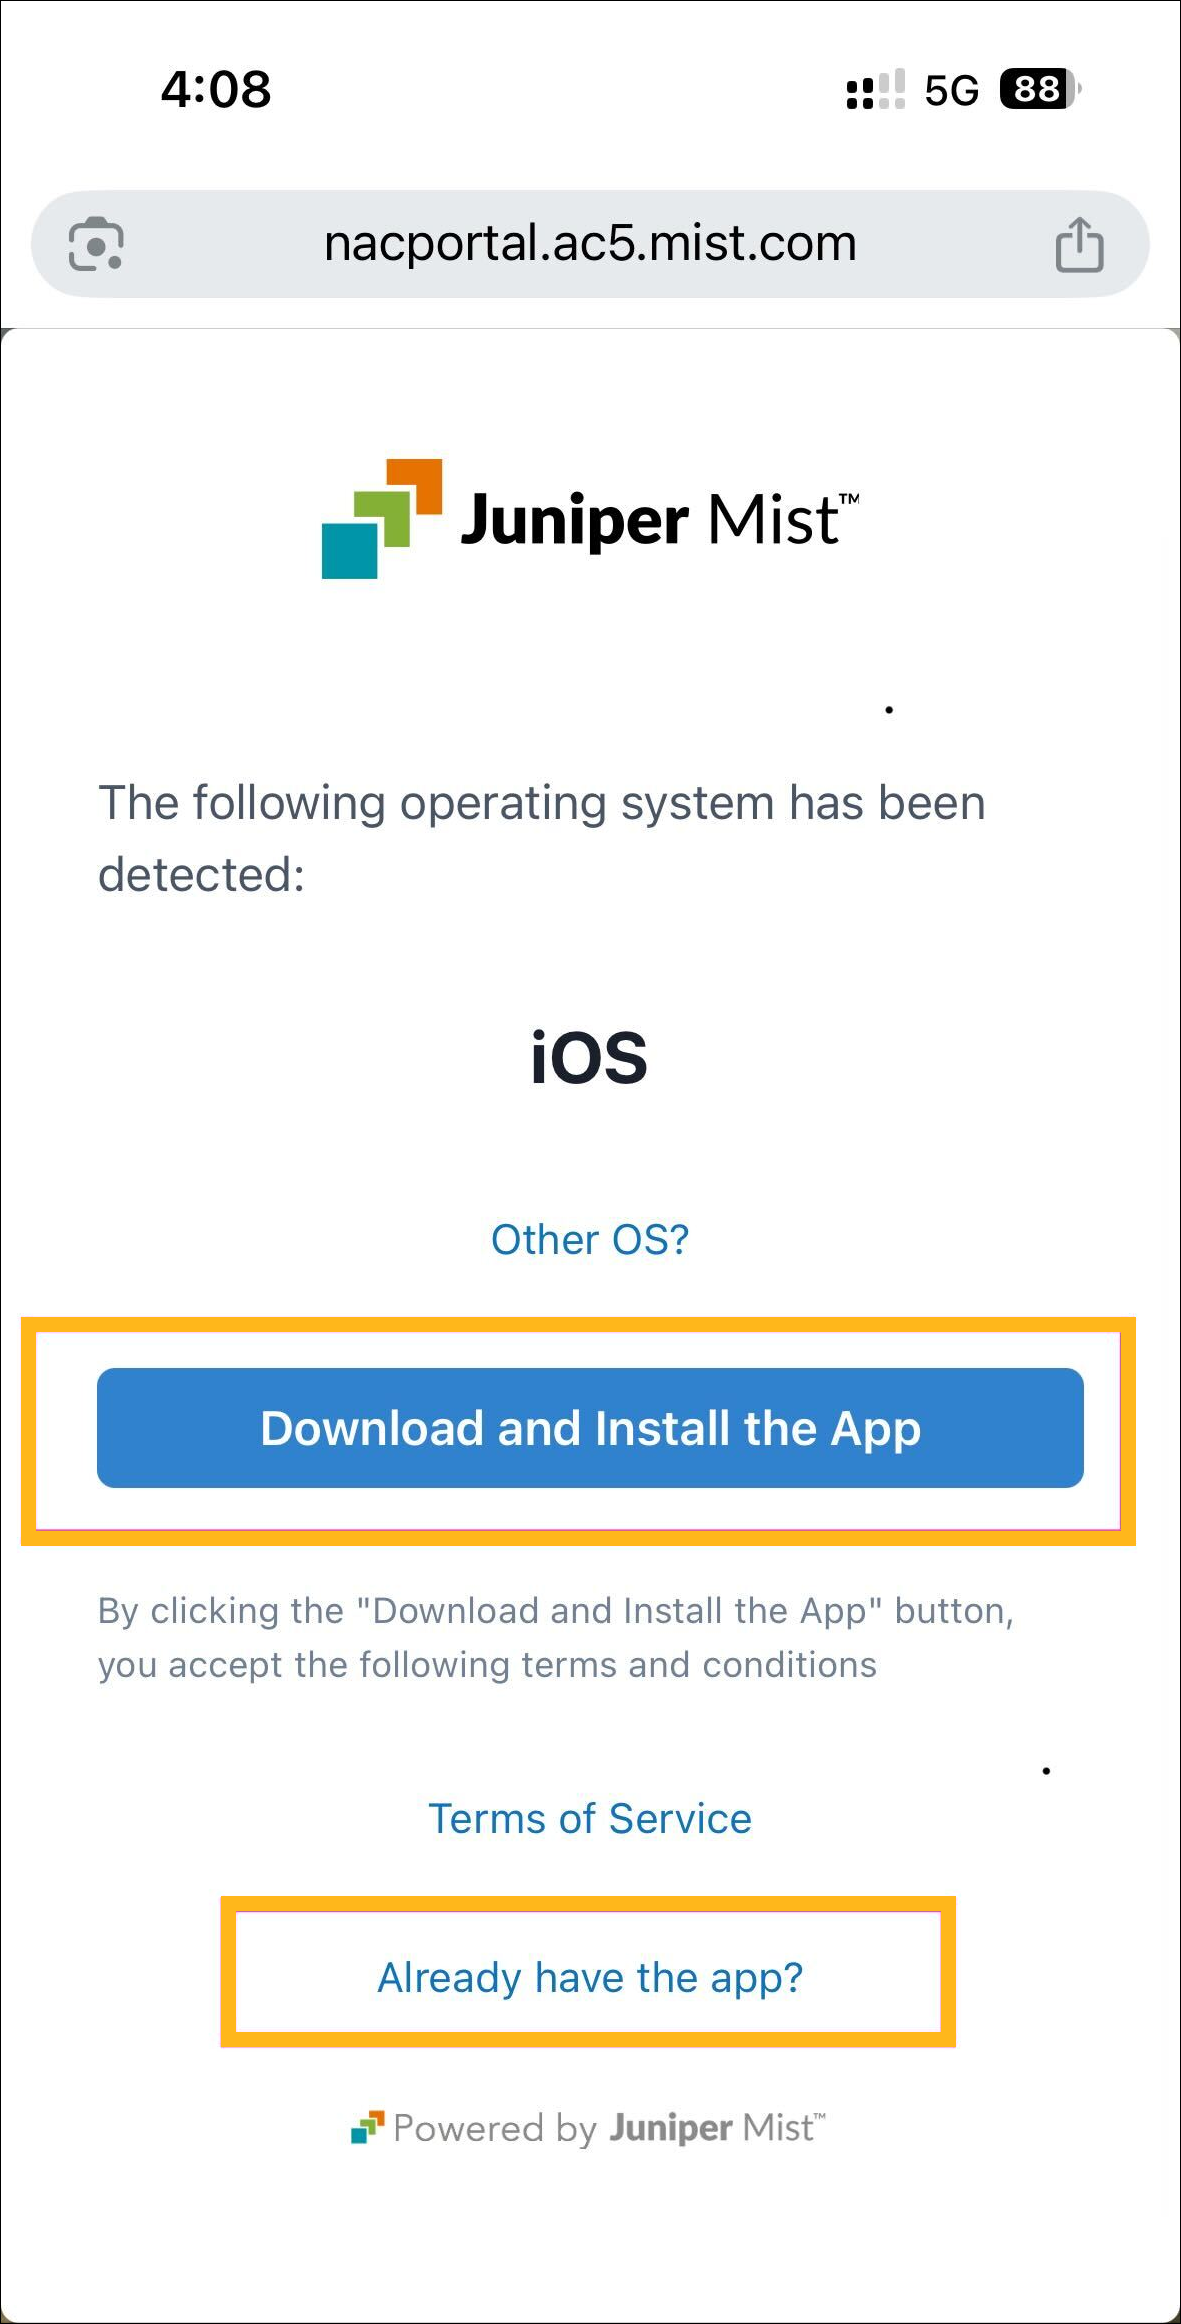
Click Download and Install App to install the Marvis client app.
If your device is running Windows or macOS, the app is downloaded automatically and you can install the app once the download process is complete.
For Android and iOS, you will be redirected to the Google or Apple Play Store to download the app.
After you install the Marvis client app (or if you have installed the app already), switch to the NAC portal page and click Already have the app? to install the profile.
You will be redirected to the Marvis client app to install the Wi-Fi profile.
Click Install.
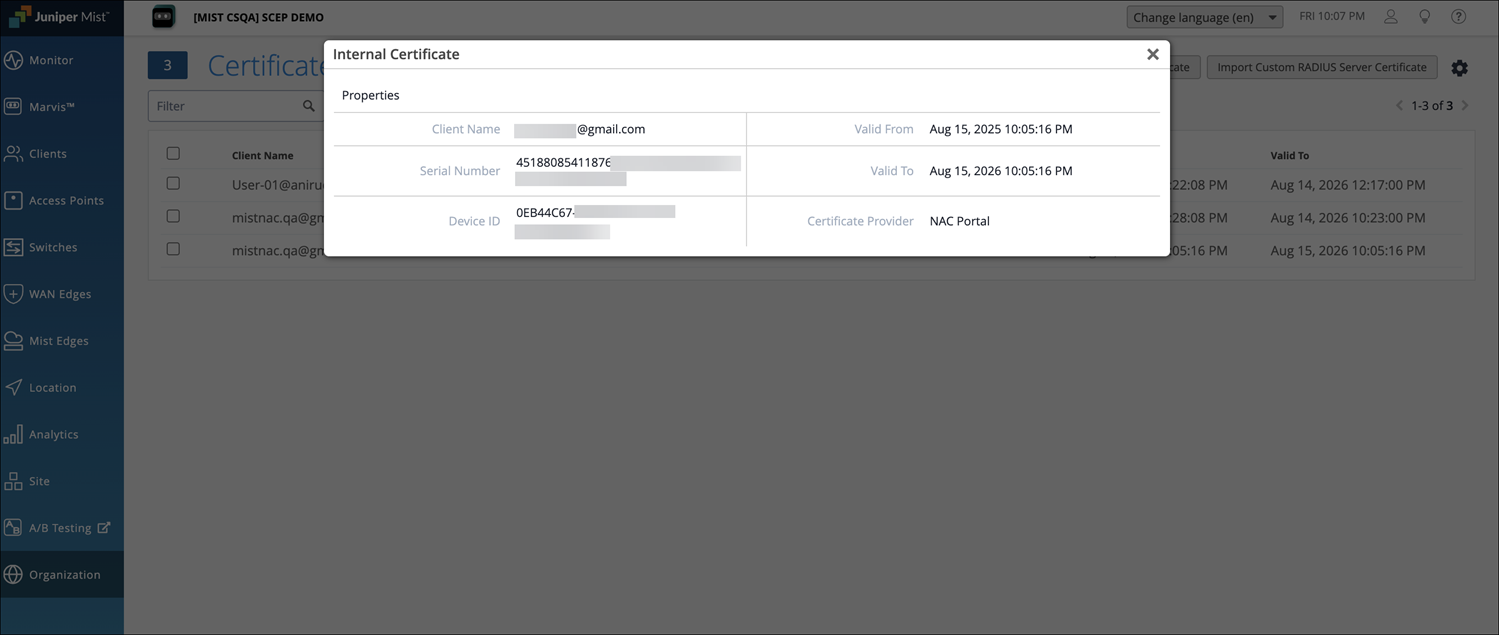
On the Juniper Mist portal, open the Certificates page and verify the client-issued certificate details under the Internal section.
Verify Client Connectivity to the Network
Verify that the device connects to the Access Assurance network through the client certificate provisioned through the Marvis client app.
From the left menu of the Juniper Mist portal, select Organization> Access>Auth Policies and configure the required authentication policy rules for the device.
Connect the device to the network and confirm successful authentication.
Navigate to the Monitor>Service Levels>Insights page and go to the Client Events section. Verify the NAC Client authentication events.