Integrate Google Workspace as an Identity Provider
Follow these steps to add Mist as a client in your Google Workspace portal, download your certificate, and add your Identity Provider to your Juniper Mist organization.
Juniper Mist Access Assurance allows you to integrate with Google Workspace as Identity Provider (IdP) to leverage secure Lightweight Directory Access Protocol over SSL (LDAPS) connector for the following use cases:
- For certificate-based (EAP-TLS or
EAP-TTLS)
authorization:
- Retrieves user group membership information to support authentication policies based on this user identity
- Gets the status—active or suspended—of an user account
-
EAP-TTLS with PAP
- Checks the username and password for authentication with Google’s Identity Provider
Some of the screenshots included in this document are sourced from third-party applications. Be aware that these screenshots may change over time and may not always match the current version of the applications.
Configuration on Google Workspace
The following procedure shows you how to configure Google Workspace as an identity provider (IdP) with Juniper Mist.
The screenshots from third-party applications are correct at the time of publishing. We have no way to know when or if the screenshots will be accurate at any future time. Please refer to the third-party website for guidance about changes to these screens or the workflows involved.
-
Create an LDAP
client.
-
From the Google Admin console, on the left-navigation bar, go to
Apps > LDAP and click Add
Client.
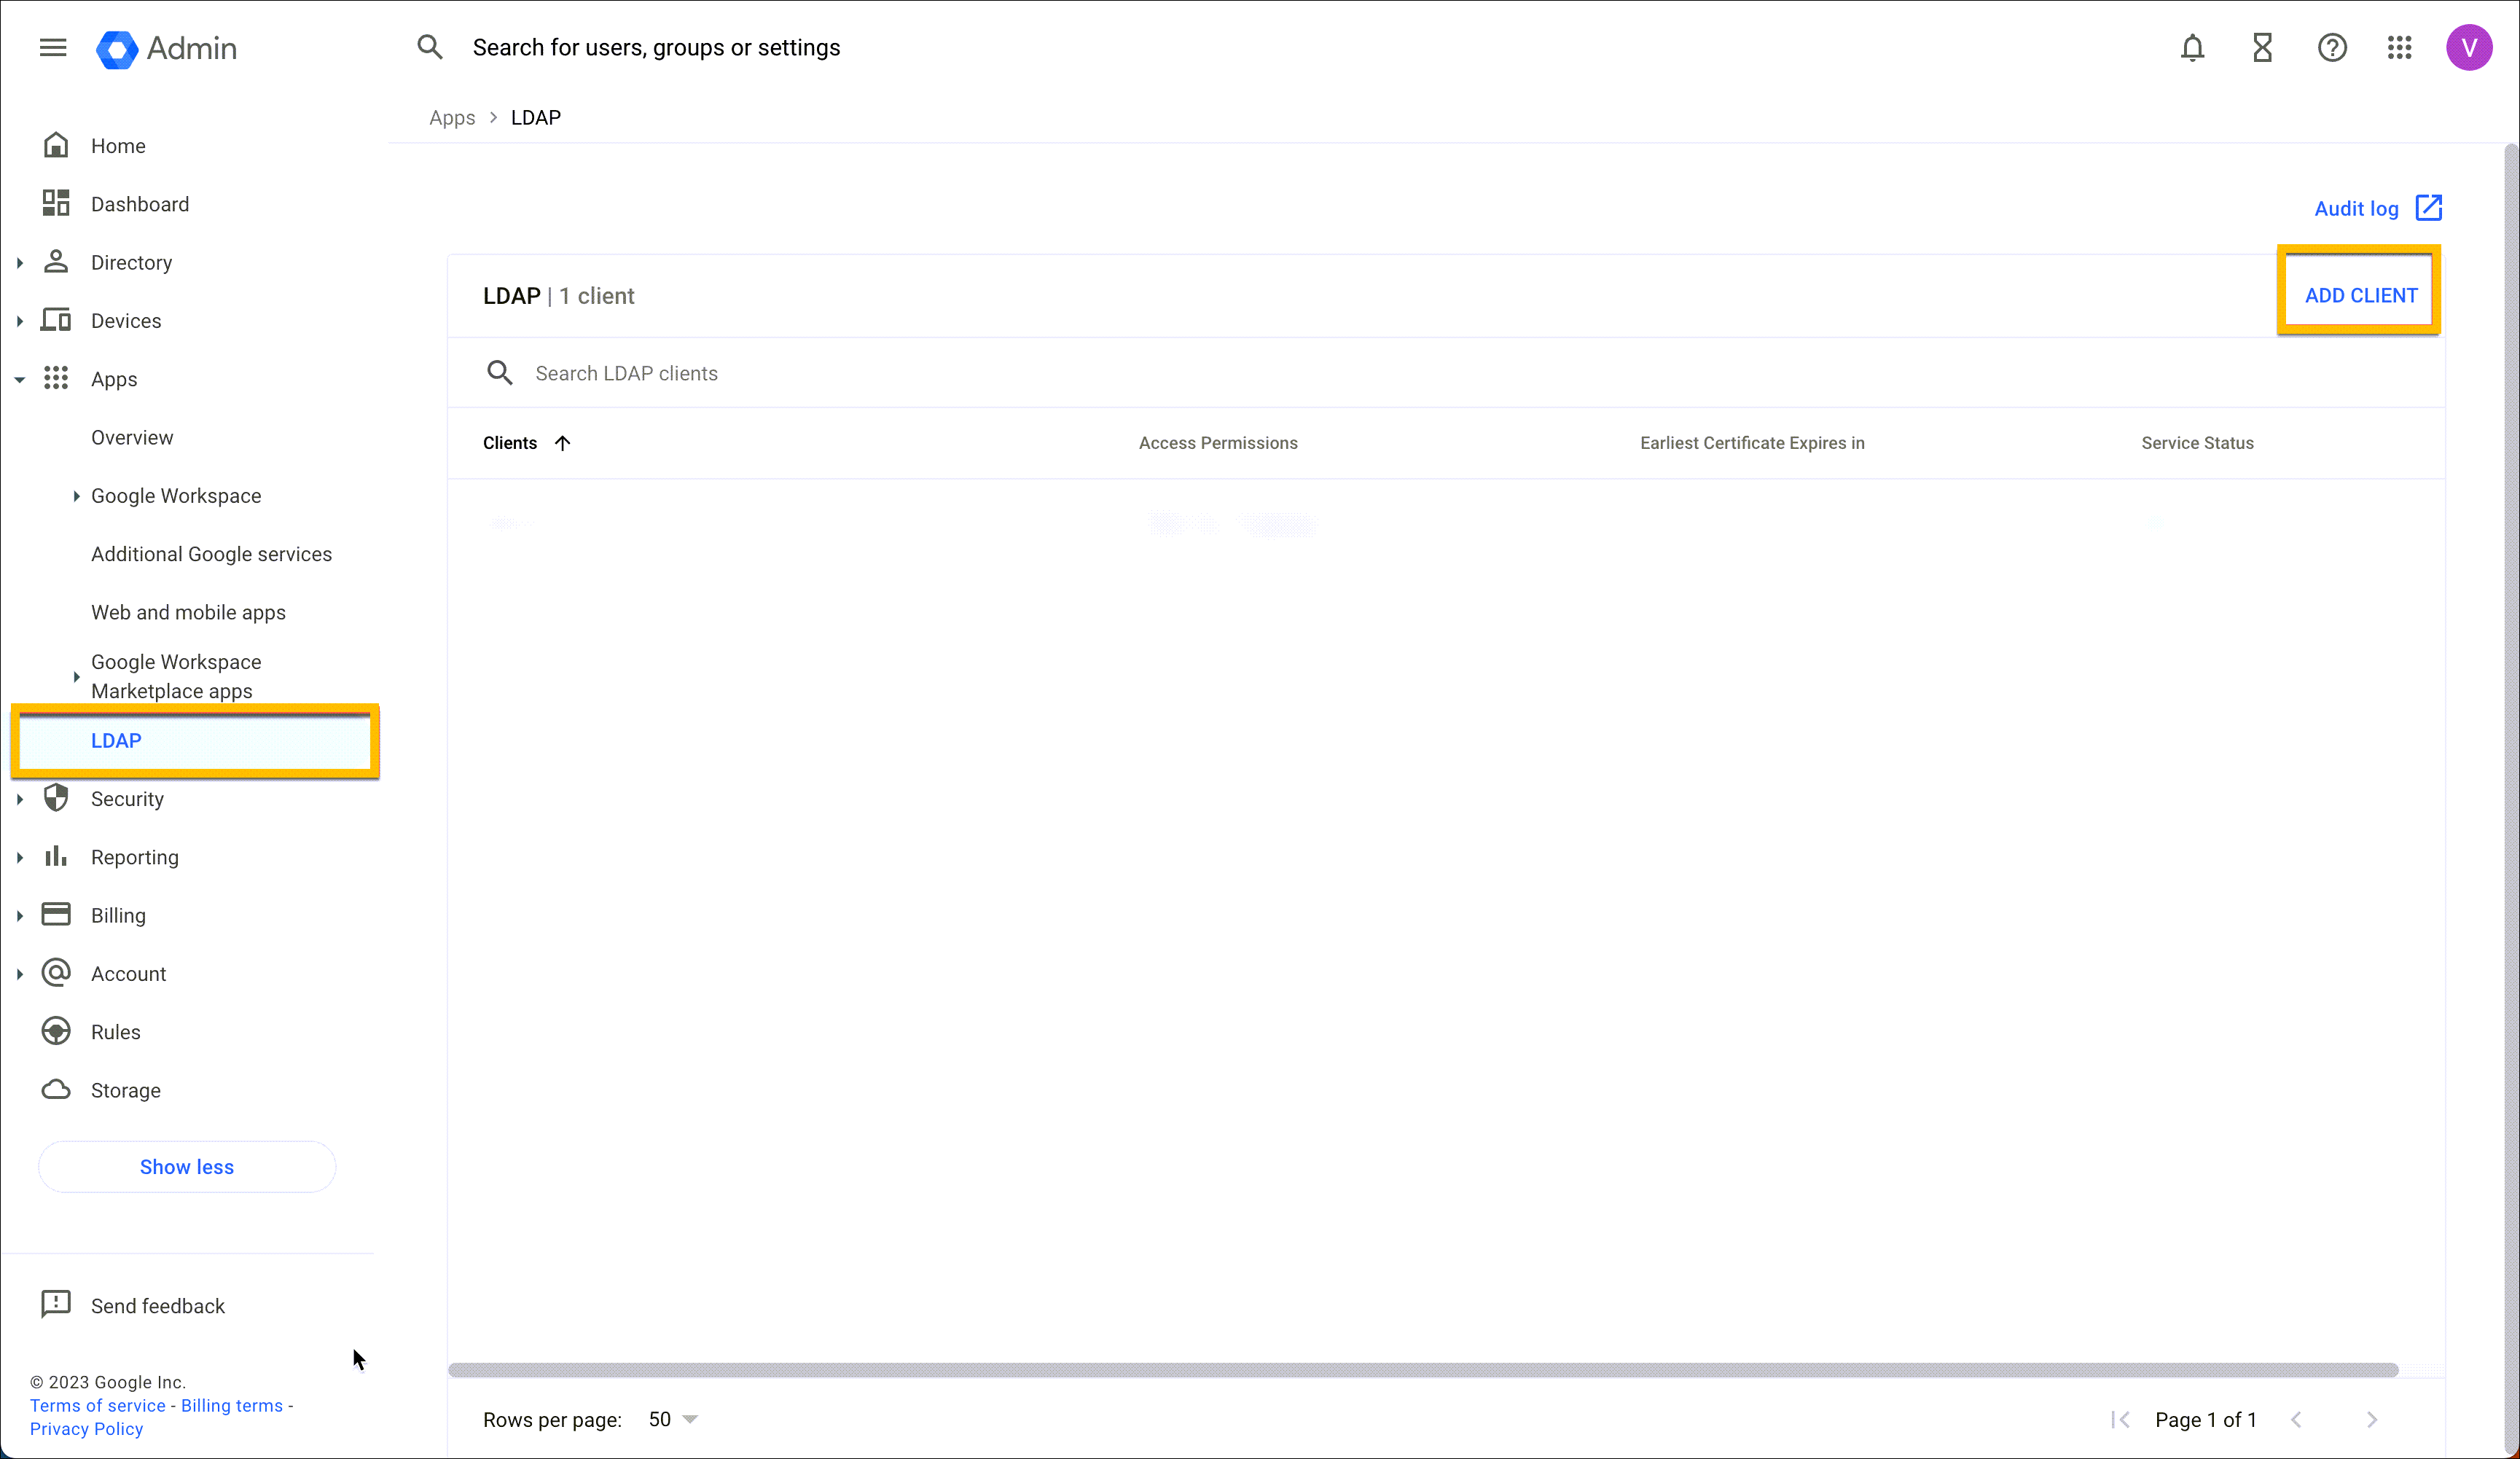
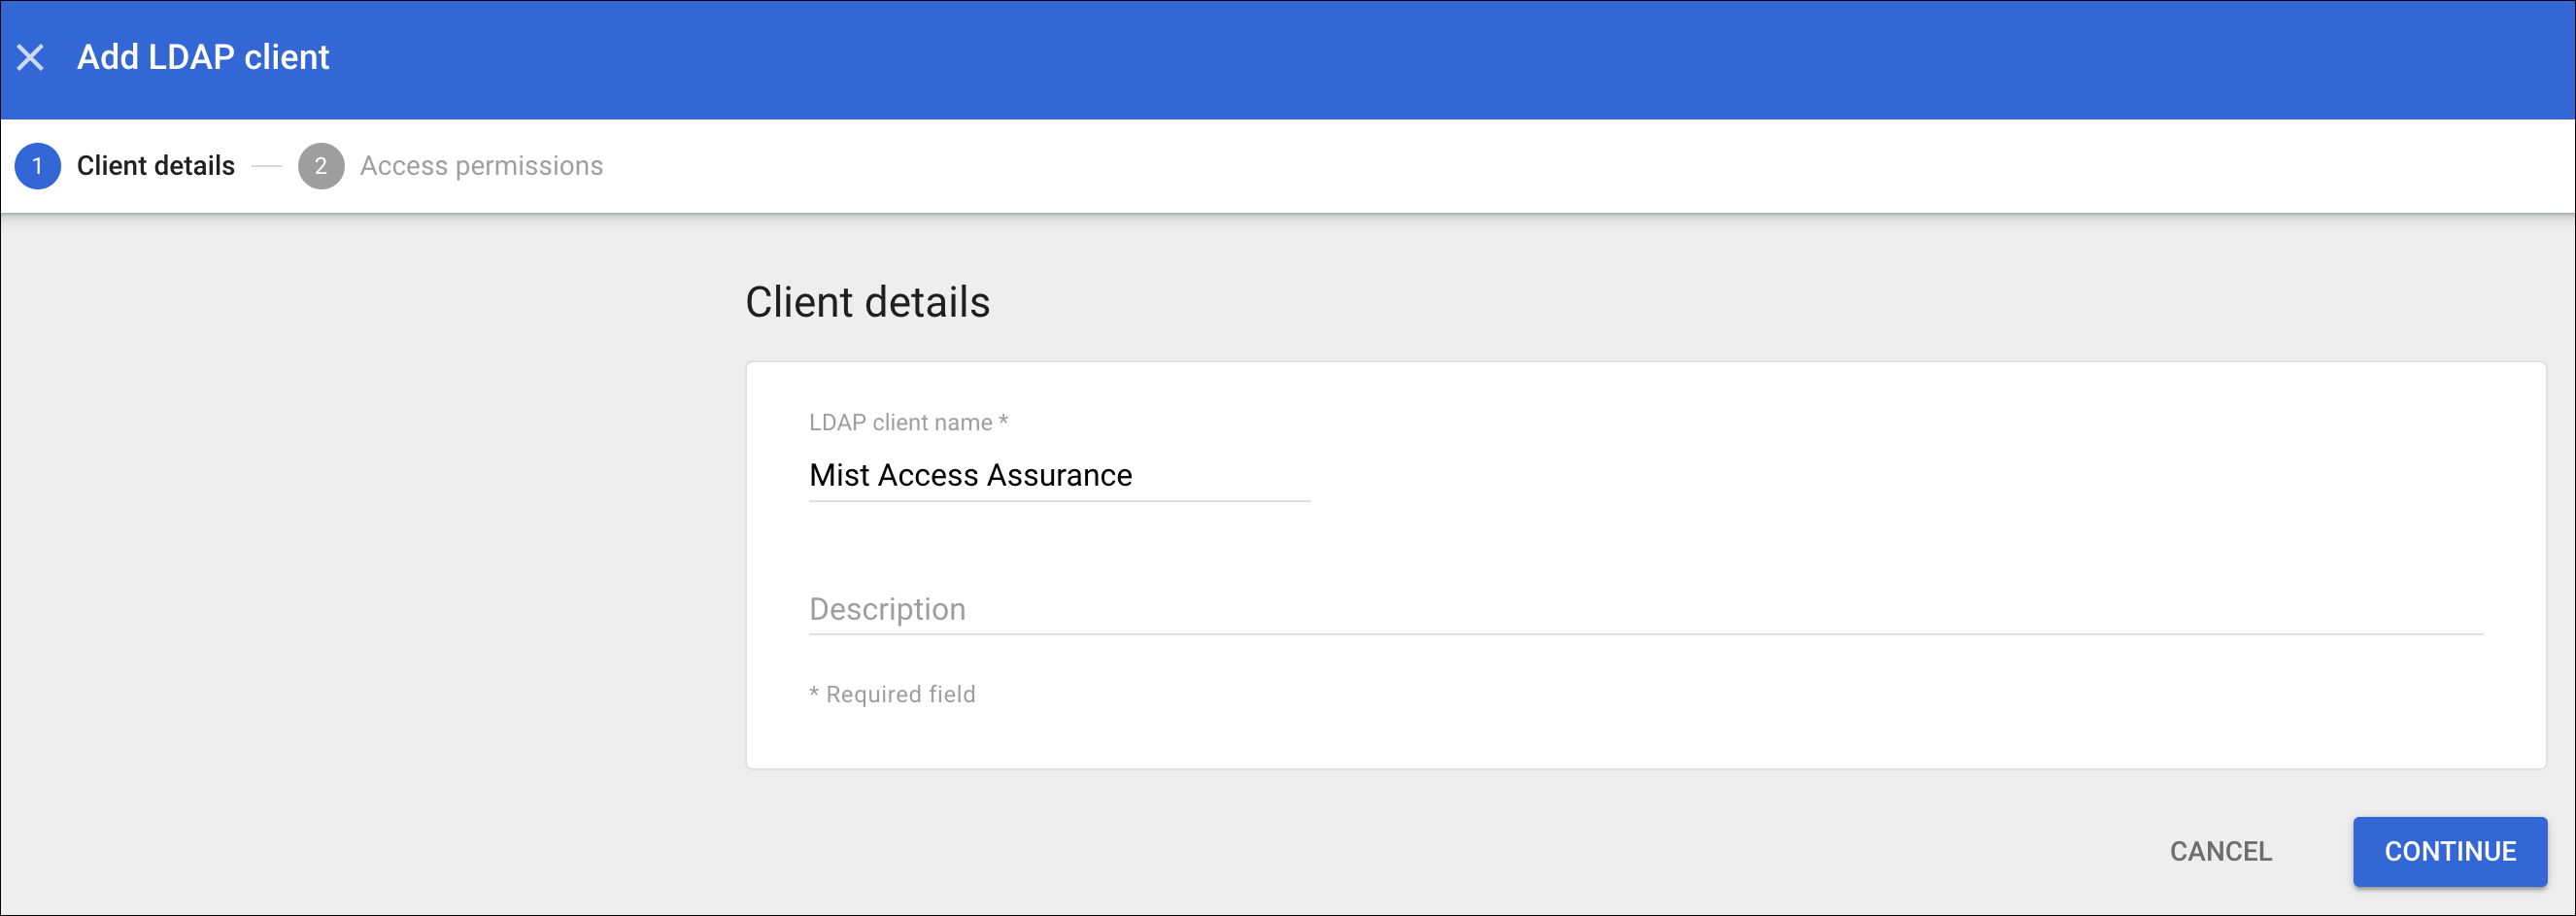
-
Provide an LDAP client name and an optional
Description and click
Continue.
The Access permissions page is displayed after adding the LDAP client.
-
From the Google Admin console, on the left-navigation bar, go to
Apps > LDAP and click Add
Client.
-
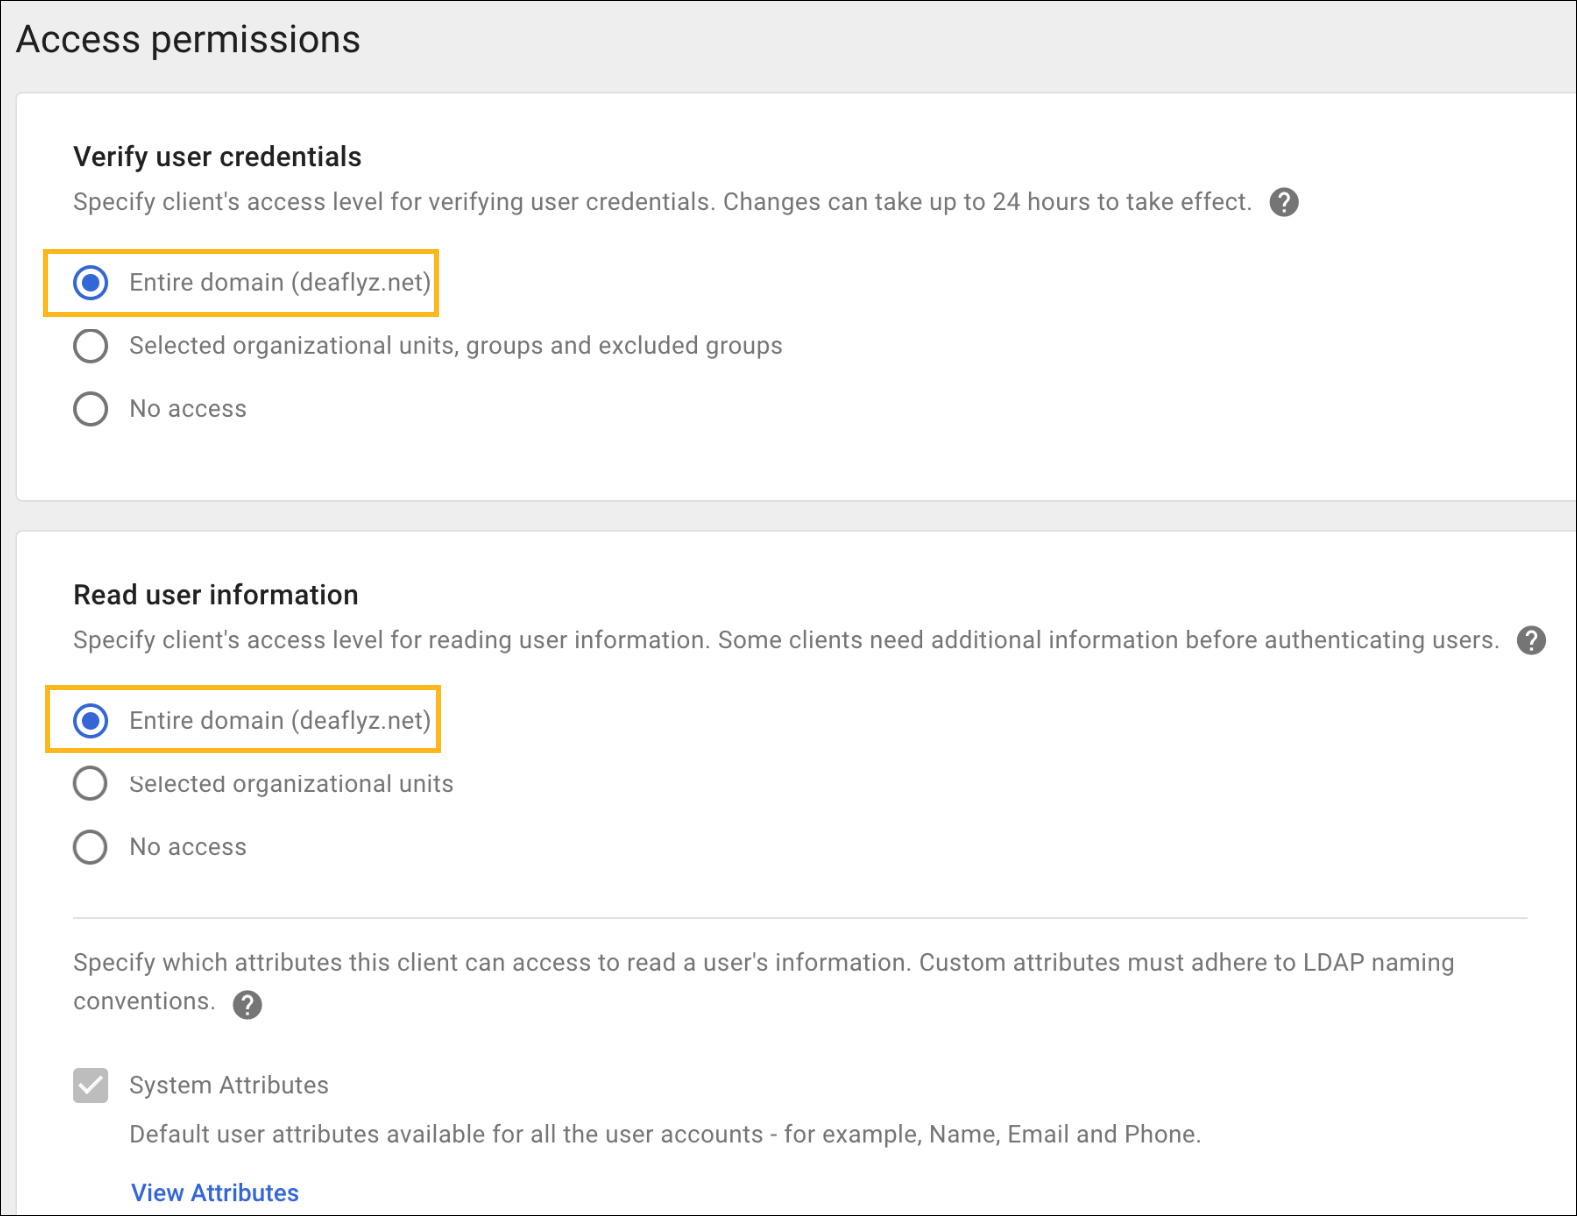
Configure Access Permission for verifying user
credentials.
The following options are available:
- Verify user credentials—Allows user credential authentication using EAP-TTLS/PAP. This setting specifies which organizational groups the LDAP client can access to verify the user’s credentials.
- Read user Information—Allows you to read basic user information. This setting specifies which organizational units and groups the LDAP client can access to retrieve additional user information.
-
Select
Entire domain for both the options if no
specific organization is
required.
-
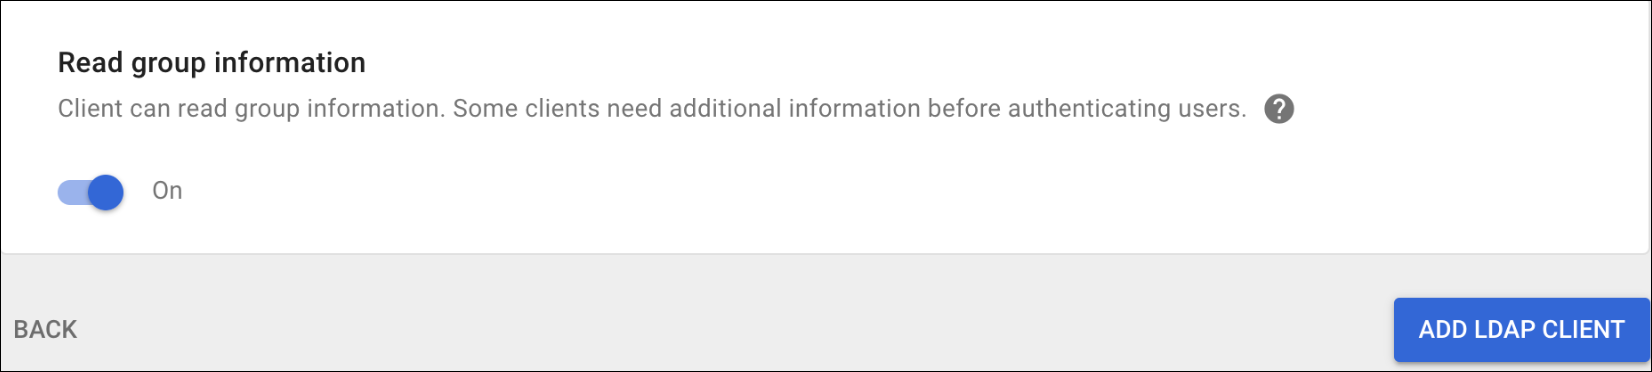
Scroll
down to Read group
information.
This setting
specifies whether the LDAP client can read group details and check a
user’s group
memberships.
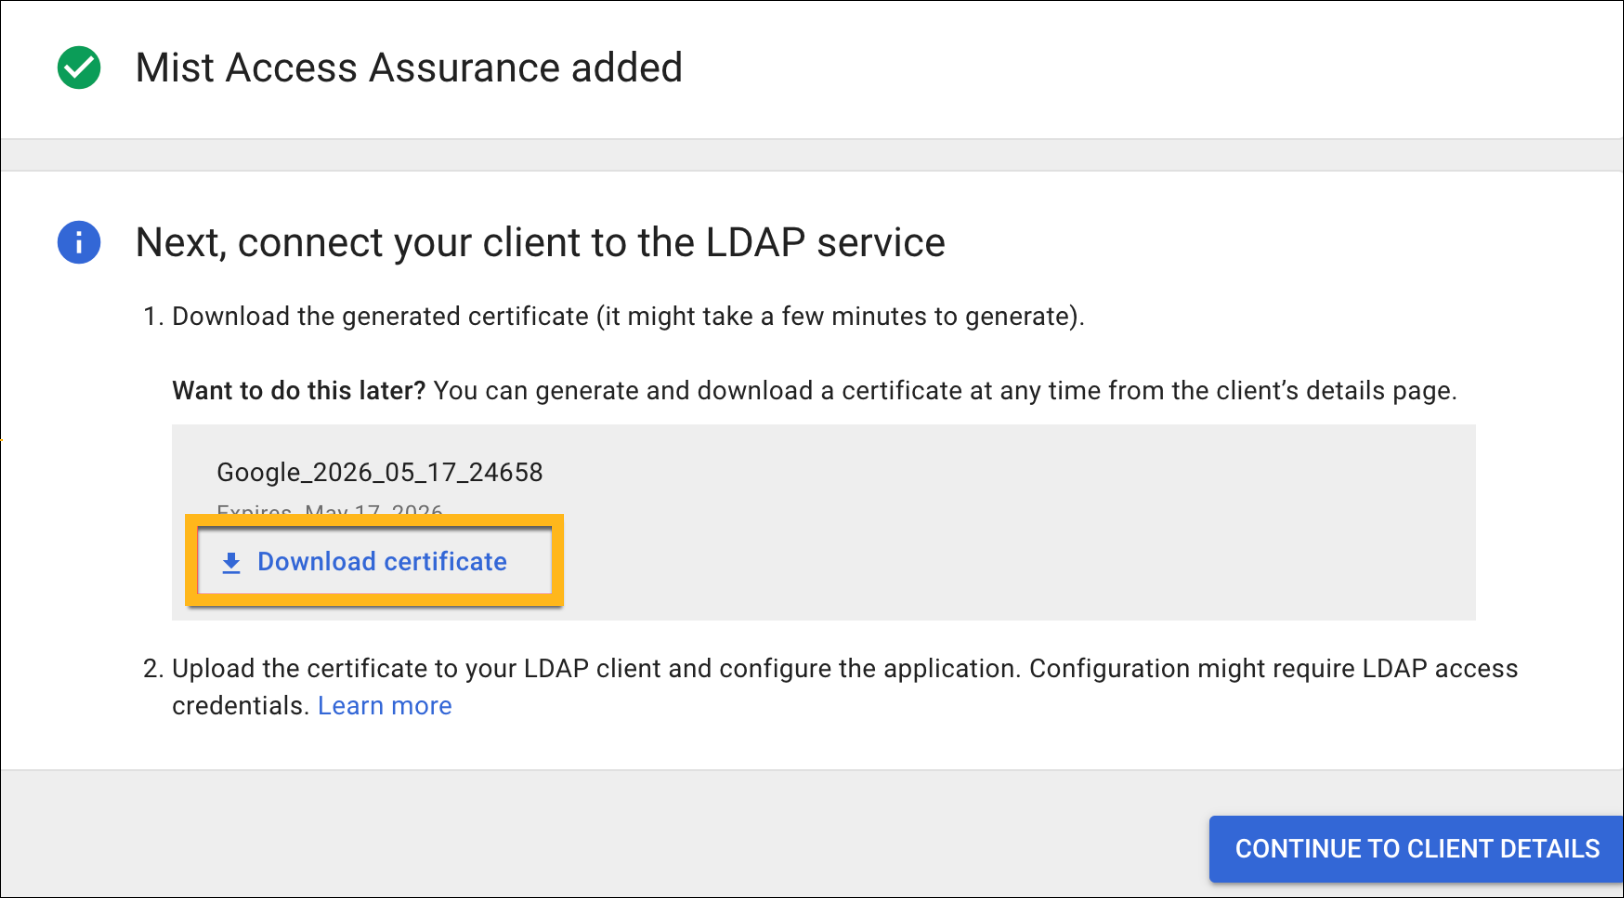
After you finish configuring access permissions and added LDAP client, the certificate is generated automatically on the same page.
-
Download the generated LDAPS client
certificate.
-
Click Download certificate and save the
downloaded certificate in a secure place. You'll need this
certificate when you set
up
an IdP
on
the
Juniper Mist portal.
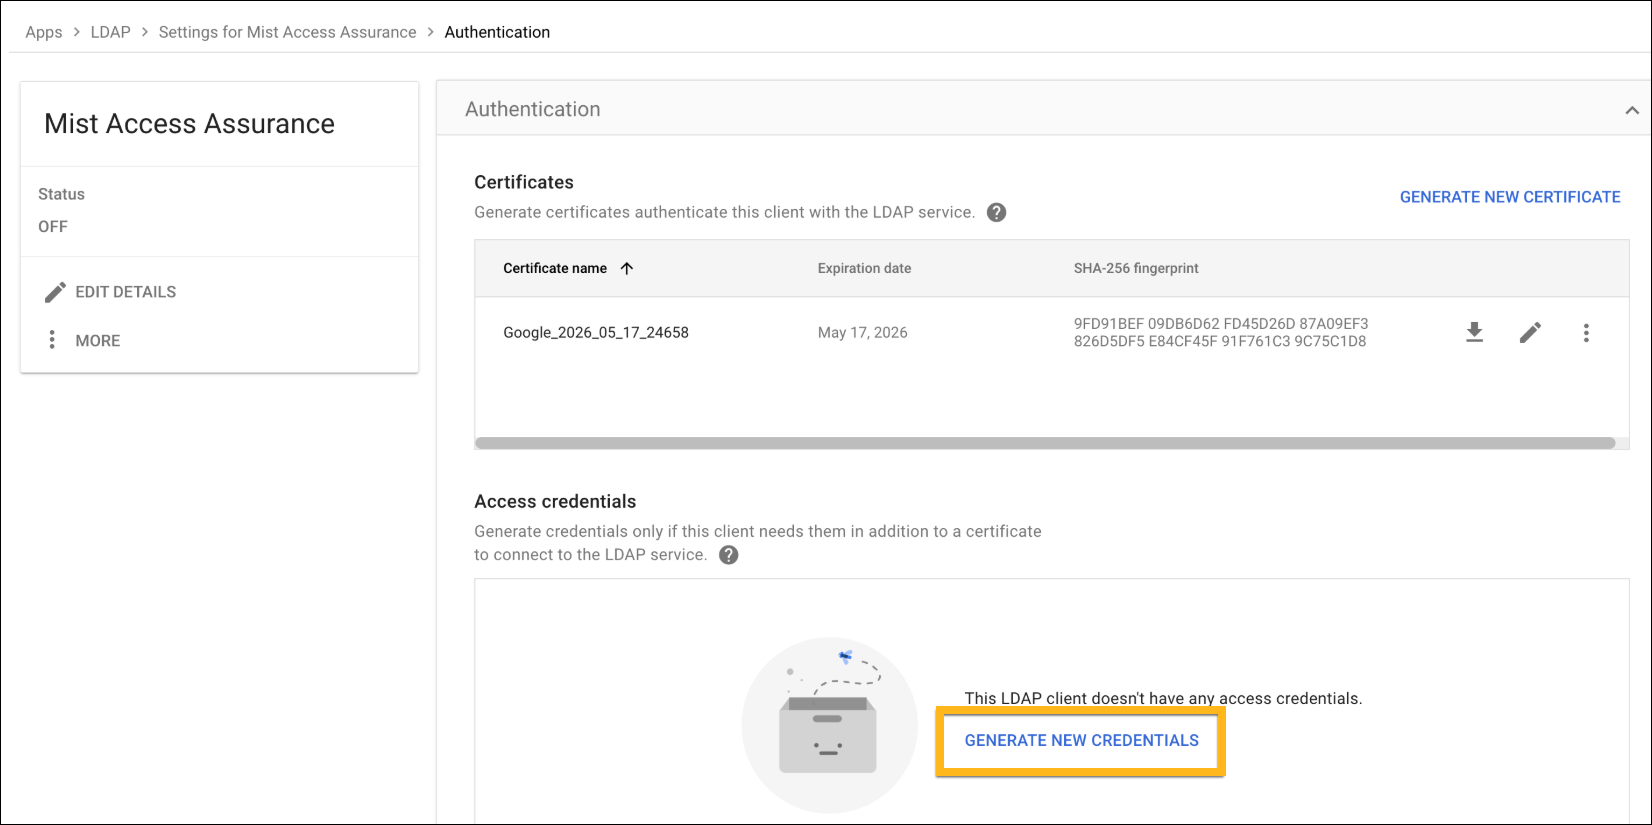
-
Expand the Authentication section.
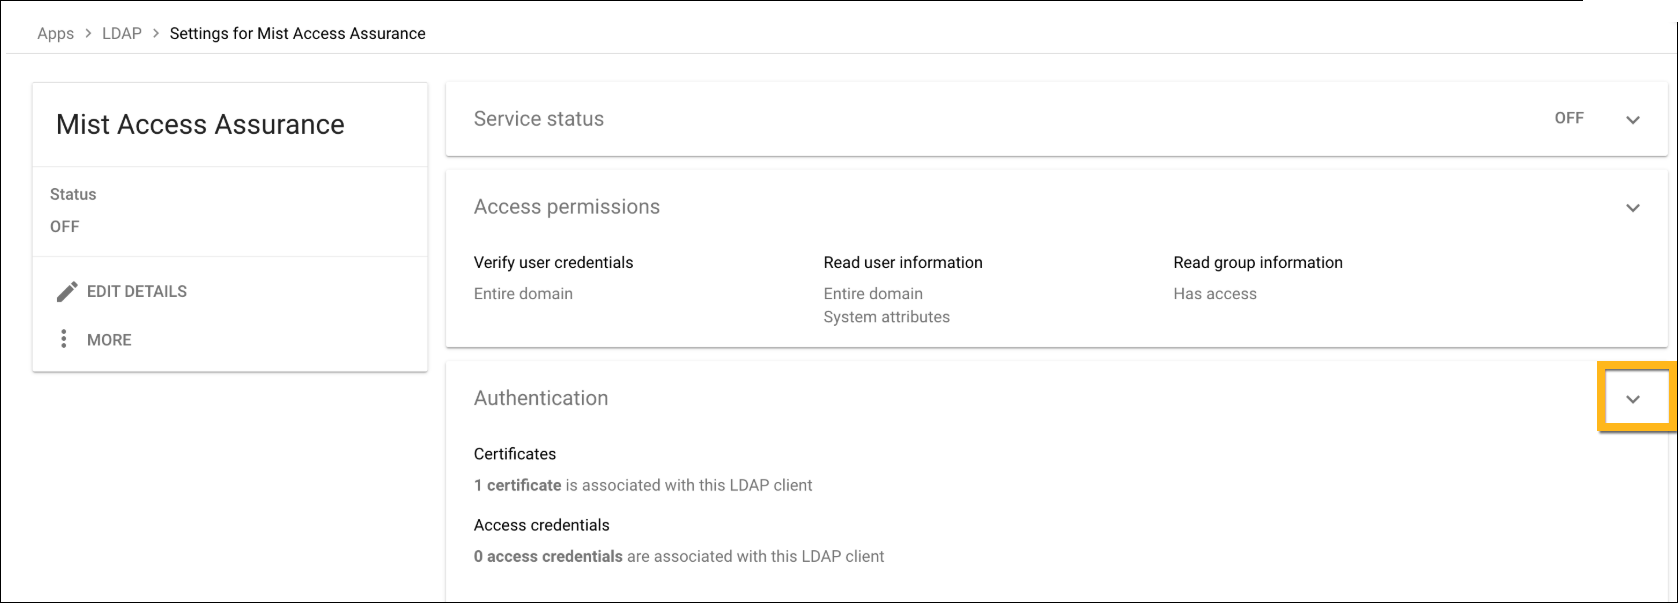
-
Under
Access
Credentials,
click Generate New Credentials.
You can view the username and password on the Access credentials page.
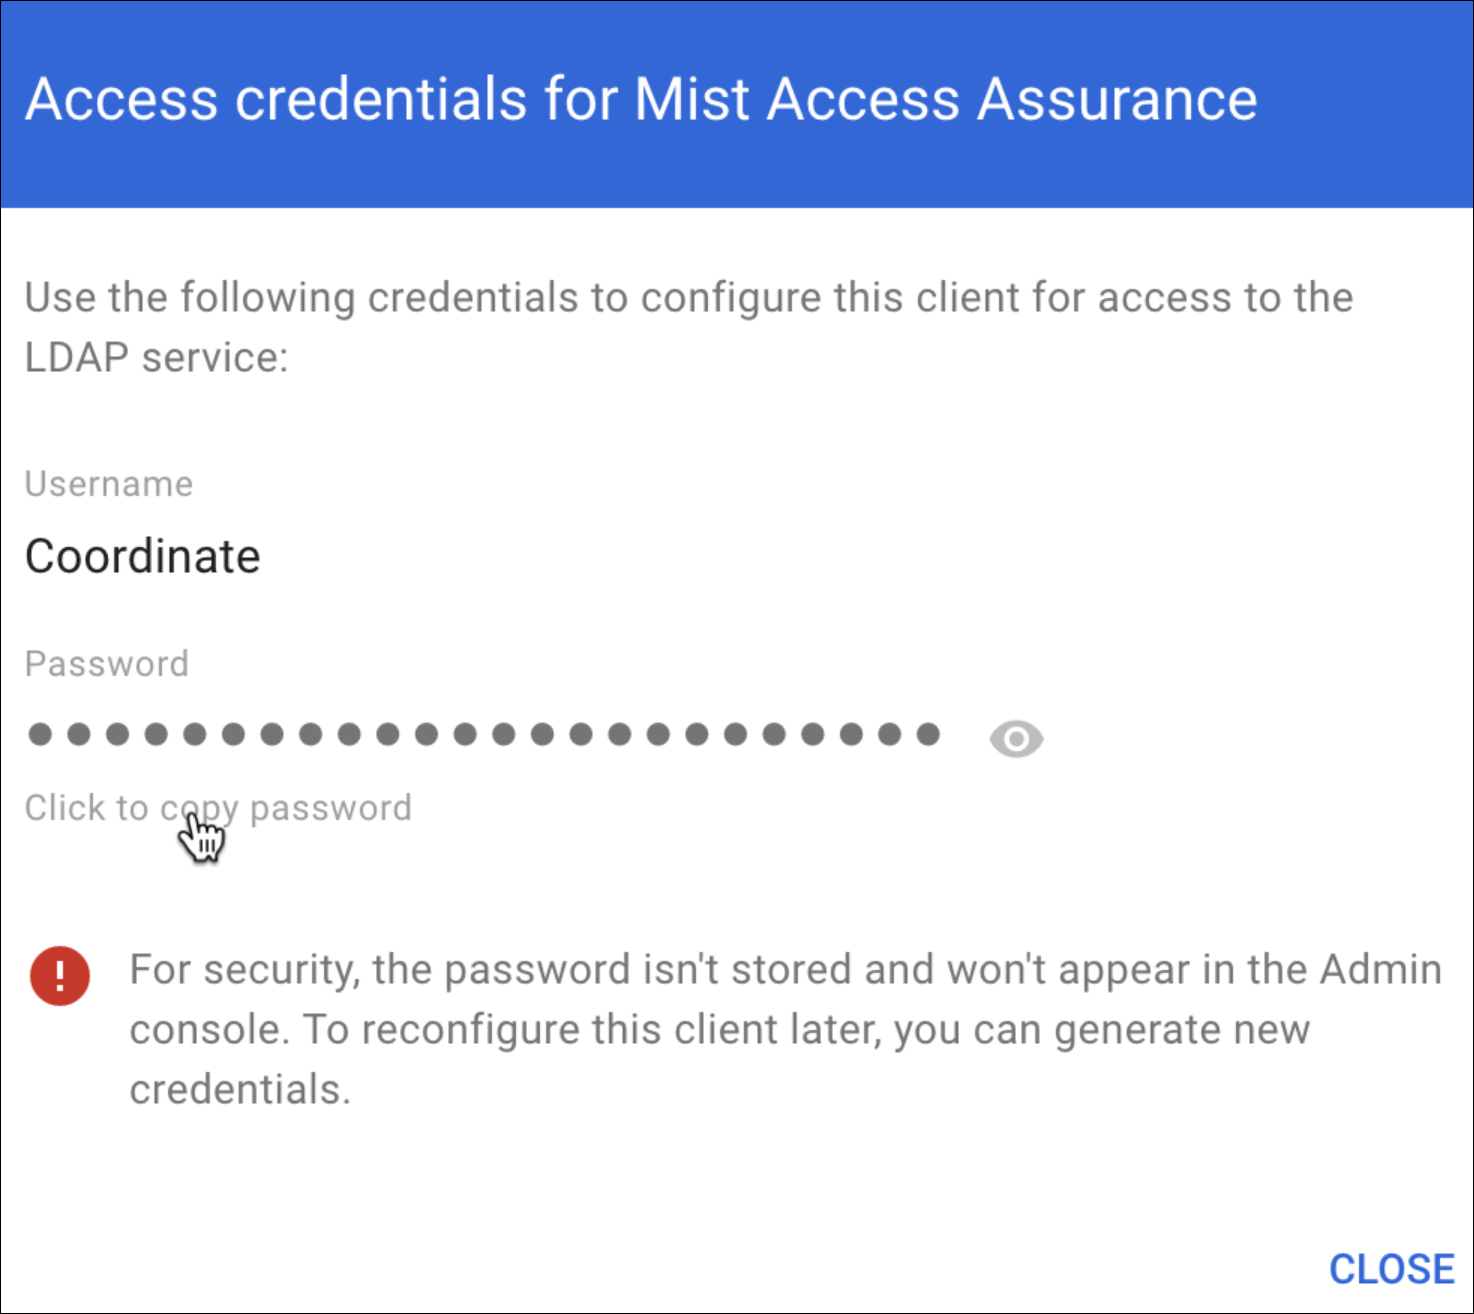
Copy and save the username and password. You need these details for the LDAPS client configuration on the Juniper Mist cloud portal.
-
Click Download certificate and save the
downloaded certificate in a secure place. You'll need this
certificate when you set
up
an IdP
on
the
Juniper Mist portal.
-
Enable
the
LDAP client service by changing the service status to
On for the LDAP
client.
This step
enables
you to set up a client with the Secure LDAP
service.
-
From the Google Admin console, go to Apps >
LDAP.
Select your client and click
Service
Status.
The service status, displayed at the top right of the page, is initially set as OFF.
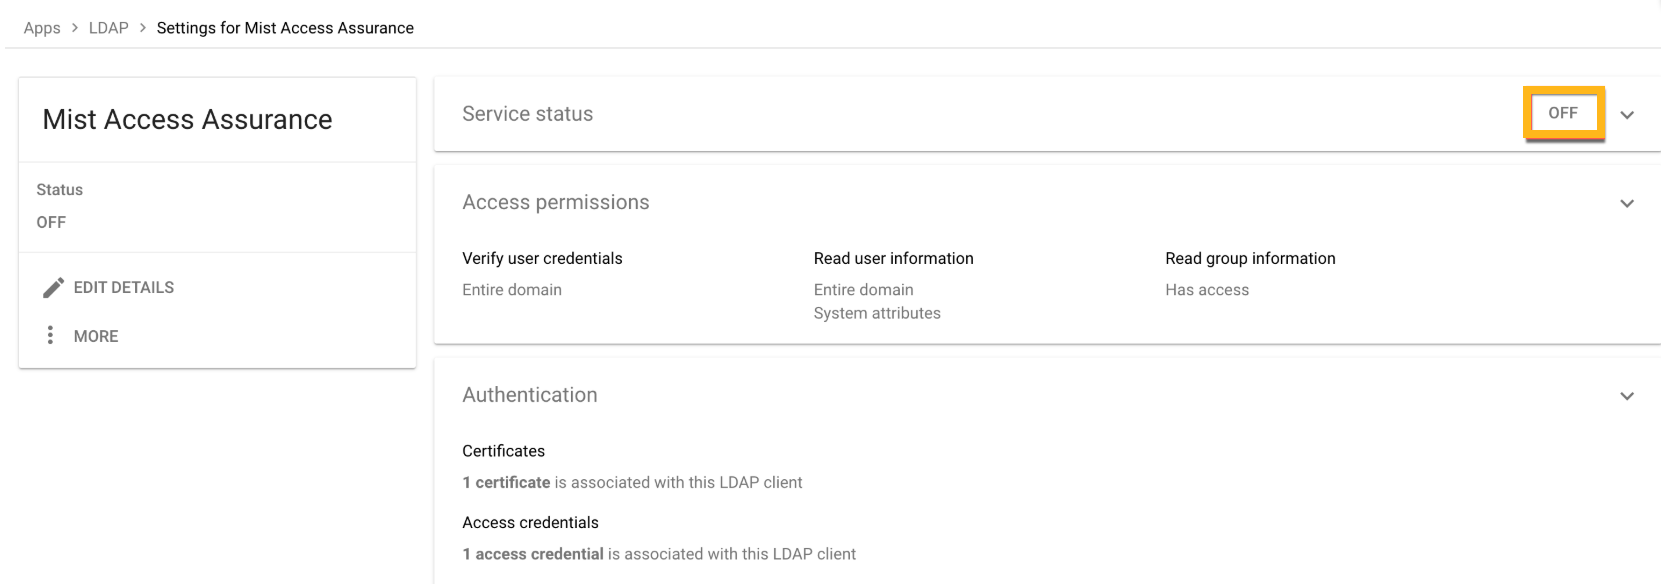
Select On for everyone to turn on the service. Allow some time for the changes to apply on the Google side.

-
From the Google Admin console, go to Apps >
LDAP.
Select your client and click
Service
Status.
Configuration on Juniper Mist Dashboard
-
From the left menu of the Juniper Mist portal, select
Organization > Access
> Identity
Providers.
The Identity Providers page displays any configured identity providers.
Figure 1: Identity Providers Page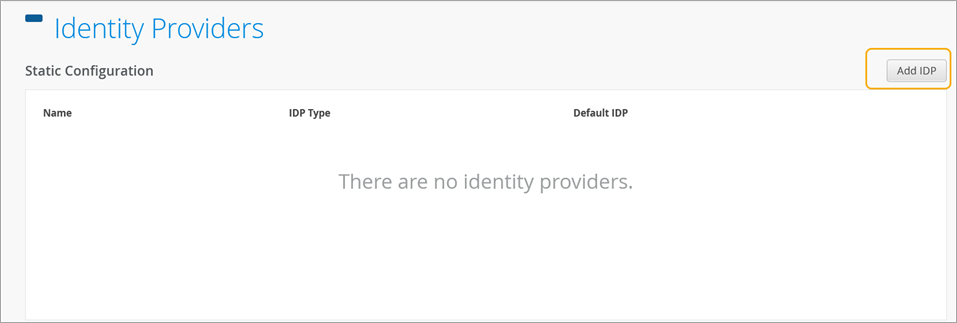
-
On the New Identity Provider page, enter the
required information to
integrate
with Google
Workspace.
Figure 2: Update Identity Provider Details
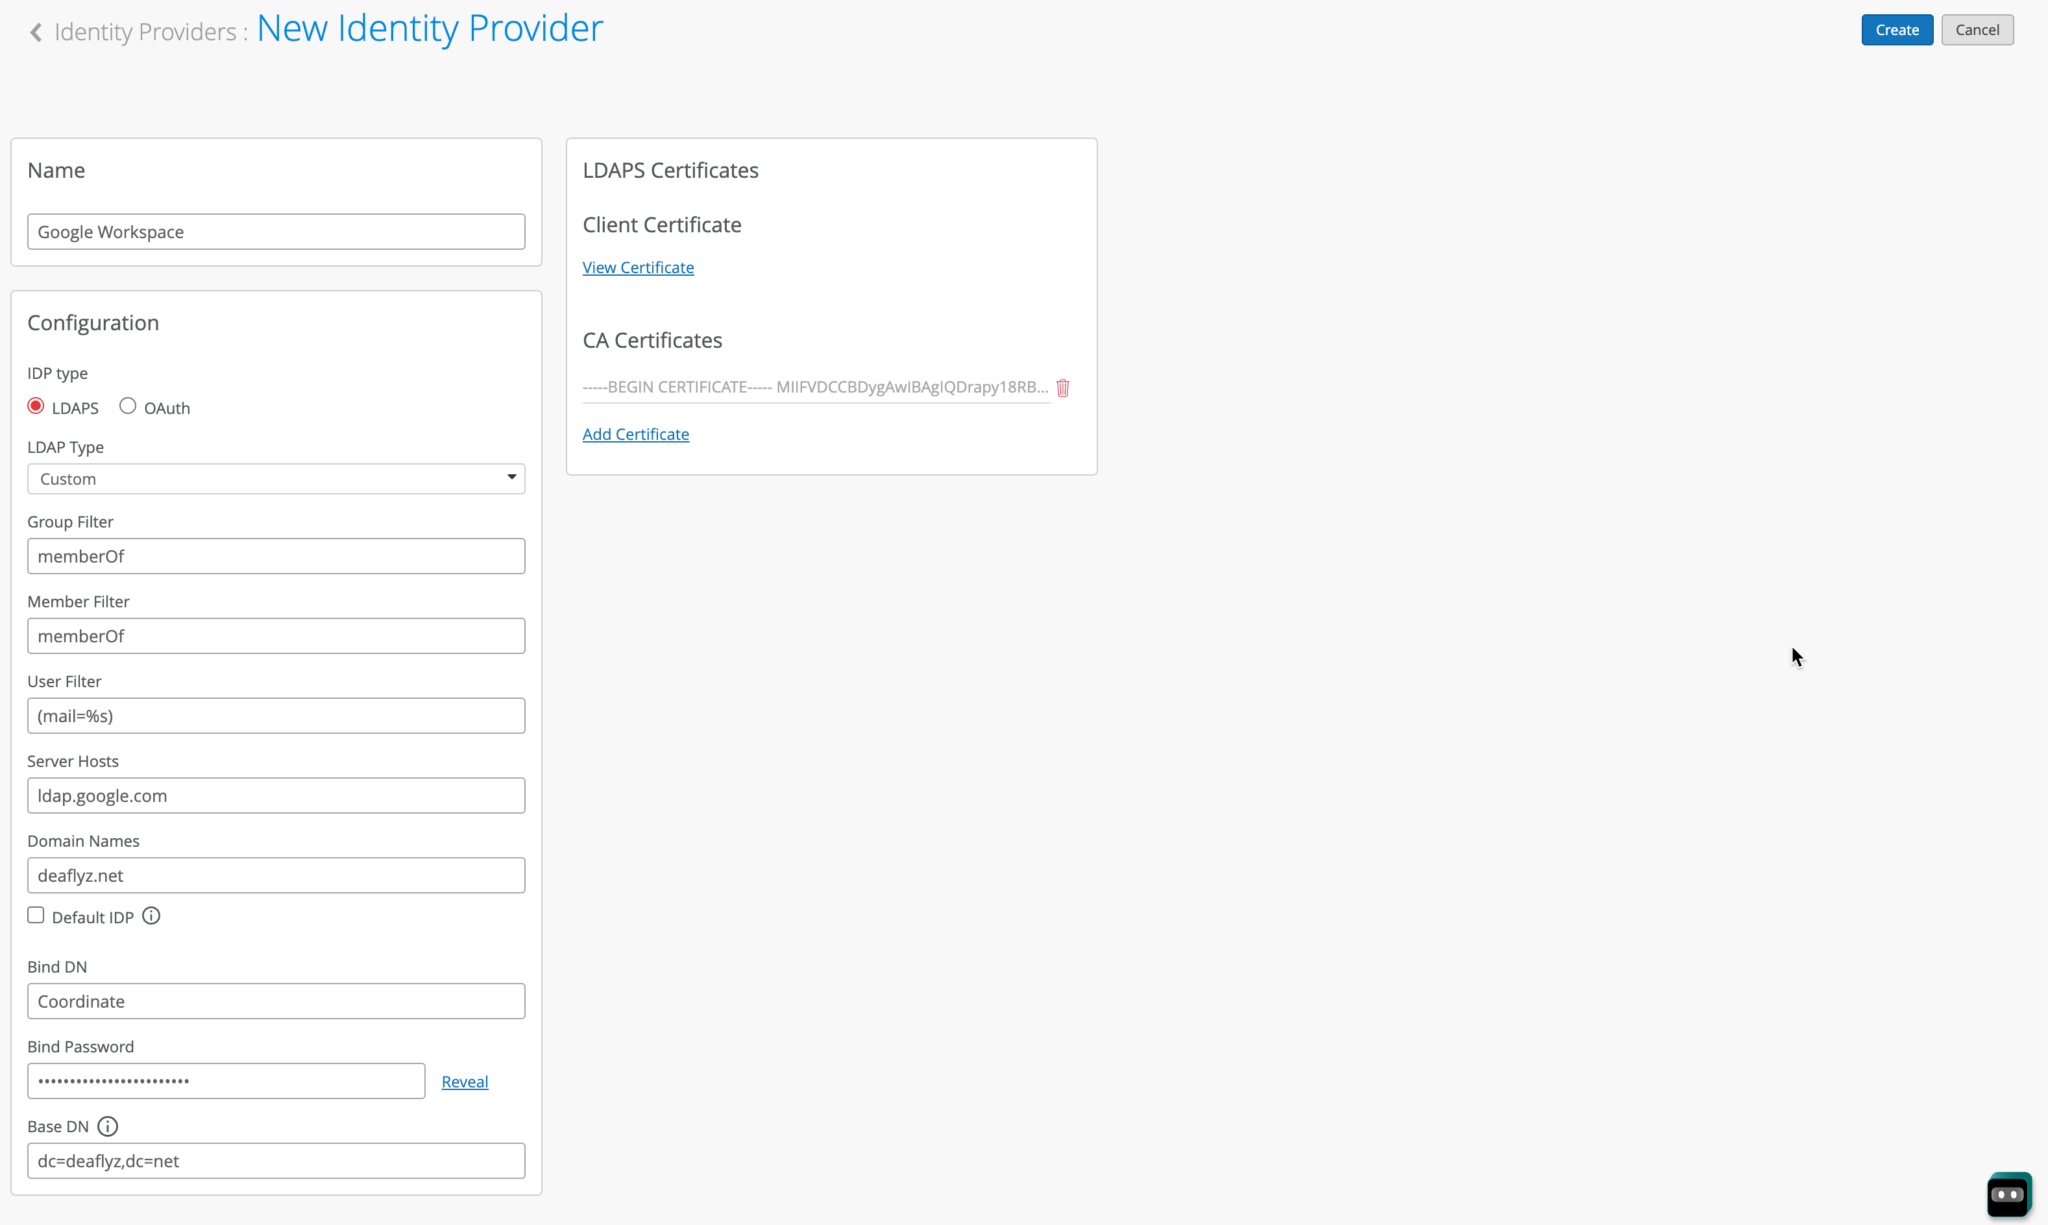
Now configure the LDAPS connector to integrate with the Google Workspace LDAP endpoint.
- Name—Enter an IdP name. (In this example, enter Google Workspace.)
- IDP Type—Select LDAPS.
- LDAP Type—Select Custom.
- Group Filter—Select memberOf. This option is required to obtain group memberships from Group attribute.
- Member Filter—Select memberOf.
- User Filter—Enter (mail=%s).
- Server Hosts—Enter ldap.google.com.
- Domain Names—Enter your Google Workspace domain name. For example: abc.com.
- Bind DN—Use the username provided by Google in the previous step.
- Bind Password—Enter the password for the above username.
- Base DN—Configure your base dn matching your Google Workspace domain. For example, if your domain is abc.com, then your base DN is dc=abc,dc=com.
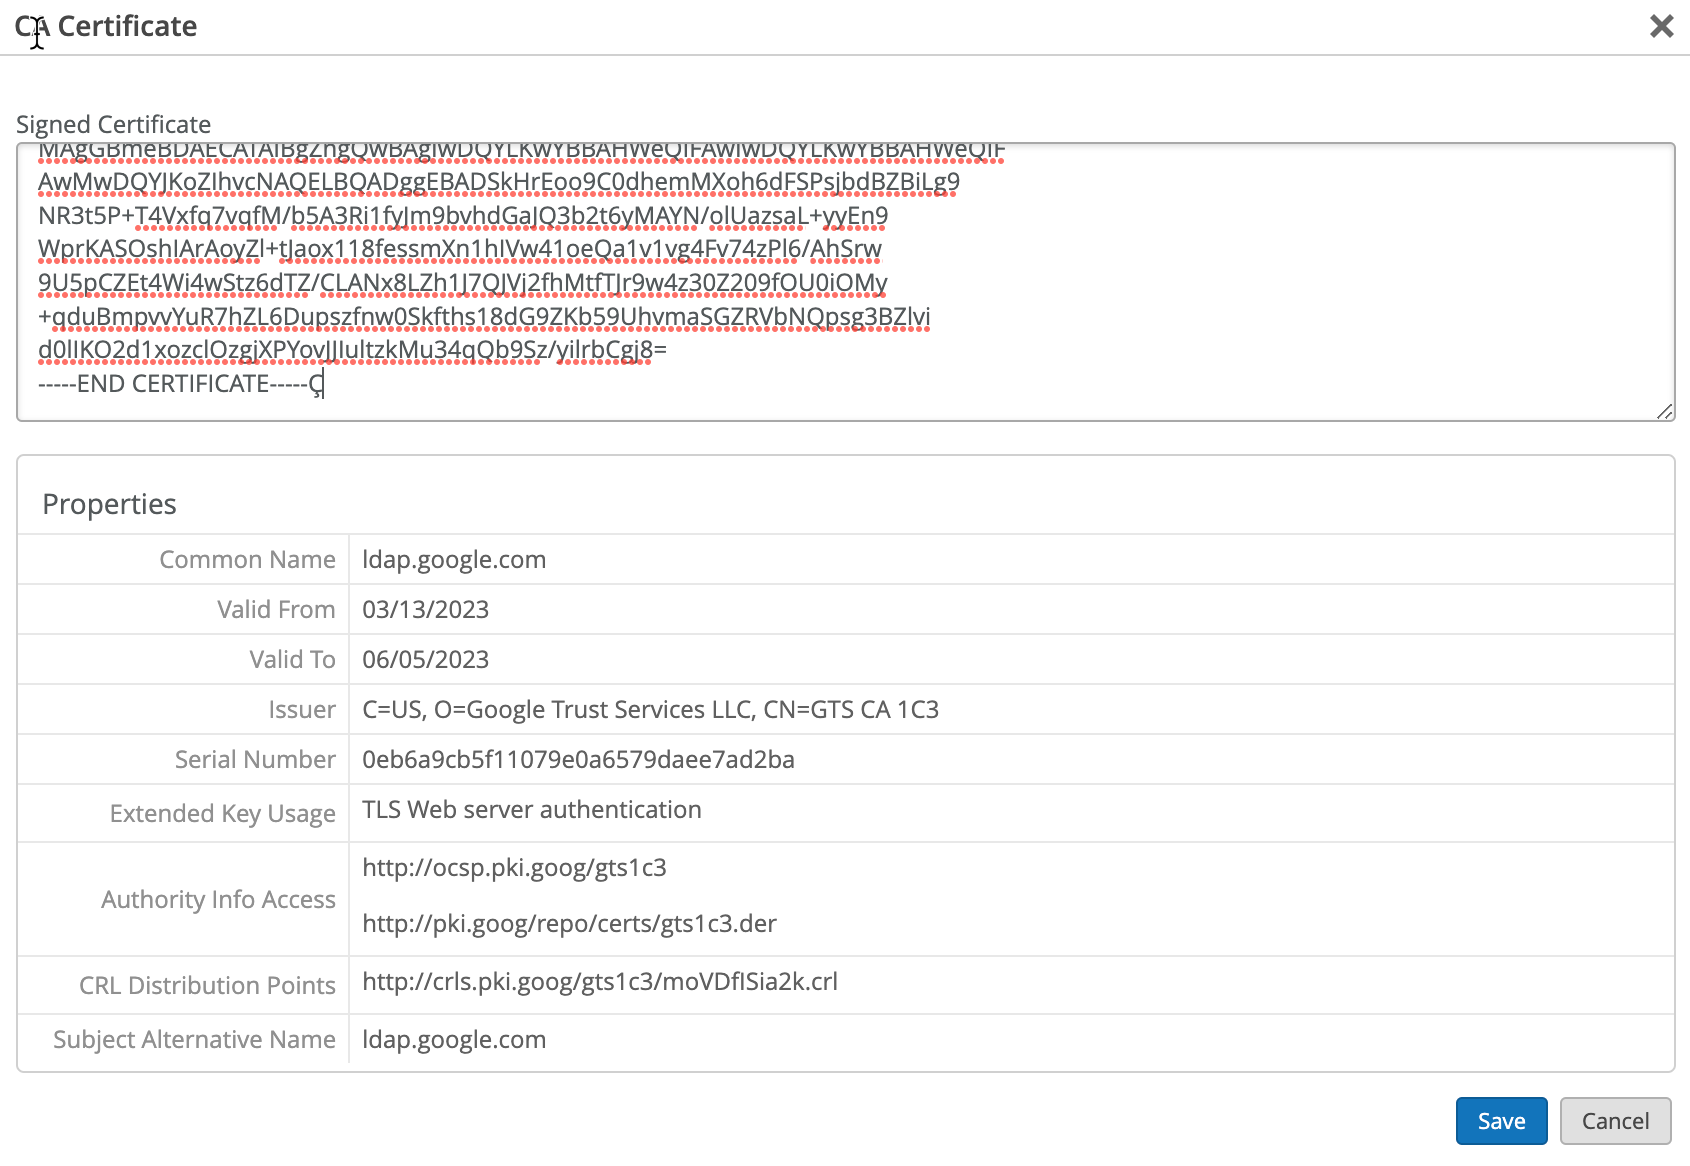
-
In
the
CA
Certificates
section, click
Add
Certificate and paste the following two certificates:
Figure 3: Add CA Certificate
-----BEGIN CERTIFICATE-----
MIIFljCCA36gAwIBAgINAgO8U1lrNMcY9QFQZjANBgkqhkiG9w0BAQsFADBHMQsw
CQYDVQQGEwJVUzEiMCAGA1UEChMZR29vZ2xlIFRydXN0IFNlcnZpY2VzIExMQzEU
MBIGA1UEAxMLR1RTIFJvb3QgUjEwHhcNMjAwODEzMDAwMDQyWhcNMjcwOTMwMDAw
MDQyWjBGMQswCQYDVQQGEwJVUzEiMCAGA1UEChMZR29vZ2xlIFRydXN0IFNlcnZp
Y2VzIExMQzETMBEGA1UEAxMKR1RTIENBIDFDMzCCASIwDQYJKoZIhvcNAQEBBQAD
ggEPADCCAQoCggEBAPWI3+dijB43+DdCkH9sh9D7ZYIl/ejLa6T/belaI+KZ9hzp
kgOZE3wJCor6QtZeViSqejOEH9Hpabu5dOxXTGZok3c3VVP+ORBNtzS7XyV3NzsX
lOo85Z3VvMO0Q+sup0fvsEQRY9i0QYXdQTBIkxu/t/bgRQIh4JZCF8/ZK2VWNAcm
BA2o/X3KLu/qSHw3TT8An4Pf73WELnlXXPxXbhqW//yMmqaZviXZf5YsBvcRKgKA
gOtjGDxQSYflispfGStZloEAoPtR28p3CwvJlk/vcEnHXG0g/Zm0tOLKLnf9LdwL
tmsTDIwZKxeWmLnwi/agJ7u2441Rj72ux5uxiZ0CAwEAAaOCAYAwggF8MA4GA1Ud
DwEB/wQEAwIBhjAdBgNVHSUEFjAUBggrBgEFBQcDAQYIKwYBBQUHAwIwEgYDVR0T
AQH/BAgwBgEB/wIBADAdBgNVHQ4EFgQUinR/r4XN7pXNPZzQ4kYU83E1HScwHwYD
VR0jBBgwFoAU5K8rJnEaK0gnhS9SZizv8IkTcT4waAYIKwYBBQUHAQEEXDBaMCYG
CCsGAQUFBzABhhpodHRwOi8vb2NzcC5wa2kuZ29vZy9ndHNyMTAwBggrBgEFBQcw
AoYkaHR0cDovL3BraS5nb29nL3JlcG8vY2VydHMvZ3RzcjEuZGVyMDQGA1UdHwQt
MCswKaAnoCWGI2h0dHA6Ly9jcmwucGtpLmdvb2cvZ3RzcjEvZ3RzcjEuY3JsMFcG
A1UdIARQME4wOAYKKwYBBAHWeQIFAzAqMCgGCCsGAQUFBwIBFhxodHRwczovL3Br
aS5nb29nL3JlcG9zaXRvcnkvMAgGBmeBDAECATAIBgZngQwBAgIwDQYJKoZIhvcN
AQELBQADggIBAIl9rCBcDDy+mqhXlRu0rvqrpXJxtDaV/d9AEQNMwkYUuxQkq/BQ
cSLbrcRuf8/xam/IgxvYzolfh2yHuKkMo5uhYpSTld9brmYZCwKWnvy15xBpPnrL
RklfRuFBsdeYTWU0AIAaP0+fbH9JAIFTQaSSIYKCGvGjRFsqUBITTcFTNvNCCK9U
+o53UxtkOCcXCb1YyRt8OS1b887U7ZfbFAO/CVMkH8IMBHmYJvJh8VNS/UKMG2Yr
PxWhu//2m+OBmgEGcYk1KCTd4b3rGS3hSMs9WYNRtHTGnXzGsYZbr8w0xNPM1IER
lQCh9BIiAfq0g3GvjLeMcySsN1PCAJA/Ef5c7TaUEDu9Ka7ixzpiO2xj2YC/WXGs
Yye5TBeg2vZzFb8q3o/zpWwygTMD0IZRcZk0upONXbVRWPeyk+gB9lm+cZv9TSjO
z23HFtz30dZGm6fKa+l3D/2gthsjgx0QGtkJAITgRNOidSOzNIb2ILCkXhAd4FJG
AJ2xDx8hcFH1mt0G/FX0Kw4zd8NLQsLxdxP8c4CU6x+7Nz/OAipmsHMdMqUybDKw
juDEI/9bfU1lcKwrmz3O2+BtjjKAvpafkmO8l7tdufThcV4q5O8DIrGKZTqPwJNl
1IXNDw9bg1kWRxYtnCQ6yICmJhSFm/Y3m6xv+cXDBlHz4n/FsRC6UfTd
-----END CERTIFICATE-----
-----BEGIN CERTIFICATE-----
MIIFYjCCBEqgAwIBAgIQd70NbNs2+RrqIQ/E8FjTDTANBgkqhkiG9w0BAQsFADBX
MQswCQYDVQQGEwJCRTEZMBcGA1UEChMQR2xvYmFsU2lnbiBudi1zYTEQMA4GA1UE
CxMHUm9vdCBDQTEbMBkGA1UEAxMSR2xvYmFsU2lnbiBSb290IENBMB4XDTIwMDYx
OTAwMDA0MloXDTI4MDEyODAwMDA0MlowRzELMAkGA1UEBhMCVVMxIjAgBgNVBAoT
GUdvb2dsZSBUcnVzdCBTZXJ2aWNlcyBMTEMxFDASBgNVBAMTC0dUUyBSb290IFIx
MIICIjANBgkqhkiG9w0BAQEFAAOCAg8AMIICCgKCAgEAthECix7joXebO9y/lD63
ladAPKH9gvl9MgaCcfb2jH/76Nu8ai6Xl6OMS/kr9rH5zoQdsfnFl97vufKj6bwS
iV6nqlKr+CMny6SxnGPb15l+8Ape62im9MZaRw1NEDPjTrETo8gYbEvs/AmQ351k
KSUjB6G00j0uYODP0gmHu81I8E3CwnqIiru6z1kZ1q+PsAewnjHxgsHA3y6mbWwZ
DrXYfiYaRQM9sHmklCitD38m5agI/pboPGiUU+6DOogrFZYJsuB6jC511pzrp1Zk
j5ZPaK49l8KEj8C8QMALXL32h7M1bKwYUH+E4EzNktMg6TO8UpmvMrUpsyUqtEj5
cuHKZPfmghCN6J3Cioj6OGaK/GP5Afl4/Xtcd/p2h/rs37EOeZVXtL0m79YB0esW
CruOC7XFxYpVq9Os6pFLKcwZpDIlTirxZUTQAs6qzkm06p98g7BAe+dDq6dso499
iYH6TKX/1Y7DzkvgtdizjkXPdsDtQCv9Uw+wp9U7DbGKogPeMa3Md+pvez7W35Ei
Eua++tgy/BBjFFFy3l3WFpO9KWgz7zpm7AeKJt8T11dleCfeXkkUAKIAf5qoIbap
sZWwpbkNFhHax2xIPEDgfg1azVY80ZcFuctL7TlLnMQ/0lUTbiSw1nH69MG6zO0b
9f6BQdgAmD06yK56mDcYBZUCAwEAAaOCATgwggE0MA4GA1UdDwEB/wQEAwIBhjAP
BgNVHRMBAf8EBTADAQH/MB0GA1UdDgQWBBTkrysmcRorSCeFL1JmLO/wiRNxPjAf
BgNVHSMEGDAWgBRge2YaRQ2XyolQL30EzTSo//z9SzBgBggrBgEFBQcBAQRUMFIw
JQYIKwYBBQUHMAGGGWh0dHA6Ly9vY3NwLnBraS5nb29nL2dzcjEwKQYIKwYBBQUH
MAKGHWh0dHA6Ly9wa2kuZ29vZy9nc3IxL2dzcjEuY3J0MDIGA1UdHwQrMCkwJ6Al
oCOGIWh0dHA6Ly9jcmwucGtpLmdvb2cvZ3NyMS9nc3IxLmNybDA7BgNVHSAENDAy
MAgGBmeBDAECATAIBgZngQwBAgIwDQYLKwYBBAHWeQIFAwIwDQYLKwYBBAHWeQIF
AwMwDQYJKoZIhvcNAQELBQADggEBADSkHrEoo9C0dhemMXoh6dFSPsjbdBZBiLg9
NR3t5P+T4Vxfq7vqfM/b5A3Ri1fyJm9bvhdGaJQ3b2t6yMAYN/olUazsaL+yyEn9
WprKASOshIArAoyZl+tJaox118fessmXn1hIVw41oeQa1v1vg4Fv74zPl6/AhSrw
9U5pCZEt4Wi4wStz6dTZ/CLANx8LZh1J7QJVj2fhMtfTJr9w4z30Z209fOU0iOMy
+qduBmpvvYuR7hZL6Dupszfnw0Skfths18dG9ZKb59UhvmaSGZRVbNQpsg3BZlvi
d0lIKO2d1xozclOzgjXPYovJJIultzkMu34qQb9Sz/yilrbCgj8=
-----END CERTIFICATE-----
-
Under Client Certificate, add a client certificate
you downloaded from
Google. Place
the
file ending with
.key
under Private Key, and
the
file ending with
.crt
under Signed Certificate as shown in the following
sample:
Figure 4: Add Client Certificate
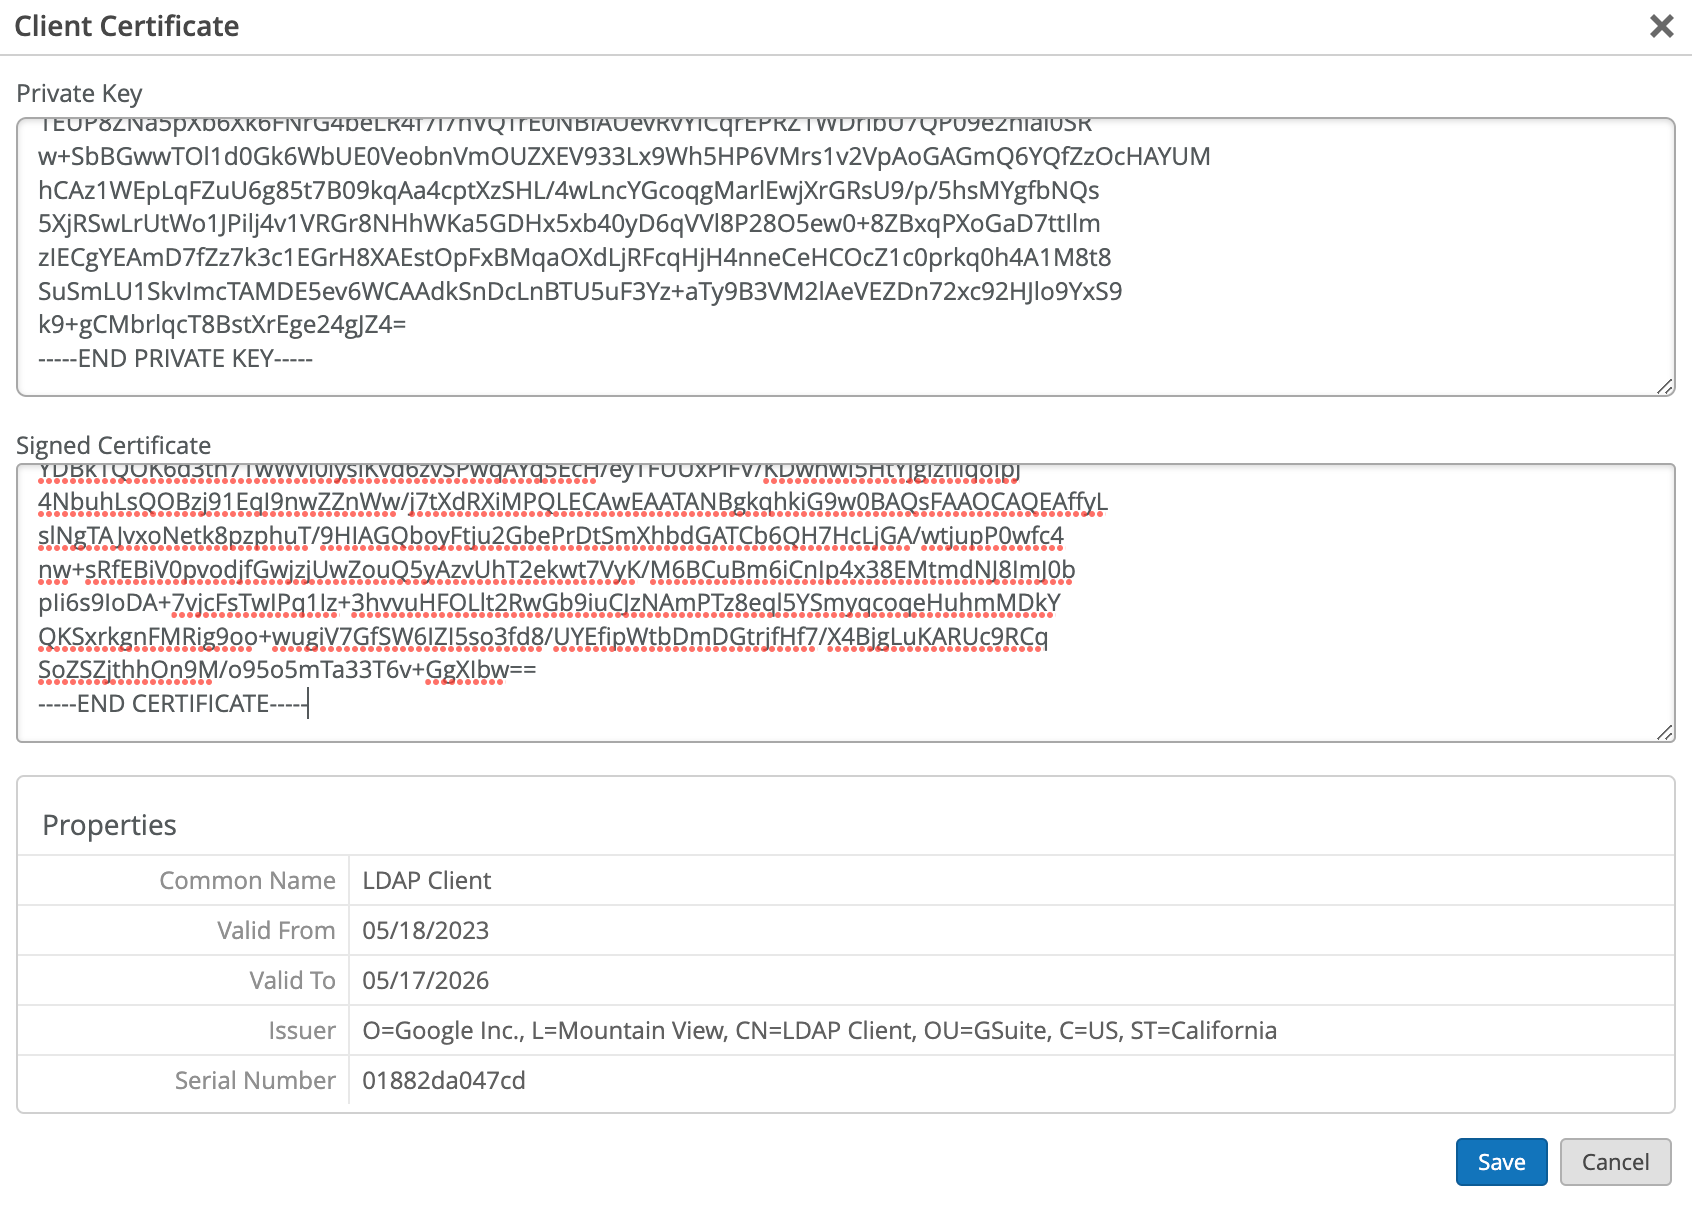
Click Save.
On the Juniper Mist portal, go to Monitoring > Insights > Client Events.
When a user authenticates using EAP-TTLS , you can see the NAC IDP Authentication Success and NAC IDP Group Lookup Success events that fetch user group membership information.
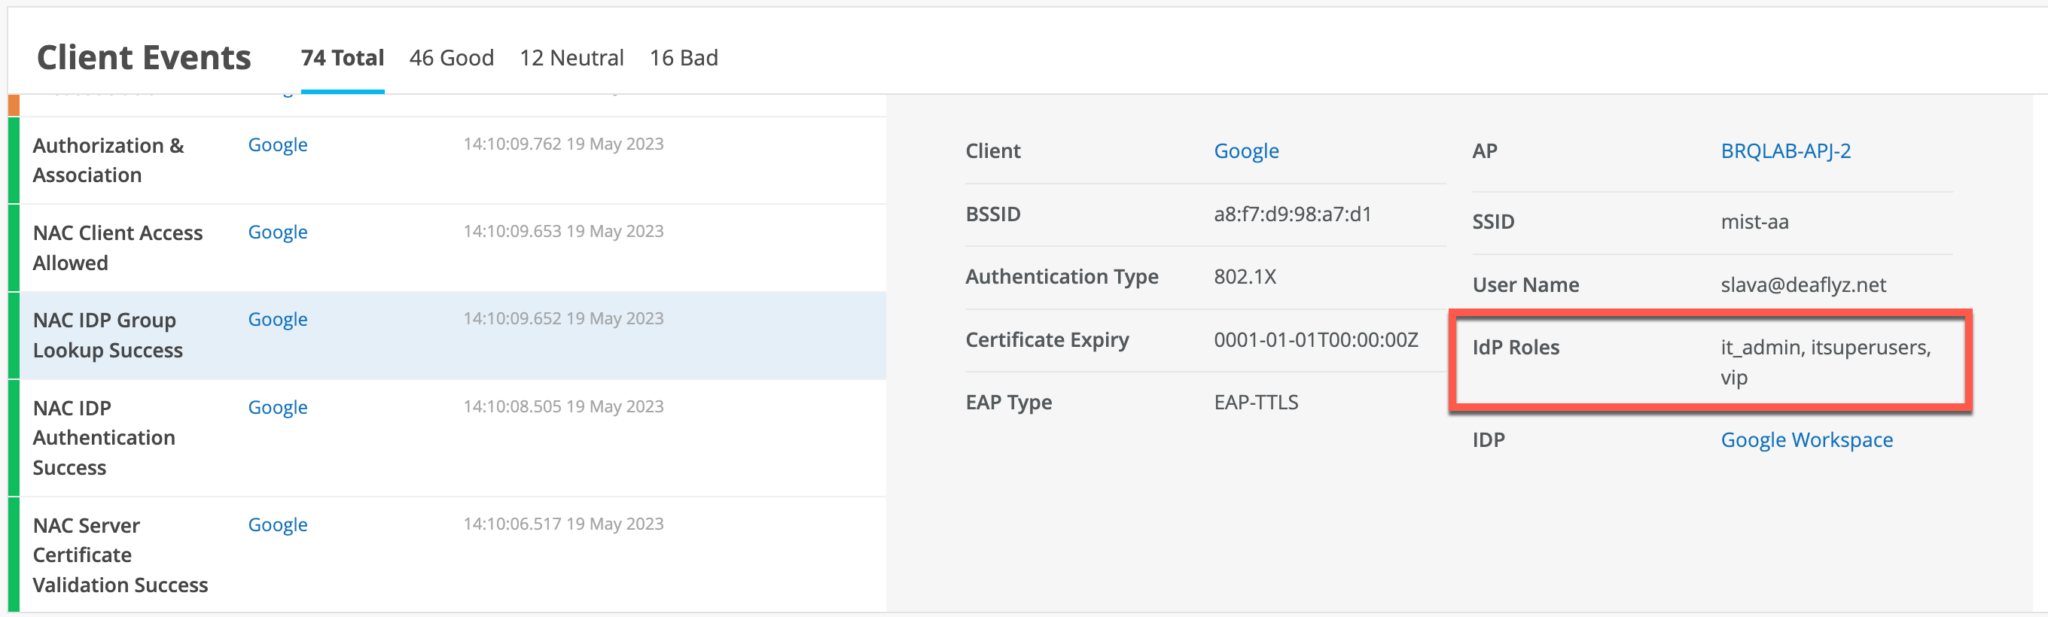
In case of EAP-TTLS authentication, you can see the NAC IDP Authentication Success event. This event indicates that Google Workspace has validated user credentials.
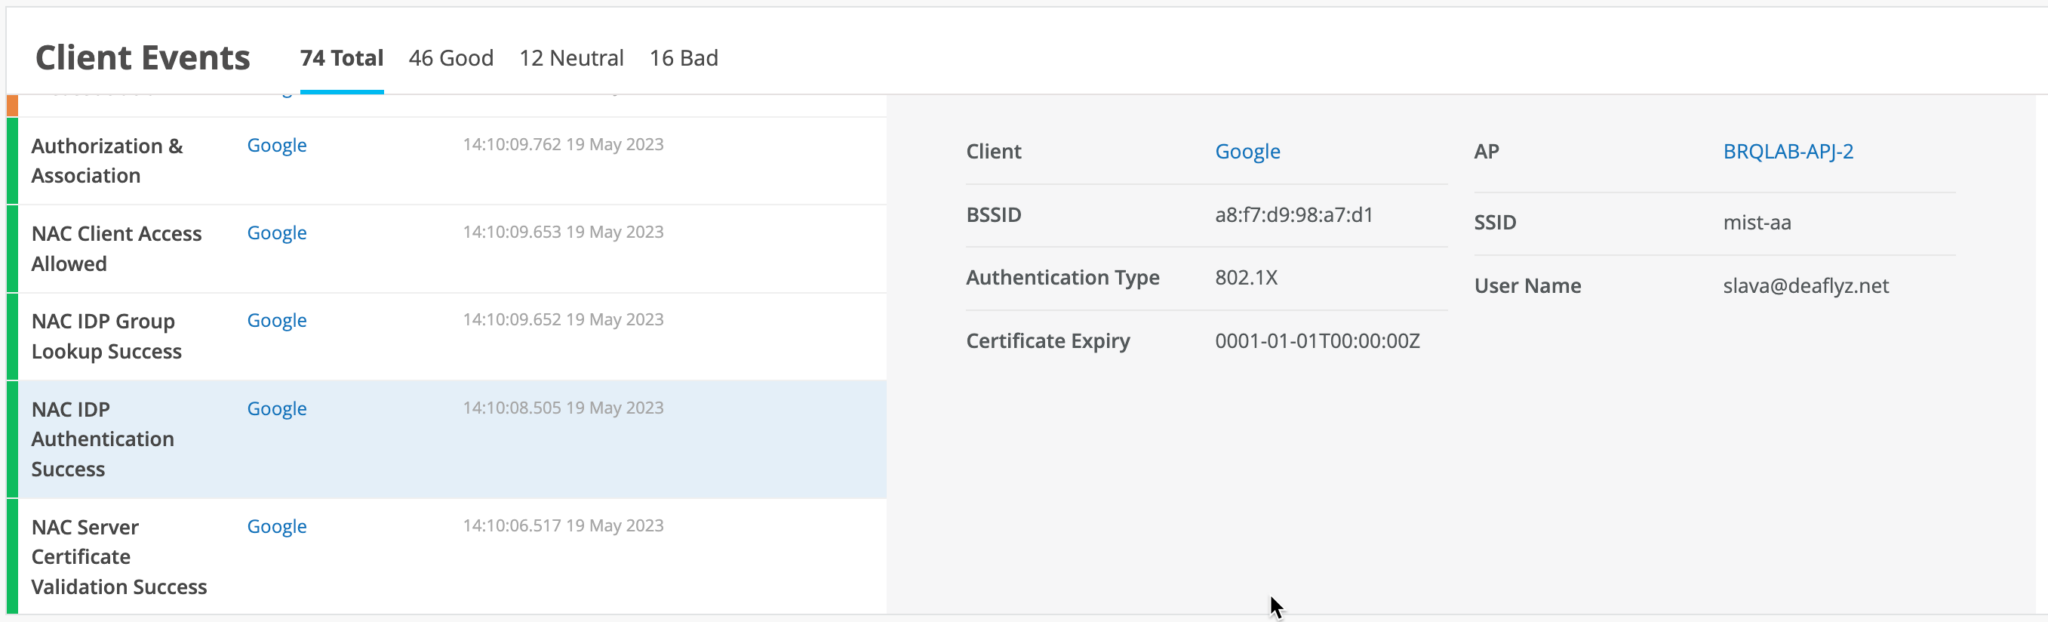
You may leverage IDP Roles from Google Workspace in your Auth policy rules to perform network segmentation based on user roles.
About EAP-TTLS and Azure AD using ROPC
Extensible Authentication Protocol–Tunneled TLS (EAP-TTLS) leverages LDAPS OAuth flow with Azure AD to perform user authentication. This implies the use of legacy authentication, which involves the use of a username and password without MFA. There are several factors to consider when employing this method:
- Configure client devices with the correct Wi-Fi profile, either from GPO or MDM. Providing only username and password at the login prompt does not work for some operating systems.
- Users must use Google Email ID (username@domain) username format for entering the username.
- Configure clients to trust server certificate. See Use Digital Certificates.