ON THIS PAGE
Example: Next-Generation VPLS for Multicast with Multihoming
This example shows how to configure next-generation VPLS for multicast with multihoming. It is organized in the following sections:
Requirements
The following table lists the hardware and software requirements for this configuration.
Equipment |
Components |
Software |
|---|---|---|
Four MX Series 5G Universal Routing Platforms |
DPC40X-1GE -X, DPC 4X-10GE-X, DPC40x-1GE-R, DPC 4X-10GE-R |
Junos OS Release 9.3 or later |
Two M320 Multiservice Edge Routers and T Series Core Routers |
FPC 3, 10GE Xenpak |
Junos OS Release 9.3 or later |
Five EX Series Ethernet Switches |
EX4200, EX3200 |
Junos OS Release 9.4 or later |
Overview and Topology
Figure 1 shows the physical topology used in this next-generation VPLS multihoming example.
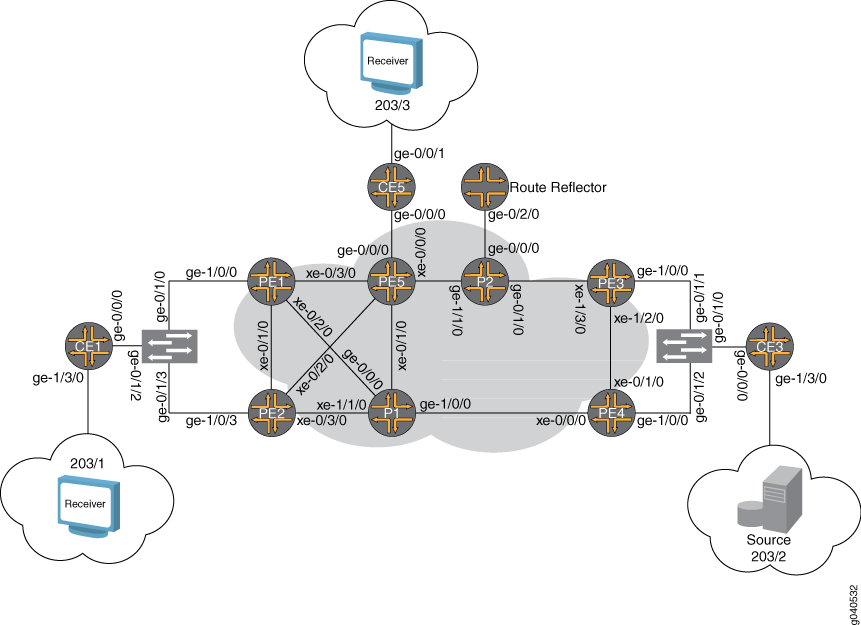
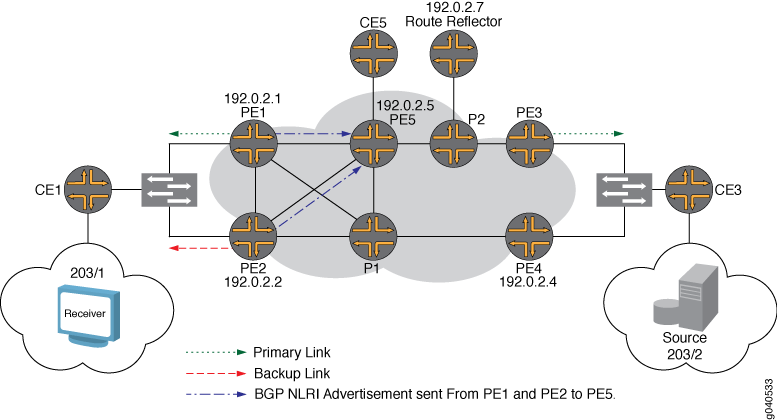
Figure 2 show the logical topology of the next-generation VPLS multihoming example.
The network state and configuration before the implementation is as follows:
Five PE routers participating in the next-generation VPLS domain named GOLD.
OSPF, BGP, and RSVP are configured on the MPLS core interfaces.
The
no-tunnel-servicesstatement is included in the VPLS routing instance. This statement supports the use of label-switched interface (LSI) tunnel interfaces for VPLS.Router PE1 and Router PE2 are configured with a dynamic point-to-multipoint LSP using the
vpls-GOLD-p2mp-templatetemplate.Router PE3 and Router PE4 are configured to use static point-to-multipoint LSPs.
Note:Single-hop point-to-multipoint LSPs are not supported, so single-hop point-to-multipoint LSPs are down.
Router CE1 is multihomed to Router PE1 and Router PE2 through an EX4200 Layer 2 switch.
Router CE3 is multihomed to Router PE3 and Router PE4 through an EX4200 Layer 2 switch.
Router CE5 is singlehomed to Router PE5.
The off-path route reflector is configured for BGP. The
family l2vpnstatement is included in the route reflector configuration.Router CE3 is connected to test equipment through port 203/2. The test equipment generates multicast traffic to groups 203.0.113.1 through 203.0.113.10 at the rate of 10,000 pps.
Router CE1 and Router CE5 are configured with static Internet Group Management Protocol (IGMP) joins so they can receive the multicast traffic from Router CE3.
The Layer 2 switches are configured with truck ports to the PE routers and access ports to the test equipment.
Here is a summary of the steps necessary to complete the configuration successfully:
Configure a unique route distinguisher for the VPLS routing instance named GOLD on Router PE1, Router PE2, Router PE3, and Router PE4.
Configure the same site ID for the multihomed PE routers. Configure both Router PE1 and Router PE2 with a site ID value of 1. Configure both Router PE3 and Router PE4 with a site ID value of 3.
Configure multihoming under the CE1 site configuration.
Configure the site-preference
Primaryon Router PE1 and configure the site-preferenceBackupon Router PE2. In this case, Router PE1 has the primary link to Router CE1 and Router PE2 has the backup link to Router CE1.Configure the site preference on Router PE3 and Router PE4. Configure Router PE3 as the primary and Router PE4 as the backup.
Configuration
This section provides a step-by-step procedure to configure next-generation VPLS for multicast with multihoming.
In any configuration session, it is good practice to verify
periodically that the configuration can be committed using the commit check command.
This example is organized in the following sections:
- Configuring Next-Generation VPLS Multihoming
- Validating the VPLS Control Plane
- Verifying the VPLS Data Plane
- Results
Configuring Next-Generation VPLS Multihoming
Step-by-Step Procedure
In BGP-based VPLS multihoming, it is recommended that you configure distinct route distinguishers for each multihomed router. Configuring distinct route distinguishers helps with faster convergence when the connection to a primary router goes down. It also requires the other backup PE routers to maintain additional state information for faster convergence.
There are two levels of path selection:
The first is BGP: BGP uses a combination of route distinguisher, site ID, and VE block offset for BGP path selection.
The second is in VPLS: VPLS uses the site ID for VPLS path selection.
By configuring unique route distinguishers, the prefixes for BGP path selection are all unique. Therefore, BGP path selection is skipped and VPLS path selection is used, which only looks at the site ID.
On Router PE1, Router PE2, Router PE3, and Router PE4 configure a unique router distinguisher for the
GOLDrouting instance.user@PE1# set routing-instance GOLD route-distinguisher 192.0.2.1:1 user@PE2# set routing-instance GOLD route-distinguisher 192.0.2.2:10 user@PE3# set routing-instance GOLD route-distinguisher 192.0.2.3:1 user@PE4# set routing-instance GOLD route-distinguisher 192.0.2.4:10
Configure site ID
1on Routers PE1 and PE2 for Router CE1. Configure site ID3on Routers PE3 and PE4 for Router CE3.user@PE1# set routing-instance GOLD protocols vpls site CE1 site-identifier 1 user@PE2# set routing-instance GOLD protocols vpls site CE1 site-identifier 1 user@PE3# set routing-instance GOLD protocols vpls site CE3 site-identifier 3 user@PE4# set routing-instance GOLD protocols vpls site CE3 site-identifier 3
Enable multihoming by including the
multi-homingstatement under the multihomed site configuration on Router PE1, Router PE2, Router PE3, and Router PE4.user@PE1# set routing-instance GOLD protocols vpls site CE1 multi-homing user@PE2# set routing-instance GOLD protocols vpls site CE1 multi-homing user@PE3# set routing-instance GOLD protocols vpls site CE3 multi-homing user@PE4# set routing-instance GOLD protocols vpls site CE3 multi-homing
Include the
site-preference primarystatement on Router PE1 and Router PE3, and include thesite-preference backupstatement on Router PE2 and Router PE4. Thesite-preference primarystatement sets the local preference to the highest value (65535) and thesite-preference backupstatement sets the BGP local preference to 1. Since the site ID is the same, the routers select the highest local preference value as the designated forwarder.user@PE1# set routing-instance GOLD protocols vpls site CE1 site-preference primary user@PE2# set routing-instance GOLD protocols vpls site CE1 site-preference backup user@PE3# set routing-instance GOLD protocols vpls site CE3 site-preference primary user@PE4# set routing-instance GOLD protocols vpls site CE3 site-preference backup
Validating the VPLS Control Plane
Step-by-Step Procedure
This section presents show commands that you can use to verify the operation of the example configuration.
In this example the traffic patterns are:
The source is connected to Router CE3 and sends 10,000 pps for the groups 203.0.113.1 to 203.0.113.10. Router CE3 is configured as a rendezvous point.
Multicast receivers are connected to both Router CE1 and Router CE5. Protocol Independent Multicast (PIM) join messages are generated by the test equipment.
The link between Router PE3 and Router CE3 and the link between Router PE1 and Router CE1 are configured as primaries for VPLS multihoming.
All PE routers have a BGP session with the route reflector.
All PE routers have a label-switched path (LSP) that is created to the route reflector so that the PE routers have a route to the route reflector in the
inet.3table for route resolution.
On Router PE1, use the
show vpls connectionscommand to verify that the VPLS connections areUpbetween Router PE1 and Router PE3 and between Router PE1 and PE5. Router PE1 is the primary link selected by the VPLS multihoming configuration.user@PE1# show vpls connections Layer-2 VPN connections: Legend for connection status (St) EI -- encapsulation invalid NC -- interface encapsulation not CCC/TCC/VPLS EM -- encapsulation mismatch WE -- interface and instance encaps not same VC-Dn -- Virtual circuit down NP -- interface hardware not present CM -- control-word mismatch -> -- only outbound connection is up CN -- circuit not provisioned <- -- only inbound connection is up OR -- out of range Up -- operational OL -- no outgoing label Dn -- down LD -- local site signaled down CF -- call admission control failure RD -- remote site signaled down SC -- local and remote site ID collision LN -- local site not designated LM -- local site ID not minimum designated RN -- remote site not designated RM -- remote site ID not minimum designated XX -- unknown connection status IL -- no incoming label MM -- MTU mismatch MI -- Mesh-Group ID not availble BK -- Backup connection ST -- Standby connection Legend for interface status Up -- operational Dn -- down Instance: GOLD Local site: CE1 (1) connection-site Type St Time last up # Up trans 1 rmt RN 3 rmt Up Nov 16 11:22:44 2009 1 Remote PE: 192.0.2.3, Negotiated control-word: No Incoming label: 262147, Outgoing label: 262145 Local interface: lsi.1048835, Status: Up, Encapsulation: VPLS Description: Intf - vpls GOLD local site 1 remote site 3 5 rmt Up Nov 16 11:22:46 2009 1 Remote PE: 192.0.2.5, Negotiated control-word: No Incoming label: 262149, Outgoing label: 262161 Local interface: lsi.1048836, Status: Up, Encapsulation: VPLS Description: Intf - vpls GOLD local site 1 remote site 5On Router PE2, use the
show vpls connectionscommand to verify that the VPLS connections to Router PE3 and Router PE5 are in theLNstate, meaning the local router is not the designated forwarder. Router PE2 is configured to be the backup link for Router CE1.user@PE2# show vpls connections ... Instance: GOLD Local site: CE1 (1) connection-site Type St Time last up # Up trans 1 rmt LN 3 rmt LN 5 rmt LNOn Router PE3, use the
show vpls connectionscommand to verify that the VPLS connections to Router PE1 and Router PE5 areUp. Router PE3 is configured to be the primary link for Router CE3.user@PE3# show vpls connections ... Instance: GOLD Local site: CE3 (3) connection-site Type St Time last up # Up trans 1 rmt Up Nov 16 11:22:01 2009 1 Remote PE: 192.0.2.1, Negotiated control-word: No Incoming label: 262145, Outgoing label: 262147 Local interface: lsi.1048832, Status: Up, Encapsulation: VPLS Description: Intf - vpls GOLD local site 3 remote site 1 3 rmt RN 5 rmt Up Nov 16 11:22:56 2009 1 Remote PE: 192.0.2.5, Negotiated control-word: No Incoming label: 262149, Outgoing label: 262163 Local interface: lsi.1048834, Status: Up, Encapsulation: VPLS Description: Intf - vpls GOLD local site 3 remote site 5On Router PE4, use the
show vpls connectionscommand to verify that the VPLS connections are in theLNstate, meaning the local site is not designated. Router PE4 is configured to be the backup link for Router CE3.user@PE4# show vpls connections ... Instance: GOLD Local site: CE3 (3) connection-site Type St Time last up # Up trans 1 rmt LN 3 rmt SC 5 rmt LNOn Router PE1, use the
show route advertising-protocolcommand to verify that Router PE1 (the multihoming primary router) is sending the BGP Layer 2 VPN route advertisement to the route reflector with the local preference value of65535. The local preference is used by Router PE3 to select Router PE1 as the designated forwarder, rather than selecting Router PE2 that has a local preference of1.user@PE1# show route advertising-protocol bgp 192.0.2.7 extensive GOLD.l2vpn.0: 5 destinations, 5 routes (5 active, 0 holddown, 0 hidden) * 192.0.2.1:1:1:1/96 (1 entry, 1 announced) BGP group to-RR type Internal Route Distinguisher: 192.0.2.1:1 Label-base: 262145, range: 8 Nexthop: Self Flags: Nexthop Change Localpref: 65535 AS path: [65000] I Communities: target:65000:1 Layer2-info: encaps:VPLS, control flags:, mtu: 0, site preference: 65535 PMSI: Flags 0:RSVP-TE:label[0:0:0]:Session_13[192.0.2.1:0:9519:192.0.2.1]On Router PE2, use the
show route advertising-protocolcommand to verify that Router PE2 is configured as the multihoming backup with a local preference of1.user@PE2# show route advertising-protocol bgp 192.0.2.7 extensive GOLD.l2vpn.0: 5 destinations, 5 routes (5 active, 0 holddown, 0 hidden) * 192.0.2.2:10:1:1/96 (1 entry, 1 announced) BGP group to-RR type Internal Route Distinguisher: 192.0.2.2:10 Label-base: 262145, range: 8 Nexthop: Self Flags: Nexthop Change Localpref: 1 AS path: [65000] I Communities: target:65000:1 Layer2-info: encaps:VPLS, control flags:, mtu: 0, site preference: 1On Router PE3, use the
show route receive-protocolcommand to verify that Router PE3 receives the Layer 2 VPN route from the route reflector for Router PE1 and Router PE2 with different local preference values.BGP route selection is based on the received
l2vpnroutes for the VPLS site connected to multihomed PE routers. Since the route distinguishers are different on Router PE1 and Router PE2, Router PE3 and Router PE4 consider the received routes from Router PE1 and Router PE2 as different routes. Router PE3 and Router PE4 run the BGP path selection algorithm and select Router PE1, the router advertising the route with the higher local preference value, as the designated forwarder.user@PE3# show route receive-protocol bgp 192.0.2.7 bgp.l2vpn.0: 4 destinations, 4 routes (4 active, 0 holddown, 0 hidden) Prefix Nexthop MED Lclpref AS path 192.0.2.1:1:1:1/96 * 192.0.2.1 65535 I 192.0.2.2:10:1:1/96 * 192.0.2.2 1 I 192.0.2.4:10:3:1/96 * 192.0.2.4 1 I 192.0.2.5:10:5:1/96 * 192.0.2.5 100 I GOLD.l2vpn.0: 5 destinations, 5 routes (5 active, 0 holddown, 0 hidden) Prefix Nexthop MED Lclpref AS path 192.0.2.1:1:1:1/96 * 192.0.2.1 65535 I 192.0.2.2:10:1:1/96 * 192.0.2.2 1 I 192.0.2.4:10:3:1/96 * 192.0.2.4 1 I 192.0.2.5:10:5:1/96 * 192.0.2.5 100 I
On Router PE3, use the
show route tablecommand to verify that Router PE3 has selected the static point-to-multipoint LSP from Router PE3 to Router PE1 for forwarding.Notice that Router PE2 does not have any provider multicast service interface (PMSI) flags because PMSI attributes are not attached.
user@PE3# show route table GOLD.l2vpn.0 extensive GOLD.l2vpn.0: 5 destinations, 5 routes (5 active, 0 holddown, 0 hidden) 192.0.2.1:1:1:1/96 (1 entry, 1 announced) *BGP Preference: 170/-65536 Route Distinguisher: 192.0.2.1:1 PMSI: Flags 0:RSVP-TE:label[0:0:0]:Session_13[192.0.2.1:0:9519:192.0.2.1] Next hop type: Indirect Next-hop reference count: 4 Source: 192.0.2.7 Protocol next hop: 192.0.2.1 Indirect next hop: 2 no-forward State: <Secondary Active Int Ext> Local AS: 65000 Peer AS: 65000 Age: 2:30:44 Metric2: 1 Task: BGP_65000.192.0.2.7+179 Announcement bits (1): 0-GOLD-l2vpn AS path: I (Originator) Cluster list: 192.0.2.7 AS path: Originator ID: 192.0.2.1 Communities: target:65000:1 Layer2-info: encaps:VPLS, control flags:, mtu: 0, site preference: 65535 Import Accepted Label-base: 262145, range: 8 Localpref: 65535 Router ID: 192.0.2.7 Primary Routing Table bgp.l2vpn.0 Indirect next hops: 1 Protocol next hop: 192.0.2.1 Metric: 3 Indirect next hop: 2 no-forward Indirect path forwarding next hops: 1 Next hop type: Router Next hop: 10.10.8.2 via xe-0/1/0.0 weight 0x1 192.0.2.1/32 Originating RIB: inet.3 Metric: 3 Node path count: 1 Forwarding nexthops: 1 Nexthop: 10.10.8.2 via xe-0/1/0.0 192.0.2.2:10:1:1/96 (1 entry, 1 announced) *BGP Preference: 170/-2 Route Distinguisher: 192.0.2.2:10 Next hop type: Indirect Next-hop reference count: 3 Source: 192.0.2.7 Protocol next hop: 192.0.2.2 Indirect next hop: 2 no-forward State: <Secondary Active Int Ext> Local AS: 65000 Peer AS: 65000 Age: 2:30:44 Metric2: 1 Task: BGP_65000.192.0.2.7+179 Announcement bits (1): 0-GOLD-l2vpn AS path: I (Originator) Cluster list: 192.0.2.7 AS path: Originator ID: 192.0.2.2 Communities: target:65000:1 Layer2-info: encaps:VPLS, control flags:, mtu: 0, site preference: 1 Import Accepted Label-base: 262145, range: 8 Localpref: 1 Router ID: 192.0.2.7 Primary Routing Table bgp.l2vpn.0 Indirect next hops: 1 Protocol next hop: 192.0.2.2 Metric: 3 Indirect next hop: 2 no-forward Indirect path forwarding next hops: 1 Next hop type: Router Next hop: 10.10.8.2 via xe-0/1/0.0 weight 0x1 192.0.2.2/32 Originating RIB: inet.3 Metric: 3 Node path count: 1 Forwarding nexthops: 1 Nexthop: 10.10.8.2 via xe-0/1/0.0On Router PE3, use the
show vpls connectionscommand to verify that the VPLS connection is in theUpstate.Notice the display also shows the local interface and the incoming and outgoing label values used.
user@PE3# show vpls connections extensive ... Instance: GOLD Local site: CE3 (3) Number of local interfaces: 1 Number of local interfaces up: 1 IRB interface present: no ge-1/0/0.1 lsi.1048832 1 Intf - vpls GOLD local site 3 remote site 1 lsi.1048833 2 Intf - vpls GOLD local site 3 remote site 2 Interface flags: VC-Down lsi.1048834 5 Intf - vpls GOLD local site 3 remote site 5 Interface flags: VC-Down Label-base Offset Range Preference 262145 1 8 65535 connection-site Type St Time last up # Up trans 1 rmt Up Nov 16 11:22:01 2009 1 Remote PE: 192.0.2.1, Negotiated control-word: No Incoming label: 262145, Outgoing label: 262147 Local interface: lsi.1048832, Status: Up, Encapsulation: VPLS Description: Intf - vpls GOLD local site 3 remote site 1 RSVP-TE P2MP lsp: Egress branch LSP: 192.0.2.3:192.0.2.1:1:vpls:GOLD, State: Up Connection History: Nov 16 11:22:54 2009 PE route changed Nov 16 11:22:01 2009 status update timer Nov 16 11:22:01 2009 PE route changed Nov 16 11:22:01 2009 Out lbl Update 262147 Nov 16 11:22:01 2009 In lbl Update 262145 Nov 16 11:22:01 2009 loc intf up lsi.1048832 3 rmt RN 5 rmt RD Ingress RSVP-TE P2MP LSP: vpls-GOLD, Flood next-hop ID: 616
Verifying the VPLS Data Plane
Step-by-Step Procedure
After the control plane is verified using the previous
steps, you can verify the data plane. The data plane operation in
the VPLS multihoming scenario is the same as the regular next-generation
VPLS operation. This section describes the show command
outputs that you can use to validate the data plane.
On Router PE3, use the
show mpls lspcommand to verify the state of the static LSPs and sub-LSPs.Router PE2 is configured with static point-to-multipoint LSPs and sub-LSPs with link protection. Point to multipoint LSPs are not supported for single-hop LSPs. In the following output notice that the single-hop point-to-multipoint LSP from Router PE3 to Router PE4 is
down.user@PE3# show mpls lsp p2mp ingress Ingress LSP: 1 sessions P2MP name: vpls-GOLD, P2MP branch count: 4 To From State Rt P ActivePath LSPname 192.0.2.5 192.0.2.3 Up 0 * to-pe5 192.0.2.1 192.0.2.3 Up 0 * to-pe1 192.0.2.4 192.0.2.3 Dn 0 * to-pe4 192.0.2.2 192.0.2.3 Up 0 * to-pe2 Total 4 displayed, Up 3, Down 1
On Router PE1, use the
show mpls lspcommand to verify the state of the dynamic LSPs.Router PE1 is using a dynamic point-to-multipoint LSP template configured with link protection. Notice that the LSP state is
Upand that link protection isdesired.user@PE1# show mpls lsp p2mp ingress extensive Ingress LSP: 1 sessions P2MP name: 192.0.2.1:1:vpls:GOLD, P2MP branch count: 1 192.0.2.3 From: 192.0.2.1, State: Up, ActiveRoute: 0, LSPname: 192.0.2.3:192.0.2.1:1:vpls:GOLD ActivePath: (primary) P2MP name: 192.0.2.1:1:vpls:GOLD Link protection desired LoadBalance: Random Encoding type: Packet, Switching type: Packet, GPID: IPv4 *Primary State: Up Priorities: 7 0 OptimizeTimer: 50 SmartOptimizeTimer: 180 Reoptimization in 45 second(s). Computed ERO (S [L] denotes strict [loose] hops): (CSPF metric: 3) 10.10.3.2 S 10.10.9.2 S 10.10.8.1 S Received RRO (ProtectionFlag 1=Available 2=InUse 4=B/W 8=Node 10=SoftPreempt): 10.10.3.2(Label=488645) 192.0.2.4(flag=0x21) 10.10.9.2(flag=1 Label=299936) 10.10.8.1(Label=262145) 12 Nov 16 15:38:08.116 CSPF: computation result ignored[314 times] 11 Nov 16 11:23:44.856 Link-protection Up 10 Nov 16 11:23:32.696 CSPF: computation result ignored[3 times] 9 Nov 16 11:22:47.859 Record Route: 10.10.3.2(Label=488645) 192.0.2.4(flag=0x21) 10.10.9.2(flag=1 Label=299936) 10.10.8.1(Label=262145) 8 Nov 16 11:22:44.910 Record Route: 10.10.3.2(Label=488645) 192.0.2.4(flag=0x20) 10.10.9.2(Label=299936) 10.10.8.1(Label=262145) 7 Nov 16 11:22:44.910 Up 6 Nov 16 11:22:44.910 10.10.3.1: Down 5 Nov 16 11:22:44.866 Selected as active path 4 Nov 16 11:22:44.864 Record Route: 10.10.3.2(Label=488629) 192.0.2.4(flag=0x20) 10.10.9.2(Label=299920) 10.10.8.1(Label=3) 3 Nov 16 11:22:44.864 Up 2 Nov 16 11:22:44.852 Originate Call 1 Nov 16 11:22:44.852 CSPF: computation result accepted 10.10.3.2 10.10.9.2 10.10.8.1 Created: Mon Nov 16 11:22:45 2009 Total 1 displayed, Up 1, Down 0On Router PE3, use the
monitor interface trafficcommand to verify the multicast replication behavior for the point-to-multipoint LSP on the designated forwarder Router PE3.The output shows that
10,000pps are received on interfacege-1/0/0from Router CE3. The traffic has been forwarded to the provider (P) Router P2 and Router PE4 through xe-0/0/0 and xe-0/1/0, respectively. Based on the output, you can determine that a single copy of the packet is being sent to Router P2 and Router PE4.user@PE3> monitor interface traffic PE3 Seconds: 8 Time: 11:58:40 Interface Link Input packets (pps) Output packets (pps) lc-0/0/0 Up 0 0 xe-0/0/0 Up 13570505 (0) 4507338866 (10000) lc-0/1/0 Up 0 0 xe-0/1/0 Up 292843 (1) 628972219 (10000) lc-0/2/0 Up 0 0 xe-0/2/0 Up 343292 (0) 206808 (1) lc-0/3/0 Up 0 0 xe-0/3/0 Down 0 (0) 0 (0) ge-1/0/0 Up 2703709733 (9999) 13203544 (1) lc-1/0/0 Up 0 0 ge-1/0/1 Down 50380341937 (0) 60024542111 (0) ge-1/0/2 Down 60652323068 (0) 84480825838 (0) ge-1/0/3 Down 81219536264 (0) 84614255165 (0) ge-1/0/4 Down 54379241112 (0) 83656815208 (0)
On Router P2, use the
monitor interface trafficcommand to verify that the multicast packet replication happens close to the PE routers connected to the receivers.Router PE1 and Router PE5 are connected to receivers that have joined this multicast group. Notice that incoming multicast packets from Router PE3 on the
ge-0/1/0interface are replicated twice and sent out on thege-1/1/0interface.user@P2> monitor interface traffic P2 Seconds: 6 Time: 12:07:58 Interface Link Input packets (pps) Output packets (pps) ge-0/1/0 Up 661459806 (10000) 116236 (0) ge-1/1/0 Up 115956 (0) 1322690473 (20000) gr-2/1/0 Up 0 (0) 0 (0) ip-2/1/0 Up 0 (0) 0 (0)
On Router PE3, use the
show vpls floodcommand to verify information about the flood next-hop route.Junos OS Release 9.0 and later identifies the flood next-hop route as a composite next hop. Notice that the interface is
ge-1/0/0.1, the next-hop type iscomposite, and that the flood composition isflood-to-all. This means the traffic is flooded to all the PE routers.user@PE3# show vpls flood extensive Name: GOLD CEs: 1 VEs: 1 Flood route prefix: 0x30002/51 Flood route type: FLOOD_GRP_COMP_NH Flood route owner: __ves__ Flood group name: __ves__ Flood group index: 0 Nexthop type: comp Nexthop index: 606 Flooding to: Name Type NhType Index __all_ces__ Group comp 603 Composition: split-horizon Flooding to: Name Type NhType Index ge-1/0/0.1 CE ucst 578 Flood route prefix: 0x30003/51 Flood route type: FLOOD_GRP_COMP_NH Flood route owner: __all_ces__ Flood group name: __all_ces__ Flood group index: 1 Nexthop type: comp Nexthop index: 611 Flooding to: Name Type NhType Index __ves__ Group comp 594 Composition: flood-to-all Component p2mp NH (for all core facing interfaces): Index 616 Flooding to: Name Type NhType Index __all_ces__ Group comp 603 Composition: split-horizon Flooding to: Name Type NhType Index ge-1/0/0.1 CE ucst 578 Flood route prefix: 0x30001/51 Flood route type: FLOOD_GRP_COMP_NH Flood route owner: __re_flood__ Flood group name: __re_flood__ Flood group index: 65534 Nexthop type: comp Nexthop index: 598 Flooding to: Name Type NhType Index __ves__ Group comp 594 Composition: flood-to-all Component p2mp NH (for all core facing interfaces): Index 616 Flooding to: Name Type NhType Index __all_ces__ Group comp 603 Composition: split-horizon Flooding to: Name Type NhType Index ge-1/0/0.1 CE ucst 578 Name: __juniper_private1__ CEs: 0 VEs: 0On Router PE3, use the
show vpls mac-tablecommand to verify that the MAC address of the PE router at the remote end of the VPLS has been learned and added to the MAC address table.Notice that the MAC address is learned on the
ge-1/0/0.1interface.user@PE3# show vpls mac-table MAC flags (S -static MAC, D -dynamic MAC, SE -Statistics enabled, NM -Non configured MAC) Routing instance : GOLD Bridging domain : __GOLD__, VLAN : NA MAC MAC Logical address flags interface 00:14:f6:75:78:00 D ge-1/0/0.1On Router PE3, use the
show route forwarding-tablecommand to verify that the forwarding table has the required entries with two labels: one for the VPLS service and the other for the next-hop interface.user@PE3> show route forwarding-table family vpls vpn GOLD Routing table: GOLD.vpls VPLS: Destination Type RtRef Next hop Type Index NhRef Netif default perm 0 dscd 574 1 lsi.1048832 intf 0 indr 1048575 4 10.10.7.1 Push 262147, Push 309680(top) 596 2 xe-0/0/0.0 lsi.1048836 intf 0 indr 1048574 4 10.10.7.1 Push 262179, Push 299856(top) 589 2 xe-0/0/0.0 00:10:db:e9:4e:b6/48 user 0 indr 1048574 4 10.10.7.1 Push 262179, Push 299856(top) 589 2 xe-0/0/0.0 00:12:1e:c6:98:00/48 user 0 indr 1048575 4 10.10.7.1 Push 262147, Push 309680(top) 596 2 xe-0/0/0.0 00:14:f6:75:78:00/48 user 0 ucst 578 4 ge-1/0/0.1 0x30002/51 user 0 comp 606 2 ge-1/0/0.1 intf 0 ucst 578 4 ge-1/0/0.1 0x30003/51 user 0 comp 611 2 0x30001/51 user 0 comp 598 2
Results
The configuration and verification parts of this example have been completed. The following section is for your reference.
The relevant sample configuration for Router PE1 follows:
Router PE1
chassis {
dump-on-panic;
fpc 1 {
pic 3 {
tunnel-services {
bandwidth 1g;
}
}
}
network-services ethernet;
}
interfaces {
xe-0/1/0 {
unit 0 {
family inet {
address 10.10.2.1/30;
}
family mpls;
}
}
xe-0/2/0 {
unit 0 {
family inet {
address 10.10.3.1/30;
}
family mpls;
}
}
xe-0/3/0 {
unit 0 {
family inet {
address 10.10.1.1/30;
}
family mpls;
}
}
ge-1/0/0 {
vlan-tagging;
encapsulation vlan-vpls;
unit 1 {
encapsulation vlan-vpls;
vlan-id 1000;
family vpls;
}
}
lo0 {
unit 0 {
family inet {
address 192.0.2.1/32;
}
}
}
}
routing-options {
static {
route 172.0.0.0/8 next-hop 172.19.59.1;
}
autonomous-system 65000;
}
protocols {
rsvp {
interface all;
interface fxp0.0 {
disable;
}
interface xe-0/3/0.0 {
link-protection;
}
interface xe-0/2/0.0 {
link-protection;
}
interface xe-0/1/0.0 {
link-protection;
}
}
mpls {
label-switched-path to-RR {
to 192.0.2.7;
}
label-switched-path vpls-GOLD-p2mp-template {
template;
optimize-timer 50;
link-protection;
p2mp;
}
label-switched-path to-PE2 {
to 192.0.2.2;
}
label-switched-path to-PE3 {
to 192.0.2.3;
}
label-switched-path to-PE4 {
to 192.0.2.4;
}
label-switched-path to-PE5 {
to 192.0.2.5;
}
interface all;
interface fxp0.0 {
disable;
}
}
bgp {
group to-RR {
type internal;
local-address 192.0.2.1;
family l2vpn {
signaling;
}
neighbor 192.0.2.7;
}
}
ospf {
traffic-engineering;
area 0.0.0.0 {
interface all;
interface fxp0.0 {
disable;
}
}
}
}
routing-instances {
GOLD {
instance-type vpls;
interface ge-1/0/0.1;
route-distinguisher 192.0.2.1:1;
provider-tunnel {
rsvp-te {
label-switched-path-template {
vpls-GOLD-p2mp-template;
}
}
}
vrf-target target:65000:1;
protocols {
vpls {
site-range 8;
no-tunnel-services;
site CE1 {
site-identifier 1;
multi-homing;
site-preference primary;
interface ge-1/0/0.1;
}
}
}
}
}
The relevant sample configuration for Router PE2 follows.
PE2 Router
chassis {
dump-on-panic;
fpc 1 {
pic 3 {
tunnel-services {
bandwidth 1g;
}
}
}
network-services ethernet;
}
interfaces {
xe-0/1/0 {
unit 0 {
family inet {
address 10.10.2.2/30;
}
family mpls;
}
}
xe-0/2/0 {
unit 0 {
family inet {
address 10.10.5.1/30;
}
family mpls;
}
}
xe-0/3/0 {
unit 0 {
family inet {
address 10.10.4.1/30;
}
family mpls;
}
}
ge-1/0/3 {
vlan-tagging;
encapsulation vlan-vpls;
unit 1 {
encapsulation vlan-vpls;
vlan-id 1000;
family vpls;
}
}
fxp0 {
apply-groups [ re0 re1 ];
}
lo0 {
unit 0 {
family inet {
address 192.0.2.2/32;
}
}
}
}
routing-options {
static {
route 172.0.0.0/8 next-hop 172.19.59.1;
}
autonomous-system 65000;
}
protocols {
rsvp {
interface all;
interface fxp0.0 {
disable;
}
}
mpls {
label-switched-path to-RR {
to 192.0.2.7;
}
label-switched-path vpls-GOLD-p2mp-template {
template;
optimize-timer 50;
link-protection;
p2mp;
}
label-switched-path to-PE1 {
to 192.0.2.1;
}
label-switched-path to-PE3 {
to 192.0.2.3;
}
label-switched-path to-PE4 {
to 192.0.2.4;
}
label-switched-path to-PE5 {
to 192.0.2.5;
}
interface all;
interface fxp0.0 {
disable;
}
}
bgp {
group to-RR {
type internal;
local-address 192.0.2.2;
family l2vpn {
signaling;
}
neighbor 192.0.2.7;
}
}
ospf {
traffic-engineering;
area 0.0.0.0 {
interface all;
interface fxp0.0 {
disable;
}
}
}
}
routing-instances {
GOLD {
instance-type vpls;
interface ge-1/0/3.1;
route-distinguisher 192.0.2.2:10;
provider-tunnel {
rsvp-te {
label-switched-path-template {
vpls-GOLD-p2mp-template;
}
}
}
vrf-target target:65000:1;
protocols {
vpls {
site-range 8;
no-tunnel-services;
site CE1 {
site-identifier 1;
multi-homing;
site-preference backup;
interface ge-1/0/3.1;
}
}
}
}