On-Device Avira Antivirus
Read this topic to understand about how to use Avira Antivirus for scanning application traffic and preventing viruses from entering your network.
You can also watch the video Avira Antivirus Solution on SRX Series Firewalls to understand about installing and using Avira antivirus on your security device.
Avira Antivirus Overview
Junos OS Content Security integrates with Avira’s Antivirus functionality and provides full file-based scan engine. This antivirus protection secures your device by scanning the application layer traffic and blocks the harmful content such as infected files, trojans, worms, spyware, and other malicious data.
Avira Antivirus scans the network traffic by accessing the virus pattern database and identifies the virus. Avira Antivirus drops the infected file and notifies the user.
Table 1 lists the components and license details for Avira Antivirus.
Components |
Detailed Information |
|---|---|
Virus pattern database |
Avira Antivirus checks the virus signature database to identify and then remove signatures. By default, the device downloads the updates for pattern database. See Configure Avira Antivirus Scanning Options to schedule the automatic download option. |
Avira Antivirus scan engine |
Avira Antivirus provides the scan engine that examines a file for known viruses at real-time. You must install and activate Avira Antivirus scan engine on your device. See Example: Configure Avira Antivirus for steps to install and activate Avira Antivirus scan engine. Avira Antivirus scan engine decompresses files before scanning for virus detection. For more information, see decompress-layer-limit. In the following scenarios, Avira Antivirus scan engine on the device does not scan the application traffic:
|
License details |
Avira Antivirus scan engine is a licensed subscription service. With this license, you can use a full file-based and real-time Avira Antivirus scanning function. The antivirus functionality uses the latest updated virus signature database. When the license expires, you can continue to use the locally stored antivirus signatures without any updates. If you delete the local database, you cannot run antivirus scanning. For more information about licenses, see Licenses for SRX Series. |
Benefits
Secures your device and protects your network from viruses, trojans, rootkits, and other types of malicious code.
Provides improved scanning performance as the virus signature database and Avira Antivirus scan engine reside locally on the device.
See Also
Additional Platform Information
Use Feature Explorer to confirm platform and release support for specific features. Additional platforms may be supported.
| Platforms | Virus Pattern Database |
|---|---|
|
Default virus pattern database |
|
|
SRX4100, SRX4200, and SRX4600 Series Firewalls |
|
|
SRX5K-SPC3 Firewalls |
|
|
vSRX Virtual Firewall |
Example: Configure Avira Antivirus
In this example, you’ll learn how to configure Avira antivirus on your security device. This topic includes the details about using default antivirus profile and customized antivirus profile to secure your device from the harmful content such as infected files, trojans, worms, spyware, and other malicious data.
Requirements
Before you begin:
Verify that you have a Avira antivirus license. For more information on how to verify licenses on your device, see Understanding Licenses for SRX Series Firewalls.
Device with Junos OS Release 18.4R1 or later.
-
For vSRX Virtual Firewall, the minimum requirement is 4 CPU cores and 4 GB memory.
We’ve tested this example using an SRX1500 device with Junos OS Release 18.4R1.
Overview
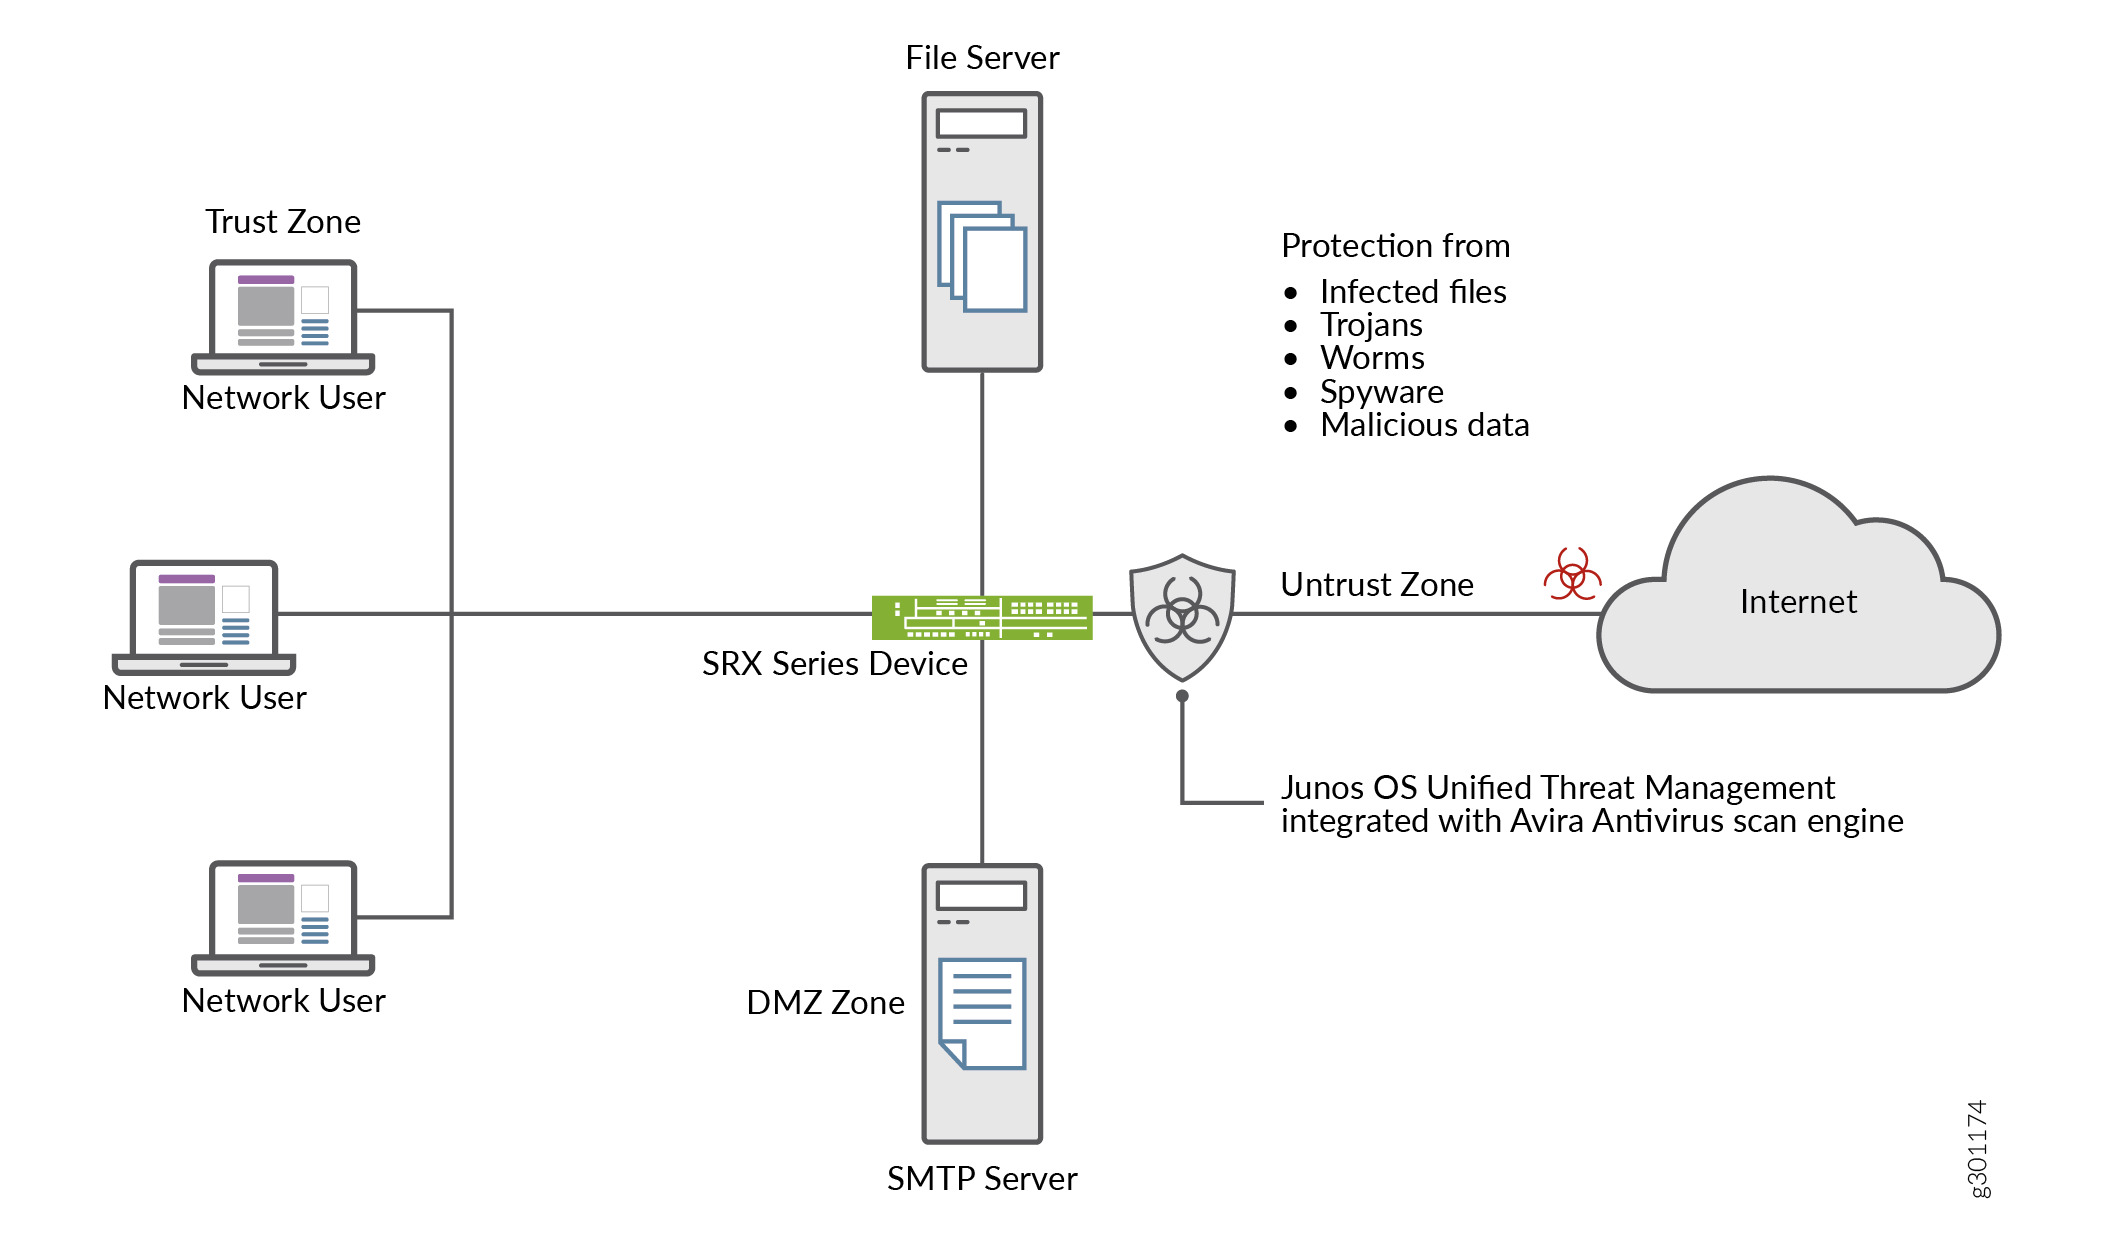
Let’s take a look at a typical enterprise network. An end user unknowingly visits a compromised Website and downloads a malicious content. This action results in compromise of the endpoint. The harmful content on the endpoint also becomes a threat to other hosts within the network. It is important to prevent the download of the malicious content.
You can use a device with Avira antivirus to protect users from virus attacks and to prevent spreading of viruses in your system, Avira antivirus scans network traffic for viruses, trojans, rootkits, and other types of malicious code and blocks the malicious content immediately when detected.
Figure 1 shows an example of Avira antivirus usage.
In this example, you’ll learn how to configure Avira antivirus on your security device. You have the following options.
To use default Avira antivirus options to get started, see Use Default Antivirus Profile to Start Antivirus Scanning.
To customize antivirus options as per your requirements, see Configure Avira Antivirus Scanning Options .
To set antivirus scanning options, see Configure Avira Antivirus Scanning with Custom Profile .
Configuration
You can enable the Juniper Networks pre-configured antivirus profile. When you use the default antivirus feature profile option, you don't have to configure additional parameter. In this procedure, you create an Content Security policy with default antivirus profiles for all protocols and apply the Content Security policy in a security policy for the permitted traffic.
- Use Default Antivirus Profile to Start Antivirus Scanning
- Configure Avira Antivirus Scanning Options
- Configure Avira Antivirus Scanning with Custom Profile
- Results
Use Default Antivirus Profile to Start Antivirus Scanning
Step-by-Step Procedure
To use default antivirus profile, complete the following steps:
-
Enable Avira antivirus scan on your security device.
user@host#set security utm default-configuration anti-virus type avira-engineAfter configuring Avira as the antivirus type, reboot the device for the new scan engine to take effect.
-
Select default antivirus profile for HTTP, FTP, SMTP, POP3, and IMAP protocols.
[edit]user@host#set security utm default-configuration anti-virus type avirauser@host#set security utm utm-policy P1 anti-virus http-profile junos-av-defaultsuser@host#set security utm utm-policy P1 anti-virus ftp upload-profile junos-av-defaultsuser@host#set security utm utm-policy P1 anti-virus ftp download-profile junos-av-defaultsuser@host#set security utm utm-policy P1 anti-virus smtp-profile junos-av-defaultsuser@host#set security utm utm-policy P1 anti-virus pop3-profile junos-av-defaultsuser@host#set security utm utm-policy P1 anti-virus imap-profile junos-av-defaults -
Apply the Content Security policy to the security policy.
[edit]user@host#set security policies from-zone trust to-zone untrust policy POLICY-1 match source-address anyuser@host#set security policies from-zone trust to-zone untrust policy POLICY-1 match destination-address anyuser@host#set security policies from-zone trust to-zone untrust policy POLICY-1 match application anyuser@host#set security policies from-zone trust to-zone untrust policy POLICY-1 then permit application-services utm-policy P1 -
Commit the configuration.
[edit]user@host#commit
You can also watch the video Avira Antivirus Solution on SRX Series Firewalls to understand about installing and using Avira antivirus on your security device.
Configure Avira Antivirus Scanning Options
Step-by-Step Procedure
In this procedure, you’ll perform optional steps to prepare your security device to use Avira antivirus.
-
Manually update the virus signature database, specify the URL of the database server. If you do not specify a URL, a default URL is provided, https://update.juniper-updates.net/avira. By default, your security device downloads the pattern updates from https://update.juniper-updates.net/avira. The location of virus pattern database depends on your device mode. See Table 1 for more details.
[edit]user@host#set security utm default-configuration anti-virus avira-engine pattern-update url http://www.example.net/This step downloads the pattern and engine files from the specified URL.
-
Set an interval for regular download of antivirus pattern update.
[edit]user@host#set security utm default-configuration anti-virus avira-engine pattern-update interval 2880In this step, you are changing the default from every 24 hours to every 48 hours. The default antivirus pattern-update interval is 1440 minutes (every 24 hours).
-
Send an e-mail notification once pattern update completes.
[edit]user@host#set security utm default-configuration anti-virus avira-engine pattern-update email-notify admin-email admin@email.net custom-message “Avira antivirus data file was updated” custom-message-subject “AV data file updated” -
(Optional) Configure pattern update from an proxy profile.
Configure proxy profile by entering the proxy host IP address and port number as follows:
user@host# set services proxy profile proxy-profile protocol http host x.x.x.x port xxxx
Configure proxy authentication within the proxy profile by setting a username and password.
[edit]
user@host# set services proxy profile proxy-profile protocol http username <username>
user@host# set services proxy profile proxy-profile protocol http password <password>
Use the proxy profile to the pattern update process.
[edit]user@host# set security utm default-configuration anti-virus avira-engine pattern-update proxy-profile <proxy-profile>
-
(Optional) Configure on-box antivirus to heavy mode.
[edit]user@host# set chassis onbox-av-load-flavor heavyThis step allocates additional resources for improved performance.
To use the antivirus scan in light mode, use the delete chassis onbox-av-load-flavor heavy command. Reboot the device once you change the modes.
-
(Optional) Change the operating mode from the default continuous delivery function (CDF) to hold mode. When you change to hold mode, the system withhold all the packets until you get the final result.
[edit]user@host# set security utm default-configuration anti-virus forwarding-mode holdFor more details on CDF mode and Inline Tap mode, see forwarding-mode.
Configure Avira Antivirus Scanning with Custom Profile
You must complete the steps as in Table 2 to configure Avira antivirus with custom options on your security device.
|
Step |
Details |
|---|---|
|
Step 1: Define custom objects |
In this step, you will define antivirus scanning options:
Alternatively, you can use the default list junos-default-bypass-mime. |
|
Step 2: Create antivirus feature profile |
|
|
Step 3: Create Content Security policy |
Associate the antivirus profile created in Step 2 for FTP, HTTP, POP3, SMTP, and IMAP traffic. Content Security policies control which protocol traffic is sent to the antivirus scanning engine. |
|
Step 4: Apply Content Security policy to a security policy |
Specify Content Security policy as application services in the security policy. The Content Security antivirus settings are applied for the traffic that matches the security policy rules. |
See scan-options and trickling to understand about the scanning configuration parameters available for antivirus feature.
CLI Quick Configuration
To quickly configure this section of the example, copy the following
commands, paste them into a text file, remove any line breaks, change any
details necessary to match your network configuration, copy and paste the
commands into the CLI at the [edit] hierarchy level, and
then enter commit from configuration mode.
set security utm default-configuration anti-virus type avira-engine
set security utm custom-objects mime-pattern Mime_1 value video/
set security utm custom-objects mime-pattern Mime_exception value video/x-shockwave-flash
set security utm custom-objects url-pattern Pattern_List_1 value www.juniper.net
set security utm custom-objects custom-url-category Cust_URL_Cat value Pattern_List_1
set security utm feature-profile anti-virus profile Avira-AV-Profile fallback-options default log-and-permit
set security utm feature-profile anti-virus profile Avira-AV-Profile fallback-options content-size block
set security utm feature-profile anti-virus profile Avira-AV-Profile fallback-options engine-not-ready log-and-permit
set security utm feature-profile anti-virus profile Avira-AV-Profile fallback-options timeout log-and-permit
set security utm feature-profile anti-virus profile Avira-AV-Profile fallback-options out-of-resources log-and-permit
set security utm feature-profile anti-virus profile Avira-AV-Profile fallback-options too-many-requests log-and-permit
set security utm feature-profile anti-virus profile Avira-AV-Profile notification-options fallback-block type protocol-only
set security utm feature-profile anti-virus profile Avira-AV-Profile notification-options fallback-block notify-mail-sender
set security utm feature-profile anti-virus profile Avira-AV-Profile notification-options fallback-block custom-message " fallback block action occured “
set security utm feature-profile anti-virus profile Avira-AV-Profile notification-options fallback-block custom-message-subject " Antivirus Fallback Alert "
set security utm feature-profile anti-virus profile Avira-AV-Profile mime-whitelist list Mime_1
set security utm feature-profile anti-virus profile Avira-AV-Profile url-whitelist Cust_URL_Cat
set security utm feature-profile anti-virus profile Avira-AV-Profile mime-whitelist list Mime_exception
set security utm utm-policy UTM-AV-Policy anti-virus http-profile Avira-AV-Profile
set security utm utm-policy UTM-AV-Policy anti-virus ftp upload-profile Avira-AV-Profile
set security utm utm-policy UTM-AV-Policy anti-virus ftp download-profile Avira-AV-Profile
set security utm utm-policy UTM-AV-Policy anti-virus smtp-profile Avira-AV-Profile
set security utm utm-policy UTM-AV-Policy anti-virus pop3-profile Avira-AV-Profile
set security utm utm-policy UTM-AV-Policy anti-virus imap-profile Avira-AV-Profile
set security policies from-zone trust to-zone untrust policy POLICY-1 match source-address any
set security policies from-zone trust to-zone untrust policy POLICY-1 match destination-address any
set security policies from-zone trust to-zone untrust policy POLICY-1 match application any
set security policies from-zone trust to-zone untrust policy POLICY-1 then permit application-services utm-policy UTM-AV-Policy
The [edit security utm feature-profile] hierarchy level
is deprecated in Junos OS Release 18.2R1. For more information, see
Content Security Overview.
Step-by-Step Procedure
To configure the on-device antivirus feature profile using the CLI:
-
Enable Avira antivirus scan on your security device if you have not already enabled..
[edit]user@host#set security utm default-configuration anti-virus type avira-engineAfter configuring Avira as the antivirus type, reboot the device for the new scan engine to take effect.
-
Create custom objects.
[edit]user@host#set security utm custom-objects mime-pattern Mime_1 value video/user@host#set security utm custom-objects mime-pattern Mime_exception value video/x-shockwave-flashuser@host#set security utm custom-objects url-pattern Pattern_List_1 value www.juniper.netuser@host#set security utm custom-objects custom-url-category Cust_URL_Cat value Pattern_List_1 -
Create the antivirus profile.
[edit]user@host#set security utm feature-profile anti-virus profile Avira-AV-Profile -
Configure a list of fallback options.
[edit]user@host#set security utm feature-profile anti-virus profile Avira-AV-Profile fallback-options default log-and-permituser@host#set security utm feature-profile anti-virus profile Avira-AV-Profile fallback-options content-size blockuser@host#set security utm feature-profile anti-virus profile Avira-AV-Profile fallback-options engine-not-ready log-and-permituser@host#set security utm feature-profile anti-virus profile Avira-AV-Profile fallback-options timeout log-and-permituser@host#set security utm feature-profile anti-virus profile Avira-AV-Profile fallback-options out-of-resources log-and-permituser@host#set security utm feature-profile anti-virus profile Avira-AV-Profile fallback-options too-many-requests log-and-permitFallback options specify the actions to take when traffic cannot be scanned.
-
Configure notification options for fallback blocking actions.
[edit]user@host#set security utm feature-profile anti-virus profile Avira-AV-Profile notification-options fallback-block type protocol-onlyuser@host#set security utm feature-profile anti-virus profile Avira-AV-Profile notification-options fallback-block notify-mail-senderuser@host#set security utm feature-profile anti-virus profile Avira-AV-Profile notification-options fallback-block custom-message " fallback block action occured “user@host#set security utm feature-profile anti-virus profile Avira-AV-Profile notification-options fallback-block custom-message-subject " Antivirus Fallback Alert " -
Configure the antivirus module to use MIME bypass lists and exception lists.
[edit]user@host#set security utm feature-profile anti-virus profile Avira-AV-Profile mime-whitelist list Mime_exception -
Configure the antivirus module to use URL bypass lists. URL allowlists are valid only for HTTP traffic. In this example you use the lists that you set up earlier.
[edit]user@host#set security utm feature-profile anti-virus profile Avira-AV-Profile mime-whitelist list Mime_1user@host#set security utm feature-profile anti-virus profile Avira-AV-Profile url-whitelist Cust_URL_Cat -
Configure a Content Security policy attach the antivirus feature profile Avira-AV-Profile.
[edit]user@host#set security utm utm-policy UTM-AV-Policy anti-virus http-profile Avira-AV-Profileuser@host#set security utm utm-policy UTM-AV-Policy anti-virus ftp upload-profile Avira-AV-Profileuser@host#set security utm utm-policy UTM-AV-Policy anti-virus ftp download-profile Avira-AV-Profileuser@host#set security utm utm-policy UTM-AV-Policy anti-virus smtp-profile Avira-AV-Profileuser@host#set security utm utm-policy UTM-AV-Policy anti-virus pop3-profile Avira-AV-Profileuser@host#set security utm utm-policy UTM-AV-Policy anti-virus imap-profile Avira-AV-Profile -
Configure a security policy and apply the Content Security policy
UTM-AV-Policyas application services for the permitted traffic.[edit]user@host#set security policies from-zone trust to-zone untrust policy POLICY-1 match source-address anyuser@host#set security policies from-zone trust to-zone untrust policy POLICY-1 match destination-address anyuser@host#set security policies from-zone trust to-zone untrust policy POLICY-1 match application anyuser@host#set security policies from-zone trust to-zone untrust policy POLICY-1 then permit application-services utm-policy UTM-AV-Policy
Results
From configuration mode, confirm your configuration by entering the show
security utm, show services, and show
security policies commands. If the output does not display the
intended configuration, repeat the configuration instructions in this example to
correct it.
user@host# show security utm
custom-objects {
    mime-pattern {
        Mime_1 {
            value video/;
        }
        Mime_exception {
            value video/x-shockwave-flash;
        }
    }
    url-pattern {
        Pattern_List_1 {
            value www.juniper.net;
        }
    }
    custom-url-category {
        Cust_URL_Cat {
            value Pattern_List_1;
        }
    }
}
feature-profile {
    anti-virus {
        profile Avira-AV-Profile {
            fallback-options {
                default log-and-permit;
                content-size block;
                engine-not-ready log-and-permit;
                timeout log-and-permit;
                out-of-resources log-and-permit;
                too-many-requests log-and-permit;
            }
            notification-options {
                fallback-block {
                    type protocol-only;
                    notify-mail-sender;
                    custom-message " fallback block action occured ";
                    custom-message-subject " Antivirus Fallback Alert ";
                }
            }
            mime-whitelist {
                list Mime_1;
            }
            url-whitelist Cust_URL_Cat;
        }
    }
}
utm-policy P1 {
    anti-virus {
        http-profile junos-av-defaults;
        ftp {
            upload-profile junos-av-defaults;
            download-profile junos-av-defaults;
        }
        smtp-profile junos-av-defaults;
        pop3-profile junos-av-defaults;
        imap-profile junos-av-defaults;
    }
}
utm-policy UTM-AV-Policy {
    anti-virus {
        http-profile Avira-AV-Profile;
        ftp {
            upload-profile Avira-AV-Profile;
            download-profile Avira-AV-Profile;
        }
        smtp-profile Avira-AV-Profile;
        pop3-profile Avira-AV-Profile;
        imap-profile Avira-AV-Profile;
    }
}
[edit]
user@host# show security policies
    from-zone untrust to-zone trust {
        policy  POLICY-1 {
            match {
                source-address any;
                destination-address any;
                application any;
            }
            then {
                permit {
                    application-services {
                        utm-policy UTM-AV-Policy;
                    }
                }
            }
        }
    }
If you are done configuring the device, enter commit from configuration mode.
Verification
To verify the configuration is working properly, use the following steps:
- Obtaining Information About the Current Antivirus Status
- Validate Avira Antivirus on Your Security Device
Obtaining Information About the Current Antivirus Status
Purpose
Action
From operational mode, enter the show security utm anti-virus status command to view the antivirus status.
Sample Output
command-name
user@host>show security utm anti-virus status
UTM anti-virus status:
  Update server: https://update.example-juniper.net/avira
           Interval: 360 minutes
           Pattern update status: next update in 236 minutes
           Last result: Downloading certs failed
    Scan engine type: avira-engine
    Scan engine information: 8.3.52.102
    Anti-virus signature version: 8.15.11.42
    Onbox AV load flavor: running heavy, configure heavy
Meaning
Antivirus key expire date—The license key expiration date.
Update server—URL for the data file update server.
Interval—The time period, in minutes, when the device will update the data file from the update server.
Pattern update status—When the data file will be updated next, displayed in minutes.
Last result—Result of the last update.
Antivirus signature version—Version of the current data file.
Scan engine type—The antivirus engine type that is currently running.
Scan engine information—Version of the scan engine.
Validate Avira Antivirus on Your Security Device
Purpose
Validate whether Avira Antivirus Solution is working on a security device
Action
Use the safe way of testing the antivirus capability using Eicar.org website. Your security device displays an error message as shown when you try to download an unsafe file.
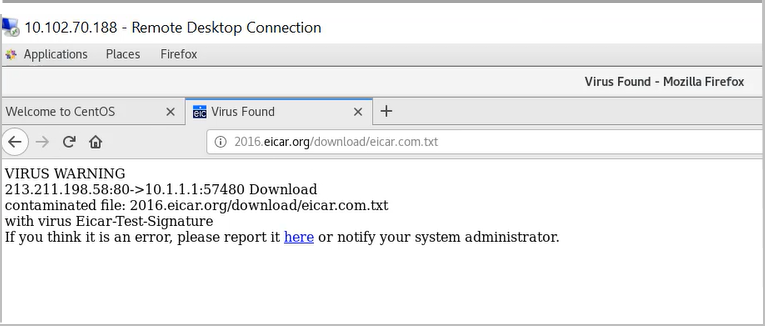
Meaning
The message indicates that your security device has blocked a malicious content.