Recover a Root Password
If you forget the root password, you can use the password recovery procedure to reset the root password.
You cannot perform root password recovery if you configure the console port as insecure.
After you configure the console port as insecure, if a user tries to perform a password recovery operation by booting in single-user mode, the device prompts for the root password. Additionally, if a user boots in CLI recovery mode, the operation is not allowed. Thus, only a user who knows the root password is able to log in. For more information, see Configuration Guidelines for Securing Console Port Access.
How to Recover the Root Password on Junos OS with Upgraded FreeBSD
If you forget the root password for a device running Junos OS with Upgraded FreeBSD, you can use the password recovery procedure to reset the root password.
For the list of Junos OS devices with upgraded FreeBSD, see Junos kernel upgrade to FreeBSD 10+
You need console access to recover the root password.
To recover the root password:
How to Recover the Root Password for Junos OS
If you forget the root password for the router, you can use the password recovery procedure to reset the root password.
Before you begin, note the following:
-
You need console access to recover the root password.
To recover the root password:
How to Recover the Root Password on Switches
Problem
Description
If you forget the root password for a switch, use the password recovery procedure to reset the root password.
Before you begin, note the following:
-
You need physical access to the switch to recover the root password.
For a video on recovering the root password for routers, see Recovering the Root Password on Routers. The procedure is similar for switches.
Solution
To recover the root password:
-
Power off your switch by unplugging the power cord or turning off the power at the wall switch.
-
Insert one end of the Ethernet cable into the serial port on the management device and connect the other end to the console port on the back of the switch. See Figure 1.
Figure 1: Connecting to the Console Port on the EX Series Switch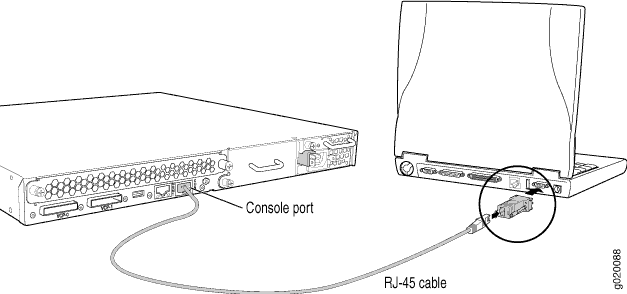
-
On the management device, start your asynchronous terminal emulation application (such as Microsoft Windows Hyperterminal). Then, select the appropriate COM port to use (for example, COM1).
-
Configure the port settings as follows:
-
Bits per second: 9600
-
Data bits: 8
-
Parity: None
-
Stop bits: 1
-
Flow control: None
-
-
Power on your switch by plugging in the power cord or turning on the power at the wall switch.
-
When the following prompt appears, press the Spacebar to access the switch's bootstrap loader command prompt.
Hit [Enter] to boot immediately, or space bar for command prompt.
Booting [kernel] in 1 second...
Note:If the switch is in unattended mode for U-Boot, access to the bootstrap loader command prompt is blocked. If the root password is lost, you must reset the switch to the factory default configuration using the LCD panel.
-
At the following prompt, type
boot -sto start up the system in single-user mode:loader> boot -s
-
At the following prompt, type
recoveryto start the root password recovery procedure:Enter full path name of shell or ’recovery’ for root password recovery or RETURN for /bin/sh: recovery
A series of messages describe consistency checks, mounting of filesystems, and initialization and checkout of management services. Then the CLI prompt appears.
-
Enter configuration mode in the CLI:
user@switch> configure
-
Set the root password.
user@switch# set system root-authentication plain-text-password
-
At the following prompt, enter the new root password:
New password: password
-
At the second prompt, reenter the new root password.
Retype new password: password
-
After you finish configuring the device, commit the configuration.
root@switch# commit
commit complete
-
Exit configuration mode in the CLI.
root@switch# exit
-
Exit operational mode in the CLI.
root@switch> exit
-
At the prompt, enter
yto reboot the switch.Reboot the system? [y/n] y