TCP Authentication Option (TCP-AO)
Learn about TCP Authentication Option (TCP-AO) for BGP and LDP sessions.
TCP-AO for BGP and LDP Sessions
The BGP and LDP protocols use TCP for transport. TCP-AO is a new authentication method proposed through RFC5925, The TCP Authentication Option to enhance the security and authenticity of TCP segments exchanged during BGP and LDP sessions. It also supports both IPv4 and IPv6 traffic.
Benefits of TCP-AO
TCP-AO provides the following benefits over TCP MD5:
-
Stronger algorithms—Supports multiple stronger authentication algorithms such as HMAC-SHA-1-96 and AES-128-CMAC-96 (mandated by RFC5925, The TCP Authentication Option). HMAC-SHA-1-96 is a hash-based MAC and AES-128-CMAC-96 is a cipher-based MAC, thus making the message digest more complex and secure than the digest created by using the MD5 algorithm.
-
Two-Fold security—In the TCP-AO method, the configured Authentication algorithm is used in two stages: Once to generate an internal traffic key from a user-configured key and then to generate a message digest using the generated traffic key, whereas in the TCP MD5 method, the MD5 algorithm generates a message digest using its user-configured key.
-
Better Key Management and Agility—You can configure up to 64 keys for a session and you can add them at any time during the lifetime of a session. It provides a simple key coordination mechanism by giving the ability to change keys (move from one key to another) within the same connection without causing any TCP connection closure. Changing TCP MD5 keys during an established connection might cause a flap or restart in the connection.
-
Suitable for long-lived connections—More suitable for long-lived connections for routing protocols such as BGP and LDP and across repeated instances of a single connection.
What is TCP-AO?
TCP-AO provides a framework to:
-
Support multiple stronger algorithms, such as HMAC-SHA1 and AES-128 to create an internal traffic key and message digest.
-
Add a new user-configured key to re-generate internal traffic keys for an established connection and a mechanism to synchronize key change between BGP or LDP peers.
In earlier releases, Junos devices only supported the TCP MD5 authentication method for BGP and LDP sessions. The MD5 method supports only the MD5 algorithm, which is less secure than TCP-AO. In addition, changing a MD5 key normally disrupts the TCP session, unlike TCP-AO. TCP MD5 is defined in RFC2385, Protection of BGP Sessions via the TCP MD5 Signature Option. For more information about TCP MD5, see TCP.
-
While Junos devices support both the TCP-AO and TCP MD5 authentication methods, you cannot use both at the same time for a given connection.
-
TCP-AO supports Nonstop Active Routing.
The following diagram explains the difference between TCP-AO and TCP MD5 authentication. The first flow shows the configuration and processing flow for TCP-AO and the second flow shows the configuration and processing flow for TCP-MD5.

Below is an explanation of the processing flows shown in Figure 1:
-
TCP-AO—The user has configured two keys in the keychain (key 0 and key 1) with all required parameters. The keychain supports two algorithms: HMAC SHA1 and AES-128 (mandated per RFC5925). TCP fetches key 0, which is the key that is currently active, as shown by the timestamp in the figure. In the example, key 0 is configured with HMAC-SHA1.
SHA1 takes the “secret” (from the key 0 configuration) and connection specific parameters for encryption and generates an internal traffic key.
SHA1 again encrypts the internal traffic key and the TCP segment to generate the message digest. The digest is copied to the TCP-AO MAC field of the TCP-AO option in the TCP segment. The segment is then sent to the receiving device.
-
TCP-MD5—The user has configured a single key because TCP MD5 option supports only one key for a connection. Further, it only supports the MD5 algorithm. The MD5 algorithm takes the “secret” from the key and the TCP segment for encryption and generates a message digest. This message digest is then copied to MD5 digest field in the TCP segment and is sent to the receiving device.
Configuration
First, configure a keychain. Then apply TCP-AO to the BGP or LDP session.
To configure a keychain for TCP-AO (with one key), configure the following statement
at the [edit security] hierarchy level.
[edit security]
user@router# set authentication-key-chains key-chain key-chain key id secret secretpassword start-time YYYY-MM-DD.HH:MM algorithm ao ao-attribute send-id send-id recv-id recv-id cryptographic-algorithm cryptographic-algorithm tcp-ao-option enabled
To apply TCP-AO to a BGP session (with the configured keychain), configure the
following statement at the [edit protocols] hierarchy level.
[edit protocols]
user@router# set bgp group group neighbor neighbor authentication-algorithm ao
user@router# set bgp group group neighbor neighbor authentication-key-chain key-chain
To apply TCP-AO to an LDP session (with the configured keychain), configure the
following statement at the [edit protocols] hierarchy level.
[edit protocols]
user@router# set ldp session session authentication-algorithm ao
user@router# set ldp session session authentication-key-chain key-chain
Example: Configure a Keychain (TCP-AO)
This example shows you how to create a TCP-AO keychain to authenticate a BGP or LDP session.
This example uses the following hardware and software components:
MX Series or PTX Series routers.
Junos OS Release 20.3R1 or later version.
This example shows you how to create a TCP-AO keychain to authenticate a BGP or LDP session.
In this example, you can create a keychain new_auth_key with two keys,
key 0 and key 1 on devices R1 and R2.
You have successfully created a keychain!
To delete a keychain, use the delete security authentication-key-chains key-chain
key-chain-name command from configuration
mode.
-
You can associate only one TCP-AO keychain with a BGP or LDP session during its life-time. You cannot point another keychain to the session in its life-time.
-
We recommend a minimum interval of 30 minutes between the start-time of any two subsequent keys within a keychain.
-
Once a keychain is configured and in use by a TCP connection, you cannot change the
send-idorrecv-idvalues of its active key. However, you can change the other parameters in the key, and any new connection associated with the updated keychain will take the updated parameters for its connection establishment. -
Starting in Junos OS Release 21.2R1, you can use the
tcpao-auth-mismatch allow-without-tcpaoto allow the connection establishment without TCP-AO if any one TCP endpoint does not have TCP-AO configured on it.
To display information about existing keychains (if any) from the operational mode, use the
show security keychain command. Here is sample output:
user@R1> show security keychainKeychain Active-ID Next-ID Transition Tolerance
Send Receive Send Receive
new_auth_key 1 1 None None None 3600 (secs)Example: Use TCP-AO to Authenticate a BGP Session
This example shows you how to authenticate a BGP session using a TCP Authentication Option (TCP-AO) keychain.
Requirements
This example uses the following hardware and software components:
-
MX Series or PTX Series routers.
-
Junos OS Release 20.3R1 or later version.
-
Configure a keychain
new_auth_key. See Configure a Keychain (TCP-AO).
Overview
BGP uses TCP as its transport protocol. TCP-AO is a method you can use to authenticate BGP sessions. You can apply a TCP-AO keychain at the BGP neighbor or at BGP group levels of the configuration hierarchy.
Topology

Configuration
In this example, you associate the TCP-AO authentication keychain
new_auth_key and authentication algorithm
ao on both devices to authenticate a BGP session.
CLI Quick Configuration
To quickly configure this example, copy the following commands, paste them into a text file, remove any line breaks, change any details necessary to match your network configuration, and then copy and paste the commands into the CLI.
R1
[edit]
set interfaces ge-0/0/1 description R1-to-R2-Link
set interfaces ge-0/0/1 unit 0 family inet address 192.0.2.1/30
set interfaces lo0 unit 0 family inet address 192.168.0.11/32
set routing-options router-id 192.168.0.11
set routing-options autonomous-system 65500
set protocols bgp group ebgp_grp type external
set protocols bgp group ebgp_grp peer-as 65501
set protocols bgp group ebgp_grp neighbor 192.0.2.2
set protocols bgp group ebgp_grp neighbor 192.0.2.2 authentication-key-chain new_auth_key
set protocols bgp group ebgp_grp neighbor 192.0.2.2 authentication-algorithm ao
R2
[edit]
set interfaces ge-0/0/1 description R2-to-R1-Link
set interfaces ge-0/0/1 unit 0 family inet address 192.0.2.2/30
set interfaces lo0 unit 0 family inet address 192.168.0.12/32
set routing-options router-id 192.168.0.12
set routing-options autonomous-system 65501
set protocols bgp group ebgp_grp type external
set protocols bgp group ebgp_grp peer-as 65500
set protocols bgp group ebgp_grp neighbor 192.0.2.1
set protocols bgp group ebgp_grp neighbor 192.0.2.1 authentication-key-chain new_auth_key
set protocols bgp group ebgp_grp neighbor 192.0.2.1 authentication-algorithm ao
Step-By-Step Procedure
-
Enter configuration mode.
-
Configure basic settings such as the interface IP address, interface description, a loopback address, router-ID, AS number on both devices.
R1
[edit]user@R1# set interfaces ge-0/0/1 description R1-to-R2-Link user@R1# set interfaces ge-0/0/1 unit 0 family inet address 192.0.2.1/30 user@R1# set interfaces lo0 unit 0 family inet address 192.168.0.11/32 user@R1# set routing-options router-id 192.168.0.11 user@R1# set routing-options autonomous-system 65500R2
[edit]user@R2# set interfaces ge-0/0/1 description R2-to-R1-Link user@R2# set interfaces ge-0/0/1 unit 0 family inet address 192.0.2.2/30 user@R2# set interfaces lo0 unit 0 family inet address 192.168.0.12/32 user@R2# set routing-options router-id 192.168.0.12 user@R2# set routing-options autonomous-system 65501 -
Configure an EBGP between R1 and R2.
R1
[edit]user@R1# set protocols bgp group ebgp_grp type external user@R1# set protocols bgp group ebgp_grp peer-as 65501 user@R1# set protocols bgp group ebgp_grp neighbor 192.0.2.2R2
[edit]user@R2# set protocols bgp group ebgp_grp type external user@R2# set protocols bgp group ebgp_grp peer-as 65500 user@R2# set protocols bgp group ebgp_grp neighbor 192.0.2.1 -
Associate the authentication keychain
new_auth_keyand the authentication algorithmaoto the BGP session on both devices.R1
[edit]user@R1# set protocols bgp group ebgp_grp neighbor 192.0.2.2 authentication-key-chain new_auth_key user@R1# set protocols bgp group ebgp_grp neighbor 192.0.2.2 authentication-algorithm aoR2
[edit]user@R2# set protocols bgp group ebgp_grp neighbor 192.0.2.1 authentication-key-chain new_auth_key user@R2# set protocols bgp group ebgp_grp neighbor 192.0.2.1 authentication-algorithm ao -
Enter
commitfrom configuration mode on both devices.Once you commit the configurations statements on both devices the BGP session should establish using the TCP-AO authentication method.
Results
Confirm your configurations by using the show interfaces,
show routing-options, and show
protocols commands from configuration mode.
user@R1# show interfaces
ge-0/0/1 {
     description R1-to-R2-Link;
    unit 0 {
        family inet {
            address 192.0.2.1/30;
        }
    }
}
lo0 {
     unit 0 {
        family inet {
            address 192.168.0.11/32;
        }
    }
}
user@R1# show routing-options
autonomous-system 65500;
user@R1# show protocols
bgp {
    group ebgp_grp {
        type external;
        peer-as 65500;
        neighbor 192.0.2.1 {
            authentication-algorithm ao;
            authentication-key-chain new_auth_key;
        {
    {
{
bgp {
    group ebgp_grp {
        type external;
        peer-as 65551;
    neighbor 192.0.2.2 {
        authentication-algorithm ao;
        authentication-key-chain new_auth_key;
        }
    }
}
Verification
Verify BGP Session Establishment
Purpose
Confirm BGP session establishment output after enabling TCP-AO.
Action
View a BGP summary of BGP session state with the show bgp
summary operational mode command.
user@R1> show bgp summary
Threading mode: BGP I/O
Default eBGP mode: advertise - accept, receive - accept
Groups: 1 Peers: 1 Down peers: 0
Table          Tot Paths  Act Paths Suppressed    History Damp State    Pending
inet.0
                       0          0          0          0          0          0
Peer                     AS      InPkt     OutPkt    OutQ   Flaps Last Up/Dwn State|#Active/Received/Accepted/Damped...
192.0.2.2             65501          6          4       0       0        1:19 Establ
  inet.0: 0/0/0/0
Meaning
The highlighted output values indicate that BGP has successfully established a session with the TCP-AO authentication method 1:19 minute ago.
Verify BGP Session is Using TCP-AO
Purpose
Verify a BGP neighbor is authenticated with the TCP-AO keychain.
Action
Use the show bgp neighbor
neighbor
command to view
configuration details for BGP peers. To filter only
authentication-specific details in the output, use the pipe (|)
function and match on authentication, as shown:
user@R1> show bgp neighbor 192.0.2.2 | match authentication
Authentication key chain: new_auth_key
  Authentication algorithm: ao
Meaning
The output indicates that authentication keychain
new_auth_key and Authentication algorithm
ao is applied to the BGP neighbor
192.0.2.2.
Example: Use TCP-AO to Authenticate an LDP Session
This example shows you how to authenticate an LDP session using a TCP Authentication Option (TCP-AO) keychain.
Requirements
This example uses the following hardware and software components:
-
MX Series or PTX Series routers.
-
Junos OS Release 20.3R1 or later version.
-
Configure a keychain
new_auth_key. See Configure a Keychain (TCP-AO).
Overview
Label Distribution Protocol (LDP) is an MPLS signaling protocol. It allows routers to establish label-switched paths (LSPs) through a network. TCP-AO helps enhance the security of sessions created among LDP peers.

Configuration
In this example, you associate the TCP-AO authentication keychain
new_auth_key and authentication algorithm
ao to both devices to authenticate their LDP session.
CLI Quick Configuration
To quickly configure this example, copy the following commands, paste them into a text file, remove any line breaks, change any details necessary to match your network configuration, and then copy and paste the commands into the CLI.
R1
                  [edit]


set interfaces ge-0/0/1 description R1-to-R2-Link
set interfaces ge-0/0/1 unit 0 family inet address 192.0.2.1/30
set interfaces ge-0/0/1 unit 0 family mpls
set interfaces lo0 unit 0 family inet address 192.168.0.11/32
set routing-options router-id 192.168.0.11
set protocols ldp interface ge-0/0/1.0
set protocols ldp interface lo0.0
set protocols ldp session 192.168.0.12 authentication-algorithm ao
set protocols ldp session 192.168.0.12 authentication-key-chain new_auth_key
set protocols ospf area 0.0.0.0 interface ge-0/0/1.0
set protocols ospf area 0.0.0.0 interface lo0.0
R2
                  [edit]


                  set interfaces ge-0/0/1 description R2-to-R1-Link
set interfaces ge-0/0/1 unit 0 family inet address 192.0.2.2/30
set interfaces ge-0/0/1 unit 0 family mpls
set interfaces lo0 unit 0 family inet address 192.168.0.12/32
set routing-options router-id 192.168.0.12
set protocols ldp interface ge-0/0/1.0
set protocols ldp interface lo0.0
set protocols ldp session 192.168.0.11 authentication-algorithm ao
set protocols ldp session 192.168.0.11 authentication-key-chain new_auth_key
set protocols ospf area 0.0.0.0 interface ge-0/0/1.0
set protocols ospf area 0.0.0.0 interface lo0.0
Step-By-Step Procedure
-
Enter configuration mode.
-
Configure basic setup such as device interface, loopback, interface description, router ID, AS number on R1 and R2.
R1
[edit]user@R1# set interfaces ge-0/0/1 description R1-to-R2-Link user@R1# set interfaces ge-0/0/1 unit 0 family inet address 192.0.2.1/30 user@R1# set interfaces lo0 unit 0 family inet address 192.168.0.11/32 user@R1# set routing-options router-id 192.168.0.11R2
[edit]user@R2# set interfaces ge-0/0/1 description R2-to-R1-Link user@R2# set interfaces ge-0/0/1 unit 0 family inet address 192.0.2.2/30 user@R2# set interfaces lo0 unit 0 family inet address 192.168.0.12/32 user@R2# set routing-options router-id 192.168.0.12 -
Configure MPLS and LDP on both devices.
R1
[edit]user@R1# set interfaces ge-0/0/1 unit 0 family mpls user@R1# set protocols ldp interface ge-0/0/1.0 user@R1# set protocols ldp interface lo0.0R2
[edit]user@R2# set interfaces ge-0/0/1 unit 0 family mpls user@R2# set protocols ldp interface ge-0/0/1.0 user@R2# set protocols ldp interface lo0.0 -
Configure an interior gateway protocol (IGP) to advertise loopback address reachability. In this example, we configure OSPF.
R1
[edit protocols]user@R1# set ospf area 0.0.0.0 interface ge-0/0/1.0 user@R1# set ospf area 0.0.0.0 interface lo0.0 passiveR2
[edit protocols]user@R2# set ospf area 0.0.0.0 interface ge-0/0/1.0 user@R2# set ospf area 0.0.0.0 interface lo0.0 passive -
Associate
authentication-key-chain new_auth_keyandauthentication-algorithm aowith the label space ID of R1 and R2.R1
[edit protocols]user@R1# set ldp session 192.168.0.12 authentication-algorithm ao user@R1# set ldp session 192.168.0.12 authentication-key-chain new_auth_keyR2
[edit protocols]user@R2# set ldp session 192.168.0.11 authentication-algorithm ao user@R2# set ldp session 192.168.0.11 authentication-key-chain new_auth_key -
Enter
commitfrom the configuration mode on both devices.
Results
Confirm your configuration by using the show interfaces,
show routing-options and show
protocols commands.
user@R1# show interfaces
ge-0/0/1 {
     description R1-to-R2-Link;
    unit 0 {
        family inet {
            address 192.0.2.1/30;
        }
    }
}
lo0 {
     unit 0 {
        family inet {
            address 192.168.0.11/32;
        }
    }
}
user@R1# show routing-options
router-id 192.168.0.11;
user@R1# show protocols
ldp {
     interface ge-0/0/1.0;
    interface lo0.0 passive;
            authentication-algorithm ao;
            authentication-key-chain new_auth_key;
        {
{
ospf {
    area 0.0.0.0 {
        interface ge-0/0/1.0;
        interface lo0.0;
    {
{
Verification
Verify LDP Session
Purpose
Verify LDP session Establishment with TCP-AO.
Action
Use the show ldp session detail operational mode command
to verify the LDP session is correctly established.
user@R1> show ldp session detail


                     Address: 192.168.0.12, State: Operational, Connection: Open, Hold time: 22
  Session ID: 192.168.0.11:0--192.168.0.12:0
  Next keepalive in 2 seconds
  Passive, Maximum PDU: 4096, Hold time: 30, Neighbor count: 1
  Neighbor types: discovered
  Keepalive interval: 10, Connect retry interval: 1
  Local address: 192.168.0.11, Remote address: 192.168.0.12
  Up for 01:11:59
  Last down 01:13:12 ago; Reason: authentication key was changed
  Number of session flaps: 2
  Capabilities advertised: none
  Capabilities received: none
  Protection: disabled
  Session flags: none
  Authentication type: new_auth_key(ao key-chain, 192.168.0.12/32)
  Local - Restart: disabled, Helper mode: enabled
  Remote - Restart: disabled, Helper mode: enabled
  Local maximum neighbor reconnect time: 120000 msec
  Local maximum neighbor recovery time: 240000 msec
  Local Label Advertisement mode: Downstream unsolicited
  Remote Label Advertisement mode: Downstream unsolicited
  Negotiated Label Advertisement mode: Downstream unsolicited
  MTU discovery: disabled
  Nonstop routing state: Not in sync
  Next-hop addresses received:
    192.0.2.2
    192.168.0.12
    128.49.110.110
Meaning
The output indicates that LDP session is established.
Example: Use TCP-AO to Authenticate RPKI Validation Sessions
Overview
Resource Public Key Infrastructure (RPKI) is a public key infrastructure framework that is designed to secure the Internet's routing infrastructure, specifically the BGP. RPKI provides a way to connect Internet number resource information, such as IP Addresses, to a trust anchor. By using RPKI, legitimate holders of number resources are able to control the operation of Internet routing protocols to prevent route hijacking and other attacks.
Starting in Junos OS Release 22.2R1, you can authenticate RPKI sessions by using TCP Authentication Option (TCP-AO) and keychain.
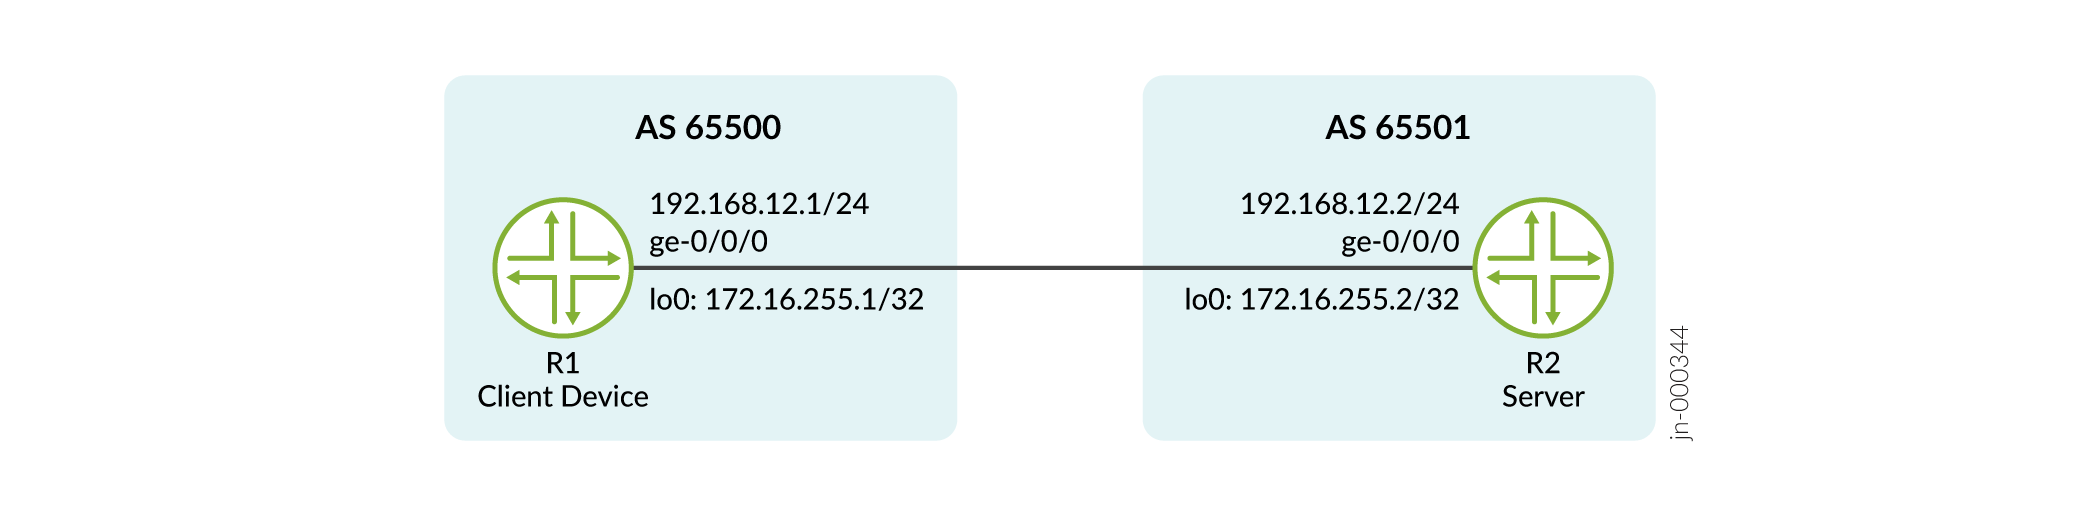
This example shows you how to authenticate an RPKI validation session using a TCP-AO keychain. We'll be establishing an authenticated RPKI session between a client device (R1) and a server (R2).
Requirements
This example uses the following hardware and software components:
- 2 MX Series routers
- Junos OS Release 22.2R1 or later version.
Topology
Configuration
In this example, you must associate the TCP-AO authentication keychain
new_auth_key and authentication algorithm
ao on both devices to authenticate an RPKI connection.
CLI Quick Configuration
To quickly configure this example, copy the following commands, paste them into a text file, remove any line breaks, change any details necessary to match your network configuration, and then copy and paste the commands into the CLI.
R1
[edit]
set system host-name R1
set interfaces ge-0/0/0 description R1-to-R2-Link
set interfaces ge-0/0/0 unit 0 family inet address 192.168.12.1/24
set interfaces lo0 unit 0 family inet address 172.16.255.1/32
set routing-options router-id 172.16.255.1
set routing-options autonomous-system 65500
set security authentication-key-chains key-chain new_auth_key key 0 secret "$ABC123"
set security authentication-key-chains key-chain new_auth_key key 0 start-time "2022-5-18.04:00:00 -0700"
set security authentication-key-chains key-chain new_auth_key key 0 algorithm ao
set security authentication-key-chains key-chain new_auth_key key 0 ao-attribute send-id 3
set security authentication-key-chains key-chain new_auth_key key 0 ao-attribute recv-id 8
set security authentication-key-chains key-chain new_auth_key key 1 secret "$ABC123"
set security authentication-key-chains key-chain new_auth_key key 1 start-time "2022-6-18.04:00:00 -0700"
set security authentication-key-chains key-chain new_auth_key key 1 algorithm ao
set security authentication-key-chains key-chain new_auth_key key 1 ao-attribute send-id 1
set security authentication-key-chains key-chain new_auth_key key 1 ao-attribute recv-id 2
set routing-options validation group to_servers session 192.168.12.2 port 8282
set routing-options validation group to_servers session 192.168.12.2 authentication-algorithm ao
set routing-options validation group to_servers session 192.168.12.2 authentication-key-chain new_auth_key
R2
[edit]
set system host-name R2
set logical-systems rv_server_1 interfaces ge-0/0/0 unit 0 family inet address 192.168.12.2/24
set interfaces lo0 unit 0 family inet address 172.16.255.2/32
set routing-options router-id 172.16.255.2
set routing-options autonomous-system 65501
set logical-systems rv_server_1 routing-options validation local-cache listen-port 8282
set logical-systems rv_server_1 routing-options validation group to_dut session 192.168.12.1 local-cache
set logical-systems rv_server_1 routing-options validation group to_dut session 192.168.12.1 local-address 192.168.12.2
set security authentication-key-chains key-chain new_auth_key key 0 secret "$ABC123"
set security authentication-key-chains key-chain new_auth_key key 0 start-time "2022-5-18.04:00:00 -0700"
set security authentication-key-chains key-chain new_auth_key key 0 algorithm ao
set security authentication-key-chains key-chain new_auth_key key 0 ao-attribute send-id 8
set security authentication-key-chains key-chain new_auth_key key 0 ao-attribute recv-id 3
set security authentication-key-chains key-chain new_auth_key key 1 secret "$ABC123"
set security authentication-key-chains key-chain new_auth_key key 1 start-time "2022-6-18.04:00:00 -0700"
set security authentication-key-chains key-chain new_auth_key key 1 algorithm ao
set security authentication-key-chains key-chain new_auth_key key 1 ao-attribute send-id 2
set security authentication-key-chains key-chain new_auth_key key 1 ao-attribute recv-id 1
set logical-systems rv_server_1 routing-options validation group to_dut session 192.168.12.1 authentication-algorithm ao
set logical-systems rv_server_1 routing-options validation group to_dut session 192.168.12.1 authentication-key-chain new_auth_key
Step-By-Step Procedure
-
Configure basic settings such as, interfaces, a loopback address, router-ID, and AS number on both devices. On R2, we configure logical systems interface for the server.
R1
[edit]
user@R1# set system host-name R1
user@R1# set interfaces ge-0/0/0 description R1-to-R2-Link
user@R1# set interfaces ge-0/0/0 unit 0 family inet address 192.168.12.1/24
user@R1# set interfaces lo0 unit 0 family inet address 172.16.255.1/32
user@R1# set routing-options router-id 172.16.255.1
user@R1# set routing-options autonomous-system 65500
R2
[edit]
user@R2# set system host-name R2
user@R2# set logical-systems rv_server_1 interfaces ge-0/0/0 unit 0 family inet address 192.168.12.2/24
user@R2# set interfaces lo0 unit 0 family inet address 172.16.255.2/32
user@R2# set routing-options router-id 172.16.255.2
user@R2# set routing-options autonomous-system 65501
-
Configure a TCP session on the client device (R1) with the RPKI server (R2) with an alternative TCP port number.
R1
[edit]
user@R1# set routing-options validation group to_servers session 192.168.12.2 port 8282
-
On the server R2, configure an RPKI session with the client R1 for origin validation.
[edit]
user@R2# set logical-systems rv_server_1 routing-options validation group to_dut session 192.168.12.1 local-cache
user@R2# set logical-systems rv_server_1 routing-options validation group to_dut session 192.168.12.1 local-address 192.168.12.2
-
Create a keychain
new_auth_keywith the first key, (key 0):R1
[edit security]
user@R1# set authentication-key-chains key-chain new_auth_key key 0 secret secretpassword start-time 2022-5-18.04:00 algorithm ao ao-attribute send-id 3 recv-id 8
R2 (with send-id and recv-id values reversed)
[edit security]
user@R2# set authentication-key-chains key-chain new_auth_key key 0 secret secretpassword start-time 2022-5-18.04:00 algorithm ao ao-attribute send-id 8 recv-id 3
-
To add another key (key 1), after creating key 0:
R1
[edit security authentication-key-chains key-chain new_auth_key]
user@R1# set key 1 secret secretpassword start-time 2022-6-18.04:00 algorithm ao ao-attribute send-id 1 recv-id 2
R2 (with send-id and recv-id values reversed)
[edit security authentication-key-chains key-chain new_auth_key]
user@R2# set key 1 secret secretpassword start-time 2022-6-18.04:00 algorithm ao ao-attribute send-id 2 recv-id 1
-
Apply the configured keychain
new_auth_keyand authentication algorithmaoon both R1 and R2.R1
[edit]
user@R1# set routing-options validation group to_servers session 192.168.12.2 authentication-algorithm ao
user@R1# set routing-options validation group to_servers session 192.168.12.2 authentication-key-chain new_auth_key
R2
[edit]
user@R2# set logical-systems rv_server_1 routing-options validation group to_dut session 192.168.12.1 authentication-algorithm ao
user@R2# set logical-systems rv_server_1 routing-options validation group to_dut session 192.168.12.1 authentication-key-chain new_auth_key
-
Enter
commitfrom configuration mode on both devices to activate your changes. -
To verify the keychain
new_auth_keywith the two keys configured, use theshow security authentication-key-chainscommand from configuration mode.
Results
Check the results of the keychain configuration on R1:
user@R1# show security
                                    authentication-key-chains
key-chain new_auth_key {
    key 0 {
        secret "$ABC123"; ## SECRET-DATA
        start-time "2022-5-18.04:00:00 -0700";
        algorithm ao;
        ao-attribute {
            send-id 3;
            recv-id 8;
        }
    }
    key 1 {
        secret "$ABC123"; ## SECRET-DATA
        start-time "2022-6-18.04:00:00 -0700";
        algorithm ao;
        ao-attribute {
            send-id 1;
            recv-id 2;
        }
    }
}
Confirm the remaining configurations applied on R1 by using the following commands:
user@R1# show interfaces
ge-0/0/0 {
    description R1-to-R2-Link;
    unit 0 {
        family inet {
            address 192.168.12.1/24;
        }
    }
}
lo0 {
    unit 0 {
        family inet {
            address 172.16.255.1/32;
        }
    }
}
user@R1# show routing-options
router-id 172.16.255.1;
autonomous-system 65500;
validation {
    group to_servers {
        session 192.168.12.2 {
            authentication-algorithm ao;
            authentication-key-chain new_auth_key;
            port 8282;
        }
    }
}
Verification
Purpose
Verify the session is established with TCP-AO keychain and algorithm configured on both the peers.
Action
View a validated session by using the show validation session
192.168.12.2 detail operational mode command.
user@R1> show validation session 192.168.12.2 detail
Session 192.168.12.2, State: up, Session index: 2
  Group: to_servers, Preference: 100
  Port: 8282
  Refresh time: 300s
  Hold time: 600s
  Record Life time: 3600s
  Serial (Full Update): 6
  Serial (Incremental Update): 6
  Authentication key-chain: new_auth_key
    Session flaps: 1
    Session uptime: 2d 01:40:05
    Last PDU received: 00:04:59
    IPv4 prefix count: 0
    IPv6 prefix count: 0
Meaning
The output indicates the session is up with the configured keychain
new_auth_key.
Change History Table
Feature support is determined by the platform and release you are using. Use Feature Explorer to determine if a feature is supported on your platform.