Example: Configuring WRED Drop Profiles
You can configure interpolated weighted random early detection (WRED) profiles to control traffic congestion by controlling packet drop characteristics for different packet loss priorities.
Do not enable WRED on lossless traffic flows. Use priority-based flow control (PFC) to prevent packet loss on lossless forwarding classes.
You cannot enable WRED on multidestination (multicast) queues. You can enable WRED only on unicast queues.
Requirements
This example uses the following hardware and software components:
One QFX switch
Any supported Junos release
Overview
You associate WRED drop profiles with loss priorities in a scheduler. When you map the scheduler to a forwarding class (queue), you apply the interpolated drop profile to traffic of the specified loss priority on that queue. Drop profiles specify two values, which work as pairs:
Fill level—The queue fullness value, which represents a percentage of the memory used to store packets in relation to the total amount of memory allocated to the queue.
Drop probability—The percentage value that corresponds to the likelihood that an individual packet is dropped.
On ECN-enabled queues, the drop profile sets the threshold for when the queue should mark a packet as experiencing congestion (see CoS Explicit Congestion Notification (ECN)). On ECN-enabled queues, the switch does not use the drop profile to control dropping packets that are not ECN-capable packets during periods of congestion. Instead, the switch uses the tail-drop algorithm to drop non-ECN-capable packets during periods of congestion. When a queue fills to its maximum level of fullness, tail-drop simply drops all subsequently arriving packets until there is space in the queue to buffer more packets. All non-ECN-capable packets are treated the same way.
Configuring WRED Drop Profiles on Switches Except QFX10000
Configuration
Step-by-Step Procedure
Interpolated means that the switch creates a smooth drop curve from a drop start point to a drop end point, with a maximum drop rate that is reached at the drop end point:
Drop start point—Percentage of average queue fill level when the WRED algorithm starts to drop packets. Before the drop start point, no packets are scheduled to drop.
Drop end point—Average queue fill level at which all subsequently arriving packets are dropped. When the queue fill levels falls below the drop end point, packets begin to be forwarded again. (At the drop end point, the packet drop probability becomes 100 percent.)
Maximum drop rate—Drop probability when the average queue fill level reaches the drop end point.
You set the drop start point and the drop end point by specifying two queue fill level percentage values. The first value is the drop start point and the second value is the drop end point.
You set the maximum drop rate by specifying two drop probability percentage values. The first value is always zero (0), which is the minimum drop rate, the probability of dropping a packet at the drop start point. The second value is the maximum drop rate at the drop end point.
The drop rate is zero until the queue fill level reaches the drop start point. As the queue continues to fill, packets drop in smooth linear curve until the queue reaches the drop end point, when packets drop at the maximum drop rate. If the queue fills beyond the drop end point, all packets that match the drop profile are dropped.
Figure 1 shows the graph for a drop profile with a drop start point of 30 percent, a drop end point of 50 percent, and a maximum drop rate of 80 percent.
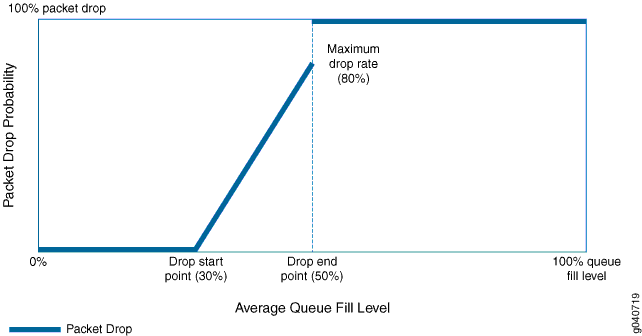
The graph shows that when the queue fill level is less than 30 percent, the packet drop rate is zero. When the queue fill level reaches 30 percent, packets begin to drop. As the queue fills, a higher percentage of packets drop. When the queue fill level reaches 50 percent, the packet drop rate has climbed to 80 percent. When the queue fill level exceeds 50 percent, all packets drop.
This example describes how to configure the drop profile shown in Figure 1. The drop profile will have:
The name
be-dp130 percent for the drop start point (first
fill-levelsetting)50 percent for the drop end point (second
fill-levelsetting)0 percent for the minimum drop rate (first
drop-probabilitysetting)80 percent for the maximum drop rate (second
drop-probabilitysetting)
You apply a drop profile by configuring a drop profile map that maps the drop profile to a packet loss priority, and associate the drop profile and packet loss priority with a scheduler. When you map the scheduler to a forwarding class (queue), the switch applies the drop profile to the packets in the forwarding class that have a matching packet loss priority.
Set the drop start point at
30percent, the drop end point at50percent, the minimum drop rate at0percent, and the maximum drop rate at80percent for the drop profilebe-dp1:[edit class-of-service] user@switch# set drop-profile be-dp1 interpolate fill-level 30 fill-level 50 drop-probability 0 drop-probability 80
Verification
Verifying the Drop Profile Configuration
Purpose
Verify that you configured the drop profile be-dp1 with the correct drop start and end points and with the correct
drop rates.
Action
Verify the results of the drop profile configuration
using the operational mode command show configuration class-of-service
drop-profiles be-dp1:
user@switch> show configuration class-of-service drop-profiles be-dp1
interpolate {
    fill-level [ 30 50 ];
    drop-probability [ 0 80 ];
}
Configuring WRED Drop Profiles on QFX10000 Switches
Configuration
Step-by-Step Procedure
Each queue fill level pairs with a drop probability. As the queue fills to different levels, every time it reaches a fill level configured in a drop profile, the queue applies the drop probability paired with that fill level to the traffic in the queue that exceeds the fill level. You can configure up to 32 pairs of fill levels and drop probabilities to create a customized packet drop probability curve with up to 32 points of differentiation.
Packets are not dropped until they reach the first configured queue fill level. When the queue reaches the first fill level, packets begin to drop at the configured drop probability rate paired with the first fill level. When the queue reaches the second fill level, packets begin to drop at the configured drop probability rate paired with the second fill level. This process continues for the number of fill level/drop probability pairs that you configure in the drop profile.
Drop profiles are interpolated. An interpolated drop profile gradually increases the drop probability along a curve between each configured fill level. When the queue reaches the next fill level, the drop probability reaches the drop probability paired with that fill level.
This example describes how to configure a drop profile with three fill level/drop probability pairs:
Drop profile name—
be-dp1Queue fill levels—25 percent, 50 percent, 75 percent
Drop probabilities—30 percent, 60 percent, 100 percent
Each of the three fill levels pairs with a drop probability to program the interpolated drop profile curve.
You apply a drop profile by configuring a drop profile map that maps the drop profile to a packet loss priority, and associate the drop profile and packet loss priority with a scheduler. When you map the scheduler to a forwarding class (queue), the switch applies the drop profile to the packets in the forwarding class that have a matching packet loss priority.
To configure a drop profile:
Set the drop start point at a
25percent fill level, an intermediate fill level of50percent, and a drop end point of75percent. Set the paired drop probabilities to30percent,60percent, and100percent, respectively, for drop profilebe-dp1:[edit class-of-service] user@switch# set drop-profile be-dp1 interpolate fill-level [ 25 50 75 ] drop-probability [ 30 60 100 ]
Verification
Verifying the Drop Profile Configuration
Purpose
Verify that you configured the drop profile be-dp1 with the correct fill levels and drop probabilities.
Action
Verify the results of the drop profile configuration
using the operational mode command show configuration class-of-service
drop-profiles be-dp1:
user@switch> show configuration class-of-service drop-profiles be-dp1
interpolate {
    fill-level [ 25 50 75 ];
    drop-probability [ 30 60 100 ];
}