ON THIS PAGE
Example: Enabling BGP Route Advertisements
Junos OS does not advertise the routes learned from one EBGP peer back to the same
external BGP (EBGP) peer. In addition, the software does not advertise those routes back
to any EBGP peers that are in the same autonomous system (AS) as the originating peer,
regardless of the routing instance. You can modify this behavior by including the
advertise-peer-as
statement in the configuration.
If you include the advertise-peer-as statement in the configuration, BGP
advertises the route regardless of this check.
To restore the default behavior, include the no-advertise-peer-as
statement in the configuration:
no-advertise-peer-as;
The route suppression default behavior is disabled if the as-override
statement is included in the configuration. If you include both the
as-override
and no-advertise-peer-as statements in the configuration, the
no-advertise-peer-as statement is ignored.
Requirements
No special configuration beyond device initialization is required before you configure this example.
This example was updated and re-validated on Junos release 21.2R1.
Overview
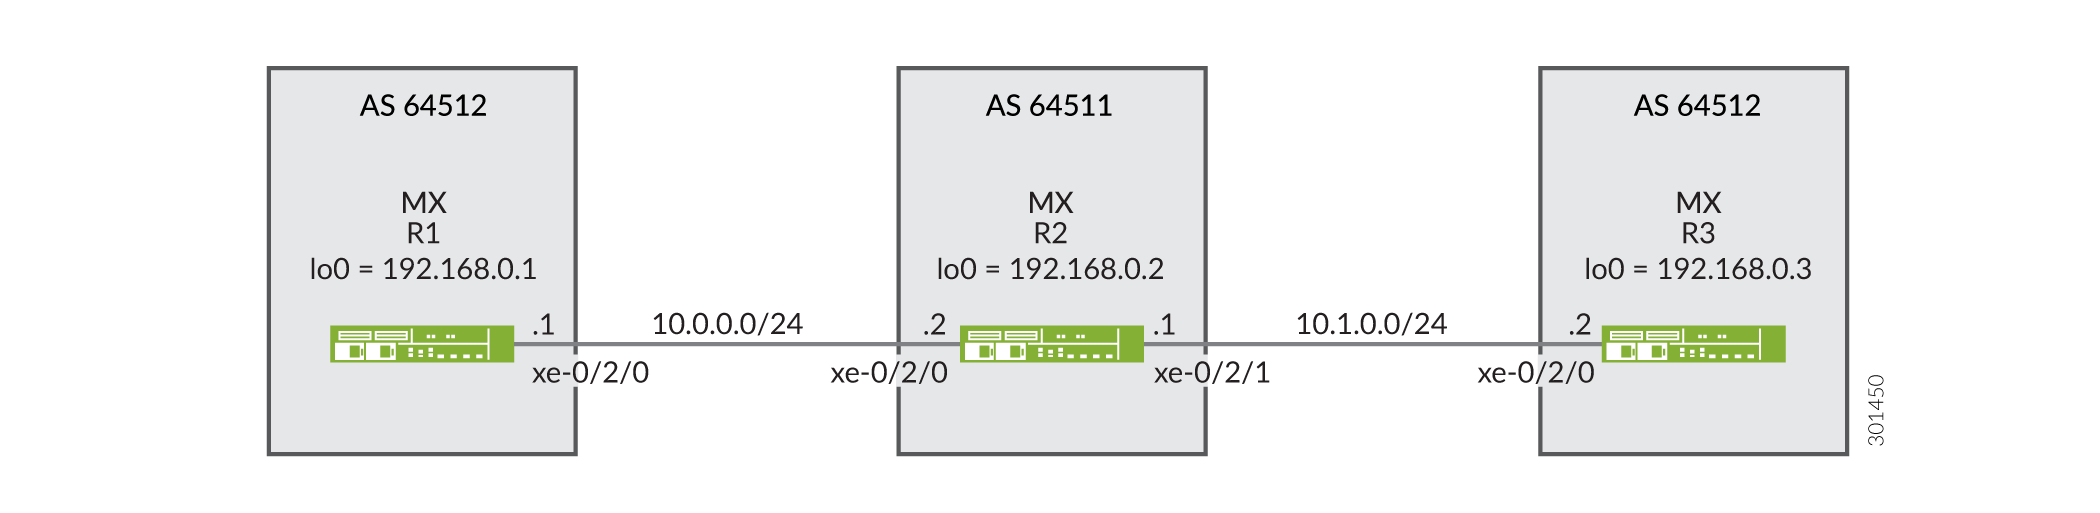
This example shows three routing devices with external BGP (EBGP) connections. Device R2 has an EBGP connection to Device R1 and another EBGP connection to Device R3. Although separated by Device R2 which is in AS 64511, Device R1 and Device R3 are in the same AS (AS 64512). Device R1 and Device R3 advertise into BGP direct routes to their own loopback interface addresses.
Device R2 receives these loopback interface routes, and the advertise
peer-as statement allows Device R2 to advertise them. Specifically,
Device R1 sends the 192.168.0.1 route to Device R2, and because Device R2 has the
advertise peer-as configured, Device R2 can send the
192.168.0.1 route to Device R3. Likewise, Device R3 sends the 192.168.0.3 route to
Device R2, and advertise peer-as enables Device R2 to forward the
route to Device R1.
To enable Device R1 and Device R3 to accept routes that contain their own AS number
in the AS path, the loops 2 statement is required on Device R1 and
Device R3.
Topology
Configuration
CLI Quick Configuration
To quickly configure this example, copy the following commands, paste them into a
text file, remove any line breaks, change any details necessary to match your
network configuration, and then copy and paste the commands into the CLI at the
[edit] hierarchy level.
Device R1
set interfaces xe-0/2/0 description R1-to-R2
set interfaces xe-0/2/0 unit 0 family inet address 10.0.0.1/30
set interfaces lo0 unit 0 family inet address 192.168.0.1/32
set protocols bgp family inet unicast loops 2
set protocols bgp group ext type external
set protocols bgp group ext export send-direct
set protocols bgp group ext peer-as 64511
set protocols bgp group ext neighbor 10.0.0.2
set policy-options policy-statement send-direct term 1 from protocol direct
set policy-options policy-statement send-direct term 1 then accept
set routing-options autonomous-system 64512
Device R2
set interfaces xe-0/2/0 description R2-to-R1
set interfaces xe-0/2/0 unit 0 family inet address 10.0.0.2/30
set interfaces xe-0/2/1 description R2-to-R3
set interfaces xe-0/2/1 unit 0 family inet address 10.1.0.1/30
set interfaces lo0 unit 0 family inet address 192.168.0.2/32
set protocols bgp group ext type external
set protocols bgp group ext advertise-peer-as
set protocols bgp group ext export send-direct
set protocols bgp group ext neighbor 10.0.0.1 peer-as 64512
set protocols bgp group ext neighbor 10.1.0.2 peer-as 64512
set policy-options policy-statement send-direct term 1 from protocol direct
set policy-options policy-statement send-direct term 1 then accept
set routing-options autonomous-system 64511
Device R3
set interfaces xe-0/2/0 description R3-to-R2
set interfaces xe-0/2/0 unit 0 family inet address 10.1.0.2/30
set interfaces lo0 unit 0 family inet address 192.168.0.3/32
set protocols bgp family inet unicast loops 2
set protocols bgp group ext type external
set protocols bgp group ext export send-direct
set protocols bgp group ext peer-as 64511
set protocols bgp group ext neighbor 10.1.0.1
set policy-options policy-statement send-direct term 1 from protocol direct
set policy-options policy-statement send-direct term 1 then accept
set routing-options autonomous-system 64512
Procedure
Step-by-Step Procedure
The following example requires that you navigate various levels in the configuration hierarchy. For information about navigating the CLI, see Using the CLI Editor in Configuration Mode in the Junos OS CLI User Guide.
To configure Device R1:
-
Configure the device interfaces.
[edit interfaces]
user@R1# set xe-0/2/0 description R1-to-R2
user@R1# set xe-0/2/0 unit 0 family inet address 10.0.0.1/30
user@R1# set lo0 unit 0 family inet address 192.168.0.1/32
-
Configure BGP.
[edit protocols bgp group ext]
user@R1# set type external
user@R1# set peer-as 64511
user@R1# set neighbor 10.0.0.2
-
Prevent routes from Device R3 from being hidden on Device R1 by including the
loops 2statement.The
loops 2statement means that the local device’s own AS number can appear in the AS path up to one time without causing the route to be hidden. The route is hidden if the local device’s AS number is detected in the path two or more times.[edit protocols bgp family inet unicast] user@R1# set loops 2
-
Configure the routing policy that sends direct routes.
[edit policy-options policy-statement send-direct term 1]
user@R1# set from protocol direct
user@R1# set then accept
-
Apply the export policy to the BGP peering session with Device R2.
[edit protocols bgp group ext]
user@R1# set export send-direct
-
Configure the autonomous system (AS) number.
[edit routing-options ]
user@R1# set autonomous-system 64512
Step-by-Step Procedure
To configure Device R2:
-
Configure the device interfaces.
[edit interfaces]
user@R2# set xe-0/2/0 description R2-to-R1
user@R2# set xe-0/2/0 unit 0 family inet address 10.0.0.2/30
user@R2# set xe-0/2/1 description R2-to-R3
user@R2# set xe-0/2/1 unit 0 family inet address 10.1.0.1/30
user@R2# set lo0 unit 0 family inet address 192.168.0.2/32
-
Configure BGP.
[edit  protocols bgp group ext]
user@R2# set type external
user@R2# set neighbor 10.0.0.1 peer-as 64512
user@R2# set neighbor 10.1.0.2 peer-as 64512
-
Configure Device R2 to advertise routes learned from one EBGP peer to another EBGP peer in the same AS.
In other words, advertise to Device R1 routes learned from Device R3 (and the reverse), even though Device R1 and Device R3 are in the same AS.
[edit  protocols bgp group ext]
user@R2# set advertise-peer-as
-
Configure a routing policy that sends direct routes.
[edit policy-options policy-statement send-direct term 1]
user@R2# set from protocol direct
user@R2# set then accept
-
Apply the export policy.
[edit protocols bgp group ext]
user@R2# set export send-direct
-
Configure the AS number.
[edit routing-options]
user@R2# set autonomous-system 64511
Results
From configuration mode, confirm your configuration by entering the
show interfaces, show protocols,
show policy-options, and show
routing-options commands. If the output does not display the
intended configuration, repeat the instructions in this example to correct
the configuration.
Device R1
user@R1# show interfaces
xe-0/2/0 {
    description R1-to-R2;
    unit 0 {
        family inet {
            address 10.0.0.1/30;
        }
    }
}
lo0 {
    unit 0 {
        family inet {
            address 192.168.0.1/32;
        }
    }
}
user@R1# show protocols
bgp {
    family inet {
        unicast {
            loops 2;
        }
    }
    group ext {
        type external;
        export send-direct;
        peer-as 64511;
        neighbor 10.0.0.2;
    }
}
user@R1# show policy-options
policy-statement send-direct {
    term 1 {
        from protocol direct;
        then accept;
    }
}
user@R1# show routing-options
autonomous-system 64512;
Device R2
user@R2# show interfaces
xe-0/2/0 {
    description R2-to-R1;
    unit 0 {
        family inet {
            address 10.0.0.2/30;
        }
    }
}
xe-0/2/1 {
    description R2-to-R3;
    unit 0 {
        family inet {
            address 10.1.0.1/30;
        }
    }
}
lo0 {
    unit 0 {
        family inet {
            address 192.168.0.2/32;
        }
    }
}
user@R2# show protocols
bgp {
    group ext {
        type external;
        advertise-peer-as;
        export send-direct;
        neighbor 10.0.0.1 {
            peer-as 64512;
        }
        neighbor 10.1.0.2 {
            peer-as 64512;
        }
    }
}
user@R2# show policy-options
policy-statement send-direct {
    term 1 {
        from protocol direct;
        then accept;
    }
}
user@R2# show routing-options
autonomous-system 64511;
If you are done configuring the devices, enter commit from
configuration mode.
Verification
Confirm that the configuration is working properly.
Verifying the BGP Routes
Purpose
Make sure that the routing tables on Device R1 and Device R3 contain the expected routes.
Action
-
On Device R2, deactivate the
advertise-peer-asstatement in the BGP configuration.[edit protocols bgp group ext] user@R2# deactivate advertise-peer-as user@R2# commit
-
On Device R3, deactivate the
loopsstatement in the BGP configuration.[edit protocols bgp family inet unicast ] user@R3# deactivate unicast loops user@R3# commit
-
On Device R1, check to see what routes are advertised to Device R2.
user@R1> show route advertising-protocol bgp 10.0.0.2
inet.0: 5 destinations, 6 routes (5 active, 0 holddown, 0 hidden)
  Prefix                  Nexthop              MED     Lclpref    AS path
* 10.0.0.0/30             Self                                    I
* 192.168.0.1/32          Self                                    I
-
On Device R2, check to see what routes are received from Device R1.
user@R2> show route receive-protocol bgp 10.0.0.1
inet.0: 7 destinations, 9 routes (7 active, 0 holddown, 0 hidden)
  Prefix                  Nexthop              MED     Lclpref    AS path
  10.0.0.0/30             10.0.0.1                                64512 I
* 192.168.0.1/32          10.0.0.1                                64512 I
-
On Device R2, check to see what routes are advertised to Device R3.
user@R2> show route advertising-protocol bgp 10.1.0.2
inet.0: 7 destinations, 9 routes (7 active, 0 holddown, 0 hidden)
  Prefix                  Nexthop              MED     Lclpref    AS path
* 10.0.0.0/30             Self                                    I
* 10.1.0.0/30             Self                                    I
* 192.168.0.2/32          Self                                    I
-
On Device R2, activate the
advertise-peer-asstatement in the BGP configuration.[edit protocols bgp group ext] user@R2# activate advertise-peer-as user@R2# commit
-
On Device R2, recheck the routes that are advertised to Device R3.
user@R2> show route advertising-protocol bgp 10.1.0.2
inet.0: 7 destinations, 9 routes (7 active, 0 holddown, 0 hidden)
  Prefix                  Nexthop              MED     Lclpref    AS path
* 10.0.0.0/30             Self                                    I
* 10.1.0.0/30             Self                                    I
* 192.168.0.1/32          Self             64512 I
* 192.168.0.2/32          Self                                    I
* 192.168.0.3/32          10.1.0.2         64512 I
-
On Device R3, check the routes that are received from Device R2.
user@R3> show route receive-protocol bgp 10.1.0.1
inet.0: 5 destinations, 6 routes (5 active, 0 holddown, 0 hidden)
  Prefix                  Nexthop              MED     Lclpref    AS path
* 10.0.0.0/30             10.1.0.1                                64511 I
  10.1.0.0/30             10.1.0.1                                64511 I
* 192.168.0.2/32          10.1.0.1                                64511 I
-
On Device R3, activate the
loopsstatement in the BGP configuration.[edit protocols bgp family inet unicast ] user@R3# activate unicast loops user@R3# commit
-
On Device R3, recheck the routes that are received from Device R2.
user@R3> show route receive-protocol bgp 10.1.0.1
inet.0: 6 destinations, 8 routes (6 active, 0 holddown, 1 hidden)
  Prefix                  Nexthop              MED     Lclpref    AS path
* 10.0.0.0/30             10.1.0.1                                64511 I
  10.1.0.0/30             10.1.0.1                                64511 I
* 192.168.0.1/32          10.1.0.1                                64511 64512 I
* 192.168.0.2/32          10.1.0.1                                64511 I
Meaning
First the advertise-peer-as statement and the
loops statement are deactivated so that the default
behavior can be examined. Device R1 sends to Device R2 a route to Device
R1’s loopback interface address, 192.168.0.1/32. Device R2 does not
advertise this route to Device R3. After activating the
advertise-peer-as statement, Device R2 does advertise
the 192.168.0.1/32 route to Device R3. Device R3 does not accept this route
until after the loops statement is activated.