RIP Authentication
Understanding RIP Authentication
RIPv2 provides authentication support so that RIP links can require authentication keys (passwords) before they become active. Authentication provides an additional layer of security on the network beyond the other security features. By default, this authentication is disabled.
Authentication keys can be specified in either plain-text or MD5 form. Authentication requires all routers within the RIP network or subnetwork to have the same authentication type and key (password) configured.
This type of authentication is not supported on RIPv1 networks.
MD5 authentication uses an encoded MD5 checksum that is included
in the transmitted packet. For MD5 authentication to work, both the
receiving and transmitting routing devices must have the same MD5
key. You define an MD5 key for each interface. If MD5 is enabled on
an interface, that interface accepts routing updates only if MD5 authentication
succeeds. Otherwise, updates are rejected. The routing device only
accepts RIPv2 packets sent using the same key identifier (ID) that
is defined for that interface. Starting in Junos OS Release 20.3R1, we support multiple MD5 authentication
keys for RIPv2 for increased security. This
supports adding of MD5 keys with their start-time. RIPv2
packets are transmitted with MD5 authentication using the first configured
key. RIPv2 authentication switches to the next key based on its configured
key start-time. This provides automatic key switching without
user intervention to change the MD5 keys as in the case of having
only one MD5 key.
Note that the RIPv2 authentication described in this topic is not supported in Junos OS Releases 15.1X49, 15.1X49-D30, or 15.1X49-D40.
See Also
Enabling Authentication with Plain-Text Passwords
To configure authentication that requires a plain-text password to be included in the transmitted packet, enable simple authentication by performing these steps on all RIP devices in the network:
- Navigate to the top of the configuration hierarchy.
- Perform the configuration tasks described in Table 1.
- If you are finished configuring the router, commit the configuration.
Task |
CLI Configuration Editor |
|---|---|
Navigate to Rip level in the configuration hierarchy. |
From the edit protocols rip |
Set the authentication type to simple. |
Set the authentication type to simple:
|
Set the authentication key to a simple-text password. The password can be from 1 through 16 contiguous characters long and can include any ASCII strings. |
Set the authentication key to a simple-text password:
|
See Also
Example: Configuring Route Authentication for RIP using single MD5 key
This example shows how to configure authentication for a RIP network.
Requirements
No special configuration beyond device initialization is required before configuring this example.
Overview
You can configure the router to authenticate RIP route queries. By default, authentication is disabled. You can use one of the following authentication methods:
Simple authentication—Uses a text password that is included in the transmitted packet. The receiving router uses an authentication key (password) to verify the packet.
MD5 authentication—Creates an encoded checksum that is included in the transmitted packet. The receiving router uses an authentication key (password) to verify the packet’s MD5 checksum.
This example shows MD5 authentication.
Figure 1 shows the topology used in this example.
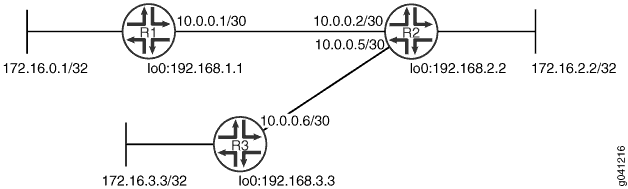
CLI Quick Configuration shows the configuration for all of the devices in Figure 1. The section #d31e70__d31e239 describes the steps on Device R1.
Topology
Configuration
Procedure
CLI Quick Configuration
To quickly configure this
example, copy the following commands, paste them into a text file,
remove any line breaks, change any details necessary to match your
network configuration, and then copy and paste the commands into the
CLI at the [edit] hierarchy level.
Device R1
set interfaces fe-1/2/0 unit 1 family inet address 10.0.0.1/30
set interfaces lo0 unit 1 family inet address 172.16.0.1/32
set interfaces lo0 unit 1 family inet address 192.168.1.1/32
set protocols rip group rip-group export advertise-routes-through-rip
set protocols rip group rip-group neighbor fe-1/2/0.1
set protocols rip authentication-type md5
set protocols rip authentication-key "$ABC123$ABC123"
set protocols rip traceoptions file rip-authentication-messages
set protocols rip traceoptions flag auth
set protocols rip traceoptions flag packets
set policy-options policy-statement advertise-routes-through-rip term 1 from protocol direct
set policy-options policy-statement advertise-routes-through-rip term 1 from protocol rip
set policy-options policy-statement advertise-routes-through-rip term 1 then accept
Device R2
set interfaces fe-1/2/0 unit 2 family inet address 10.0.0.2/30
set interfaces fe-1/2/1 unit 5 family inet address 10.0.0.5/30
set interfaces lo0 unit 2 family inet address 192.168.2.2/32
set interfaces lo0 unit 2 family inet address 172.16.2.2/32
set protocols rip group rip-group export advertise-routes-through-rip
set protocols rip group rip-group neighbor fe-1/2/0.2
set protocols rip group rip-group neighbor fe-1/2/1.5
set protocols rip authentication-type md5
set protocols rip authentication-key "$ABC123$ABC123"
set protocols rip traceoptions file rip-authentication-messages
set protocols rip traceoptions flag auth
set protocols rip traceoptions flag packets
set policy-options policy-statement advertise-routes-through-rip term 1 from protocol direct
set policy-options policy-statement advertise-routes-through-rip term 1 from protocol rip
set policy-options policy-statement advertise-routes-through-rip term 1 then accept
Device R3
set interfaces fe-1/2/0 unit 6 family inet address 10.0.0.6/30
set interfaces lo0 unit 3 family inet address 192.168.3.3/32
set interfaces lo0 unit 3 family inet address 172.16.3.3/32
set protocols rip group rip-group export advertise-routes-through-rip
set protocols rip group rip-group neighbor fe-1/2/0.6
set protocols rip authentication-type md5
set protocols rip authentication-key "$ABC123$ABC123"
set protocols rip traceoptions file rip-authentication-messages
set protocols rip traceoptions flag auth
set protocols rip traceoptions flag packets
set policy-options policy-statement advertise-routes-through-rip term 1 from protocol direct
set policy-options policy-statement advertise-routes-through-rip term 1 from protocol rip
set policy-options policy-statement advertise-routes-through-rip term 1 then accept
Step-by-Step Procedure
The following example requires you to navigate various levels in the configuration hierarchy. For information about navigating the CLI, see Using the CLI Editor in Configuration Mode in the CLI User Guide.
To configure RIP authentication:
Configure the network interfaces.
This example shows multiple loopback interface addresses to simulate attached networks.
[edit interfaces]
user@R1# set fe-1/2/0 unit 1 family inet address 10.0.0.1/30
user@R1# set lo0 unit 1 family inet address 172.16.0.1/32
user@R1# set lo0 unit 1 family inet address 192.168.1.1/32
Create the RIP group and add the interface.
To configure RIP in Junos OS, you must configure a group that contains the interfaces on which RIP is enabled. You do not need to enable RIP on the loopback interface.
[edit protocols rip group rip-group]
user@R1# set neighbor fe-1/2/0.1
Create the routing policy to advertise both direct and RIP-learned routes.
[edit policy-options policy-statement advertise-routes-through-rip term 1]
user@R1# set from protocol direct
user@R1# set from protocol rip
user@R1# set then accept
Apply the routing policy.
In Junos OS, you can only apply RIP export policies at the group level.
[edit protocols rip group rip-group]
user@R1# set export advertise-routes-through-rip
Require MD5 authentication for RIP route queries received on an interface.
The passwords must match on neighboring RIP routers. If the password does not match, the packet is rejected. The password can be from 1 through 16 contiguous characters long and can include any ASCII strings.
Do not enter the password as shown here. The password shown here is the encrypted password that is displayed in the configuration after the actual password is already configured.
[edit protocols rip]
user@R1# set authentication-type md5
user@R1# set authentication-key "$ABC123$ABC123"
Configure tracing operations to track authentication.
[edit protocols rip traceoptions]
user@R1# set file rip-authentication-messages
user@R1# set flag auth
user@R1# set flag packets
Results
From configuration mode, confirm your configuration
by entering the show interfaces, show protocols, and show policy-options commands. If the output does
not display the intended configuration, repeat the configuration instructions
in this example to correct it.
user@R1# show interfaces
fe-1/2/0 {
    unit 1 {
        family inet {
            address 10.0.0.1/30;
        }
    }
}
lo0 {
    unit 1 {
        family inet {
            address 172.16.0.1/32;
            address 192.168.1.1/32;
        }
    }
}
user@R1# show protocols
rip {
    traceoptions {
        file rip-authentication-messages;
        flag auth;
        flag packets;
    }
    authentication-type md5;
    authentication-key $ABC123$ABC123; ## SECRET-DATA
    group rip-group {
        export advertise-routes-through-rip;
        neighbor fe-1/2/0.1;
    }
}
user@R1# show policy-options
policy-statement advertise-routes-through-rip {
    term 1 {
        from protocol [ direct rip ];
        then accept;
    }
}
If you are done configuring the device, enter commit from configuration mode.
Verification
Confirm that the configuration is working properly.
- Checking for Authentication Failures
- Verifying That MD5 Authentication Is Enabled in RIP Update Packets
Checking for Authentication Failures
Purpose
Verify that there are no authentication failures.
Action
From operational mode, enter the show rip statistics command.
user@R1> show rip statistics
RIPv2 info: port 520; holddown 120s.
    rts learned  rts held down  rqsts dropped  resps dropped
              5              0              0              0

fe-1/2/0.1:  5 routes learned; 2 routes advertised; timeout 180s; update interval 30s
Counter                         Total   Last 5 min  Last minute
-------                   -----------  -----------  -----------
Updates Sent                     2669           10            2
Triggered Updates Sent              2            0            0
Responses Sent                      0            0            0
Bad Messages                        0            0            0
RIPv1 Updates Received              0            0            0
RIPv1 Bad Route Entries             0            0            0
RIPv1 Updates Ignored               0            0            0
RIPv2 Updates Received           2675           11            2
RIPv2 Bad Route Entries             0            0            0
RIPv2 Updates Ignored               0            0            0
Authentication Failures             0            0            0
RIP Requests Received               0            0            0
RIP Requests Ignored                0            0            0
none                                0            0            0
Meaning
The output shows that there are no authentication failures.
Verifying That MD5 Authentication Is Enabled in RIP Update Packets
Purpose
Use tracing operations to verify that MD5 authentication is enabled in RIP updates.
Action
From operational mode, enter the show log command.
user@R1> show log rip-authentication-messages | match md5
Feb 15 15:45:13.969462          sending msg 0xb9a8c04, 3 rtes (needs MD5)
Feb 15 15:45:43.229867          sending msg 0xb9a8c04, 3 rtes (needs MD5)
Feb 15 15:46:13.174410          sending msg 0xb9a8c04, 3 rtes (needs MD5)
Feb 15 15:46:42.716566          sending msg 0xb9a8c04, 3 rtes (needs MD5)
Feb 15 15:47:11.425076          sending msg 0xb9a8c04, 3 rtes (needs MD5)
...
Meaning
The (needs MD5) output shows that all route updates require MD5 authentication.
Example: Configuring Route Authentication for RIP using multiple MD5 keys
This example shows how to configure authentication for a RIP network using multiple MD5 keys and how to configure a transition of MD5 keys on a RIP interface.
Requirements
This example uses the following hardware and software components:.
Three ACX Series routers
Junos OS Release 20.3 or later
Overview
MD5 authentication uses an encoded MD5 checksum that is included in the transmitted packet. For MD5 authentication to work, both the receiving and transmitting routing devices must have the same MD5 key.
You define an MD5 key for each interface. If MD5 is enabled on an interface, that interface accepts routing updates only if MD5 authentication succeeds. Otherwise, updates are rejected. The routing device only accepts RIPv2 packets sent using the same key identifier (ID) that is defined for that interface.
For increased security, you can configure multiple MD5 keys, each with a unique key ID, and set the date and time to switch to a new key. The receiver of the RIPv2 packet uses the ID to determine which key to use for authentication. RIPv2 with multiple MD5 key feature supports adding of MD5 keys with their start-time. RIPv2 packets are transmitted with MD5 authentication using the first configured key. RIPv2 authentication switches to the next key based on its configured respective key start-time. This provides automatic key switching without user intervention to change the MD5 keys as in case of having only one MD5 key.
This example shows RIPv2 mutliple MD5 keys authentication.
Figure 2 shows the topology used in this example.
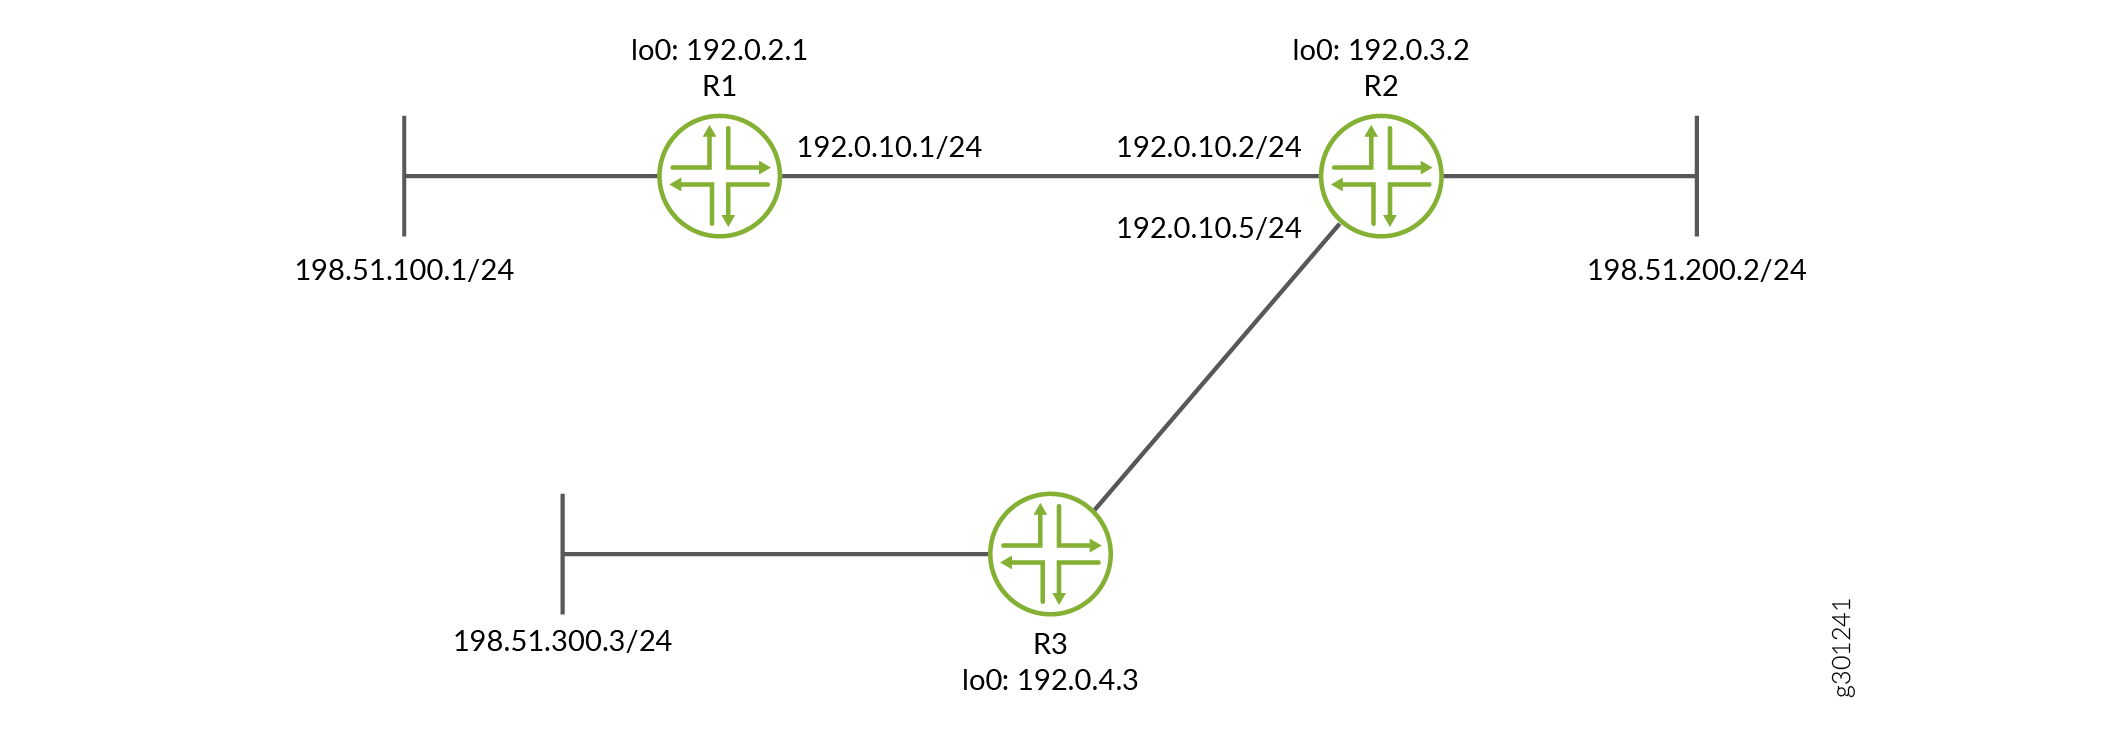
CLI Quick Configuration shows the configuration for all of the devices in Figure 2. The section CLI Quick Configuration describes the steps on Device R1.
Configuration
Procedure
CLI Quick Configuration
To quickly configure this
example, copy the following commands, paste them into a text file,
remove any line breaks, change any details necessary to match your
network configuration, and then copy and paste the commands into the
CLI at the [edit] hierarchy level.
Device R1
set interfaces fe-1/2/0 unit 1 family inet address 10.0.0.1/30
set interfaces lo0 unit 1 family inet address 172.16.0.1/32
set interfaces lo0 unit 1 family inet address 192.168.1.1/32
set protocols rip group rip-group export advertise-routes-through-rip
set protocols rip group rip-group neighbor fe-1/2/0.1
set protocols rip authentication-selective-md5 2 key $ABC123$ABC123 start-time 2020-02-01.01:01
set protocols rip authentication-selective-md5 3 key $MNO123$MNO123 start-time 2020-03-02.02:01
set protocols rip authentication-selective-md5 4 key $XYZ123$XYZ123 start-time 2020-04-03.03:01
set protocols rip traceoptions file rip-authentication-messages
set protocols rip traceoptions flag auth
set protocols rip traceoptions flag packets
set policy-options policy-statement advertise-routes-through-rip term 1 from protocol direct
set policy-options policy-statement advertise-routes-through-rip term 1 from protocol rip
set policy-options policy-statement advertise-routes-through-rip term 1 then accept
Device R2
set interfaces fe-1/2/0 unit 2 family inet address 10.0.0.2/30
set interfaces fe-1/2/1 unit 5 family inet address 10.0.0.5/30
set interfaces lo0 unit 2 family inet address 192.168.2.2/32
set interfaces lo0 unit 2 family inet address 172.16.2.2/32
set protocols rip group rip-group export advertise-routes-through-rip
set protocols rip group rip-group neighbor fe-1/2/0.2
set protocols rip group rip-group neighbor fe-1/2/1.5
set protocols rip authentication-type md5
set protocols rip authentication-selective-md5 2 key $ABC123$ABC123 start-time 2020-02-01.01:01
set protocols rip authentication-selective-md5 3 key $MNO123$MNO123 start-time 2020-03-02.02:01
set protocols rip authentication-selective-md5 4 key $XYZ123$XYZ123 start-time 2020-04-03.03:01
set protocols rip traceoptions file rip-authentication-messages
set protocols rip traceoptions flag auth
set protocols rip traceoptions flag packets
set policy-options policy-statement advertise-routes-through-rip term 1 from protocol direct
set policy-options policy-statement advertise-routes-through-rip term 1 from protocol rip
set policy-options policy-statement advertise-routes-through-rip term 1 then accept
Device R3
set interfaces fe-1/2/0 unit 6 family inet address 10.0.0.6/30
set interfaces lo0 unit 3 family inet address 192.168.3.3/32
set interfaces lo0 unit 3 family inet address 172.16.3.3/32
set protocols rip group rip-group export advertise-routes-through-rip
set protocols rip group rip-group neighbor fe-1/2/0.6
set protocols rip authentication-selective-md5 2 key $ABC123$ABC123 start-time 2020-02-01.01:01
set protocols rip authentication-selective-md5 3 key $MNO123$MNO123 start-time 2020-03-02.02:01
set protocols rip authentication-selective-md5 4 key $XYZ123$XYZ123 start-time 2020-04-03.03:01
set protocols rip traceoptions file rip-authentication-messages
set protocols rip traceoptions flag auth
set protocols rip traceoptions flag packets
set policy-options policy-statement advertise-routes-through-rip term 1 from protocol direct
set policy-options policy-statement advertise-routes-through-rip term 1 from protocol rip
set policy-options policy-statement advertise-routes-through-rip term 1 then accept
Step-by-Step Procedure
The following example requires you to navigate various levels in the configuration hierarchy. For information about navigating the CLI, see Using the CLI Editor in Configuration Mode in the CLI User Guide.
To configure RIP authentication:
Configure the network interfaces.
This example shows multiple loopback interface addresses to simulate attached networks.
[edit interfaces]
user@R1# set fe-1/2/0 unit 1 family inet address 192.0.10.1/24
user@R1# set lo0 unit 1 family inet address 198.51.100.1/24
user@R1# set lo0 unit 1 family inet address 192.0.2.1/32
Create the RIP group and add the interface.
To configure RIP in Junos OS, you must configure a group that contains the interfaces on which RIP is enabled. You do not need to enable RIP on the loopback interface.
[edit protocols rip group rip-group]
user@R1# set neighbor fe-1/2/0
Create the routing policy to advertise both direct and RIP-learned routes.
[edit policy-options policy-statement advertise-routes-through-rip term 1]
user@R1# set from protocol direct
user@R1# set from protocol rip
user@R1# set then accept
Apply the routing policy.
In Junos OS, you can only apply RIP export policies at the group level.
[edit protocols rip group rip-group]
user@R1# set export advertise-routes-through-rip
You can configure multiple MD5 keys by using different Key IDs. The key-IDs must match with the key-IDs of the neighboring RIP routers. If a router receives a packet with a key-id that is not within its configured set of keys, then the packet is rejected and is considered as authentication failure.
The key-ID can be a number from 0 to 255 which uniquely identifies an MD5 key and the key value can be an ASCII string upto 16 characters long.
Do not enter the password as shown here. The password shown here is the encrypted password that is displayed in the configuration after the actual password is already configured.
[edit protocols rip]
user@R1# set authentication-selective-md5 key-id key key-value start-time time
user@R1# set authentication-selective-md5 2 key $ABC123$ABC123 start-time 2020-02-01.01:01
The
authentication-selective-md5can be repeated to configure multiple keys.If you want to migrate from an existing md5 authentication key, then you can configure another key with a start-time in future with enough leeway so as to allow configuring all the routers on the link. The transition to the new key is based on its start-time and it happens as soon as the clock reaches the start-time. You may delete keys that are no longer valid by entering the following command:.
[edit protocols rip]
user@host# delete authentication-selective-md5 key-id
Note:The start time is relevant for transmission only and not for receiving RIPv2 packets. Acceptance of received packets is based on the keys configured.
For example, if the time now is February 1, 2020, 1:00 AM and the following key is configured:
[edit protocols rip]
user@host# set authentication-selective-md5 2 key $ABC123$ABC123 start-time 2020-02-01.01:01
If you want to transition from this key to another key on March 2, at 2:00 AM, and you are able to configure all the routers on the link with the new key at the same time, then you may configure the following key:
[edit protocols rip]
user@host# set authentication-selective-md5 3 key $MNO123$MNO123 start-time 2020-03-02.02:01
At 2:00 AM, once all the routers switch to the new key, you can safely delete key with id 2 by entering the following command.
[edit protocols rip]
user@host# delete authentication-selective-md5 2
Deletion of active key: If you delete the lastest active key, the system checks for the current configuration and uses the key with the latest key-ID within the existing configuration for RIPv2 packet transmission.
For example, If you have configured the following keys with the key-ids:
[edit protocols rip]
user@R1# set authentication-selective-md5 2 key $ABC123$ABC123 start-time 2020-02-01.01:01
user@R1#set authentication-selective-md5 3 key $MNO123$MNO123 start-time 2020-03-02.02:01
user@R1#set authentication-selective-md5 4 key $XYZ123$XYZ123 start-time 2020-04-03.03:01
The active key in this configuration is the key with key ID 4 and is used for sending the RIPv2 packet out. If you delete the active key ID 4, then the system checks for current configuration and looks for the key with the latest start-time, that is the key with ID 3 and uses it for packet transmission.
Configure tracing operations to track authentication.
[edit protocols rip traceoptions]
user@R1# set file rip-authentication-messages
user@R1# set flag auth
user@R1# set flag packets
Results
From configuration mode, confirm your configuration
by entering the show interfaces, show protocols, and show policy-options commands. If the output does
not display the intended configuration, repeat the configuration instructions
in this example to correct it.
user@R1# show interfaces
fe-1/2/0 {
    unit 1 {
        family inet {
            address 192.0.10.1/24;
        }
    }
}
lo0 {
    unit 1 {
        family inet {
            address 198.51.100.1/24;
            address 192.0.2.1/32;
        }
    }
}
user@R1# show protocols
rip {
    traceoptions {
        file rip-authentication-messages;
        flag auth;
        flag packets;
    }
    authentication-selective-md5 2 key $ABC123$ABC123 start-time 2020-02-01.01:01 ## SECRET-DATA
    authentication-selective-md5 3 key $MNO123$MNO123 start-time 2020-03-02.02:01 ## SECRET-DATA
    authentication-selective-md5 4 key $XYZ123$XYZ123 start-time 2020-04-03.03:01 ## SECRET-DATA
    group rip-group {
        export advertise-routes-through-rip;
        neighbor ge-0/0/5.0;
    }
}
user@R1# show policy-options
policy-statement advertise-routes-through-rip {
    term 1 {
        from protocol [ direct rip ];
        then accept;
    }
}
If you are done configuring the device, enter commit from configuration mode.
Verification
Confirm that the configuration is working properly.
- Checking for Authentication Failures
- Checking for the current active MD5 key.
- Verifying That MD5 Authentication Is Enabled in RIP Update Packets
Checking for Authentication Failures
Purpose
To check for authentication failures counters.
Action
From operational mode, enter the show rip statistics command.
user@R1> show rip statistics
RIPv2 info: port 520; holddown 120s.
    rts learned  rts held down  rqsts dropped  resps dropped
              5              0              0              0

ge-0/0/5.0:  5 routes learned; 28 routes advertised; timeout 180s; update interval 30s
Counter                         Total   Last 5 min  Last minute
-------                   -----------  -----------  -----------
Updates Sent                    53058           20            4
Triggered Updates Sent              2            0            0
Responses Sent                      0            0            0
Bad Messages                        0            0            0
RIPv1 Updates Received              0            0            0
RIPv1 Bad Route Entries             0            0            0
RIPv1 Updates Ignored               0            0            0
RIPv2 Updates Received          26538           10            2
RIPv2 Bad Route Entries             0            0            0
RIPv2 Updates Ignored               0            0            0
Authentication Failures               23853            0            0
RIP Requests Received               0            0            0
RIP Requests Ignored                0            0            0
none                                0            0            0
Meaning
The Authentication Failures counter displays the authentication failures count. This output
shows that the authentication failure count is 23853.
Checking for the current active MD5 key.
Purpose
To check for the current active key being used.
Action
From operational mode, enter the show rip neighbor
fe-1/2/0 command.
user@R1> show rip neighbor fe-1/2/0
                  Local  Source          Destination     Send   Receive   In
Neighbor          State  Address         Address         Mode   Mode     Met
--------          -----  -------         -----------     ----   -------  ---
fe-1/2/0           Up 14.14.14.1      224.0.0.9       mcast  both       1
  Auth type: SELECTIVE-MD5, Active key ID: 2, Start time: 1970 Jan  1 05:30:00 IST
Verifying That MD5 Authentication Is Enabled in RIP Update Packets
Purpose
Use tracing operations to verify that MD5 authentication is enabled in RIP updates.
Action
From operational mode, enter the show log command.
user@R1> show log rip-authentication-messages | match md5
Feb 15 15:45:13.969462          sending msg 0xb9a8c04, 3 rtes (needs MD5)
Feb 15 15:45:43.229867          sending msg 0xb9a8c04, 3 rtes (needs MD5)
Feb 15 15:46:13.174410          sending msg 0xb9a8c04, 3 rtes (needs MD5)
Feb 15 15:46:42.716566          sending msg 0xb9a8c04, 3 rtes (needs MD5)
Feb 15 15:47:11.425076          sending msg 0xb9a8c04, 3 rtes (needs MD5)
...
Meaning
The (needs MD5) output shows that all route updates require MD5 authentication.
Change History Table
Feature support is determined by the platform and release you are using. Use Feature Explorer to determine if a feature is supported on your platform.