Real-Time Performance Monitoring for SRX Devices
This section describes the real-time performance monitoring (RPM) feature that allows network operators and their customers to accurately measure the performance of the network between two endpoints.
RPM Overview (SRX)
With the RPM tool, you configure and send probes to a specified target and monitor the analyzed results to determine packet loss, round-trip time, and jitter.
RPM allows you to perform service-level monitoring. When RPM is configured on a device, the device calculates network performance based on packet response time, jitter, and packet loss. These values are gathered by Hypertext Transfer Protocol (HTTP) GET requests, Internet Control Message Protocol (ICMP) requests, and TCP and UDP requests, depending on the configuration.
This section contains the following topics:
- RPM Probes
- RPM Tests
- Probe and Test Intervals
- Jitter Measurement with Hardware Timestamping
- RPM Statistics
- RPM Thresholds and Traps
- RPM for BGP Monitoring
RPM Probes
You gather RPM statistics by sending out probes to a specified probe target, identified by an IP address or URL. When the target receives the probe, it generates responses, which are received by the device. By analyzing the transit times to and from the remote server, the device can determine network performance statistics.
The device sends out the following probe types:
HTTP GET request at a target URL
HTTP GET request for metadata at a target URL
ICMP echo request to a target address (the default)
ICMP timestamp request to a target address
UDP ping packets to a target device
UDP timestamp requests to a target address
TCP ping packets to a target device
UDP and TCP probe types require that the remote server be configured as an RPM receiver so that it generates responses to the probes.
The RPM probe results are also available in the form of MIB objects through the SNMP protocol.
On SRX300, SRX320, SRX340, SRX1500, SRX4600 devices and vSRX Virtual Firewall instances, when you configure basic RPM probes, the following combination of the configuration parameters is not supported:
Source address and destination port and next-hop.
Configuring RPM probe with these parameters prevents sending out RPM probes to a specified probe target. We recommend you to configure either the source address or destination port and next-hop to configure RPM probe.
RPM Tests
Each probed target is monitored over the course of a test. A test represents a collection of probes, sent out at regular intervals, as defined in the configuration. Statistics are then returned for each test. Because a test is a collection of probes that have been monitored over some amount of time, test statistics such as standard deviation and jitter can be calculated and included with the average probe statistics.
Probe and Test Intervals
Within a test, RPM probes are sent at regular intervals, configured in seconds. When the total number of probes has been sent and the corresponding responses received, the test is complete. You can manually set the probe interval for each test to control how the RPM test is conducted.
After all the probes for a particular test have been sent, the test begins again. The time between tests is the test interval. You can manually set the test interval to tune RPM performance.
On SRX340 devices, the RPM server operation with icmp is not supported. The RPM server works fine with TCP and UDP.
Jitter Measurement with Hardware Timestamping
Jitter is the difference in relative transit time between two consecutive probes.
You can timestamp the following RPM probes to improve the measurement of latency or jitter:
ICMP ping
ICMP ping timestamp
UDP ping
UDP ping timestamp
The device supports hardware timestamping of UDP ping and UDP ping timestamp RPM probes only if the destination port is UDP-ECHO (port 7).
Timestamping takes place during the forwarding process of the device originating the probe (the RPM client), but not on the remote device that is the target of the probe (the RPM server).
The supported encapsulations on a device for timestamping are Ethernet including VLAN, synchronous PPP, and Frame Relay. The only logical interface supported is an lt services interface.
RPM probe generation with hardware timestamp can be retrieved through the SNMP protocol.
RPM Statistics
At the end of each test, the device collects the statistics for packet round-trip time, packet inbound and outbound times (for ICMP timestamp probes only), and probe loss as shown in Table 1.
RPM Statistics |
Description |
|---|---|
| Round-Trip Times | |
Minimum round-trip time |
Shortest round-trip time from the Juniper Networks device to the remote server, as measured over the course of the test |
Maximum round-trip time |
Longest round-trip time from the Juniper Networks device to the remote server, as measured over the course of the test |
Average round-trip time |
Average round-trip time from the Juniper Networks device to the remote server, as measured over the course of the test |
Standard deviation round-trip time |
Standard deviation of the round-trip times from the Juniper Networks device to the remote server, as measured over the course of the test |
Jitter |
Difference between the maximum and minimum round-trip times, as measured over the course of the test |
| Inbound and Outbound Times (ICMP Timestamp Probes Only) | |
Minimum egress time |
Shortest one-way time from the Juniper Networks device to the remote server, as measured over the course of the test |
Maximum ingress time |
Shortest one-way time from the remote server to the Juniper Networks device, as measured over the course of the test |
Average egress time |
Average one-way time from the Juniper Networks device to the remote server, as measured over the course of the test |
Average ingress time |
Average one-way time from the remote server to the Juniper Networks device, as measured over the course of the test |
Standard deviation egress time |
Standard deviation of the one-way times from the Juniper Networks device to the remote server, as measured over the course of the test |
Standard deviation ingress time |
Standard deviation of the one-way times from the remote server to the Juniper Networks device, as measured over the course of the test |
Egress jitter |
Difference between the maximum and minimum outbound times, as measured over the course of the test |
Ingress jitter |
Difference between the maximum and minimum inbound times, as measured over the course of the test |
| Probe Counts | |
Probes sent |
Total number of probes sent over the course of the test |
Probe responses received |
Total number of probe responses received over the course of the test |
Loss percentage |
Percentage of probes sent for which a response was not received |
RPM Thresholds and Traps
You can configure RPM threshold values for the round-trip times, ingress (inbound) times, and egress (outbound) times that are measured for each probe, as well as for the standard deviation and jitter values that are measured for each test. Additionally, you can configure threshold values for the number of successive lost probes within a test and the total number of lost probes within a test.
If the result of a probe or test exceeds any threshold, the device generates a system log message and sends any Simple Network Management Protocol (SNMP) notifications (traps) that you have configured.
Starting in Junos OS Release 18.4R1, if the result of a probe or test exceeds the packet loss threshold, the real-time performance monitoring (RPM) test probe is marked as failed. The test probe also fails when the round-trip time (RTT) exceeds the configured threshold value. As a result, the device generates an SNMP notification (trap) and marks the RPM test as failed. RPM allows you to perform service-level monitoring. When RPM is configured on a device, the device calculates network performance based on packet response time, jitter, and packet loss.
RPM for BGP Monitoring
When managing peering networks that are connected using Border Gateway Protocol (BGP), you might need to find out if a path exists between the Juniper Networks device and its configured BGP neighbors. You can ping each BGP neighbor manually to determine the connection status, but this method is not practical when the device has a large number of BGP neighbors configured.
In the device, you can configure RPM probes to monitor the BGP neighbors and determine if they are active.
Guidelines for Configuring RPM Probes for IPv6 (SRX Series Firewalls)
Starting with Junos OS Release 15.1X49-D10, you can configure RPM Probes for IPv6.
Keep the following guidelines in mind when you configure IPv6 addresses for RPM destinations or servers:
IPv6 RPM uses ICMPv6 probe requests. You cannot configure ICMP or ICMP timestamp probe types.
Only Routing Engine-based RPM is supported for IPv6 targets including VRF support, specification of the size of the data portion of ICMPv6 probes, data pattern, and traffic class.
You can configure probes with a combination of IPv4 and IPv6 tests. However, an individual test must be either IPv4 or IPv6.
Routing Engine-based RPM does not support hardware-based, or one-way hardware-based timestamping.
We recommend that you include the
probe-limitstatement at the[edit services rpm]hierarchy level to set the limit on concurrent probes to 10. Higher concurrent probes can result in higher spikes.SNMP set operation is permitted only on ICMP probes and it is not supported for other probe types.
The following table describes the IPv6 special address prefixes that you cannot configure in a probe.
IPV6 Address Type
IPV6 Address Prefix
Node-Scoped Unicast
::1/128 is the loopback address
::/128 is the unspecified address
IPv4-Mapped Addresses
::FFFF:0:0/96
IPv4-Compatible Addresses
:<ipv4-address>/96
Link-Scoped Unicast
fe80::/10
Unique-Local
fc00::/7
Documentation Prefix
2001:db8::/32
6to4
2002::/16
6bone
5f00::/8
ORCHID
2001:10::/28
Teredo
2001::/32
Default Route
::/0
Multicast
ff00::/8
In Routing Engine-based RPM, route-trip time (RTT) spikes might occur because of queuing delays, even with a single test.
Since RPM might open TCP and UDP ports to communicate between the RPM server and RPM client, we recommend that you use firewalls and distributed denial-of-service (DDoS) attack filters to protect against security threats.
IPv6 RPM Probes (vSRX Virtual Firewall)
Starting with Junos OS Release 15.1X49-D10, Route Engine-based RPM can send and receive IPv6 probe packets to monitor performance on IPv6 networks.
A probe request is a standard IPv6 packet with corresponding TCP, UDP, and ICMPv6 headers. A probe response is also a standard IPv6 packet with corresponding TCP, UDP, and ICMPv6 headers. No RPM header is appended to the standard packet for RE-based RPM. An IPv6-based RPM test occurs between an IPv6 RPM client and IPv6 RPM server.
You can have both IPv4 tests and IPv6 tests in the same probe.
Configuring IPv6 RPM Probes (vSRX Virtual Firewall)
Starting with Junos OS Release 15.1X49-D10, you can configure IPv6 destination addresses for an IPv6-based RPM probe test.
To configure an IPv6 RPM test:
Tuning RPM Probes (SRX Series Firewalls)
After configuring an RPM probe, you can set parameters to control probe functions, such as the interval between probes, the total number of concurrent probes that a system can handle, and the source address used for each probe packet.
To tune RPM probes:
Monitoring RPM Probes (SRX Series Firewalls)
The RPM information includes the round-trip time, jitter, and
standard deviation values for each configured RPM test on the device.
To view these RPM properties, select Troubleshoot>RPM>View RPM in the J-Web user interface, or in configuration mode enter the show command:
[edit] user@host# run show services rpm probe-results
In addition to the RPM statistics for each RPM test, the J-Web user interface displays the round-trip times and cumulative jitter graphically. Figure 1 shows sample graphs for an RPM test.
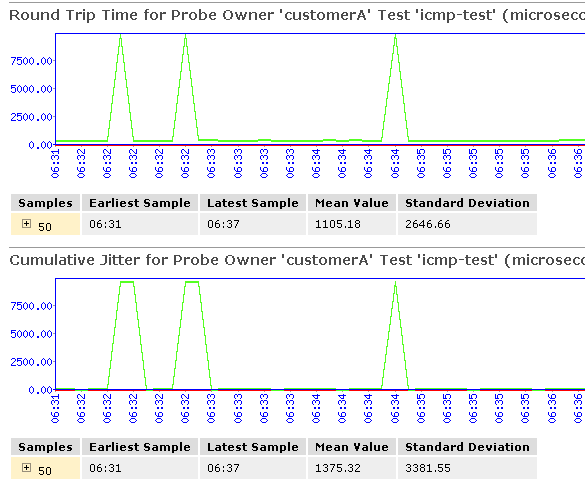
In Figure 1, the round-trip time and jitter values are plotted as a function of the system time. Large spikes in round-trip time or jitter indicate a slower outbound (egress) or inbound (ingress) time for the probe sent at that particular time.
Table 2 summarizes key output fields in RPM displays.
|
Field |
Values |
Additional Information |
|---|---|---|
| Currently Running Tests | ||
|
Graph |
Click the Graph link to display the graph (if it is not already displayed) or to update the graph for a particular test. |
|
|
Owner |
Configured owner name of the RPM test. |
– |
|
Test Name |
Configured name of the RPM test. |
– |
|
Probe Type |
Type of RPM probe configured for the specified test:
|
– |
|
Target Address |
IPv4 address, IPv6 address, or URL of the remote server that is being probed by the RPM test. |
– |
|
Source Address |
Explicitly configured IPv4 or IPv6 source address that is included in the probe packet headers. |
If no source address is configured, the RPM probe packets use the outgoing interface as the source address, and the Source Address field is empty. |
|
Minimum RTT |
Shortest round-trip time from the Juniper Networks device to the remote server, as measured over the course of the test. |
– |
|
Maximum RTT |
Longest round-trip time from the Juniper Networks device to the remote server, as measured over the course of the test. |
– |
|
Average RTT |
Average round-trip time from the Juniper Networks device to the remote server, as measured over the course of the test. |
– |
|
Standard Deviation RTT |
Standard deviation of round-trip times from the Juniper Networks device to the remote server, as measured over the course of the test. |
– |
|
Probes Sent |
Total number of probes sent over the course of the test. |
– |
|
Loss Percentage |
Percentage of probes sent for which a response was not received. |
– |
| Round-Trip Time for a Probe | ||
|
Samples |
Total number of probes used for the data set. |
The Juniper Networks device maintains records of the most recent 50 probes for each configured test. These 50 probes are used to generate RPM statistics for a particular test. |
|
Earliest Sample |
System time when the first probe in the sample was received. |
– |
|
Latest Sample |
System time when the last probe in the sample was received. |
– |
|
Mean Value |
Average round-trip time for the 50-probe sample. |
– |
|
Standard Deviation |
Standard deviation of the round-trip times for the 50-probe sample. |
– |
|
Lowest Value |
Shortest round-trip time from the device to the remote server, as measured over the 50-probe sample. |
– |
|
Time of Lowest Sample |
System time when the lowest value in the 50-probe sample was received. |
– |
|
Highest Value |
Longest round-trip time from the Juniper Networks device to the remote server, as measured over the 50-probe sample. |
– |
|
Time of Highest Sample |
System time when the highest value in the 50-probe sample was received. |
– |
| Cumulative Jitter for a Probe | ||
|
Samples |
Total number of probes used for the data set. |
The Juniper Networks device maintains records of the most recent 50 probes for each configured test. These 50 probes are used to generate RPM statistics for a particular test. |
|
Earliest Sample |
System time when the first probe in the sample was received. |
– |
|
Latest Sample |
System time when the last probe in the sample was received. |
– |
|
Mean Value |
Average jitter for the 50-probe sample. |
– |
|
Standard Deviation |
Standard deviation of the jitter values for the 50-probe sample. |
– |
|
Lowest Value |
Smallest jitter value, as measured over the 50-probe sample. |
– |
|
Time of Lowest Sample |
System time when the lowest value in the 50-probe sample was received. |
– |
|
Highest Value |
Highest jitter value, as measured over the 50-probe sample. |
– |
|
Time of Highest Sample |
System time when the highest jitter value in the 50-probe sample was received. |
– |
Example: Configuring Basic RPM Probes (SRX)
This example shows how to configure basic RPM probes to measure performance between two network endpoints.
Requirements
Before you begin:
Establish basic connectivity.
Configure network interfaces. See Interfaces User Guide for Security Devices.
Overview
In this example, you configure basic probes for two RPM owners, customerA and customerB. You configure the RPM test as icmp-test for customerA with a test interval of 15 seconds and specify a probe type as icmp-ping-timestamp, a probe timestamp, and a target address as 192.178.16.5. You then configure the RPM thresholds and corresponding SNMP traps to catch ingress (inbound) times greater than 3000 microseconds.
Then you configure the RPM test as http-test for customerB with a test interval of 30 seconds and specify a probe type as http-get and a target URL as http://customerB.net. Finally, you configure RPM thresholds and corresponding SNMP traps as probe-failure and test-failure to catch three or more successive lost probes and total lost probes of 10.
On SRX300, SRX320, SRX340, SRX1500 devices and vSRX Virtual Firewall instances, when you configure basic RPM probes, the following combination of the configuration parameters is not supported:
Source address and destination port and next-hop.
Configuring RPM probe with these parameters prevents sending out RPM probes to a specified probe target. We recommend you to configure either the source address or destination port and next-hop to configure RPM probe.
Configuration
Procedure
CLI Quick Configuration
To quickly configure this example, copy the
following commands, paste them into a text file, remove any line breaks,
change any details necessary to match your network configuration,
copy and paste the commands into the CLI at the [edit] hierarchy
level, and then enter commit from configuration mode.
set services rpm probe customerA test icmp-test probe-interval 15 set services rpm probe customerA test icmp-test probe-type icmp-ping-timestamp set services rpm probe customerA test icmp-test hardware-timestamp set services rpm probe customerA test icmp-test target address 192.178.16.5 set services rpm probe customerA test icmp-test thresholds ingress-time 3000 set services rpm probe customerA test icmp-test traps ingress-time-exceeded set services rpm probe customerB test http-test probe-interval 30 set services rpm probe customerB test http-test probe-type http-get set services rpm probe customerB test http-test target url http://customerB.net set services rpm probe customerB test http-test thresholds successive-loss 3 set services rpm probe customerB test http-test thresholds total-loss 10 set services rpm probe customerB test http-test traps probe-failure set services rpm probe customerB test http-test traps test-failure
Step-by-Step Procedure
The following example requires you to navigate various levels in the configuration hierarchy. For instructions on how to do that, see Using the CLI Editor in Configuration Mode in the Junos OS CLI User Guide .
To configure basic RPM probes:
Configure the RPM.
[edit] user@host# edit services rpm
Configure the RPM owners.
[edit services rpm] user@host# set probe customerA user@host# set probe customerB
Configure the RPM test for customerA.
[edit services rpm] user@host# edit probe customerA user@host# set test icmp-test probe-interval 15 user@host# set test icmp-test probe-type icmp-ping-timestamp
Specify a probe timestamp and a target address.
[edit services rpm probe customerA] user@host# set test icmp-test hardware-timestamp user@host# set test icmp-test target address 192.178.16.5
Configure RPM thresholds and corresponding SNMP traps.
[edit services rpm probe customerA] user@host# set test icmp-test thresholds ingress-time 3000 user@host# set test icmp-test traps ingress-time-exceeded
Configure the RPM test for customerB.
[edit] user@host# edit services rpm probe customerB user@host# set test http-test probe-interval 30
Specify a probe type and a target URL.
[edit services rpm probe customerB]
user@host# set test http-test probe-type http-get
user@host# set test http-test target url http://customerB.net
Configure RPM thresholds and corresponding SNMP traps.
[edit services rpm probe customerB]
user@host# set test http-test thresholds successive-loss 3
user@host# set test http-test thresholds total-loss 10
user@host# set test http-test traps probe-failure
user@host# set test http-test traps test-failure
Results
From configuration mode, confirm your configuration by entering the run show services
rpm command. If the output does not display the intended
configuration, repeat the configuration instructions in this example to
correct it.
[edit]
user@host# run show services rpm
probe customerA {
test icmp-test {
probe-type icmp-ping-timestamp;
target address 192.178.16.5;
probe-interval 15;
thresholds {
ingress-time 3000;
}
traps ingress-time-exceeded;
hardware-timestamp;
}
}
probe customerB {
test http-test {
probe-type http-get;
target url http://customerB.net;
probe-interval 30;
thresholds {
successive-loss 3;
total-loss 10;
}
traps [ probe-failure test-failure ];
}
}
If you are done configuring the device, enter commit from configuration mode.
Verification
Confirm that the configuration is working properly.
Verifying RPM Services
Purpose
Verify that the RPM configuration is within the expected values.
Action
From operational mode, enter the show services rpm command. The output shows the values that are configured for RPM
on the device.
Verifying RPM Statistics
Purpose
Verify that the RPM probes are functioning and that the RPM statistics are within expected values.
Action
From operational mode, enter the show services rpm probe-results command.
user@host> show services rpm probe-results
Owner: customerD, Test: icmp-test
Probe type: icmp-ping-timestamp
Minimum Rtt: 312 usec, Maximum Rtt: 385 usec, Average Rtt: 331 usec,
Jitter Rtt: 73 usec, Stddev Rtt: 27 usec
Minimum egress time: 0 usec, Maximum egress time: 0 usec,
Average egress time: 0 usec, Jitter egress time: 0 usec,
Stddev egress time: 0 usec
Minimum ingress time: 0 usec, Maximum ingress time: 0 usec,
Average ingress time: 0 usec, Jitter ingress time: 0 usec,
Stddev ingress time: 0 usec
Probes sent: 5, Probes received: 5, Loss percentage: 0
Owner: customerE, Test: http-test
Target address: 192.176.17.4, Target URL: http://customerB.net,
Probe type: http-get
Minimum Rtt: 1093 usec, Maximum Rtt: 1372 usec, Average Rtt: 1231 usec,
Jitter Rtt: 279 usec, Stddev Rtt: 114 usec
Probes sent: 3, Probes received: 3, Loss percentage: 0
Owner: Rpm-Bgp-Owner, Test: Rpm-Bgp-Test-1
Target address: 10.209.152.37, Probe type: icmp-ping, Test size: 5 probes
Routing Instance Name: LR1/RI1
Probe results:
Response received, Fri Oct 28 05:20:23 2005
Rtt: 662 usec
Results over current test:
Probes sent: 5, Probes received: 5, Loss percentage: 0
Measurement: Round trip time
Minimum: 529 usec, Maximum: 662 usec, Average: 585 usec,
Jitter: 133 usec, Stddev: 53 usec
Results over all tests:
Probes sent: 5, Probes received: 5, Loss percentage: 0
Measurement: Round trip time
Minimum: 529 usec, Maximum: 662 usec, Average: 585 usec,
Jitter: 133 usec, Stddev: 53 usecConfigure the traps you want using the set services rpm
probe p1 test t1 traps command.
If a trap is triggered, you can view the same in the log file
named messages using the show snmp log messages |
match rmopd command.
|
Possible Option |
Set of values |
|---|---|
|
egress-jitter-exceeded |
Exceeded jitter in egress time threshold |
|
egress-std-dev-exceeded |
Exceeded egress time standard deviation threshold |
|
egress-time-exceeded |
Exceeded maximum egress time threshold |
|
ingress-jitter-exceeded |
Exceeded jitter in ingress time threshold |
|
ingress-std-dev-exceeded |
Exceeded ingress time standard deviation threshold |
|
probe-failure |
Successive probe loss threshold reached |
|
rtt-exceeded |
Exceeded maximum round trip time threshold |
|
std-dev-exceeded |
Exceeded round trip time standard deviation threshold |
|
test-completion |
Test completed |
|
test-failure |
Total probe loss threshold reached |
Example: Configuring RPM Using TCP and UDP Probes (SRX Series Firewalls)
This example shows how to configure RPM using TCP and UDP probes.
Requirements
Before you begin:
Establish basic connectivity.
Configure network interfaces. See Interfaces User Guide for Security Devices.
Configure the probe owner, the test, and the specific parameters of the RPM probe. See Real-Time Performance Monitoring for SRX Devices.
Overview
In this example, you configure both the host (device A) and the remote device (device B) to act as TCP and UDP servers. You configure a probe for customerC, which uses TCP packets. Device B is configured as an RPM server for both TCP and UDP packets, using an lt services interface as the destination interface, and ports 50000 and 50037, respectively.
Use probe classification with caution, because improper configuration can cause packets to be dropped.
Configuration
Procedure
CLI Quick Configuration
To quickly configure this example, copy the
following commands, paste them into a text file, remove any line breaks,
change any details necessary to match your network configuration,
copy and paste the commands into the CLI at the [edit] hierarchy
level, and then enter commit from configuration mode.
{device A}
set services rpm probe customerC test tcp-test probe-interval 5
set services rpm probe customerC test tcp-test probe-type tcp-ping
set services rpm probe customerC test tcp-test target address 192.162.45.6
set services rpm probe customerC test tcp-test destination-interface lt-0/0/0
set services rpm probe customerC test tcp-test destination-port 50000
{device B}
set services rpm probe-server tcp port 50000
set services rpm probe-server udp port 50037
Step-by-Step Procedure
The following example requires you to navigate various levels in the configuration hierarchy. For instructions on how to do that, see Using the CLI Editor in Configuration Mode in the Junos OS CLI User Guide .
To configure RPM using TCP and UDP probes:
Configure the RPM owner on device A.
{device A} [edit] user@host# edit services rpm user@host# set probe customerCConfigure the RPM test.
{device A} [edit services rpm] user@host# edit services rpm probe customerC user@host# set test tcp-test probe-interval 5Set the probe type.
{device A} [edit services rpm probe customerC] user@host# set test tcp-test probe-type tcp-pingSpecify the target address.
{device A} [edit services rpm probe customerC] user@host# set test tcp-test target address 192.162.45.6Configure the destination interface.
{device A} [edit services rpm probe customerC] user@host# set test tcp-test destination-interface It-0/0/0Configure port 50000 as the TCP port to which the RPM probes are sent.
{device A} [edit services rpm probe customerC] user@host# set test tcp-test destination-port 50000Configure device B to act as a TCP server using port 50000.
{device B} [edit] user@host# edit services rpm user@host# set probe-server tcp port 50000Configure device B to act as a UDP server using port 50037.
{device B} [edit services rpm] user@host# set probe-server udp port 50037
Results
From operational mode, confirm your configuration by entering the show services
rpm command. If the output does not display the intended
configuration, repeat the configuration instructions in this example to
correct it.
[edit]
user@host# show services rpm
probe customerC {
test tcp-test {
probe-type tcp-ping;
target address 192.162.45.6;
probe-interval 5;
destination-port 50000;
destination-interface lt-0/0/0.0;
}
}
probe-server {
tcp {
port 50000;
}
udp {
port 50037;
}
}
If you are done configuring the device, enter commit from configuration mode.
Verification
Verifying RPM Probe Servers
Purpose
Confirm that the configuration is working properly.
Verify that the device is configured to receive and transmit TCP and UDP RPM probes on the correct ports.
Action
From operational mode, enter the show services rpm active-servers command. The
output shows a list of the protocols and corresponding ports for which the
device is configured as an RPM server.
user@host> show services rpm active-servers
Protocol: TCP, Port: 50000
Protocol: UDP, Port: 50037
Example: Configuring RPM Probes for BGP Monitoring
This example shows how to configure RPM probes to monitor BGP neighbors.
Requirements
Before you begin:
Configure the BGP parameters under RPM configuration to send RPM probes to BGP neighbors. See Real-Time Performance Monitoring for SRX Devices.
Use TCP or UDP probes by configure both the probe server (Juniper Networks device) and the probe receiver (the remote device) to transmit and receive RPM probes on the same TCP or UDP port. See Real-Time Performance Monitoring for SRX Devices.
Overview
In this example, you specify a hexadecimal value that you want to use for the data portion of the RPM probe as ABCD123. ( It ranges from 1 through 2048 characters.) You specify the data size of the RPM probe as 1024 bytes. ( The value ranges from 0 through 65,507.)
Then you configure destination port 50000 as the TCP port to which the RPM probes are sent. You specify the number of probe results to be saved in the probe history as 25. (It ranges from 0 through 255, and the default is 50.) You set the probe count to 5 and probe interval as 1. (The probe count ranges from 1 through 15, and the default is 1; and the probe interval ranges from 1 through 255, and the default is 3.) You then specify tcp-ping as the type of probe to be sent as part of the test.
Finally, you set the test interval as 60. The value ranges from 0 through 86,400 seconds for the interval between tests.
Configuration
Procedure
CLI Quick Configuration
To quickly configure this example, copy the
following commands, paste them into a text file, remove any line breaks,
change any details necessary to match your network configuration,
copy and paste the commands into the CLI at the [edit] hierarchy
level, and then enter commit from configuration mode.
set services rpm bgp data-fill ABCD123 data-size 1024 set services rpm bgp destination-port 50000 history-size 25 set services rpm bgp probe-count 5 probe-interval 1 set services rpm bgp probe-type tcp-ping test-interval 60
Step-by-Step Procedure
The following example requires you to navigate various levels in the configuration hierarchy. For instructions on how to do that, see Using the CLI Editor in Configuration Mode in the Junos OS CLI User Guide .
To configure RPM probes to monitor BGP neighbors:
Configure the RPM and BGP.
[edit] user@host# edit services rpm bgp
Specify a hexadecimal value.
[edit services rpm bgp] user@host# set data-fill ABCD123
Specify the data size of the RPM probe.
[edit services rpm bgp] user@host# set data-size 1024
Configure the destination port.
[edit services rpm bgp] user@host# set destination-port 50000
Specify the number of probes.
[edit services rpm bgp] user@host# set history-size 25
Set the probe count and probe interval.
[edit services rpm bgp] user@host# set probe-count 5 probe-interval 1
Specify the type of probe.
[edit services rpm bgp] user@host# set probe-type tcp-ping
Note:If you do not specify the probe type the default ICMP probes are sent.
Set the test interval.
[edit services rpm bgp] user@host# set test-interval 60
Results
From configuration mode, confirm your configuration by entering the
run show services
                            rpm
command. If the output does
not display the intended configuration, repeat the configuration
instructions in this example to correct it.
[edit]
    user@host# run show services rpm
    bgp {
    probe-type tcp-ping;
        probe-count 5;
        probe-interval 1;
        test-interval 60;
        destination-port 50000;
        history-size 25;
        data-size 1024;
    data-fill ABCD123;
}
If you are done configuring the device, enter commit from configuration mode.
Change History Table
Feature support is determined by the platform and release you are using. Use Feature Explorer to determine if a feature is supported on your platform.