Static Routing on Logical Systems
Example: Configuring Static Routes Between Logical Systems Within the Same Router
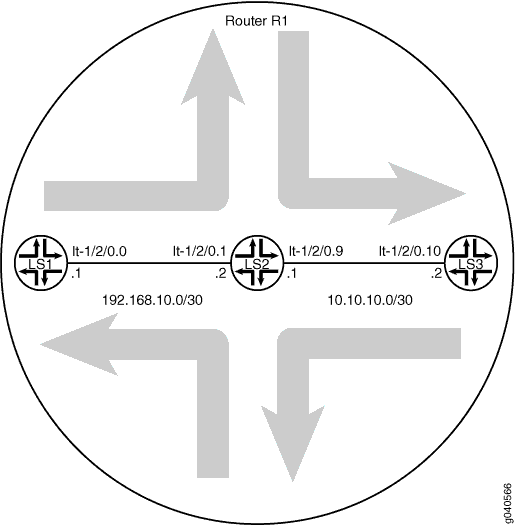
This example shows how to configure static routes between logical systems. The logical systems are configured in a single physical router and are connected by logical tunnel interfaces.
Requirements
You must connect the logical systems by using logical tunnel (lt) interfaces. See Example: Connecting Logical Systems Within the Same Device Using Logical Tunnel Interfaces on MX Series Routers and EX Series Switches.
Overview
A static route is a hard-coded path in the device that specifies how the route gets to a certain subnet by using a certain path. Routers that are connected to stub networks are often configured to use static routes. A stub network is a network with no knowledge of other networks. Stub networks send non-local traffic by way of a single path, with the network aware only of a default route to non-local destinations. In this example, you configure Logical System LS1 with a static route to the 10.10.10.0/30 network and define the next-hop address as 192.168.10.2. You also configure Logical System LS1 with a static route to the 192.168.10.0/30 network and define a next-hop address of 10.10.10.1.
Configuration
CLI Quick Configuration
To quickly configure this example, copy the
following commands, paste them into a text file, remove any line breaks,
change any details necessary to match your network configuration,
and then copy and paste the commands into the CLI at the [edit] hierarchy level.
set logical-systems LS1 interfaces lt-1/2/0 unit 0 description LS1->LS2
set logical-systems LS1 interfaces lt-1/2/0 unit 0 encapsulation ethernet
set logical-systems LS1 interfaces lt-1/2/0 unit 0 peer-unit 1
set logical-systems LS1 interfaces lt-1/2/0 unit 0 family inet address 192.168.10.1/30
set logical-systems LS2 interfaces lt-1/2/0 unit 1 description LS2->LS1
set logical-systems LS2 interfaces lt-1/2/0 unit 1 encapsulation ethernet
set logical-systems LS2 interfaces lt-1/2/0 unit 1 peer-unit 0
set logical-systems LS2 interfaces lt-1/2/0 unit 1 family inet address 192.168.10.2/30
set logical-systems LS2 interfaces lt-1/2/0 unit 9 description LS2->LS3
set logical-systems LS2 interfaces lt-1/2/0 unit 9 encapsulation ethernet
set logical-systems LS2 interfaces lt-1/2/0 unit 9 peer-unit 10
set logical-systems LS2 interfaces lt-1/2/0 unit 9 family inet address 10.10.10.1/30
set logical-systems LS3 interfaces lt-1/2/0 unit 10 description LS3->LS2
set logical-systems LS3 interfaces lt-1/2/0 unit 10 encapsulation ethernet
set logical-systems LS3 interfaces lt-1/2/0 unit 10 peer-unit 9
set logical-systems LS3 interfaces lt-1/2/0 unit 10 family inet address 10.10.10.2/30
set logical-systems LS1 routing-options static route 10.10.10.0/30 next-hop 192.168.10.2
set logical-systems LS3 routing-options static route 192.168.10.0/30 next-hop 10.10.10.1
Procedure
Step-by-Step Procedure
The following example requires you to navigate various levels in the configuration hierarchy. For information about navigating the CLI, see Using the CLI Editor in Configuration Mode in the CLI User Guide.
To configure static routes between logical systems:
-
Run the
show interfaces tersecommand to verify that the router has a logical tunnel (lt) interface.user@host> show interfaces terse Interface Admin Link Proto Local Remote so-0/0/0 up down so-0/0/1 up down so-0/0/2 up down so-0/0/3 up down gr-1/2/0 up up ip-1/2/0 up up lt-1/2/0 up up ...
-
Configure the logical tunnel interface on Logical System LS1 connecting to Logical System LS2.
[edit]
user@host# set logical-systems LS1 interfaces lt-1/2/0 unit 0 description LS1->LS2
user@host# set logical-systems LS1 interfaces lt-1/2/0 unit 0 encapsulation ethernet
user@host# set logical-systems LS1 interfaces lt-1/2/0 unit 0 peer-unit 1
user@host# set logical-systems LS1 interfaces lt-1/2/0 unit 0 family inet address 192.168.10.1/30
-
Configure the logical tunnel interface on Logical System LS2 connecting to Logical System LS1.
[edit]
user@host# set logical-systems LS2 interfaces lt-1/2/0 unit 1 description LS2->LS1
user@host# set logical-systems LS2 interfaces lt-1/2/0 unit 1 encapsulation ethernet
user@host# set logical-systems LS2 interfaces lt-1/2/0 unit 1 peer-unit 0
user@host# set logical-systems LS2 interfaces lt-1/2/0 unit 1 family inet address 192.168.10.2/30
-
Configure the logical tunnel interface on Logical System LS2 connecting to Logical System LS3.
[edit]
user@host# set logical-systems LS2 interfaces lt-1/2/0 unit 9 description LS2->LS3
user@host# set logical-systems LS2 interfaces lt-1/2/0 unit 9 encapsulation ethernet
user@host# set logical-systems LS2 interfaces lt-1/2/0 unit 9 peer-unit 10
user@host# set logical-systems LS2 interfaces lt-1/2/0 unit 9 family inet address 10.10.10.1/30
-
Configure the logical tunnel interface on Logical System LS3 connecting to Logical System LS2.
[edit]
user@host# set logical-systems LS3 interfaces lt-1/2/0 unit 10 description LS3->LS2
user@host# set logical-systems LS3 interfaces lt-1/2/0 unit 10 encapsulation ethernet
user@host# set logical-systems LS3 interfaces lt-1/2/0 unit 10 peer-unit 9
user@host# set logical-systems LS3 interfaces lt-1/2/0 unit 10 family inet address 10.10.10.2/30
-
Configure the static route on Logical System LS1 connecting to the 10.10.10.0/30 network.
[edit]
user@host# set logical-systems LS1 routing-options static route 10.10.10.0/30 next-hop 192.168.10.2
-
Configure the static route on Logical System LS3 connecting to the 192.168.10.0/30 network.
[edit]
user@host# set logical-systems LS3 routing-options static route 192.168.10.0/30 next-hop 10.10.10.1
-
If you are done configuring the device, commit the configuration.
[edit]
user@host# commit
Results
Confirm your configuration by issuing the show logical-systems command. If the output does not display the
intended configuration, repeat the instructions in this example to
correct the configuration.
user@host# show logical-systems
LS1 {
    interfaces {
        lt-1/2/0 {
            unit 0 {
                description LS1->LS2;
                encapsulation ethernet;
                peer-unit 1;
                family inet {
                    address 192.168.10.1/30;
                }
            }
        }
    }
    routing-options {
        static {
            route 10.10.10.0/30 next-hop 192.168.10.2;
        }
    }
}
LS2 {
    interfaces {
        lt-1/2/0 {
            unit 1 {
                description LS2->LS1;
                encapsulation ethernet;
                peer-unit 0;
                family inet {
                    address 192.168.10.2/30;
                }
            }
            unit 9 {
                description LS2->LS3;
                encapsulation ethernet;
                peer-unit 10;
                family inet {
                    address 10.10.10.1/30;
                }
            }
        }
    }
}
LS3 {
    interfaces {
        lt-1/2/0 {
            unit 10 {
                description LS3->LS2;
                encapsulation ethernet;
                peer-unit 9;
                family inet {
                    address 10.10.10.2/30;
                }
            }
        }
    }
    routing-options {
        static {
            route 192.168.10.0/30 next-hop 10.10.10.1;
        }
    }
}
Verification
Confirm that the configuration is working properly.
Verifying That the Logical Systems Are Up
Purpose
Make sure that the interfaces are properly configured.
Action
user@host> show interfaces terse
Interface               Admin Link Proto    Local                 Remote
...
lt-1/2/0                up    up
lt-1/2/0.0              up    up   inet     192.168.10.1/30
lt-1/2/0.1              up    up   inet     192.168.10.2/30
lt-1/2/0.9              up    up   inet     10.10.10.1/30
lt-1/2/0.10             up    up   inet     10.10.10.2/30
...
Verifying Connectivity Between the Logical Systems
Purpose
Make sure that the static routes appear in the routing tables of Logical Systems LS1 and LS3. Also, make sure that the logical systems can ping each other.
Action
user@host> show route logical-system LS1
inet.0: 3 destinations, 3 routes (3 active, 0 holddown, 0 hidden)
+ = Active Route, - = Last Active, * = Both

10.10.10.0/30      *[Static/5] 18:43:25
                    > to 192.168.10.2 via lt-1/2/0.0
192.168.10.0/30    *[Direct/0] 18:43:25
                    > via lt-1/2/0.0
192.168.10.1/32    *[Local/0] 18:43:25
                      Local via lt-1/2/0.0
user@host> show route logical-system LS3
inet.0: 3 destinations, 3 routes (3 active, 0 holddown, 0 hidden)
+ = Active Route, - = Last Active, * = Both

10.10.10.0/30      *[Direct/0] 23:11:21
                    > via lt-1/2/0.10
10.10.10.2/32      *[Local/0] 23:11:21
                      Local via lt-1/2/0.10
192.168.10.0/30    *[Static/5] 00:23:31
                    > to 10.10.10.1 via lt-1/2/0.10
From LS1, Ping LS3
user@host> set cli logical-system LS1
user@host:LS1> ping 10.10.10.2
PING 10.10.10.2 (10.10.10.2): 56 data bytes
64 bytes from 10.10.10.2: icmp_seq=0 ttl=63 time=1.263 ms
64 bytes from 10.10.10.2: icmp_seq=1 ttl=63 time=1.086 ms
64 bytes from 10.10.10.2: icmp_seq=2 ttl=63 time=1.077 ms
From LS3, Ping LS1
user@host> set cli logical-system LS3
user@host:LS3> ping 192.168.10.1
PING 192.168.10.1 (192.168.10.1): 56 data bytes
64 bytes from 192.168.10.1: icmp_seq=0 ttl=63 time=10.781 ms
64 bytes from 192.168.10.1: icmp_seq=1 ttl=63 time=1.167 ms
64 bytes from 192.168.10.1: icmp_seq=2 ttl=63 time=1.152 ms