Develop On-Device JET Applications
Overview
JET applications written in C, C++, and Python languages can run on-device. You can develop the applications in the downloaded JET VM and then deploy these applications on the device running Junos OS. You can sign on-device JET applications to show that they can be trusted.
The Python 2.7 end-of-life and end-of-support date is January 1, 2020. The official upgrade path for Python 2.7 is to Python 3. As support for Python 3 is added to devices running Junos OS for the different types of on-device scripts, we recommend that you migrate supported script types from Python 2 to Python 3.
Starting in Junos OS Release 21.1R1 and Junos OS Evolved Release 22.3R1, Python
2.7 is no longer supported and the set system scripts language
python statement is deprecated. Use the set system scripts
language python3 statement instead.
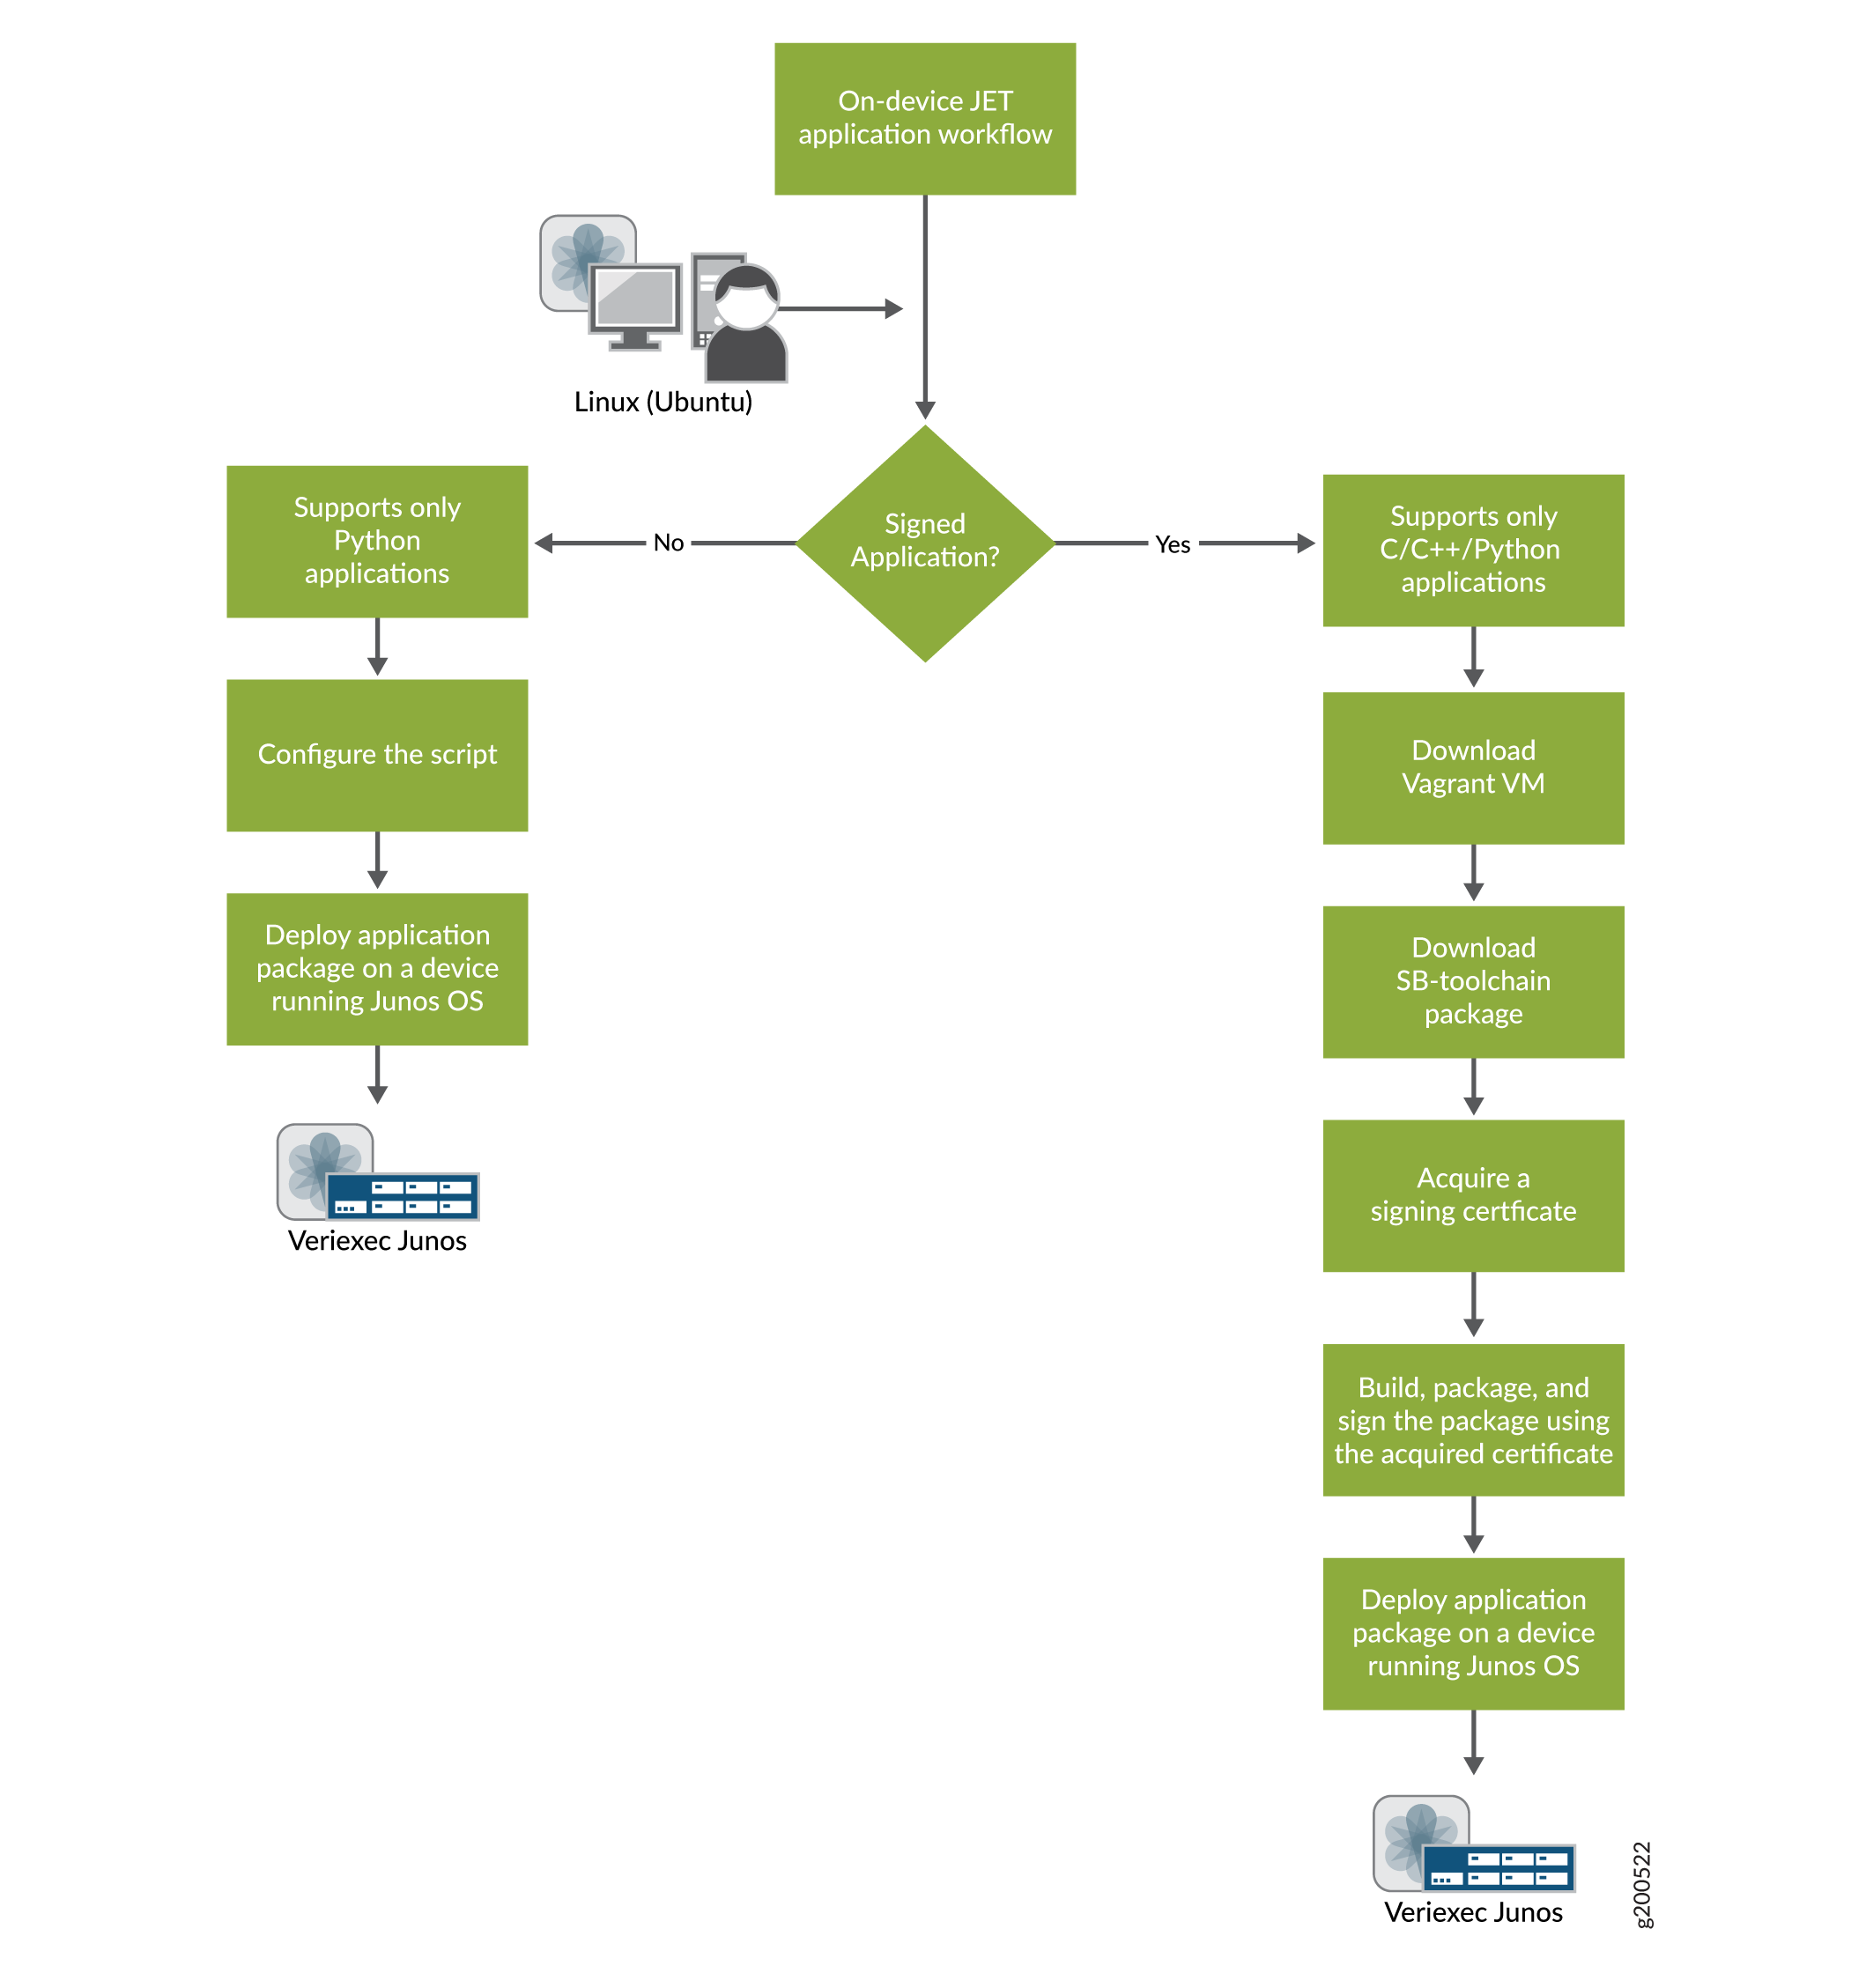
Figure 1 shows the application development workflow for unsigned and signed on-device JET applications.
See Also
Develop Unsigned JET Applications
Unsigned JET applications can only be written in Python.
To develop an unsigned JET application:
(Optional) Download and set up the JET VM. See Set Up the JET VM.
Develop your application in Python.
Package your application. See Package JET Applications.
-
Configure the
languagestatement on the Junos device. For example, to use Python 3 to run a JET script that supports Python 3:[edit] user@device# set system scripts language python3
See Understanding Python Automation Scripts for Devices Running Junos OS for more information.
Run the application on a device running on Junos OS.
Develop Signed JET Applications
You can develop signed applications in C, C++, or Python.
To develop a signed application:
Download the packages you need and set up the JET VM. See Set Up the JET VM.
Request a signing certificate. See Request a Signing Certificate.
Develop the application.
Configure the license if your application is written in C or C++. This step is optional for applications written in Python. See Configuring the JET Application and its License on a Device Running Junos OS for details.
Build the package and sign the package using the acquired certificate.
Deploy the application on a device running Junos OS.
Request a Signing Certificate
To develop and distribute JET applications, you must install a package signing certificate on the JET VM by executing the certificate request script. This script assists you in creating a signing key and a certificate request for use with JET.
Never share the signing key with anyone, including Juniper Networks. The key enables anyone to sign applications that your router will trust. Therefore, treat the key with the same level of security as the root password for the routers. Once you obtain your signing key, save it in a file outside of the VM.
The certificate request script asks for the following information:
City, state, and country.
Your organization and unit. The organization should not be vague. There cannot be any hyphens ("-").
Certificate type: Specify whether the certificate is commercial or private. Non-Juniper entities must use commercial. Private certificates are only assigned when the organization is Juniper.
Provider prefix: This is the unique provider name assigned by Juniper to each JET partner.
User string: This is an additional specification of your choosing. It could be a string specifying the development team or project name. The user string can consist of a lowercase letter followed by one or more lowercase letters or numbers (for example, teamjet2).
Deployment scope: The deployment scope is the string assigned by Juniper to differentiate multiple certificates for the same JET partner. This defines the validity period for the generated certificate. The scope can be commercial or evaluation. If none is assigned to you, leave it empty.
Index number: This number is known as a certificate generations number. It will be 1 for your initial certificate. When a certificate expires and when you request a new one, this number will be incremented.
Email address: The email address for the certificate contact will be embedded into the certificate. We recommend using the email address of a department or unit in your organization. We recommend that you do not use a personal email address.
To create a signed application, request certificates and copy them as explained in the following procedure. This procedure is optional if you want to create an unsigned application.
To manually request a certificate:
Create the /usr/local/junos-jet/certs directory if it does not already exist on your device.
In a VM terminal, run the
jet-certificate-requestcommand.The script leads you through a series of questions. Answer the questions and press Enter after each answer. See the requirements for each answer listed above.
Based on your answers, the script generates two files in the /usr/local/junos-jet/certs directory: certname_key.pem and certname_req.pem. The certname is the name of the certificate.
The certificate name must follow the format ORGANIZATION-USER-TYPE-NUMBER. All four parameters are mandatory or else you will see the following error:
ERROR: CN has invalid format; regex: ^([a-z0-9]+)-([a-z0-9]+)-(commercial|private)-([1-9][0-9]*)$
       Expected format: ORGANIZATION-USER-TYPE-NUMBER
           organization: [a-z0-9]+
               Must be "juniper" for type is "private"
           user:   [a-z0-9]+
           type:   commercial|private
           number: [1-9][0-9]*
Save the certname_key.pem file outside the VM. This is your signing key. Ensure that no one outside of your development organization has access to it. Never share the signing key with anyone, including Juniper Networks.
The key enables anyone to sign applications that your router will trust. Therefore, treat the key with the same level of security as the root password for the routers.
Send the certname_req.pem file to JET Certificate Processing at mailto:jet-cert@juniper.net. This file contains your certificate request. The requestor should be authorized to request signing certificates on behalf of their organization. JET Certificate Processing will immediately send your certificate to you.
When you receive your certificate, save it as certname and copy it to the /usr/local/junos-jet/certs directory.
Verify the certificate and the signing key are available in the /usr/local/junos-jet/certs directory.
Compile 64-Bit Applications
JET supports 64-bit applications for Junos OS with FreeBSD and Junos OS with upgraded FreeBSD. When you are ready to package your application, use the following commands to compile 64-bit applications for use with the AMD64 or ARM64 64-bit processor architecture.
To compile the application for use with AMD64 and Junos OS with FreeBSD:
Check you have the GCC toolchain, which should be included in the JET package.
Use the command
mk-amd64 application nameto build the application package.
To compile the application for use with AMD64 and Junos OS with upgraded FreeBSD:
Check you have the Clang toolchain, which should be included in the JET package.
Use the command
mk-amd64,bsdx application
name
to build the application package.
To compile the application for use with ARM64 and Junos OS with upgraded FreeBSD:
Check you have the Clang toolchain, which should be included in the JET package.
Use the command
mk-arm64,bsdx application
name
to build the application package.
Example: Develop a Signed C Package
After you have set up the JET VM and acquired a signing certification, you are ready to create the development sandbox in the VM and start developing your signed, on-device application. Use this example to create C applications echoclient and echoserver.
Example: Develop a Signed Python Package Without C Dependencies
After you have set up the JET VM and acquired a signing certification, you are ready to create the development sandbox in the VM and start developing your signed, on-device application. Use this example to develop a signed Python package without C dependencies.
Now configure the Junos device and install the package.
Enter configuration mode.
root@device> configure
Entering configuration mode
[edit]
root@device#
-
Configure the application's provider's ID, license type, and deployment scope on the Junos device, if necessary. Use the same provider license that you used to package it.
root@device# set system extensions providers 12345 license-type juniper deployment-scope commercial
For more information, see Configuring the JET Application and its License on a Device Running Junos OS.
-
Exit to operational mode and install the copied package on the Junos device.
root@device# exit
root@device> request system software add /var/tmp/SamplePyApp-x86-32-20180828.231545_user.tgz
Note:This step will fail if
providersis not configured. Verify the package was installed successfully.
root@device> show version

Hostname: device
Model: mx480
…
…
JET app SamplePyApp [20180828.231545_user]
Enter configuration mode.
root@device> configure
Entering configuration mode
[edit]
root@device#
Configure the command-line arguments through the Junos OS CLI. If a Python JET script is available in the /var/db/scripts/jet/ directory on a device running Junos OS, you can configure command-line arguments for the file and supply the arguments from the Junos CLI.
Here are the arguments in the application.
import argparse

def main():
    parser = argparse.ArgumentParser(description='This is a demo script.')

    parser.add_argument('-arg1', required=True)
    parser.add_argument('-arg2', required=True)

    args = parser.parse_args()

    print args.arg1
    print args.arg2

if __name__ == '__main__':
    main()
Configure the command-line arguments in the CLI. In this example, the script filename is
cmdline_args.py.root@device# set system extensions extension-service application file cmdline_args.py arguments "-arg1 jet -arg2 application"
Commit the configuration and exit to operational mode.
root@device# commit
root@device# exit
Run the application.
root@device> request extension-service start cmdline_args.py

Extension-service application 'cmdline_args.py' started with PID: 12345
jet
application
Example: Develop a Signed Python Package With C Dependencies
After you have set up the JET VM and acquired a signing certification, you are ready to create the development sandbox in the VM and start developing your signed, on-device application. Use this example to develop a signed Python package with C dependencies.
Change History Table
Feature support is determined by the platform and release you are using. Use Feature Explorer to determine if a feature is supported on your platform.