URL Filtering
URL Filtering Overview
You can use URL filtering to determine which Web content is not accessible to users.
Components of this feature include the following:
-
URL filter database file
-
Configuration of one or more templates (up to eight per profile)
-
URL Filter Plug-in (jservices-urlf)
-
URL filtering daemon (url-filterd)
The URL filter database file is stored on the Routing Engine and contains all the disallowed URLs. Configured templates define which traffic to monitor, what criteria to match, and which actions to take. You configure the templates and the location of the URL filter database file in a profile.
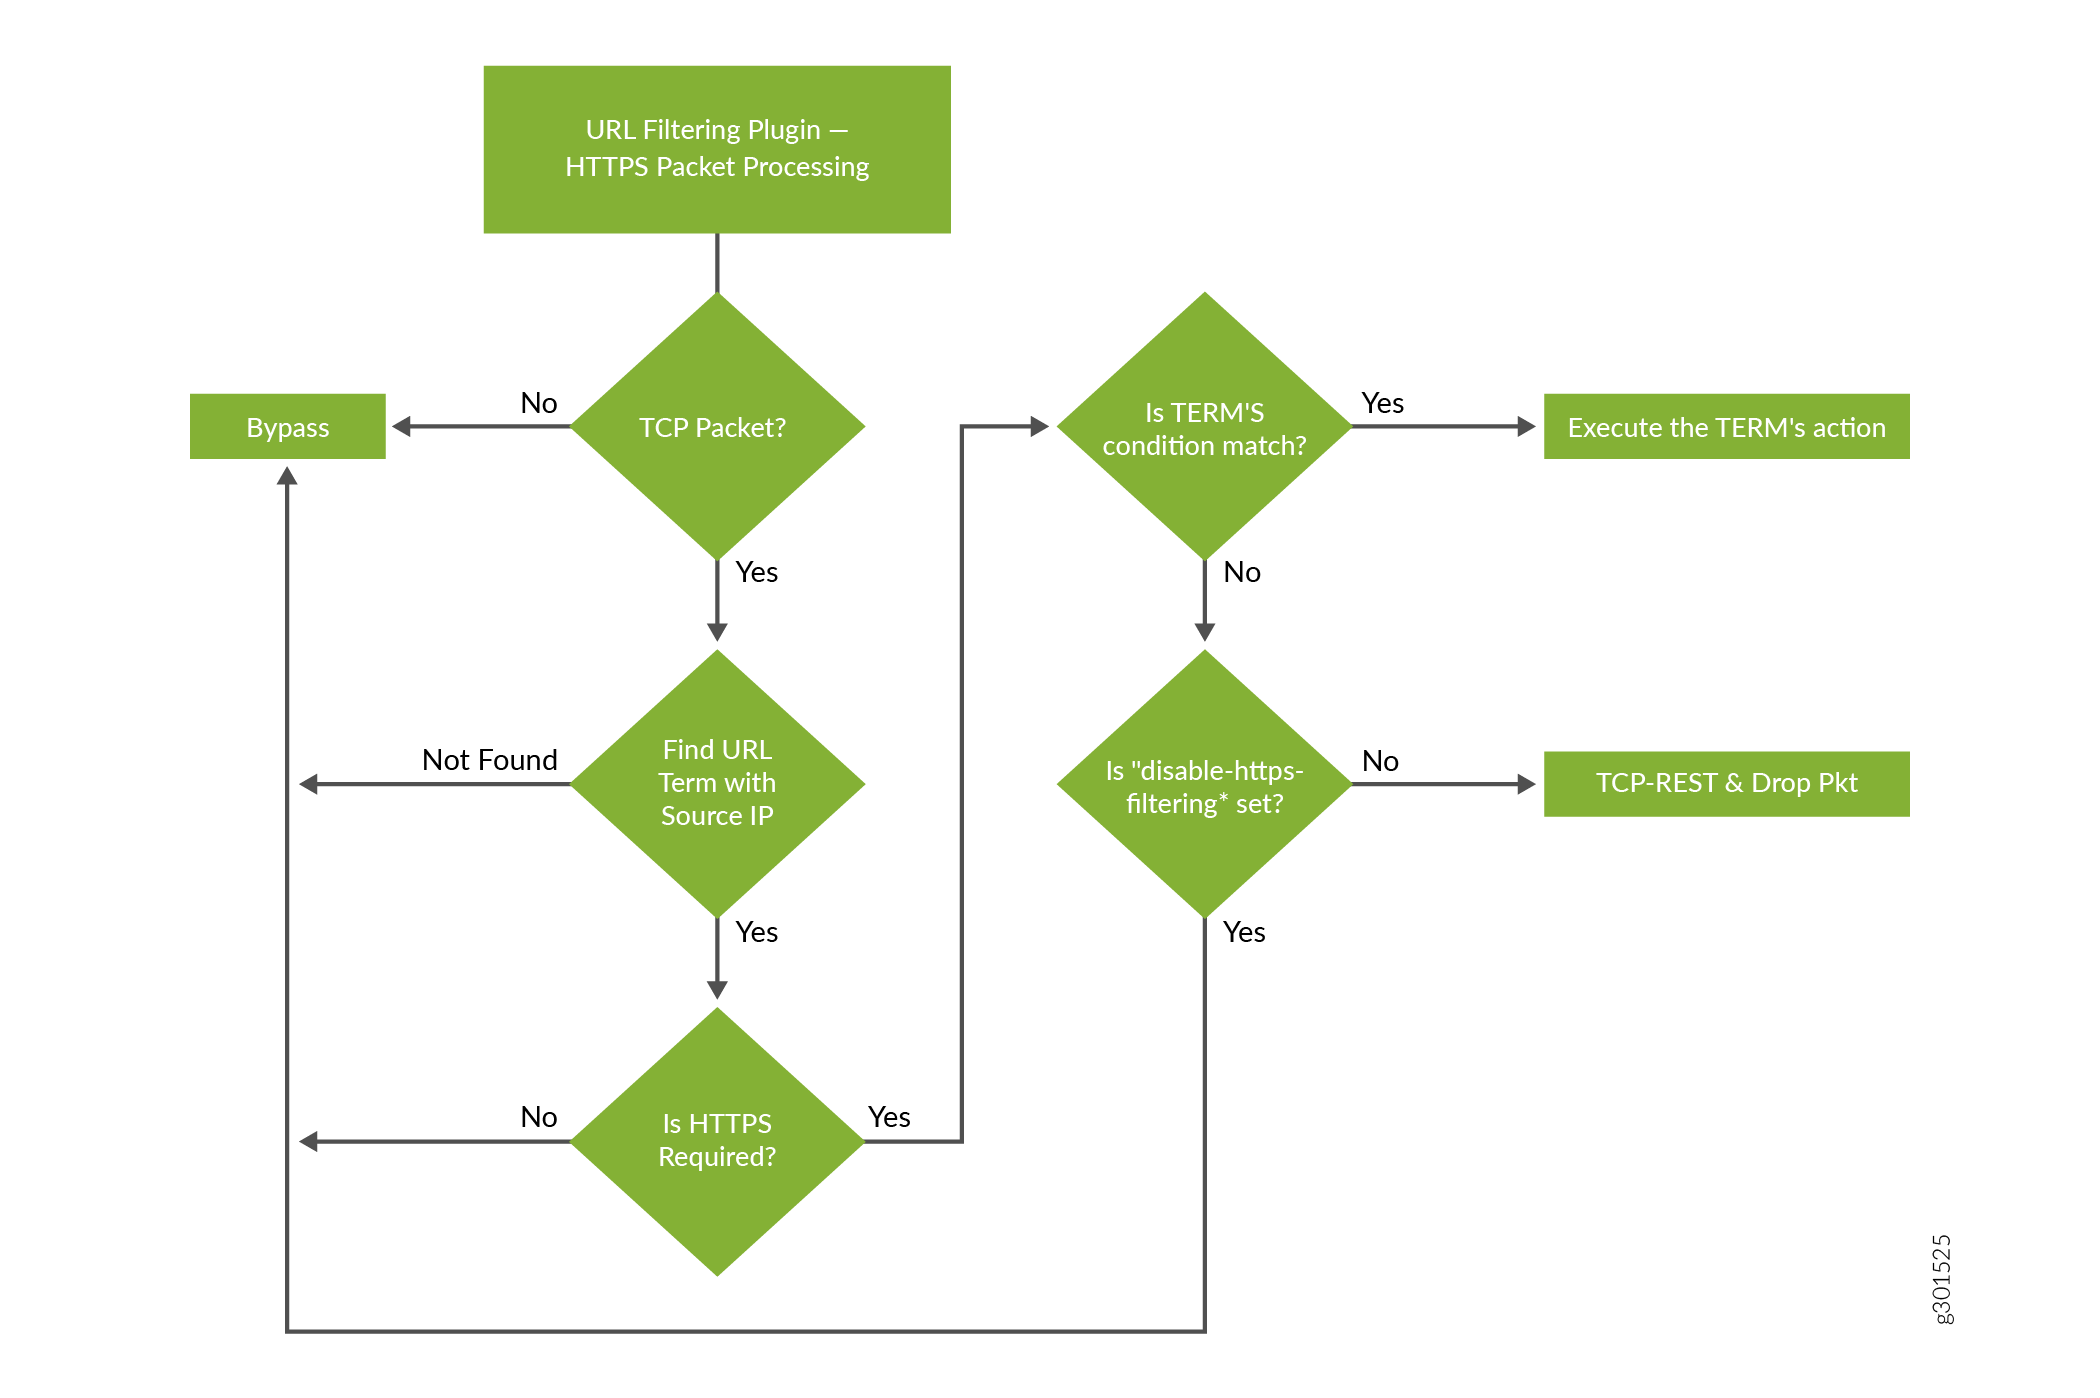
Starting in Junos OS Release 17.2R2 and 17.4R1, for Adaptive Services, you can disable the filtering of HTTP traffic that contains an embedded IP address (for example, http:/10.1.1.1) belonging to a disallowed domain name in the URL filter database.Starting in Junos OS Release 19.3R2, this same functionaly is supported for Next Gen Services on MX240, MX480, and MX960.
To enable the URL filtering feature, you must configure jservices-urlf
as the package-name at the [edit chassis fpc
slot-number pic pic-number
adaptive-services service-package extension-provider] hierarchy level. Once
enabled, jservices-urlf maintains the URL filtering profile and receives all traffic to
be filtered, the filtering criteria, and the action to be taken on the filtered
traffic.
MX-SPC3 does not explicitly need jservices-urlf as
the package-name at the [edit chassis
fpc slot-number pic pic-number
adaptive-services service-package extension-provider] hierarchy level.
It is supported by
default.
The URL filtering daemon (url-filterd), which also resides on the Routing Engine, resolves the domain name of each URL in the URL filter database to a list of IPv4 and IPv6 addresses. It then downloads the list of IP addresses to the service PIC, which runs jservices-urlf. Then url-filterd interacts with the Dynamic Firewall process (dfwd) to install filters on the Packet Forwarding Engine to punt the selected traffic from the Packet Forwarding Engine to the service PIC.
As new HTTP and HTTPS traffic reaches the router, a decision is made based on the information in the URL filter database file. The filtering rules are checked and either the router accepts the traffic and passes it on or blocks the traffic. If the traffic is blocked, one of the following configured actions is taken:
-
An HTTP redirect is sent to the user.
-
A custom page is sent to the user.
-
An HTTP status code is sent to the user.
-
A TCP reset is sent.
Accept is also an option. In this case, the traffic is not blocked.
Figure 1 illustrates the URL filtering for HTTP sessions.
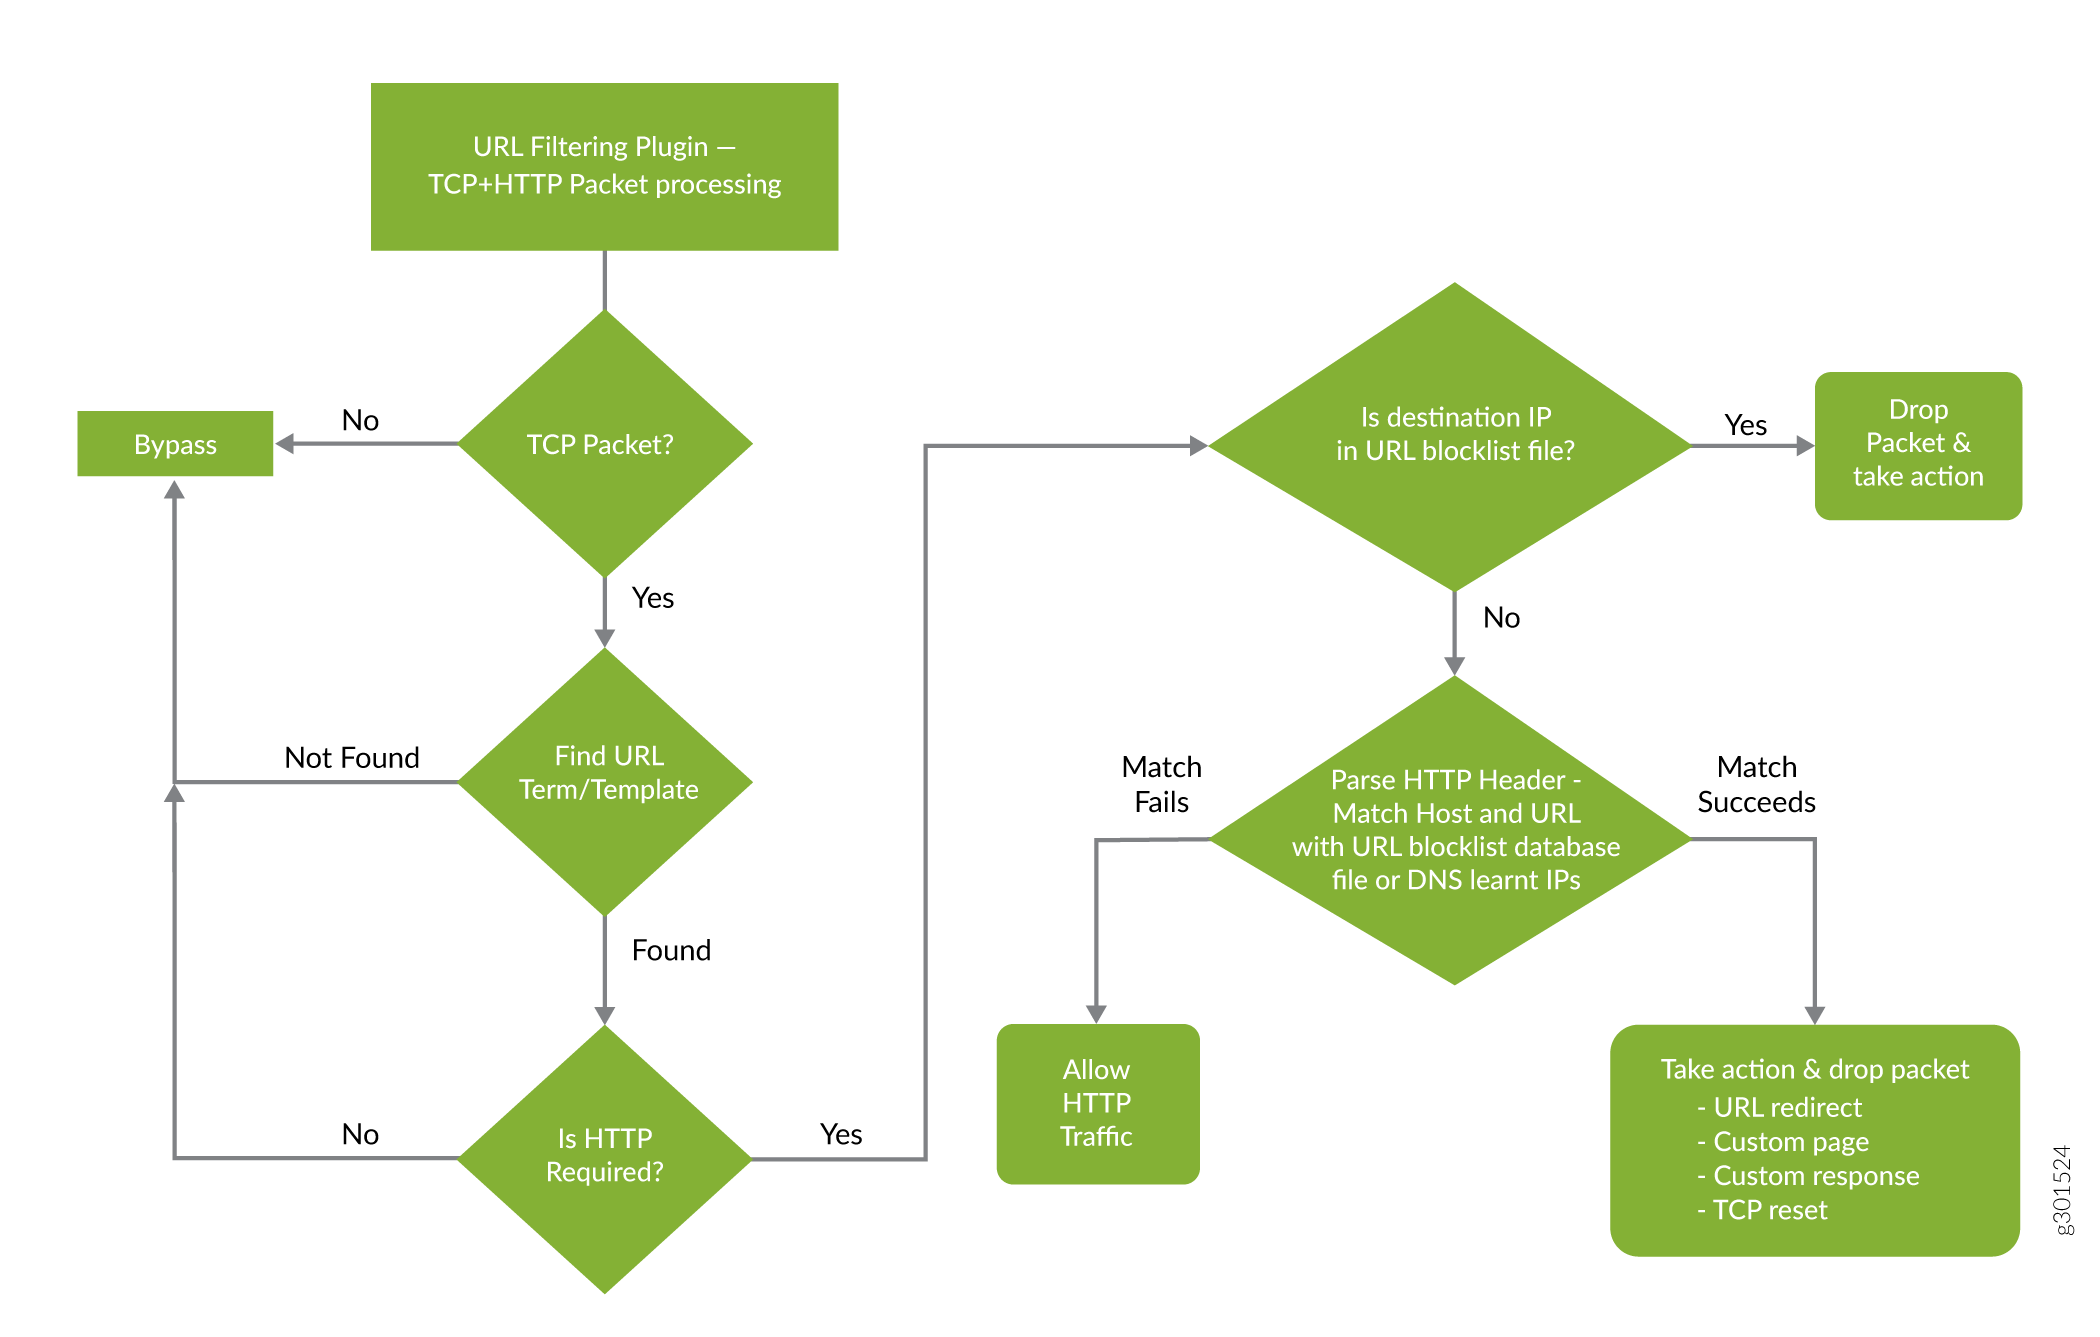
Figure 2 illustrates the URL filtering for HTTPS sessions.
For more details on the URL filtering feature, see the following sections:
URL Filter Database File
The URL filter database file contains entries of URLs and IP addresses. Create the URL filter database file in the format indicated in Table 1 and locate it on the Routing Engine in the /var/db/url-filterd directory.
|
Entry |
Description |
Example |
|---|---|---|
|
FQDN |
Fully qualified domain name. |
www.badword.com/jjj/bad.jpg |
|
URL |
Full string URL without the Layer 7 protocol. |
www.srch.com/*badword*/ www.srch.com www.srch.com/xyz www.srch.com/xyz* |
|
IPv4 address |
HTTP request on a specific IPv4 address. |
10.1.1.199 |
|
IPv6 address |
HTTP request on a specific IPv6 address. |
1::1 |
You must specify a custom URL filter database in the profile. If needed, you can also assign a custom URL filter database file with any template, and that database takes precedence over the database configured at the profile level.
If you change the contents of the URL filter database file, use the request
services (url-filter | web-filter) update command. Other commands to
help maintain the URL filter database file include the following:
-
request services (url-filter | web-filter) delete -
request services (url-filter | web-filter) force -
request services (url-filter | web-filter) validate
URL Filter Profile Caveats
The URL filter profile consists of from one to eight templates. Each template consists of a set of configured logical interfaces where traffic is monitored for URL filtering and one or more terms.
A term is a set of match criteria with actions to be taken if the match
criteria is met. You must configure at least one term to configure URL filtering.
Each term consists of a from statement and a then
statement, where the from statement defines the source IP prefixes
and destination ports that are monitored. The then statement
specifies the action to be taken. If you omit the from statement,
any source IP prefix and any destination port are considered to match. But you can
omit only one from statement per template or per profile.
Example configuration of multiple terms without from statements
template1 {
    client-interfaces [ xe-4/0/3.35 xe-4/0/3.36 ];
    server-interfaces xe-4/0/0.31;
    dns-source-interface xe-4/0/0.1;
    dns-routing-instance data_vr;
    routing-instance data_vr2;
    dns-server 50.0.0.3;
    dns-retries 3;
    url-filter-database url_database.txt;
    term term1 {
        then {
            tcp-reset;
        }
    }
    term term2 {
        then {
            redirect-url www.google.com;
        }
    }
}
If you omit more than one from statement per template, you will get
the following error message on commit:
URLFD_CONFIG_FAILURE: Configuration not valid:
Cannot have two wild card terms in template template1
error: configuration check-out failed
See Also
Configuring URL Filtering
To configure the URL filtering feature, you
must first configure jservices-urlf as the package-name at the [edit chassis fpc slot-number pic pic-number adaptive-services
service-package extension-provider] hierarchy level. For more
information on configuring the extension-provider package package-name configuration statement, see the package (Loading on PIC) statement.
MX-SPC3 does not explicitly need
jservices-urlf as the
package-name at the [edit
chassis fpc slot-number pic pic-number
adaptive-services service-package extension-provider] hierarchy
level. It is supported by
default.
URL filtering is configured on a service PIC. The interfaces
you are dealing with are services interfaces (which use the ms prefix) or aggregated multiservices (AMS) interfaces (which use
the ams prefix). For more information on AMS interfaces,
see the Adaptive Services Interfaces User Guide for Routing
Devices starting with Understanding Aggregated Multiservices Interfaces.
A URL filtering profile is a collection of templates. Each template consists of a set of criteria that defines which URLs are disallowed and how the recipient is notified.
To configure the URL profile:
See Also
DNS Request Filtering for Disallowed Website Domains
- Overview of DNS Request Filtering
- How to Configure DNS Request Filtering
- Multitenant Support for DNS Filtering
- Configuring Multi-tenant Support for DNS Filtering
- Example: Configuring Multitenant Support for DNS Filtering
Overview of DNS Request Filtering
Starting in Junos OS Release 18.3R1, you can configure DNS filtering to identify DNS requests for disallowed website domains. Starting in Junos OS Release 19.3R2, you can configure DNS filtering if you are running Next Gen Services with the MX-SPC3 services card. Next Gen Services are supported on MX240, MX480 and MX960 routers. For DNS request types A, AAAA, MX, CNAME, TXT, SRV, and ANY, you configure the action to take for a DNS request for a disallowed domain. You can either:
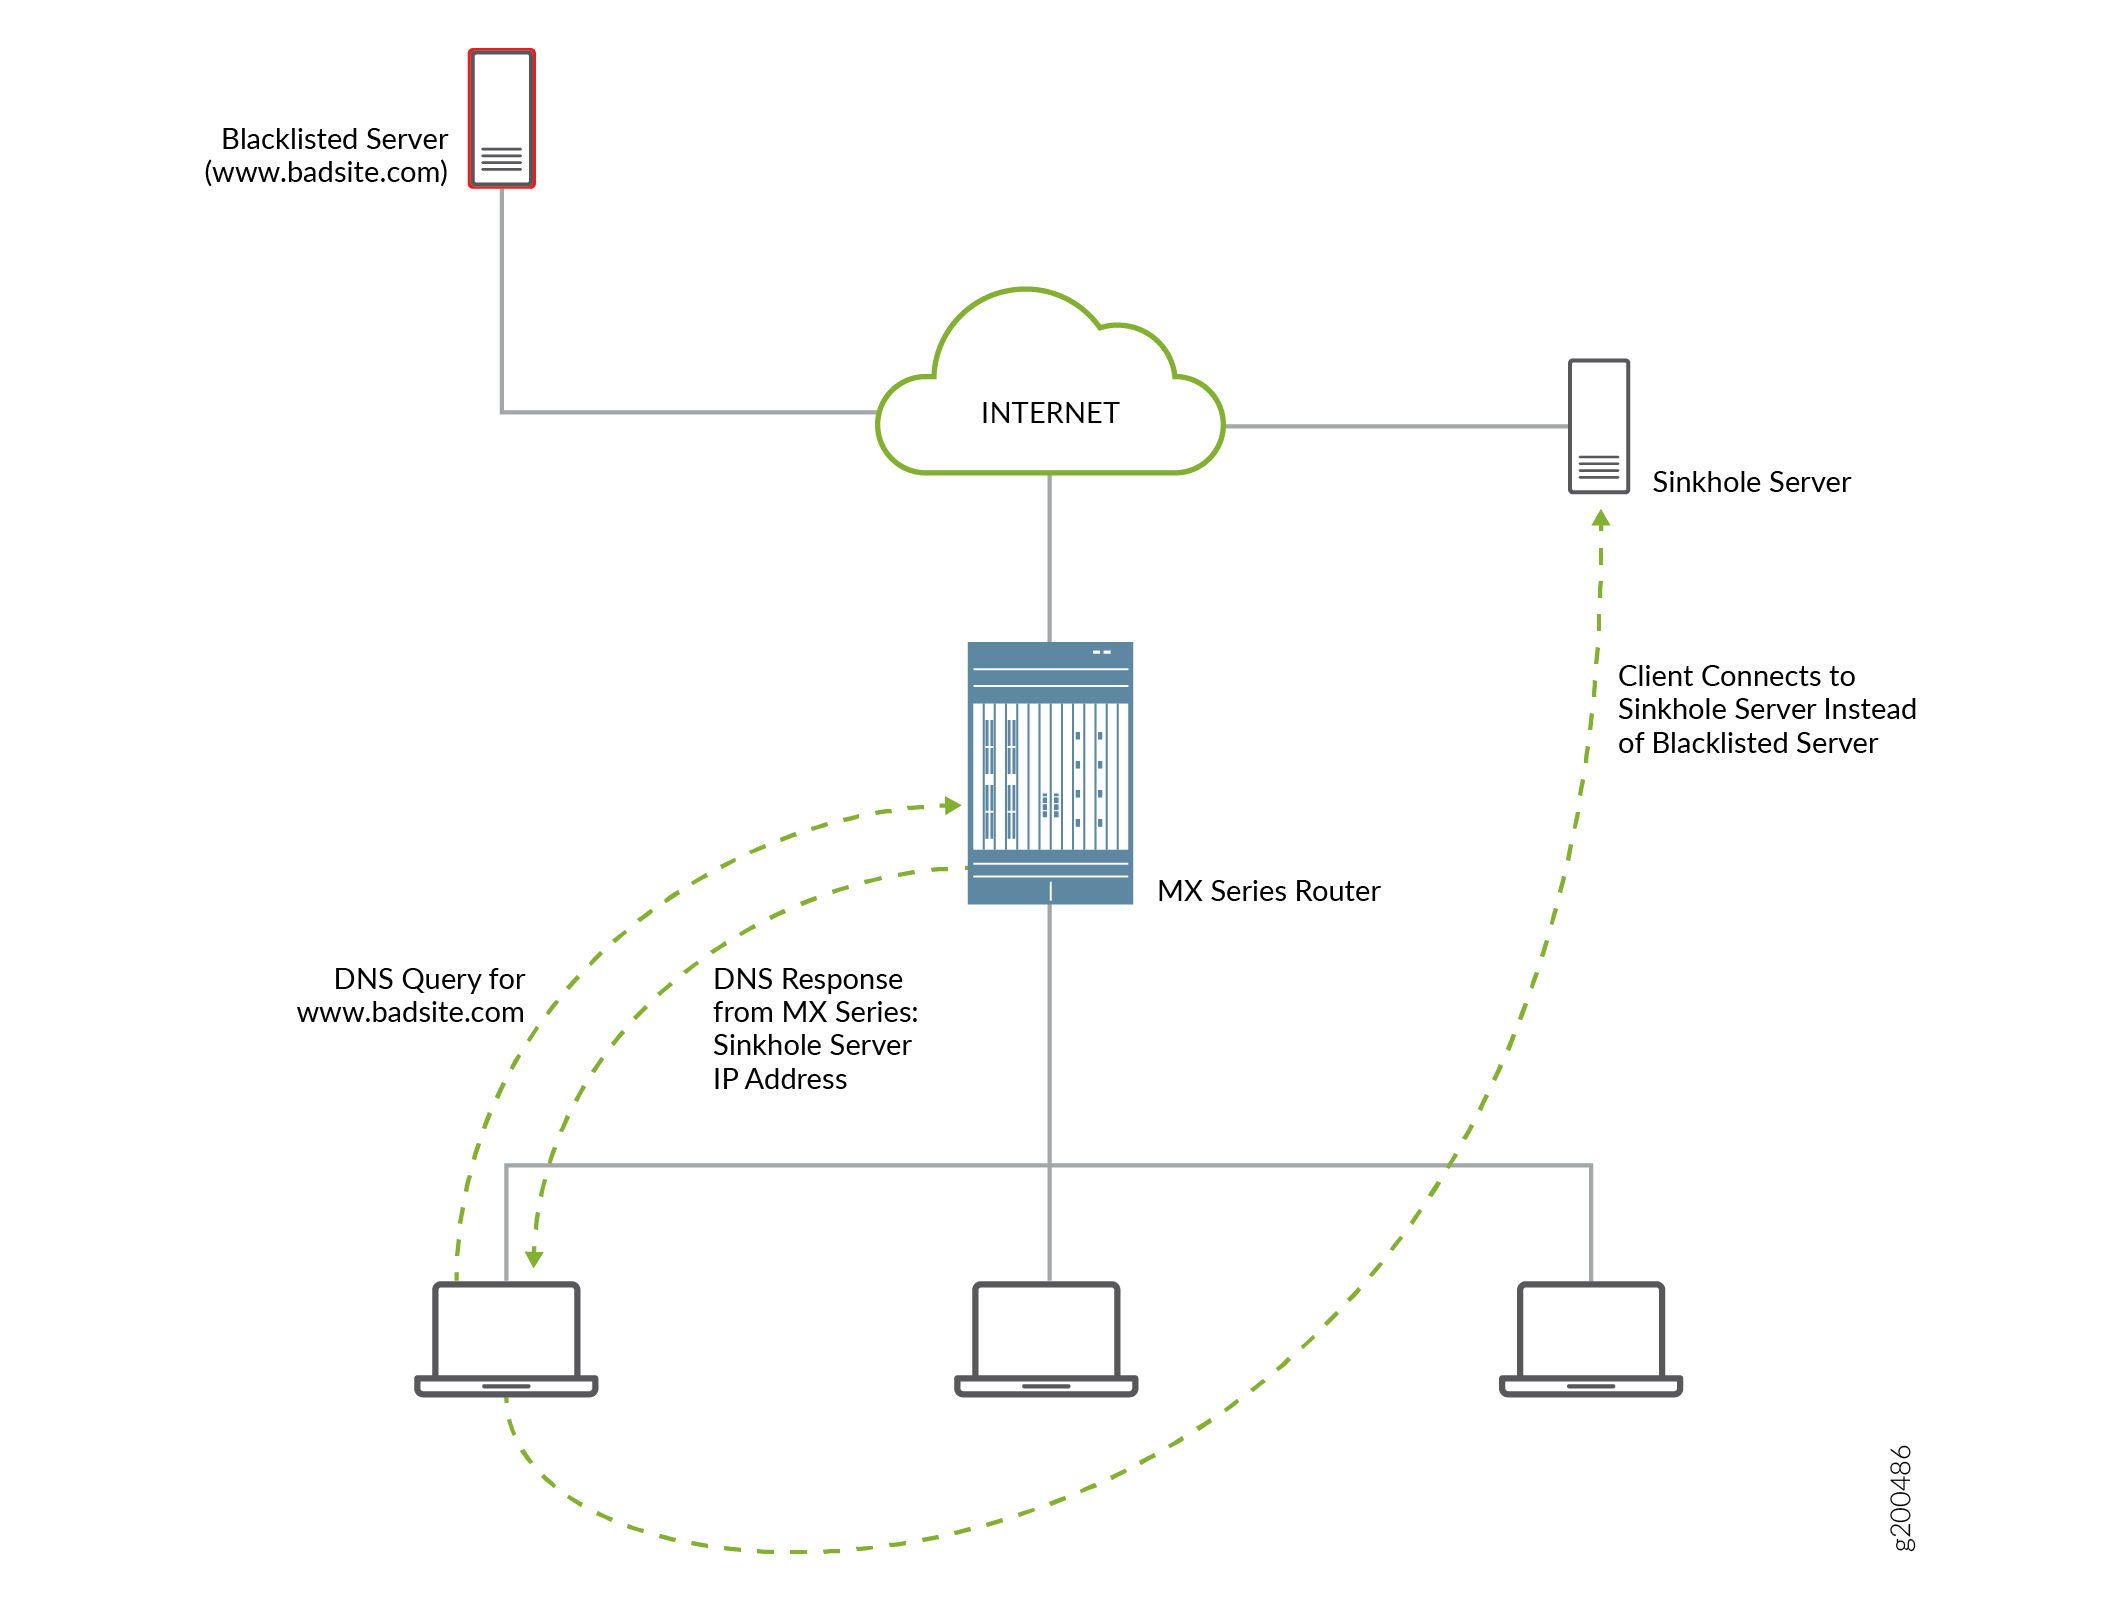
Block access to the website by sending a DNS response that contains the IP address or fully qualified domain name (FQDN) of a DNS sinkhole server. This ensures that when the client attempts to send traffic to the disallowed domain, the traffic instead goes to the sinkhole server (see Figure 3).
Log the request and allow access.
Starting in Junos OS release 21.1R1, you can also configure the following actions for a DNS request for a disallowed domain:
- Alert
- Accept
- Drop
- Drop-no-log
For other DNS request types for a disallowed domain, the request is logged and access is allowed.
The actions that the sinkhole server takes are not controlled by the DNS request filtering feature; you are responsible for configuring the sinkhole server actions. For example, the sinkhole server could send a message to the requestor that the domain is not reachable and prevent access to the disallowed domain.
Benefits
DNS filtering redirects DNS requests for disallowed website domains to sinkhole servers, while preventing anyone operating the system from seeing the list of disallowed domains. This is because the disallowed domain names are in an encrypted format.
Disallowed Domain Filter Database File
DNS request filtering requires a disallowed domain filter database .txt file, which identifies each disallowed domain name, the action to take on a DNS request for the disallowed domain, and the IP address or fully qualified domain name (FQDN) of a DNS sinkhole server.
DNS Filter Profile
You configure a DNS filter profile to specify which disallowed domain filter database file to use. You can also specify the interfaces on which DNS request filtering is performed, limit the filtering to requests for specific DNS servers, and limit the filtering to requests from specific source IP address prefixes.
How to Configure DNS Request Filtering
To filter DNS requests for disallowed website domains, perform the following:
- How to Configure a Domain Filter Database
- How to Configure a DNS Filter Profile
- How to Configure a Service Set for DNS Filtering
How to Configure a Domain Filter Database
Create one or more domain filter database files that include an entry for each disallowed domain. Each entry specifies what to do with a DNS request for a disallowed website domain.
To configure a domain filter database file:
How to Configure a DNS Filter Profile
A DNS filter profile includes general settings for filtering DNS requests for disallowed website domains, and includes up to 32 templates. The template settings apply to DNS requests on specific uplink and downlink logical interfaces or routing instances, or to DNS requests from specific source IP address prefixes, and override the corresponding settings at the DNS profile level. You can configure up to eight DNS filter profiles.
To configure a DNS filter profile:
How to Configure a Service Set for DNS Filtering
[edit services service-set service-set-name] user@host# set web-filter-profile profile-name user@host# set syslog host hostname class urlf-logs user@host# set next-hop-service inside-service-interface interface-name.unit-number user@host# set next-hop-service outside-service-interface interface-name.unit-number
Multitenant Support for DNS Filtering
Overview
Starting in Junos OS Release 21.1R1, you can configure custom domain feeds per customer or IP subgroup. You can :
- Configure domain names and actions for multiple tenants such that domain feeds can be managed on a per tenant basis.
- Configure hierarchical domain feed management per profile, per dns-filter-template or per dns-filter-term.
- Exempt domain feeds at the IP, subnet, or CIDR level.
To implement the mutiltenant support for DNS filtering, creating the domain filter database file under template or profile level is disabled. You need not specify a file at the template or profile level. Starting in Junos OS 21.1R1, by default, a global file with a fixed name, nsf_multi_tenant_dn_custom_file.txt (plain text format) or dnsf_multi_tenant_dn_custom_file_hashed.txt (encrypted file) is available.
Each entry in the database file has the following items:
hashed-domain-name, IPv4 sinkhole address, IPv6 sinkhole address, sinkhole FQDN, ID, action, feed-name.
The file hash is calculated and appended to the list of domain name entries in the file.
The file hash is calculated using a global key and method ,which is validated with the file
hash computed using the hash key configured at the [edit services
web-filter] hierarchy. The file validation is successful only if the calculated
file-hash matches the file hash present in the file.
Each entry in nsf_multi_tenant_dn_custom_file.txt file consists of an additional field called feed-name. This feed-name s used as an indicator to group set of domain-names and map them to a tenant (profile, template, term, or IP address).
When the DNS packets are received from a particular SRC IP address, the corresponding feed-name is fetched and lookup happens against the domain-names mapped with the feed-name associated with the term. If the feed-name is not provisioned for that IP address, then it falls back to the feed-name configured at the template-level and lookup happens against the domain-names mapped with the feed-name associated with the template. If the feed-name is not configured at template, then the lookup is against the domain-names mapped against the feed-name associated with the profile.
Configuring Multi-tenant Support for DNS Filtering
Example: Configuring Multitenant Support for DNS Filtering
Configuration
CLI Quick Configuration
To quickly configure this example, copy the following commands, paste them into a text file, remove any line breaks, change any details necessary to match your network configuration, and then copy and paste the commands into the CLI at the [edit] hierarchy level.
set services service-set Test Zone3 syslog mode stream set services service-set Test Zone3 syslog source-address 10.1.1.1 set services service-set Test Zone3 syslog stream t1 category urlf set services service-set Test Zone3 syslog stream t1 host 10.10.1.1 set services service-set Test Zone3 syslog stream t1 routing-instance client_vr4 set services service-set Test Zone3 web-filter-profile Test-Profile-3-Zone3 set services service-set Test Zone3 next-hop-service inside-service-interface ams3.24 set services service-set Test Zone3 next-hop-service outside-service-interface ams3.25 set services web-filter multi-tenant-support set services web-filter multi-tenant-hash file-hash-key ascii-text "$9$VjsgJikP36AGD6Ap0hcbs2" set services web-filter multi-tenant-hash hash-method hmac-sha2-256 set services web-filter profile Test-Profile-3-Zone3 feed-name abc set services web-filter profile Test-Profile-3-Zone3 global-dns-filter-stats-log-timer 20 set services web-filter profile Test-Profile-3-Zone3 dns-filter statistics-log-timer 5 set services web-filter profile Test-Profile-3-Zone3 dns-filter dns-resp-ttl 100 set services web-filter profile Test-Profile-3-Zone3 dns-filter wildcarding-level 10 set services web-filter profile Test-Profile-3-Zone3 dns-filter-template Test-Profile-3-Zone3-Area1 inactive: client-interfaces xe-7/0/2.32 set services web-filter profile Test-Profile-3-Zone3 dns-filter-template Test-Profile-3-Zone3-Area1 inactive: server-interfaces xe-7/2/0.36 set services web-filter profile Test-Profile-3-Zone3 dns-filter-template Test-Profile-3-Zone3-Area1 inactive: client-routing-instance client_vr4 set services web-filter profile Test-Profile-3-Zone3 dns-filter-template Test-Profile-3-Zone3-Area1 inactive: server-routing-instance server_vr4 set services web-filter profile Test-Profile-3-Zone3 dns-filter-template Test-Profile-3-Zone3-Area1 term Test-Profile-3-Zone3-Area1-Customer1 feed-name customer2 set services web-filter profile Test-Profile-3-Zone3 dns-filter-template Test-Profile-3-Zone3-Area1 term Test-Profile-3-Zone3-Area1-Customer1 from src-ip-prefix 10.12.1.1 set services web-filter profile Test-Profile-3-Zone3 dns-filter-template Test-Profile-3-Zone3-Area1 term Test-Profile-3-Zone3-Area1-Customer1 then dns-sinkhole set services web-filter profile Test-Profile-3-Zone3 dns-filter-template Test-Profile-3-Zone3-Area1 term Test-Profile-3-Zone3-Area1-Customer2 feed-name customer2 set services web-filter profile Test-Profile-3-Zone3 dns-filter-template Test-Profile-3-Zone3-Area1 term Test-Profile-3-Zone3-Area1-Customer2 from src-ip-prefix 2001:db8::0/96 set services web-filter profile Test-Profile-3-Zone3 dns-filter-template Test-Profile-3-Zone3-Area1 term Test-Profile-3-Zone3-Area1-Customer2 then dns-sinkhole set services web-filter profile Test-Profile-3-Zone3 dns-filter-template Test-Profile-3-Zone3-Area1 term Test-Profile-3-Zone3-Area1-Customer3 from src-ip-prefix 2001:db8:bbbb::/96 set services web-filter profile Test-Profile-3-Zone3 dns-filter-template Test-Profile-3-Zone3-Area1 term Test-Profile-3-Zone3-Area1-Customer3 then dns-sinkhole set services web-filter profile Test-Profile-3-Zone3 dns-filter-template Test-Profile-3-Zone3-Area2 inactive: client-interfaces xe-7/0/2.32 set services web-filter profile Test-Profile-3-Zone3 dns-filter-template Test-Profile-3-Zone3-Area2 inactive: server-interfaces xe-7/2/0.36 set services web-filter profile Test-Profile-3-Zone3 dns-filter-template Test-Profile-3-Zone3-Area2 inactive: client-routing-instance client_vr4 set services web-filter profile Test-Profile-3-Zone3 dns-filter-template Test-Profile-3-Zone3-Area2 inactive: server-routing-instance server_vr4 set services web-filter profile Test-Profile-3-Zone3 dns-filter-template Test-Profile-3-Zone3-Area2 term Test-Profile-3-Zone3-Area2-Customer1 from src-ip-prefix 22.21.128.0/17 set services web-filter profile Test-Profile-3-Zone3 dns-filter-template Test-Profile-3-Zone3-Area2 term Test-Profile-3-Zone3-Area2-Customer1 then dns-sinkhole set services web-filter profile Test-Profile-3-Zone3 dns-filter-template Test-Profile-3-Zone4-Area2 feed-name customer2 set services web-filter profile Test-Profile-3-Zone3 dns-filter-template Test-Profile-3-Zone4-Area2 inactive: client-routing-instance client_vr4 set services web-filter profile Test-Profile-3-Zone3 dns-filter-template Test-Profile-3-Zone4-Area2 inactive: server-routing-instance server_vr4 set services web-filter profile Test-Profile-3-Zone3 dns-filter-template Test-Profile-3-Zone4-Area2 term Test-Profile-3-Zone4-Area2-Customer1 from src-ip-prefix 2001:0db8:0001:/48 set services web-filter profile Test-Profile-3-Zone3 dns-filter-template Test-Profile-3-Zone4-Area2 term Test-Profile-3-Zone4-Area2-Customer1 then dns-sinkhole set services web-filter profile Test-Profile-3-Zone3 dns-filter-template Test-Profile-3-Zone4-Area2 term wildcard then dns-sinkhole set interfaces xe-7/0/0 unit 0 family inet address 10.11.1.1/24 set interfaces xe-7/0/1 unit 0 family inet address 10.12.1.1/24 set interfaces xe-7/0/2 flexible-vlan-tagging set interfaces xe-7/0/2 mtu 9192 set interfaces xe-7/0/2 encapsulation flexible-ethernet-services set interfaces xe-7/0/2 unit 1 vlan-id 10 set interfaces xe-7/0/2 unit 1 family inet address 198.31.100.1/24 set interfaces xe-7/0/2 unit 31 vlan-id 31 set interfaces xe-7/0/2 unit 31 family inet address 198.51.70.1/24; set interfaces xe-7/0/2 unit 31 family inet6 address 2001:db8:10::0/96 set interfaces xe-7/0/2 unit 32 vlan-id 32 set interfaces xe-7/0/2 unit 32 family inet address 198.51.71.1/24; set interfaces xe-7/0/2 unit 32 family inet6 address 2001:db8:11::0/96 set interfaces xe-7/0/2 unit 33 vlan-id 33 set interfaces xe-7/0/2 unit 33 family inet address 198.51.72.1/24 set interfaces xe-7/0/2 unit 33 family inet6 address 2001:db8:12::0/96 set interfaces xe-7/0/2 unit 34 vlan-id 34 set interfaces xe-7/0/2 unit 34 family inet address 198.51.73.1/24 set interfaces xe-7/0/2 unit 34 family inet6 address 2001:db8:13::0/96 set interfaces xe-7/0/2 unit 35 vlan-id 35 set interfaces xe-7/0/2 unit 35 vlan-id 35 family inet address 198.51.74.1/24 set interfaces xe-7/0/2 unit 3135 vlan-id 35 family inet6 address 2001:db8:14::0/96 set interfaces xe-7/0/2 unit 36 vlan-id 36 set interfaces xe-7/0/2 unit 36 family inet address 198.51.75.1/24 set interfaces xe-7/0/2 unit 36 family inet6 address 2001:db8:15::0/96 set interfaces xe-7/0/2 unit 37 vlan-id 37 set interfaces xe-7/0/2 unit 37 family inet address 198.51.76.1/24 set interfaces xe-7/0/2 unit 37 family inet6 address 2001:db8:16::0/96 set interfaces xe-7/0/2 unit 38 vlan-id 38 set interfaces xe-7/0/2 unit 38 family inet address 198.51.77.1/24 set interfaces xe-7/0/2 unit 38 family inet6 address 2001:db8:17::0/96 set interfaces xe-7/0/2 unit 39 vlan-id 39 set interfaces xe-7/0/2 unit 39 family inet address 198.51.78.1/24 set interfaces xe-7/0/2 unit 39 family inet6 address 2001:db8:18::0/96 set interfaces xe-7/0/2 unit 40 vlan-id 40 set interfaces xe-7/0/2 unit 40 family inet address 198.51.79.1/24 set interfaces xe-7/0/2 unit 40 family inet6 address 2001:db8:19::0/96 set interfaces xe-7/0/2 unit 41 vlan-id 41 set interfaces xe-7/0/2 unit 41 family inet address 198.51.80.1/24 set interfaces xe-7/0/2 unit 41 family inet6 address 2001:db8:20::0/96 set interfaces xe-7/2/0 flexible-vlan-tagging set interfaces xe-7/2/0 mtu 1514 set interfaces xe-7/2/0 encapsulation flexible-ethernet-services set interfaces xe-7/2/0 inactive unit 1 vlan-id 1 set interfaces xe-7/2/0 inactive unit 1 family inet address 198.168.50.0/24 set interfaces xe-7/2/0 inactive unit 1 family inet6 address 2001:0db0:1600:0::1/112 set interfaces xe-7/2/0 unit 2 vlan-id 2 set interfaces xe-7/2/0 unit 2 vlan-id 2 family inet address 198.100.70.0/24 set interfaces xe-7/2/0 unit 31 vlan-id 31 set interfaces xe-7/2/0 unit 31 family inet address 10.1.0.1/16 set interfaces xe-7/2/0 unit 31 family inet6 address 2001:0db0:1601:0::1/112 set interfaces xe-7/2/0 unit 32 vlan-id 32 set interfaces xe-7/2/0 unit 32 family inet address 10.2.0.1/16 set interfaces xe-7/2/0 unit 32 family inet6 address 2001:0db0:1602:0::1/112 set interfaces xe-7/2/0 unit 33 vlan-id 33 set interfaces xe-7/2/0 unit 33 family inet address 10.3.0.1/16 set interfaces xe-7/2/0unit 33 vlan-id 33 family inet6 address 2001:0db0:1603:0::1/112 set interfaces xe-7/2/0 unit 34 vlan-id 34 set interfaces xe-7/2/0 unit 34 family inet address 10.0.0.1/16 set interfaces xe-7/2/0 unit 34 family inet6 address 2001:0db0:1600:0::1/112 set interfaces xe-7/2/0 unit 35 vlan-id 35 set interfaces xe-7/2/0 unit 35 family inet address 10.4.0.1/16 set interfaces xe-7/2/0 unit 35 family inet6 address 2001:0db0:1604:0::1/112 set interfaces xe-7/2/0 unit 36 vlan-id 36 set interfaces xe-7/2/0 unit 36 family inet address 10.5.0.1/16 set interfaces xe-7/2/0 unit 36 family inet6 address 2001:0db0:1605:0::1/112 set interfaces xe-7/2/0 unit 37 vlan-id 37 set interfaces xe-7/2/0 unit 37 family inet address 10.6.0.1/16 set interfaces xe-7/2/0unit 37 family inet6 address 2001:0db0:1606:0::1/112 set interfaces xe-7/2/0 unit 38 vlan-id 38 set interfaces xe-7/2/0 unit 38 family inet address 10.7.0.1/16 set interfaces xe-7/2/0 unit 38 vlan-id 38 family inet6 address 2001:0db0:160:0::1/112 set interfaces ams3 load-balancing-options member-interface mams-3/0/0 set interfaces ams3 load-balancing-options member-interface mams-3/1/0 set interfaces ams3 load-balancing-options member-failure-options redistribute-all-traffic enable-rejoin set interfaces ams3 load-balancing-options high-availability-options many-to-one preferred-backup mams-3/1/0 set interfaces ams3 unit 22 family inet set interfaces ams3 unit 22 family inet6 set interfaces ams3 unit 22 service-domain inside set interfaces ams3 unit 22 load-balancing-options hash-keys ingress-key (source-ip destination-ip ) set interfaces ams3 unit 24 family inet set interfaces ams3 unit 24 family inet6 set interfaces ams3 unit 24 service-domain inside set interfaces ams3 unit 24 family inet6 load-balancing-options hash-keys ingress-key (source-ip destination-ip) set interfaces ams3 unit 25 family inet set interfaces ams3 unit 25 family inet6 set interfaces ams3 unit 25 service-domain inside set interfaces ams3 unit 25 load-balancing-options hash-keys ingress-key (source-ip destination-ip ) set routing-instances client_vr4 instance-type virtual-router set routing-instances client_vr4 routing-options rib client_vr4.inet6.0 static route 2001:0db0:bbbb:0::0/49 next-hop 2001:0db0:7070:71::2 set routing-instances client_vr4 routing-options rib client_vr4.inet6.0 static route 2001:0db0:aaaa:8000::0/49 next-hop 2001:0db0:7070:71::3 set routing-instances client_vr4 routing-options rib client_vr4.inet6.0 static route 60::0/64 next-hop ams3.24 set routing-instances client_vr4 routing-options static route 10.12.1.1 next-hop 192.168.1.2 set routing-instances client_vr4 routing-options static route 22.21.128.0/17 next-hop 192.168.1.3 set routing-instances client_vr4 routing-options static route 0.0.0.0/0 next-hop ams3.24 set routing-instances client_vr4 routing-options static route 10.11.10.10/16 next-hop 192.168.1.4 set routing-instances client_vr4 routing-options static route 10.10.23.10/16 next-hop 192.168.1.5 set routing-instances client_vr4 routing-options static route 10.1.0.0/16 next-hop 192.168.1.6 set routing-instances client_vr4 routing-options static route 10.20.20.0/16 next-hop 192.168.1.7 set routing-instances client_vr4 routing-options static route 10.2.0.0/16 next-hop 192.168.1.8 set routing-instances client_vr4 routing-options static route 10.30.20.0/16 next-hop 192.168.1.9 set routing-instances client_vr4 routing-options static route 10.3.0.0/16 next-hop 192.168.10. set routing-instances client_vr4 routing-options static route 10.40.20.0/16 next-hop 192.168.1.11 set routing-instances client_vr4 routing-options static route 10.4.0.0/16 next-hop 192.168.1.12 set routing-instances client_vr4 routing-options static route 10.50.20.0/16 next-hop 192.168.1.13 set routing-instances client_vr4 interface xe-7/0/0.0 set routing-instances client_vr4 interface xe-7/0/2.32 set routing-instances client_vr4 interface ams3.24 set routing-instances server_vr4 instance-type virtual-router set routing-instances server_vr4 routing-options rib server_vr4.inet6.0 static route 2001:0db0:2221:0::0/48 next-hop ams3.25 set routing-instances server_vr4 routing-options rib server_vr4.inet6.0 static route 2001:db8:ffff::1/128 next-hop 2001:0db0:1605:0::2 set routing-instances server_vr4 routing-options rib server_vr4.inet6.0 static route 2001:db8:bbbb::1/128 next-hop 2001:0db0:1605:0::3 set routing-instances server_vr4 routing-options static route 10.10.20.1 next-hop ams3.25 set routing-instances server_vr4 routing-options static route 60.0.6.0/24 next-hop 192.0.2.2 set routing-instances server_vr4 routing-options static route 60.0.18.0/24 next-hop 192.0.2.3 set routing-instances server_vr4 routing-options static route 10.9.9.0/24 next-hop ams3.25 set routing-instances server_vr4 routing-options static route 60.0.19.0/24 next-hop 192.0.2.4 set routing-instances server_vr4 routing-options static route 60.0.20.0/24 next-hop 192.0.2.5 set routing-instances server_vr4 routing-options static route 60.0.21.0/24 next-hop 192.0.2.6 set routing-instances server_vr4 routing-options static route 60.0.22.0/24 next-hop 192.0.2.7 set routing-instances server_vr4 routing-options static route 60.0.23.0/24 next-hop 192.0.2.8 set routing-instances server_vr4 routing-options static route 60.0.24.0/24 next-hop 192.0.2.9 set routing-instances server_vr4 routing-options static route 60.0.25.0/24 next-hop 192.0.2.10 set routing-instances server_vr4 routing-options static route 60.0.26.0/24 next-hop 192.0.2.11 set routing-instances server_vr4 routing-options static route 60.0.27.0/24 next-hop 192.0.2.12 set routing-instances server_vr4 routing-options static route 60.0.28.0/24 next-hop 192.0.2.13 set routing-instances server_vr4 routing-options static route 10.1.0.0/16 next-hop ams3.25 set routing-instances server_vr4 interface xe-7/0/1.0 set routing-instances server_vr4 interface xe-7/2/0.36 set routing-instances server_vr4 interface ams3.25 set routing-options static route 0.0.0.0/0 next-hop 10.48.179.254
Integration of Juniper ATP Cloud and Web Filtering on MX Series Routers
- Overview
- Configuring the Web Filter Profile for Sampling
- GeoIP Filtering
- Global Allowlist and Global Blocklist
Overview
Juniper Advanced Threat Prevention (Juniper ATP Cloud) is integrated with MX series routers to protect all hosts in your network against evolving security threats by employing cloud-based threat detection software with a next-generation firewall system.
This topic provides an overview of Juniper ATP Cloud, Policy Enforcer, Security Intelligence, Web filtering, and their benefits when integrated on MX Series routers .
For details on the platform and release information, see Feature Explorer .
- Benefits
- Understanding Policy Enforcer and Juniper ATP Cloud
- Security Intelligence (SecIntel) - Overview
- Web Filtering (URL-Filterd) - Overview
Benefits
-
Simplifies deployment and enhances the anti-threat capabilities when integrated with the MX routers.
-
Delivers protection against “zero-day” threats using a combination of tools to provide robust coverage against sophisticated, evasive threats.
-
Checks inbound and outbound traffic with policy enhancements that allow users to stop malware, quarantine infected systems, prevent data exfiltration, and disrupt lateral movement.
-
Supports High Availability to provide uninterrupted service.
-
Provides scalability to handle increasing loads that require more computing resources, increased network bandwidth to receive more customer submissions, and a large storage for malware.
-
Provides deep inspection, actionable reporting, and inline malware blocking.
-
Provides ability to provide tenancy information using VRF information in logs
Understanding Policy Enforcer and Juniper ATP Cloud
Juniper Networks Security Director comprises a feature called the Policy Enforcer (PE) that enables it to learn from threat conditions, automate the policy creation, and to dynamically deploy enforcement to Juniper devices in the network.
Figure 4 illustrates the traffic flow between the PE, the Juniper ATP Cloud, and the MX router which functions as a firewall.
-
Policy Enforcer (PE) learns from threat conditions, automates the policy creation, and deploys enforcement to Juniper devices in the network.
-
Juniper Advanced Threat Prevention (Juniper ATP Cloud) protects all hosts in your network by employing cloud-based threat detection software with a next-generation firewall system.
-
MX router fetches the threat intelligence feeds from Policy Enforcer (PE) and implements those policies to quarantine compromised hosts. It comprises of the following important components:
-
Security Intelligence process
-
Web Filtering process
-
Firewall process
-
To understand the functionality of the system architecture consider the following example—if a user downloads a file from the Internet and that file passes through an MX firewall, the file can be sent to the Juniper ATP Cloud cloud for malware inspection (depending on your configuration settings.) If the file is determined to be malware, PE identifies the IP address and MAC address of the host that downloaded the file. Based on a user-defined policy, that host can be put into a quarantine VLAN or blocked from accessing the Internet.
MX Series routers can be integrated with the Juniper ATP Cloud to prevent compromised hosts (botnets) from communicating with command and control servers:
-
Starting in Junos OS Release 18.4R1 with the Adaptive Services as an Inline security capability
-
Starting in Junos OS Release 19.3R2 with the Next Gen Services as an Inline security capability
MX Sseries routers can download C&C and Geo-IP from either of the following methods:
-
Indirect method-Policy Enforcer acts like a feed proxy to all devices with in a defined environment. This method is beneficial in avoiding individual devices accessing Juniper ATP cloud services on the Internet. Thus, decreasing the vulnerability of the devices reaching out to Internet.
-
Direct method-MX series routers enroll directly to Juniper ATP cloud to download the C&C and Geo-IP feeds.
Security Intelligence (SecIntel) - Overview
The Security Intelligence process (IPFD), is responsible for downloading the security intelligence feeds and parsing from the feed connector or ATP Cloud cloud feed server. The IPFD process on the MX platforms fetches the command and control IPv4/IPv6 feeds from Policy Enforcer. C&C feeds are essentially a list of servers that are known command and control servers for botnets. The list also includes servers that are known sources for malware downloads. The information thus fetched is saved in a file (urlf_si_cc_db.txt) created under the /var/db/url-filterd directory.
The file format of the disallowed IPs sent by IPFD to the web filtering process is as follows:
IPv4 address | IPv6 address,
threat-level.
The threat-level is an integer ranging from 1 to
10 to indicate the threat level of files scanned for malware and for infected hosts.
Here, 1 represents the lowest threat level and 10 represents the highest threat
level.
For example: 178.10.19.20, 4
Here, 178.10.19.20 indicates the disallowed IP and 4 indicates the
threat-level.
The C&C feed database is synced onto the backup Routing Engine. IPFD then shares the information to the web filtering process (url-filterd). The web filtering process reads the file contents and configures the filters accordingly.
Configuring Security Intelligence to Download the CC Feed from Policy Enforcer
To download the command and control IPv4/IPv6 feeds from Juniper ATP Cloud/Policy
Enforcer, include the security-intelligence statement at the
[edit services] hierarchy as shown in the following
example:
security-intelligence {
authentication {
auth-token 7QGSBL5ZRKR5UHUZ2X2R6QLHB656D5EN;
}
url https://10.92.83.245:443/api/v1/manifest.xml;
traceoptions {
file security-inteligence.log size 1g;
level all;
flag all;
}
}
Web Filtering (URL-Filterd) - Overview
The web filtering process reads the file contents fetched from the IPFD and configures the filters on the Packet Forwarding Engine accordingly. The web filtering process enforces the command and control feeds by programming the filters in the Packet Forwarding Engine to block the packets destined to the blocked IP addresses and to generate logs for reporting the incident.
Figure 5 illustrates the way C&C feed is fetched by the IPFD and then processed by the web filtering process.
The web filter profile can have more than one templates. Each template consists of a
set of configured logical interfaces for Web filtering and one or more terms. A term
is a set of match criteria with actions to be taken if the match criteria is met.
To configure
the web filter profile to use dynamically fetched C&C feed, you can configure
the security-intelligence-policy command under the [edit
services web-filter profile profile-name
hierarchy level. You need not configure a term for a
security-intelligence-policy based web filter profiles.
You can configure the following threat level actions for the web filter profile at
the edit web-filter profile profile-name
security-intelligence-policy threat-level threat-level
threat-action hierarchy level:
-
drop -
drop-and-log -
log
You can
configure only one threat-action for each threat
level. If the threat-action is not configured for a
particular threat level, the default threat-action
is accept.
Starting in Junos OS Release 24.4R1, for threats configured with log
action, the threat-level and the tenant or the VRF information is embedded in the
outgoing syslogs. The Class-of-Service policy-maps are enhanced with a new
user-attribute integer keyword to store and
indicate the threat-level.
You can configure the user-attribute integer at
the [editi class-of-service policy-map
policy-name] hierarchy.
The policy-map is referenced in each threat-level configuration to map the new
user-attribute<> into the dfw filter term driving the configured
action for each threat-level. The policy-map is used at the [edit services
web-filter profile profile-name security-intelligence-policy
threat level integer policy-map
policy-name] hierarchy or [edit services
web-filter profile profile-name url-filter-template
template-name security-intelligence-policy threat level
integer policy-map
policy-name] hierarchy to map the threat level to a
user-attribute.
For example,
[edit] user@host set class-of-service policy-map threat1 user-attribute 1 user@host set class-of-service policy-map threat2 user-attribute 2 user@host set class-of-service policy-map threat3 user-attribute 3 ... ... user@host set class-of-service policy-map threat10 user-attribute 10 user@host set class-of-service policy-map white-list user-attribute 11 user@host set class-of-service policy-map black-list user-attribute 12 ...
[edit] user@host set services web-filter profile ATP-P1 security-intelligence-policy threat-level 1 threat-action log user@host set services web-filter profile ATP-P1 security-intelligence-policy threat-level 1 policy-map threat1
See Also
Configuring the Web Filter Profile for Sampling
Starting in Junos OS
Release 19.3R1, web filtering process (url-filterd) supports inline
sampling of packets as a threat level action. The packets are dropped, logged, and sampled based on the threat-action
you configure. For scaled scenarios, sampling of packets is preferred
over the logging option. Along with the existing threat level actions,
you can configure the following threat level actions on the web filter
profile at the edit web-filter profile profile-name security-intelligence-policy threat-level threat-level threat-action hierarchy level:
drop-and-sampledrop-log-and-samplelog-and-samplesample
The inline flow monitoring samples the packets and sends the flow records in IPFIX format to a flow collector. You can derive the threat level for the sampled packets received at the external collector by matching the received IP from the sampled packets with the corresponding IP entry in /var/db/url-filterd/urlf_si_cc_db.txt. You can configure sampling using any of the following methods:
Associate a sampling instance with the FPC on which the media interface is present at the
[edit chassis]hierarchy level. If you are configuring sampling of IPv4 flows, IPv6 flows, or VPLS flows, you can configure the flow hash table size for each family.Configure the template properties for inline flow monitoring at the
[edit services flow-monitoringhierarchy level.Configure a sampling instance and associate the flow-server IP address, port number, flow export rate, and specify the collectors at the
[edit forwarding-optionshierarchy level.
- Associate a Sampling Instance with the FPC
- Configure a Sampling Instance and Associate the Template With the Sampling Instance.
- Configure the sample instance and associate the flow-server IP address and other parameters.
- Example: Configuring Web-filter Profile to Define Different Threat-Levels
Associate a Sampling Instance with the FPC
To associate the defined instance with a particular FPC, MPC,
or DPC, you include the sampling-instance statement at
the [edit chassis fpc number] hierarchy level, as shown
in the following example:
chassis {
redundancy {
graceful-switchover;
}
fpc 0 {
pic0 {
inline-services {
bandwidth 10g;
}
}
}
pic 2 {
inline-services {
bandwidth 10g;
}
}
pic 3 {
inline-services {
bandwidth 10g;
}
}
sampling-instance 1to1;
inline-services{
flow-table-size {
ipv4-flow-table-size 5;
ipv6flow-table-size 5;
}
}
}
Configure a Sampling Instance and Associate the Template With the Sampling Instance.
To configure the template properties for inline flow monitoring,
include the following statements at the edit services flow-monitoring hierarchy level as shown in the following example:
services {
flow-monitoring {
version-ipfix {
template ipv4 {
flow-active-timeout 60;
flow-inactive-timeout 60;
template-refresh-rate {
packets 48000;
seconds 60;
}
option-refresh-rate {
packets 48000;
seconds 60;
}
ipv4-template;
template ipv6 {
flow-active-timeout 60;
flow-inactive-timeout 60;
template-refresh-rate {
packets 48000;
seconds 60;
}
ipv6-template;
}
}
}
Configure the sample instance and associate the flow-server IP address and other parameters.
To configure a sampling instance and associate the flow-server
IP address and other parameters. include the following
statements at the [edit forwarding-options] hierarchy,
as shown in the following example:
forwarding-options {
sampling {
traceoptions {
file ipfix.log size 10k;
}
instance {
1to1 {
input {
rate 1;
}
family inet {
output {
flow-server 192.168.9.194;
port 2055;;
autonomous-system-type origin;
version-ipfix {
template {
ipv4;
}
}
}
inline-jflow {
source-address 192.168.9.195;
}
}
}
family inet6 {
output {
flow-server 192.168.9.194;
port 2000;
autonomous-system-type origin;
version-ipfix {
template {
ipv6;
}
}
}
inline-jflow {
source-address 192.168.9.195;
}
}
}
}
}
Example: Configuring Web-filter Profile to Define Different Threat-Levels
web-filter {
profile Profile1 ;
security-intelligence-policy{
file-type txt;
threat-level 7 {
threat-action {
log-and-sample;
}
}
threat-level 8 {
threat-action {
drop-log-and-sample;
}
}
threat-level 10 {
threat-action {
drop-log-and-sample;
}
}
threat-level 5{
threat-action {
drop-log-and-sample;
}
}
threat-level 6 {
threat-action {
drop-log-and-sample;
}
}
threat-level 9{
threat-action {
drop-log-and-sample;
}
}
}
url-filter-template template1 {
client-interfaces ge-0/0/4.0;
client-routing-instance inet.0;
}
}
traceoptions {
file webfilter_log size 1g;
level all;
flag all;
}
}
}
See Also
GeoIP Filtering
Overview
The GeoIP feeds are essentially a list of IP address to country code mappings. Starting in Junos OS 21.4R1, you can configure IP-based Geo locations on MX Series routers to fetch the GeoIP feeds from Policy Enforcer. By deploying the GeoIP feeds, you can enable the network to prevent devices from communicating with IP addresses belonging to specific countries.
You can configure the security intelligence process (IPFD) on MX series routers to fetch the GeoIP feeds from Policy Enforcer. Similar to existing C&C IP or IPv6 feeds, IPFD downloads the GeoIP feeds from the Policy Enforcer. IPFD translates the feed in the file format that is processed by the web-filtering process (url-filterd) subsequently.
Starting in Junos OS 22.1R1, you can configure the security intelligence process (IPFD) on MX series routers to fetch the GeoIP feeds from Juniper ATP Cloud. Similar to existing C&C IP or IPv6 feeds, IPFD downloads the GeoIP feeds from the Juniper ATP Cloud.
How to Configure GeoIP Filtering on MX Series Routers
The information fetched by the IPFD is saved in a file (urlf_si_geoip_db.txt) created at the /var/db/url-filterd location.
The format of the file sent by IPFD to the web filtering process is as follows:
IPv4 address|IPv6
address,Prefix,threat-level,VRF-name,Gen-num.
Gen-num is always 0. VRF-name refers to a country code.
For example, 178.10.19.22,12,255,US,0
IPFD and the web-filtering process maintain a pconn connection for communicating the creation or update of files containing GeoIP feeds. The Web-Filtering process enforces the GeoIP feeds by programming the filters in the PFE to block the packets destined to the blocked countries. The APIs provided by liburlf are used to validate and parse the files.
The web-filtering process reads the file containing the list of IP addresses and the PFE filters are programmed with the destination IP addresses listed in the feed and the action configured for the associated country.
-
Global filter- Countries are configured under global rule within a profile. All IP addresses for countries specific to that global rule are programmed in a single filter and applied to all templates in the profile. You can configure a profile to dynamically fetch GeoIP feed by configuring
geo-ip rule match country country-nameat the[edit services web-filter profile profile-name security-intelligence-policy]hierarchy . Group filter- Groups of countries are configured under a template. All IP addresses associated with the countries for a Group are programmed in a group filter applied to the templates under which that group is configured. Group is a list of countries defined in a json file that is parsed by liburlf.
To configure a group filter, you must configure a json file at the /var/db/url-filterd location, where the group.json file contains the group mappings.
The format of the json file is as follows:
[{"group_name" : "group1","country" : ["ZA","YE"]},{"group_name" : "group2","country" : ["YT"]}]To dynamically fetch GeoIP feeds, you can configure a global filter using a single profile or configure multiple group filters using templates. We do not support both the configurations together.
The groups created in the json file are referred in the GeoIP match clause defined at the
[edit services web-filter profile profile-name url-filter-template template-name security-intelligence-policy geo-ip rule match group group-name]hierarchy.
Global Allowlist and Global Blocklist
You can choose to customize the IP feed by adding your own allowlist and blocklist. This can be helpful to manage intelligence feeds that are custom to your security operations center or as a temporary measure for false positives. Starting in Junos OS release 21.4R1, you can allow or block certain IP addresses based on configuration through a CLI or a file. You can either configure separate list for allowlist and a separate list for blocklist or include the IP addresses in a file and include the file name in the CLI configuration.
You
can create an IP-address-list at the [edit services
web-filter] hierarchy. Here, IP-address-list contains the list
of IP addresses that must be allowed or blocked. You can also create a file containing the
IP addresses that need to be allowed or blocked in the
/var/db/url-filterd location. The IP addresses configured as a part
of the file or IP address list are programmed as a part of the global filter, which is
attached to all templates.
You can define a global allowlist by configuring
white-list (IP-address-list | file-name) at the
edit services web-filter profile profile-name
security-intelligence-policy hierarchy. You can define a global blocklist by
configuring the black-list (IP-address-list | file-name)
at the edit services web-filter profile profile-name
security-intelligence-policy hierarchy. Here, the
IP-address-list, refers to the name of IP address-list specified at the
[edit services
          web-filter]
hierarchy. The file-name
refers to the name of the file which contains the list of the IP addresses that must be
allowed or blocked. The file must be in the /var/db/url-filterd
location and must have the same name as in the
configuration.
The format of the global allowlist file is as follows:
Security Intelligence Policy
Enforcement Version
2.0IP Address,Prefix,Threat-level,VRF-Name,Gen-Num 198.51.100.1,32,0,junos-default-vrf,0
The format of the global blocklist file is as follows:
Security Intelligence Policy
Enforcement Version
2.0IP Address,Prefix,Threat-level,VRF-Name,Gen-Num 192.168.1.1,255,junos-default-vrf,0
The web-filtering process parses the list of global allowlist or global blocklist IP addresses and programs the implicit filter terms with the configured IP addresses to either allow or block the packets.
Change History Table
Feature support is determined by the platform and release you are using. Use Feature Explorer to determine if a feature is supported on your platform.
[edit services web-filter] hierarchy level. Before Junos OS
Release 18.3R1, configure the profile at the [edit services url-filter] hierarchy level.