Example: Copying Traffic to a PIC While an M, MX or T Series Router Forwards the Packet to the Original Destination
Traffic sampling enables you to copy traffic
to a Physical Interface Card (PIC) while the router forwards the packet
to its original destination. This example describes how to configure
a router to perform sampling on the Routing Engine using the sampled process. For this method, you configure a filter (input or output)
with a matching term that contains the then sample statement.
In addition, for VPN routing and forwarding (VRF) Routing Engine-based
sampling, you configure a VRF routing instance that maps to an interface.
Each VRF instance corresponds with a forwarding table. Routes on the
interface go into the corresponding forwarding table.
For VRF Routing Engine-based sampling, the kernel queries the correct VRF route table based on the ingress interface index for the received packet. For interfaces configured in VRF, the sampled packets contain the correct input and output interface SNMP index, the source and destination AS numbers, and the source and destination mask.
With Junos OS Release 10.1, VRF Routing Engine-based sampling is performed only on IPv4 traffic. You cannot use Routing Engine-based sampling on IPv6 traffic or on MPLS label-switched paths.
This example describes how to configure and verify VRF Routing Engine-based sampling on one router in a four-router topology.
Requirements
This example uses the following hardware and software components:
-
Junos OS Release 10.1 or later
-
M Series, MX Series, or T Series router
Before you configure VRF Routing Engine-Based sampling on your router, be sure you have an active connection between the routers on which you configure sampling. In addition, you need to have an understanding of VRF to configure the interfaces and routing instances that form the basis of the sampling configuration; and an understanding of the BGP, MPLS, and OSPF protocols to configure the other routers in the network to bring up the sampling configuration.
Overview and Topology
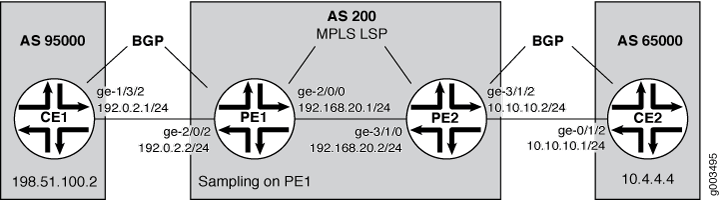
The scenario in this example illustrates VRF Routing Engine-based sampling configured on the PE1 router in a four-router network. The CE routers use BGP as the routing protocol to communicate with the PE routers. MPLS LSPs pass traffic between the PE routers. Packets from the CE1 router are sampled on the PE1 router. Regular traffic is forwarded to the original destination (the CE2 router).
Topology
Configuration
In this configuration example, the VRF Routing Engine-based sampling is configured on the PE1 router that samples the traffic that goes through the interface and routes configured in the VRF. The configurations on the other three routers are included to show the sampling configuration on the PE1 router working in the context of a network.
To configure VRF Routing Engine-based sampling for the network example, perform these tasks:
- Configuring the CE1 Router
- Configuring the PE1 Router
- Configuring the PE2 Router
- Configuring the CE2 Router
Configuring the CE1 Router
Step-by-Step Procedure
In this step, you configure interfaces, routing options, protocols, and policy options for the CE1 router. To configure the CE1 router:
-
Configure one interface with two IP addresses. One address is for traffic to the PE1 router; the other address is to check that traffic is flowing to the CE2 router:
[edit interfaces]
user@router-ce1# set ge-1/3/2 unit 0 family inet address 192.0.2.1/24
user@router-ce1# set ge-1/3/2 unit 0 family inet address 198.51.100.2/8
-
Configure the autonomous system to establish a connection between BGP peers:
[edit routing-options]
user@router-ce1# set autonomous-system 95000
-
Configure BGP as the routing protocol between the CE router and the PE router:
[edit protocols]
user@router-ce1# set bgp group to_r1 type external
user@router-ce1# set bgp group to_r1 export my_lo0_addr
user@router-ce1# set bgp group to_r1 peer-as 200
user@router-ce1# set bgp group to_r1 neighbor 192.0.2.2
-
Configure the policies that ensure that the CE routers exchange routing information. In this example, Router CE1 exchanges routing information with Router CE2:
[edit policy-options]
user@router-ce1# set policy-statement my_lo0_addr term one from protocol direct
user@router-ce1# set policy-statement my_lo0_addr term one from route-filter 10.255.15.32/32 exact
user@router-ce1# set policy-statement my_lo0_addr term one then accept
user@router-ce1# set policy-statement my_lo0_addr term four from protocol direct
user@router-ce1# set policy-statement my_lo0_addr term four from route-filter 203.0.113.0/8 exact
user@router-ce1# set policy-statement my_lo0_addr term four then accept
Results
The output below shows the configuration of the CE1 router:
[edit]
user@router-ce1# show
[...Output Truncated...]
interfaces {
    ge-1/3/2 {
        unit 0 {
            family inet {
                address 192.0.2.1/24;
                address 198.51.100.2/8;
            }
        }
    }
}
routing-options {
    autonomous-system 95000;
}
protocols {
    bgp {
        group to_r1 {
            type external;
            export my_lo0_addr;
            peer-as 200;
            neighbor 192.0.2.2;
        }
    }
}
policy-options {
    policy-statement my_lo0_addr {
        term one {
            from {
                protocol direct;
                route-filter 10.255.15.32/32 exact;
            }
            then accept;
        }
        term four {
            from {
                protocol direct;
                route-filter 203.0.113.0/8 exact;
            }
            then accept;
        }
    }
}
Configuring the PE1 Router
Step-by-Step Procedure
In this step, you configure a filter with a matching
term that contains the then sample statement and apply
the filter to the ingress interface. You also configure a VRF routing
instance with import and export policies. In addition, you configure
interfaces, forwarding options, routing options, protocols, and policy
options for the PE1 router. To configure the PE1 router:
-
Create the fw firewall filter that is applied to the logical interface being sampled:
[edit firewall]
user@router-pe1# set family inet filter fw term 1 from protocol tcp
user@router-pe1# set family inet filter fw term 1 from port bgp
user@router-pe1# set family inet filter fw term 1 then accept
user@router-pe1# set family inet filter fw term 2 then sample
-
Configure two interfaces, one interface that connects to the CE1 router (ge-2/0/2), and another that connects to the PE2 router (ge-2/0/0):
[edit interfaces]
user@router-pe1# set ge-2/0/2 unit 0 family inet address 192.0.2.2/24
user@router-pe1# set ge-2/0/0 unit 0 family inet address 192.168.20.1/24
user@router-pe1# set ge-2/0/0 unit 0 family mpls
-
Enable MPLS on the interface that connects to the PE2 router (ge-2/0/0):
[edit interfaces]
user@router-pe1# set ge-2/0/0 unit 0 family mpls
-
On the interface that connects to the CE1 router, apply the fw filter that was configured in the firewall configuration:
[edit interfaces]
user@router-pe1# set ge-2/0/2 unit 0 family inet filter input fw
user@router-pe1# set ge-2/0/2 unit 0 family inet filter output fw
-
Configure the management (fxp0) and loopback (lo0) interfaces:
[edit interfaces]
user@router-pe1# set fxp0 unit 0 family inet address 192.168.69.153/21
user@router-pe1# set lo0 unit 0 family inet address 127.0.0.1/32
-
Configure the sampled log file in the /var/log directory to record traffic sampling:
[edit forwarding-options]
user@router-pe1# set sampling traceoptions file sampled
user@router-pe1# set sampling traceoptions file world-readable
user@router-pe1# set sampling traceoptions flag all
-
Specify the sampling rate and threshold value for traffic sampling:
[edit forwarding-options]
user@router-pe1# set sampling input rate 1
user@router-pe1# set sampling input run-length 0
user@router-pe1# set sampling input max-packets-per-second 20000
-
Specify active and inactive flow periods, and the router (198.51.100.2) that sends out the monitored information:
[edit forwarding-options]
user@router-pe1# set sampling family inet output flow-active-timeout 60
user@router-pe1# set sampling family inet output flow-inactive-timeout 60
user@router-pe1# set sampling family inet output flow-server 198.51.100.2 port 2055
user@router-pe1# set sampling family inet output flow-server 198.51.100.2 local-dump
user@router-pe1# set sampling family inet output flow-server 198.51.100.2 version 500
-
Configure the autonomous system to establish a connection between BGP peers:
[edit routing-options]
user@router-pe1# set autonomous-system 200
-
Configure RSVP to support MPLS label-switched paths (LSPs) between the PE routers:
[edit protocols]
user@router-pe1# set rsvp interface all
user@router-pe1# set rsvp interface fxp0.0 disable
-
Configure an MPLS LSP from the PE1 router to the PE2 router:
[edit protocols]
user@router-pe1# set mpls label-switched-path R1toR2 from 192.168.20.1
user@router-pe1# set mpls label-switched-path R1toR2 to 192.168.20.2
user@router-pe1# set mpls interface all
user@router-pe1# set mpls interface fxp0.0 disable
-
Configure an internal BGP group for the PE routers. Include the
family inet-vpn unicaststatement to enable BGP to carry network layer reachability information (NLRI) parameters and for BGP peers to only carry unicast routes for forwarding:[edit protocols] user@router-pe1# set bgp group to_r2 type internal user@router-pe1# set bgp group to_r2 local-address 192.168.20.1 user@router-pe1# set bgp group to_r2 neighbor 192.168.20.2 family inet-vpn unicast
-
Configure OSPF as the interior gateway protocol (IGP) and to compute the MPLS LSPs:
user@router-pe1# set ospf traffic-engineering
user@router-pe1# set ospf area 0.0.0.0 interface all
user@router-pe1# set ospf area 0.0.0.0 interface fxp0.0 disable
-
Create the extended community that is applied in the policy options configuration:
[edit policy-options]
user@router-pe1# set community vpna-comm members target:200:100
-
Define the vpna-export routing policy that is applied in the
vrf-exportstatement in the routing instance configuration. Also, apply the vpna-comm community from which routes are learned:[edit policy-options] user@router-pe1# set policy-statement vpna-export term one from protocol bgp user@router-pe1# set policy-statement vpna-export term one from protocol direct user@router-pe1# set policy-statement vpna-export term one then community add vpna-comm user@router-pe1# set policy-statement vpna-export term one then accept user@router-pe1# set policy-statement vpna-export term two then reject
-
Define the vpna-import routing policy that is applied in the
vrf-importstatement in the routing instance configuration. Also, apply the vpna-comm community from which routes are learned:[edit policy-options] user@router-pe1# set policy-statement vpna-import term one from protocol bgp user@router-pe1# set policy-statement vpna-import term one from community vpna-comm user@router-pe1# set policy-statement vpna-import term one then accept user@router-pe1# set policy-statement vpna-import term two then reject
-
Configure a VRF routing instance so that routes received from the provider edge-provider edge (PE-PE) session can be imported into any of the instance’s VRF secondary routing tables:
 [edit routing-instances]
user@router-pe1#set vrf1 instance-type vrf set vrf1 interface ge-2/0/2.0
user@router-pe1# set vrf1 route-distinguisher 10.255.15.51:1
user@router-pe1# set vrf1 vrf-import vpna-import
user@router-pe1# set vrf1 vrf-export vpna-export
user@router-pe1# set vrf1 protocols bgp group customer type external
user@router-pe1# set vrf1 protocols bgp group customer peer-as 95000
user@router-pe1# set vrf1 protocols bgp group customer as-override
user@router-pe1# set vrf1 protocols bgp group customer neighbor 192.168.30.1
user@router-pe1# set vrf1 protocols bgp group customer neighbor 192.0.2.1
Results
Check the results of the configuration for the PE1 router:
user@router-pe1> show configuration
[...Output Truncated...]
}
interfaces {
    ge-2/0/0 {
        unit 0 {
            family inet {
                address 192.168.20.1/24;
            }
            family mpls;
        }
    }
    ge-2/0/2 {
        unit 0 {
            family inet {
                filter {
                    input fw;
                    output fw;
                }
                address 192.0.2.2/24;
            }
        }
    }
    fxp0 {
        unit 0 {
            family inet {
                address 192.168.69.153/21;
            }
        }
    }
    lo0 {
        unit 0 {
            family inet {
                address 127.0.0.1/32;
            }
        }
    }
}
forwarding-options {
    sampling {
        traceoptions {
            file sampled world-readable;
            flag all;
        }
        input {
            rate 1;
            run-length 0;
            max-packets-per-second 20000;
        }
        family inet {
            output {
                flow-inactive-timeout 60;
                flow-active-timeout 60;
                flow-server 198.51.100.2 {
                    port 2055;
                    local-dump;
                    version 500;
                }
            }
        }
    }
}
routing-options {
[...Output Truncated...]
    autonomous-system 200;
}
protocols {
    rsvp {
        interface all;
        interface fxp0.0 {
            disable;
        }
    }
    mpls {
        label-switched-path R1toR2 {
            from 192.168.20.1;
            to 192.168.20.2;
        }
        interface all;
        interface fxp0.0 {
            disable;
        }
    }
    bgp {
        group to_r2 {
            type internal;
            local-address 192.168.20.1;
            neighbor 192.168.20.2 {
                family inet-vpn {
                    unicast;
                }
            }
        }
    }
    ospf {
        traffic-engineering;
        area 0.0.0.0 {
            interface all;
            interface fxp0.0 {
                disable;
            }
        }
    }
}
policy-options {
    policy-statement vpna-export {
        term one {
            from protocol [ bgp direct ];
            then {
                community add vpna-comm;
                accept;
            }
        }
        term two {
            then reject;
        }
    }
    policy-statement vpna-import {
        term one {
            from {
                protocol bgp;
                community vpna-comm;
            }
            then accept;
        }
        term two {
            then reject;
        }
    }
    community vpna-comm members target:200:100;
}
firewall {
    family inet {
        filter fw {
            term 1 {
                from {
                    protocol tcp;
                    port bgp;
                }
                then accept;
            }
            term 2 {
                then sample;
            }
        }
    }
}
routing-instances {
    vrf1 {
        instance-type vrf;
        interface ge-2/0/2.0;
        route-distinguisher 10.255.15.51:1;
        vrf-import vpna-import;
        vrf-export vpna-export;
        protocols {
            bgp {
                group customer {
                    type external;
                    peer-as 95000;
                    as-override;
                    neighbor 192.168.30.1;
                    neighbor 192.0.2.1;
                }
            }
        }
    }
}
Configuring the PE2 Router
Step-by-Step Procedure
In this step, you configure a filter with a matching
term that contains the then sample statement and apply
the filter to the ingress interface. You also configure a VRF routing
instance with import and export policies. In addition, you configure
interfaces, forwarding options, routing options, protocols, and policy
options for the PE2 router. To configure the PE2 router:
-
Create the fw firewall filter that is applied to the logical interface being sampled:
[edit firewall]
user@router-pe2# set family inet filter fw term 1 from protocol tcp
user@router-pe2# set family inet filter fw term 1 from port bgp
user@router-pe2# set family inet filter fw term 1 then accept
user@router-pe2# set family inet filter fw term 2 then sample
user@router-pe2# set family inet filter fw term 2 then accept
-
Configure two interfaces, one interface that connects to the CE2 router (ge-3/1/2), and another that connects to the PE1 router (ge-3/1/0):
[edit interfaces]
user@router-pe2# set ge-3/1/0 unit 0 family inet address 192.168.20.2/24
user@router-pe2#  set ge-3/1/0 unit 0 family mpls
user@router-pe2#  set ge-3/1/2 unit 0 family inet address 10.10.10.2/24
-
Enable MPLS on the interface that connects to the PE1 router (ge-3/1/0):
[edit interfaces]
user@router-pe2#  set ge-3/1/0 unit 0 family mpls
-
On the interface that connects to the CE2 router, apply the fw filter that was configured in the firewall configuration:
[edit interfaces]
user@router-pe2#  set ge-3/1/2 unit 0 family inet filter input fw
user@router-pe2#  set ge-3/1/2 unit 0 family inet filter output fw
-
Configure the sampled log file in the /var/log directory to record traffic sampling:
[edit forwarding-options]
user@router-pe2# set sampling traceoptions file sampled
user@router-pe2# set sampling traceoptions file world-readable
user@router-pe1# set sampling traceoptions flag all
-
Specify the sampling rate and threshold value for traffic sampling:
[edit forwarding-options]
user@router-pe2# set sampling input rate 1
user@router-pe2# set sampling input run-length 0
user@router-pe2# set sampling input max-packets-per-second 20000
-
Specify active and inactive flow periods, and the router (198.51.100.2) that sends out the monitored information:
[edit forwarding-options]
user@router-pe2# set sampling family inet output flow-active-timeout 60
user@router-pe2# set sampling family inet output flow-inactive-timeout 60
user@router-pe2# set sampling family inet output flow-server 198.51.100.2 port 2055
user@router-pe2# set sampling family inet output flow-server 198.51.100.2 local-dump
user@router-pe2# set sampling family inet output flow-server 198.51.100.2 version 500
-
Configure the autonomous system to establish a connection between BGP peers:
[edit routing-options]
user@router-pe2# set autonomous-system 200
-
Configure RSVP to support MPLS label-switched paths (LSPs) between the PE routers:
[edit protocols]
user@router-pe2# set rsvp interface all
user@router-pe2# set rsvp interface fxp0.0 disable
-
Configure an MPLS LSP from the PE2 router to the PE1 router:
[edit protocols]
user@router-pe2# set mpls label-switched-path R2toR1 from 192.168.20.2
user@router-pe2# set mpls label-switched-path R2toR1 to 192.168.20.1
user@router-pe2# set mpls interface all
user@router-pe2# set mpls interface fxp0.0 disable
-
Configure an internal BGP group for the PE routers. Include the
family inet-vpn unicaststatement to enable BGP to carry network layer reachability information (NLRI) parameters and for BGP peers to only carry unicast routes for forwarding:[edit protocols] user@router-pe2# set bgp group to_r1 type internal user@router-pe2# set bgp group to_r1 local-address 192.168.20.2 user@router-pe2# set bgp group to_r1 neighbor 192.168.20.1 family inet-vpn unicast
-
Configure OSPF as the interior gateway protocol (IGP) and to compute the MPLS LSPs:
[edit protocols]
user@router-pe2# set ospf traffic-engineering
user@router-pe2# set ospf area 0.0.0.0 interface all
user@router-pe2# set ospf area 0.0.0.0 interface fxp0.0 disable
-
Create the extended community that is applied in the policy options configuration:
[edit policy-options]
user@router-pe2# set community vpna-comm members target:200:100
-
Define the vpna-export routing policy that is applied in the
vrf-exportstatement in the routing instance configuration. Also, apply the vpna-comm community from which routes are learned:[edit policy-options] user@router-pe2# set policy-statement vpna-export term one from protocol bgp user@router-pe2# set policy-statement vpna-export term one from protocol direct user@router-pe2# set policy-statement vpna-export term one then community add vpna-comm user@router-pe2# set policy-statement vpna-export term one then accept user@router-pe2# set policy-statement vpna-export term two then reject
-
Define the vpna-import routing policy that is applied in the
vrf-importstatement in the routing instance configuration. Also, apply the vpna-comm community from which routes are learned:[edit policy-options] user@router-pe2# set policy-statement vpna-import term one from protocol bgp user@router-pe2# set policy-statement vpna-import term one from community vpna-comm user@router-pe2# set policy-statement vpna-import term one then accept user@router-pe2# set policy-statement vpna-import term two then reject
-
Configure a VRF routing instance so that routes received from the provider edge-provider edge (PE-PE) session can be imported into any of the instance’s VRF secondary routing tables:
 [edit routing-instances]
user@router-pe2# set vrf1 instance-type vrf
 user@router-pe2# set vrf1 interface ge-3/1/2.0
 user@router-pe2# set vrf1 route-distinguisher 10.255.19.12:1
user@router-pe2# set vrf1 vrf-import vpna-import
 user@router-pe2# set vrf1 vrf-export vpna-export
user@router-pe2#set vrf1 protocols bgp group R3-R4 type external
 user@router-pe2# set vrf1 protocols bgp group R3-R4 peer-as 65000
 user@router-pe2# set vrf1 protocols bgp group R3-R4 as-override
user@router-pe2# set vrf1 protocols bgp group R3-R4 neighbor 10.10.10.1
Results
Check the results of the configuration for the PE2 router:
user@router-pe2> show configuration
[...Output Truncated...]
}
interfaces {
    ge-3/1/0 {
        unit 0 {
            family inet {
                address 192.168.20.2/24;
            }
            family mpls;
        }
    }
    ge-3/1/2 {
        unit 0 {
            family inet {
                filter {
                    input fw;
                    output fw;
                }
                address 10.10.10.2/24;
            }
        }
    }
}
forwarding-options {
    sampling {
        traceoptions {
            file sampled world-readable;
            flag all;
        }
        input {
            rate 1;
            run-length 0;
            max-packets-per-second 20000;
        }
        family inet {
            output {
                flow-inactive-timeout 60;
                flow-active-timeout 60;
                flow-server 198.51.100.2 {
                    port 2055;
                    local-dump;
                    version 500;
                }
            }
        }
    }
}
routing-options {
[...Output Truncated...]
    autonomous-system 200;
}
protocols {
    rsvp {
        interface all;
        interface fxp0.0 {
            disable;
        }
    }
    mpls {
        label-switched-path R2toR1 {
            from 192.168.20.2;
            to 192.168.20.1;
        }
        interface all;
        interface fxp0.0 {
            disable;
        }
    }
    bgp {
        group to_r1 {
            type internal;
            local-address 192.168.20.2;
            neighbor 192.168.20.1 {
                family inet-vpn {
                    unicast;
                }
            }
            neighbor 192.0.2.1;
        }
    }
    ospf {
        traffic-engineering;
        area 0.0.0.0 {
            interface all;
            interface fxp0.0 {
                disable;
            }
        }
    }
}
policy-options {
    policy-statement vpna-export {
        term one {
            from protocol [ bgp direct ];
            then {
                community add vpna-comm;
                accept;
            }
        }
        term two {
            then reject;
        }
    }
    policy-statement vpna-import {
        term one {
            from {
                protocol bgp;
                community vpna-comm;
            }
            then accept;
        }
        term two {
            then reject;
        }
    }
    community vpna-comm members target:200:100;
}
firewall {
    family inet {
        filter fw {
            term 1 {
                from {
                    protocol tcp;
                    port bgp;
                }
                then accept;
            }
            term 2 {
                then {
                    sample;
                    accept;
                }
            }
        }
    }
}
routing-instances {
    vrf1 {
        instance-type vrf;
        interface ge-3/1/2.0;
        route-distinguisher 10.255.19.12:1;
        vrf-import vpna-import;
        vrf-export vpna-export;
        protocols {
            bgp {
                group R3-R4 {
                    type external;
                    peer-as 65000;
                    as-override;
                    neighbor 10.10.10.1;
                }
            }
        }
    }
}
Configuring the CE2 Router
Step-by-Step Procedure
In this step, you configure interfaces, routing options, protocols, and policy options for the CE2 router. To configure the CE2 router:
-
Configure one interface with two IP addresses. One address is for traffic to the PE2 router and the other address is to check that traffic is flowing from the CE1 router:
[edit interfaces]
user@router-ce2# set ge-0/1/2 unit 0 family inet address 10.10.10.1/24
user@router-ce2#  set ge-0/1/2 unit 0 family inet address 10.4.4.4/16
-
Configure the autonomous system to establish a connection between BGP peers:
[edit routing-options]
user@router-ce1# set autonomous-system 65000
-
Configure BGP as the routing protocol between the CE and the PE routers:
[edit protocols]
user@router-ce2# set bgp group R3-R4 type external
 user@router-ce2#  set bgp group R3-R4 export l3vpn-policy
user@router-ce2#  set bgp group R3-R4 peer-as 200
 user@router-ce2#  set bgp group R3-R4 neighbor 10.10.10.2
-
Configure the policies that ensure that the CE routers exchange routing information. In this example, Router CE2 exchanges routing information with Router CE1:
[edit policy-options]
user@router-ce2# set policy-statement l3vpn-policy term one from protocol direct
 user@router-ce2#  set policy-statement l3vpn-policy term one from route-filter 10.255.15.75/32 exact
user@router-ce2# set policy-statement l3vpn-policy term one then accept
user@router-ce2# set policy-statement l3vpn-policy term two from protocol direct
user@router-ce2# set policy-statement l3vpn-policy term two from route-filter 10.4.0.0/16 exact
 user@router-ce2#  set policy-statement l3vpn-policy term two then accept
Results
The output below shows the configuration of the CE2 router:
[edit]
user@router-ce2# show
[...Output Truncated...]
interfaces {
    ge-0/1/2 {
        unit 0 {
            family inet {
                address 10.10.10.1/24;
                address 10.4.4.4/16;
            }
        }
    }
}
routing-options {
    autonomous-system 65000;
}
protocols {
    bgp {
        group R3-R4 {
            type external;
            export l3vpn-policy;
            peer-as 200;
            neighbor 10.10.10.2;
        }
    }
}
policy-options {
    policy-statement l3vpn-policy {
        term one {
            from {
                protocol direct;
                route-filter 10.255.15.75/32 exact;
            }
            then accept;
        }
        term two {
            from {
                protocol direct;
                route-filter 10.4.0.0/16 exact;
            }
            then accept;
        }
    }
}
Verification
After you have completed the configuration of the four routers, you can verify that traffic is flowing from the CE1 router to the CE2 router, and you can observe the sampled traffic from two locations. To confirm that the configuration is working properly, perform these tasks:
- Verifying the Traffic Flow Between the CE Routers
- Verifying Sampled Traffic
- Cross Verifying Sampled Traffic
Verifying the Traffic Flow Between the CE Routers
Purpose
Use the ping command to verify traffic between
the CE routers.
Action
From the CE1 router, issue the ping command
to the CE2 router:
user@router-ce2> ping 10.4.4.4 source 198.51.100.2
PING 10.4.4.4 (10.4.4.4): 56 data bytes
64 bytes from 10.4.4.4: icmp_seq=0 ttl=64 time=0.861 ms
64 bytes from 10.4.4.4: icmp_seq=1 ttl=64 time=0.869 ms
64 bytes from 10.4.4.4: icmp_seq=2 ttl=64 time=0.786 ms
^C
--- 10.4.4.4 ping statistics ---
3 packets transmitted, 3 packets received, 0% packet loss
round-trip min/avg/max/stddev = 0.786/0.839/0.869/0.037 ms
Meaning
The output from the ping command shows that
the ping command was successful. Traffic is flowing between
the CE routers.
Verifying Sampled Traffic
Purpose
You can observe the sampled traffic using the show log sampled command from the CLI or from the router shell
using the tail –f /var/log/sampled command. In addition,
you can collect the logs in a flowcollector. The same information
appears in the output of both commands and in the flow collector.
For information about using a flow collector, see “Sending cflowd Records to Flow Collector Interfaces” and “Example: Configuring
a Flow Collector Interface on an M, MX or T Series Router.”
Action
From the PE1 router, use the show log sampled command:
user@router-pe1> show log sampled
[...Output Truncated...]
Nov 16 23:24:19    Src addr: 198.51.100.2
Nov 16 23:24:19    Dst addr: 10.4.4.4
Nov 16 23:24:19    Nhop addr: 192.168.20.2
Nov 16 23:24:19    Input interface: 503     # SNMP index of the incoming interface on PE1
Nov 16 23:24:19    Output interface: 505     # SNMP index of the outgoing interface on PE1
Nov 16 23:24:19    Pkts in flow: 5
Nov 16 23:24:19    Bytes in flow: 420
Nov 16 23:24:19    Start time of flow: 602411369
Nov 16 23:24:19    End time of flow: 602415369
Nov 16 23:24:19    Src port: 0
Nov 16 23:24:19    Dst port: 2048
Nov 16 23:24:19    TCP flags: 0x0
Nov 16 23:24:19    IP proto num: 1
Nov 16 23:24:19    TOS: 0x0
Nov 16 23:24:19    Src AS: 95000     # The autonomous system of CE1
Nov 16 23:24:19    Dst AS: 65000,,,,,# The autonomous system of CE2
Nov 16 23:24:19    Src netmask len: 8
Nov 16 23:24:19    Dst netmask len: 16
Nov 16 23:24:19 cflowd header:
Nov 16 23:24:19   Num-records: 1
Nov 16 23:24:19   Version: 500
Nov 16 23:24:19   Flow seq num: 13
Nov 16 23:24:19   Sys Uptime: 602450382 (msecs)
Nov 16 23:24:19   Time-since-epoch: 1258413859 (secs)
Nov 16 23:24:19   Engine id: 0
Nov 16 23:24:19   Engine type: 0
Nov 16 23:24:19   Sample interval: 1
[...Output Truncated...]
Meaning
The output from the show log sampled command
shows the correct SNMP index for the incoming and outgoing interfaces
on the PE1 router. Also, the source and destination addresses for
the autonomous systems for the two CE routers are correct.
Cross Verifying Sampled Traffic
Purpose
You can also double check that the sampled traffic
is the correct traffic by using the show interface interface-name-fpc/pic/port.unit-number | match SNMP command and the show route route-name detail command.
Action
The following output is a cross check of the output in the Verifying Sampled Traffic task:
user@router-pe1> show interfaces ge-2/0/2.0 | match SNMP
  Logical interface ge-2/0/2.0 (Index 76) (SNMP ifIndex 503)
Flags: SNMP-Traps 0x4000000 Encapsulation: ENET2user@router-pe1> show route 10.4.4.4 detail
vrf1.inet.0: 5 destinations, 5 routes (5 active, 0 holddown, 0 hidden)
10.4.0.0/16 (1 entry, 1 announced)
*BGP Preference: 170/-101
Route Distinguisher: 10.255.19.12:1
Next hop type: Indirect
Next-hop reference count: 6
Source: 192.168.20.2
Next hop type: Router, Next hop index: 659
Next hop: 192.168.20.2 via ge-2/0/0.0 weight 0x1, selected
Label operation: Push 299776
Protocol next hop: 192.168.20.2
Push 299776
Indirect next hop: 8e6f780 1048574
State: <Secondary Active Int Ext>
Local AS: 200 Peer AS: 200
Age: 3d 19:49:32 Metric2: 65535
Task: BGP_200.20.20.20.2+179
Announcement bits (3): 0-RT 1-BGP RT Background 2-KRT
AS path: 65000 I
AS path: Recorded
Communities: target:200:100
Import Accepted
VPN Label: 299776
Localpref: 100
Router ID: 10.10.10.2
Primary Routing Table bgp.l3vpn.0Meaning
The output of the show interfaces ge-2/0/2.0 |
match SNMP command shows that the SNMP ifIndex field has the
same value (503) as the output for the show log sampled command in the Verifying Sampled Traffic task, indicating that the intended traffic
is being sampled.
The output of the show route 10.4.4.4 detail command
shows that the source address 10.4.4.4, the source mask (16), and the source AS (65000) have the same values
as the output for the show log sampled command in the Verifying Sampled Traffic task, indicating that the intended traffic is being sampled.