DHCP and BOOTP Relay Agent
You can configure a Juniper Networks switch to act as a Dynamic Host Configuration Protocol (DHCP) or Bootstrap Protocol (BOOTP) relay agent. If you configure a switch to be a DHCP relay agent, you can also enable smart DHCP relay.
You can also enable BOOTP support when the switch is configured as a DHCP server. For more details, read this topic.
DHCP and BOOTP Relay Overview for Switches
You can configure a Juniper Networks switch to act as a Dynamic Host Configuration Protocol (DHCP) or Bootstrap Protocol (BOOTP) relay agent. This means that if the switch receives a broadcast DHCP or BOOTP request from a locally attached host (client), it relays the message to a specified DHCP or BOOTP server. You should configure the switch to be a DHCP/BOOTP relay agent if you have locally attached hosts and a distant DHCP or BOOTP server.
You can configure the switch to use the gateway IP address (giaddr) as the source IP address of the switch for relayed DHCP packets when the switch is used as the DHCP relay agent. For information on configuring this option, see the source-address-giaddr configuration statement.
You can also use smart DHCP relay, which enables you to configure alternative IP addresses for the gateway interface so that if the server fails to reply to the requests sent from the primary gateway address, the switch can resend the requests using the alternative gateway addresses. To use this feature, you must configure a Layer 3 interface, Layer 3 subinterface, or IRB interface with multiple IP addresses and configure that interface to be a relay agent.
Because DHCP and BOOTP messages are broadcast and are not directed to a specific server, switch, or router, Juniper switches cannot function as both a DHCP server and a DHCP/BOOTP relay agent at the same time. The Junos operating system (Junos OS) generates a commit error if both options are configured at the same time, and the commit operation does not succeed until one of the options is removed.
DHCP Client and Server Model
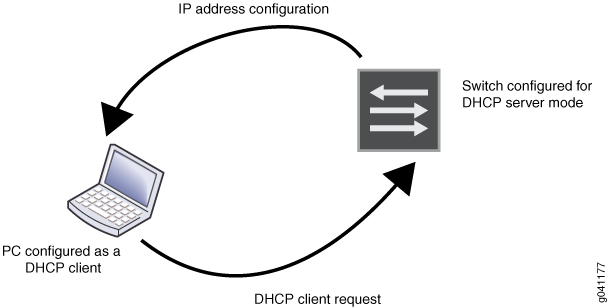
DHCP IP address allocation works on a client/server model in which the server, in this case a Junos OS, assigns the client reusable IP information from an address pool. A DHCP client might receive offer messages from multiple DHCP servers and can accept any one of the offers; however, the client usually accepts the first offer it receives. See Figure 1.
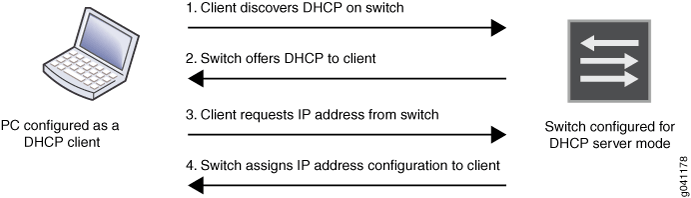
DHCP consists of a four-step transfer process beginning with a broadcast DHCP discovery message from the client. As the second step, the client receives a DHCP offer message from the server. This message includes the IP address and mask, and some other specific parameters. The client then sends a DHCP request message to accept the IP address and other parameters that it received from the server in the previous step. The DHCP server sends a DHCP response message and removes the now-allocated address from the DHCP address pool. See Figure 2.
Because the DHCP discovery message from the client is a broadcast message and because broadcast messages cross other segments only when they are explicitly routed, you might have to configure a DHCP relay agent on the switch interface so that all DHCP discovery messages from the clients are forwarded to one DHCP server.
DHCP Client, Server, and Relay Agent Model
The DHCP relay agent is located between a DHCP client and DHCP server and forwards DHCP messages between servers and clients as following:
The DHCP client sends a discover packet to find a DHCP server in the network from which to obtain configuration parameters for the subscriber (or DHCP client), including an IP address.
The DHCP relay agent receives the discover packet and forwards copies to each of the two DHCP servers. The DHCP relay agent then creates an entry in its internal client table to keep track of the client’s state.
In response to receiving the discover packet, each DHCP server sends an offer packet to the client. The DHCP relay agent receives the offer packets and forwards them to the DHCP client.
On receipt of the offer packets, the DHCP client selects the DHCP server from which to obtain configuration information. Typically, the client selects the server that offers the longest lease time on the IP address.
The DHCP client sends a request packet that specifies the DHCP server from which to obtain configuration information.
The DHCP relay agent receives the request packet and forwards copies to each of the two DHCP servers.
The DHCP server requested by the client sends an acknowledgement (ACK) packet that contains the client’s configuration parameters.
The DHCP relay agent receives the ACK packet and forwards it to the client.
The DHCP client receives the ACK packet and stores the configuration information.
If configured to do so, the DHCP relay agent installs a host route and Address Resolution Protocol (ARP) entry for this client.
After establishing the initial lease on the IP address, the DHCP client and the DHCP server use unicast transmission to negotiate lease renewal or release. The DHCP relay agent “snoops” on all of the packets unicast between the client and the server that pass through the router (or switch) to determine when the lease for this client has expired or been released. This process is referred to as lease shadowing or passive snooping.
Configuring DHCP and BOOTP Relay
You can configure a switch to act as a Dynamic Host Configuration Protocol (DHCP) and Bootstrap Protocol (BOOTP) server or DHCP relay agent. When a switch is a relay agent, if a locally attached host issues a DHCP or BOOTP request as a broadcast message, the switch relays the message to a specified DHCP or BOOTP server. You should configure a switch to be a DHCP and BOOTP relay agent if you have locally attached hosts and a remote DHCP or BOOTP server.
This task uses the Enhanced Layer 2 Software (ELS) configuration style.If your switch runs software that does not support ELS, see Configuring DHCP and BOOTP Relay. For ELS details, see Using the Enhanced Layer 2 Software CLI.
To configure a switch to be a server, use the dhcp-local-server statement. To configure a switch to be a relay agent, use the dhcp-relay statement.
If you want to enable BOOTP support when the switch is configured to be a DHCP server, enter the following statement:
[edit system services dhcp-local-server]
user@switch# set overrides bootp-support
If you want to enable BOOTP support when the switch is configured to be a DHCP relay agent, enter the following statement:
[edit forwarding-options dhcp-relay]
user@switch# set overrides bootp-support
Configuring DHCP and BOOTP Relay on QFX Series
You can configure the QFX Series to act as a Dynamic Host Configuration Protocol (DHCP) and Bootstrap Protocol (BOOTP) relay agent. This means that if a locally attached host can issue a DHCP or BOOTP request as a broadcast message and the switch relays the message to a specified DHCP or BOOTP server. You should configure a switch to be a DHCP and BOOTP relay agent if you have locally attached hosts and a remote DHCP or BOOTP server.
This task uses a release of Junos OS that does not support the Enhanced Layer 2 Software (ELS) configuration style. If your switch runs software that supports ELS, see Configuring DHCP and BOOTP Relay. For ELS details, see Using the Enhanced Layer 2 Software CLI.
If you configure a switch to be a DHCP relay agent, you can also enable smart DHCP relay, which allows you to configure alternative gateway addresses for a DHCP server so that if the server fails to reply to the requests sent using the primary gateway address, the switch can resend the requests via the alternative gateway addresses. To use this feature, you must configure a routed VLAN interface or Layer 3 logical interface with multiple IP addresses and configure that interface to be a relay agent.
Configuring a DHCP and BOOTP Relay Agent on QFX Series
To configure a switch to act as a DHCP and BOOTP relay agent,
include the bootp statement at the [edit forwarding-options
helpers] hierarchy level:
[edit forwarding-options helpers] bootp { apply-secondary-as-giaddr text-description; client-response-ttl number; description text-description; interface (interface-name | interface-group) { client-response-ttl number; description text-description; maximum-hop-count number; minimum-wait-time seconds; no-listen; server address apply-secondary-as-giaddr } maximum-hop-count number; minimum-wait-time seconds; relay-agent-option; server server-identifier }
To include a description of the BOOTP service, DHCP service,
or interface, use the description statement.
To configure a logical interface or a group of logical interfaces
with a specific DHCP relay or BOOTP configuration, include the interface statement.
To stop packets from being forwarded, include the no-listen statement.
To set the maximum allowed number in the hops field of the BOOTP
message, include the maximum-hop-count statement. BOOTP
messages that have a larger number in the hops field than the maximum
allowed are not forwarded. If you omit the maximum-hop-count statement, the default maximum number of hops is four.
To set the minimum allowed number of seconds in the secs field of the BOOTP message, include the minimum-wait-time statement. This setting configures a minimum number of seconds since
the client sent its first BOOTP request. BOOTP messages that have
a smaller number in the secs field than the allowed minimum
are not forwarded. The default value for the minimum wait time is
zero (0).
To set the IP address that specify the DHCP or BOOTP server
for the router, switch, or interface, include the server statement. You can include multiple server statements.
To set an IP time-to-live (TTL) value for DHCP response packets
sent to a DHCP client, include the client-response-ttl statement.
The following example demonstrates a BOOTP relay agent configuration.
user@host# show forwarding-options
helpers {
    bootp {
        description "dhcp relay agent global parameters";
        server 192.168.55.44;
        server 172.16.0.3 routing-instance c3;
        maximum-hop-count 10;
        minimum-wait-time 8;
        interface {
            xe-0/0/1 {
                description "use this info for this interface";
                server 10.10.10.10;
                server 192.168.14.14;
                maximum-hop-count 11;
                minimum-wait-time 3;
            }
            xe-0/0/2 {
                no-listen;  ###ignore DHCPDISCOVER messages on this interface
            }
            all {
                description "globals apply to all other interfaces";
            }
        }
    }
}
See Also
Configuring DHCP Smart Relay on QFX Series
You can use DHCP smart relay to provide redundancy and resiliency to your DHCP relay configuration. Smart relay provides additional relay functionality and requires all of the configuration settings required by DHCP relay. To use DHCP smart relay, you also need an interface with multiple IP addresses assigned to it. You can achieve this by doing either of the following tasks:
Create a routed VLAN interface and assign at least two IP addresses to it. See Configuring IRB Interfaces on Switches and Example: Configuring Routing Between VLANs on One Switch Using an IRB Interface for information about this approach.
Create a Layer 3 logical interface (by using VLAN tagging) and assign at least two IP addresses to it. See Understanding Layer 3 Logical Interfaces and Configuring a Layer 3 Logical Interface for information about this approach.
Once you have created an interface with multiple IP addresses, complete the smart relay configuration by entering one of the following statements:
set forwarding-options helpers bootp smart-relay-global: Use this statement to enable smart relay on all the interfaces that are configured as relay agents.set forwarding-options helpers bootp interface interface-name smart-relay-agent: Use this statement to enable smart relay on a specific interface.
When smart relay is configured for an interface, the switch initially sends DHCP request (discover) messages out of that interface using the primary address of the interface as the gateway IP address (in the giaddr field) for the DHCP message. If no DHCP offer message is received from a server in reply, the switch allows the client to send as many as three more discover messages using the same gateway IP address. If no DHCP offer message is received after three retries, the switch resends the discover message using the alternate IP address as the gateway IP address. If you configure more than two IP addresses on the relay agent interface, the switch repeats this process until a DHCP offer message is received or all of the IP addresses have been used without success.