ON THIS PAGE
Protecting Your Network Against SYN Flood Attacks by Enabling SYN Flood Protection
Example: Enabling SYN Flood Protection for Webservers in the DMZ
Detecting and Protecting Your Network Against SYN Flood Attacks by Enabling SYN Cookie Protection
Protecting Your Network Against ICMP Flood Attacks by Enabling ICMP Flood Protection
Protecting Your Network Against UDP Flood Attacks by Enabling UDP Flood Protection
Protecting Your Network Against Land Attacks by Enabling Land Attack Protection
Network DoS Attacks
A network attack consists of three major stages. In the first stage, the attacker performs reconnaissance on the target network. This reconnaissance might consist of many different kinds of network probes, For more information, see the following topics:
Use Feature Explorer to confirm platform and release support for specific features.
Review the Platform-Specific Network DoS Attacks Behavior section for notes related to your platform.
Network DoS Attacks Overview
A denial-of-service (DoS) attack directed against one or more network resources floods the target with an overwhelming number of SYN, ICMP, or UDP packets or with an overwhelming number of SYN fragments.
Depending on the attackers' purpose and the extent and success of previous intelligence gathering efforts, the attackers might single out a specific host, such as a device or server or they might aim at random hosts across the targeted network. Either approach has the potential of upsetting service to a single host or to the entire network, depending on how critical the role of the victim is to the rest of the network.
Understanding SYN Flood Attacks
A SYN flood occurs when a host becomes so overwhelmed by SYN segments initiating incomplete connection requests that it can no longer process legitimate connection requests.
Two hosts establish a TCP connection with a triple exchange of packets known as a three-way handshake: A sends a SYN segment to B; B responds with a SYN/ACK segment; and A responds with an ACK segment. A SYN flood attack inundates a site with SYN segments containing forged (spoofed) IP source addresses with nonexistent or unreachable addresses. B responds with SYN/ACK segments to these addresses and then waits for responding ACK segments. Because the SYN/ACK segments are sent to nonexistent or unreachable IP addresses, they never elicit responses and eventually time out. See Figure 1.
By flooding a host with incomplete TCP connections, the attacker eventually fills the memory buffer of the victim. Once this buffer is full, the host can no longer process new TCP connection requests. The flood might even damage the victim's operating system. Either way, the attack disables the victim and its normal operations.
This topic includes the following sections:
SYN Flood Protection
Junos OS can impose a limit on the number of SYN segments permitted to pass through the firewall per second. You can base the attack threshold on the destination address and ingress interface port, the destination address only, or the source address only. When the number of SYN segments per second exceeds the set threshold, Junos OS will either start proxying incoming SYN segments, replying with SYN/ACK segments and storing the incomplete connection requests in a connection queue, or it will drop the packets.
SYN proxying only happens when a destination address and ingress interface port attack threshold is exceeded. If a destination address or source address threshold is exceeded, additional packets are simply dropped.
In Figure 2, the SYN attack threshold for a destination address and ingress interface port has been exceeded and Junos OS has started proxying incoming SYN segments. The incomplete connection requests remain in the queue until the connection is completed or the request times out.
SYN Flood Options
You can set the following parameters for proxying uncompleted TCP connection requests:
-
Attack Threshold—This option allows you to set the number of SYN segments (that is, TCP segments with the SYN flag set) to the same destination address per second required to activate the SYN proxying mechanism. Although you can set the threshold to any number, you need to know the normal traffic patterns at your site to set an appropriate threshold for it. For example, if it is an e-business site that normally gets 20,000 SYN segments per second, you might want to set the threshold to 30,000 per second. If a smaller site normally gets 20 SYN segments per second, you might consider setting the threshold to 40.
-
Alarm Threshold—This option allows you to set the number of proxied, half-complete TCP connection requests per second after which Junos OS enters an alarm in the event log. The value you set for an alarm threshold triggers an alarm when the number of proxied, half-completed connection requests to the same destination address per second exceeds that value. For example, if you set the SYN attack threshold at 2000 SYN segments per second and the alarm at 1000, then a total of 3000 SYN segments to the same destination address per second is required to trigger an alarm entry in the log.
For each SYN segment to the same destination address in excess of the alarm threshold, the attack detection module generates a message. At the end of the second, the logging module compresses all similar messages into a single log entry that indicates how many SYN segments to the same destination address and port number arrived after exceeding the alarm threshold. If the attack persists beyond the first second, the event log enters an alarm every second until the attack stops.
-
Source Threshold—This option allows you to specify the number of SYN segments received per second from a single source IP address—regardless of the destination IP address—before Junos OS begins dropping connection requests from that source.
Tracking a SYN flood by source address uses different detection parameters from tracking a SYN flood by destination address. When you set a SYN attack threshold and a source threshold, you put both the basic SYN flood protection mechanism and the source-based SYN flood tracking mechanism in effect.
-
Destination Threshold—This option allows you to specify the number of SYN segments received per second for a single destination IP address before Junos OS begins dropping connection requests to that destination. If a protected host runs multiple services, you might want to set a threshold based on destination IP address only—regardless of the destination port number.
When you set a SYN attack threshold and a destination threshold, you put both the basic SYN flood protection mechanism and the destination-based SYN flood tracking mechanism in effect.
Consider a case where Junos OS has policies permitting FTP requests and HTTP requests to the same IP address. If the SYN flood attack threshold is 1000 packets per second (pps) and an attacker sends 999 FTP packets and 999 HTTP pps, Junos OS treats both FTP and HTTP packets with the same destination address as members of a single set and rejects the 1001st packet—FTP or HTTP—to that destination.
-
Timeout—This option allows you to set the maximum length of time before a half-completed connection is dropped from the queue. The default is 20 seconds, and you can set the timeout from 1–50 seconds. You might try decreasing the timeout value to a shorter length until you begin to see any dropped connections during normal traffic conditions. Twenty seconds is a very conservative timeout for a three-way handshake ACK response.
Junos OS supports SYN flood protection for both IPv4 and IPv6 traffic.
Protecting Your Network Against SYN Flood Attacks by Enabling SYN Flood Protection
This example shows how to protect your network against SYN flood attacks by enabling SYN flood protection.
Requirements
No special configuration beyond device initialization is required before configuring this feature.
Overview
In this example, you enable the zone-syn-flood protection screen option and set the timeout value to 20. You also specify the zone where the flood might originate.
Configuration
Procedure
CLI Quick Configuration
To quickly configure this example, copy the
following commands, paste them into a text file, remove any line breaks,
change any details necessary to match your network configuration,
copy and paste the commands into the CLI at the [edit] hierarchy
level, and then enter commit from configuration mode.
set security screen ids-option zone-syn-flood tcp syn-flood source-threshold 10000
set security screen ids-option zone-syn-flood tcp syn-flood destination-threshold 10000
set security zones security-zone untrust screen zone-syn-flood
Step-by-Step Procedure
The following example requires you to navigate various levels in the configuration hierarchy. For instructions on how to do that, see Using the CLI Editor in Configuration Mode in the CLI User Guide. To enable SYN flood protection:
Specify the screen object name.
[edit]
user@host# set security screen ids-option zone-syn-flood tcp syn-flood source-threshold 10000
user@host# set security screen ids-option zone-syn-flood tcp syn-flood destination-threshold 10000
Set the security zone for the zone screen.
[edit]
user@host# set security zones security-zone untrust screen zone-syn-flood
Results
From configuration mode, confirm your configuration
by entering the show security screen and show security
zones commands. If the output does not display the intended
configuration, repeat the configuration instructions in this example
to correct it.
[edit]
user@host# show security screen
    ids-option zone-syn-flood {
        tcp {
        syn-flood {
             source-threshold 10000;
                destination-threshold 10000;
                timeout 20;
            }
        }
    }
[edit]
user@host# show security zones
    security-zone untrust {
        screen zone-syn-flood;
        interfaces {
            ge-0/0/1.0;
        }
    }
If you are done configuring the device, enter commit from configuration mode.
Verification
Verifying SYN Flood Protection
Purpose
Verify SYN flood protection.
Action
Enter the show security screen ids-option zone-syn-flood and show security zones commands from operational mode.
user@host> show security screen ids-option zone-syn-flood
node0:
--------------------------------------------------------------------------
Screen object status:
Name                                         Value
  TCP SYN flood attack threshold             200
  TCP SYN flood alarm threshold              512
  TCP SYN flood source threshold             10000
  TCP SYN flood destination threshold        10000
  TCP SYN flood timeout                      20

user@host> show security zones
Security zone: untrust
  Send reset for non-SYN session TCP packets: Off
  Policy configurable: Yes
  Screen: zone-syn-flood
  Interfaces bound: 1
  Interfaces:
    ge-0/0/1.0
Meaning
The sample output shows that SYN flood protection is enabled with source and destination threshold.
Example: Enabling SYN Flood Protection for Webservers in the DMZ
This example shows how to enable SYN flood protection for webservers in the DMZ.
Requirements
No special configuration beyond device initialization is required before configuring this feature.
Overview
This example shows how to protect four webservers in the DMZ from SYN flood attacks originating in the external zone, by enabling the SYN flood protection screen option for the external zone. See Figure 3.
We recommend that you augment the SYN flood protection that Junos OS provides with device-level SYN flood protection on each webserver. In this example, the webservers are running UNIX, which also provides some SYN flood defenses, such as adjusting the length of the connection request queue and changing the timeout period for incomplete connection requests.
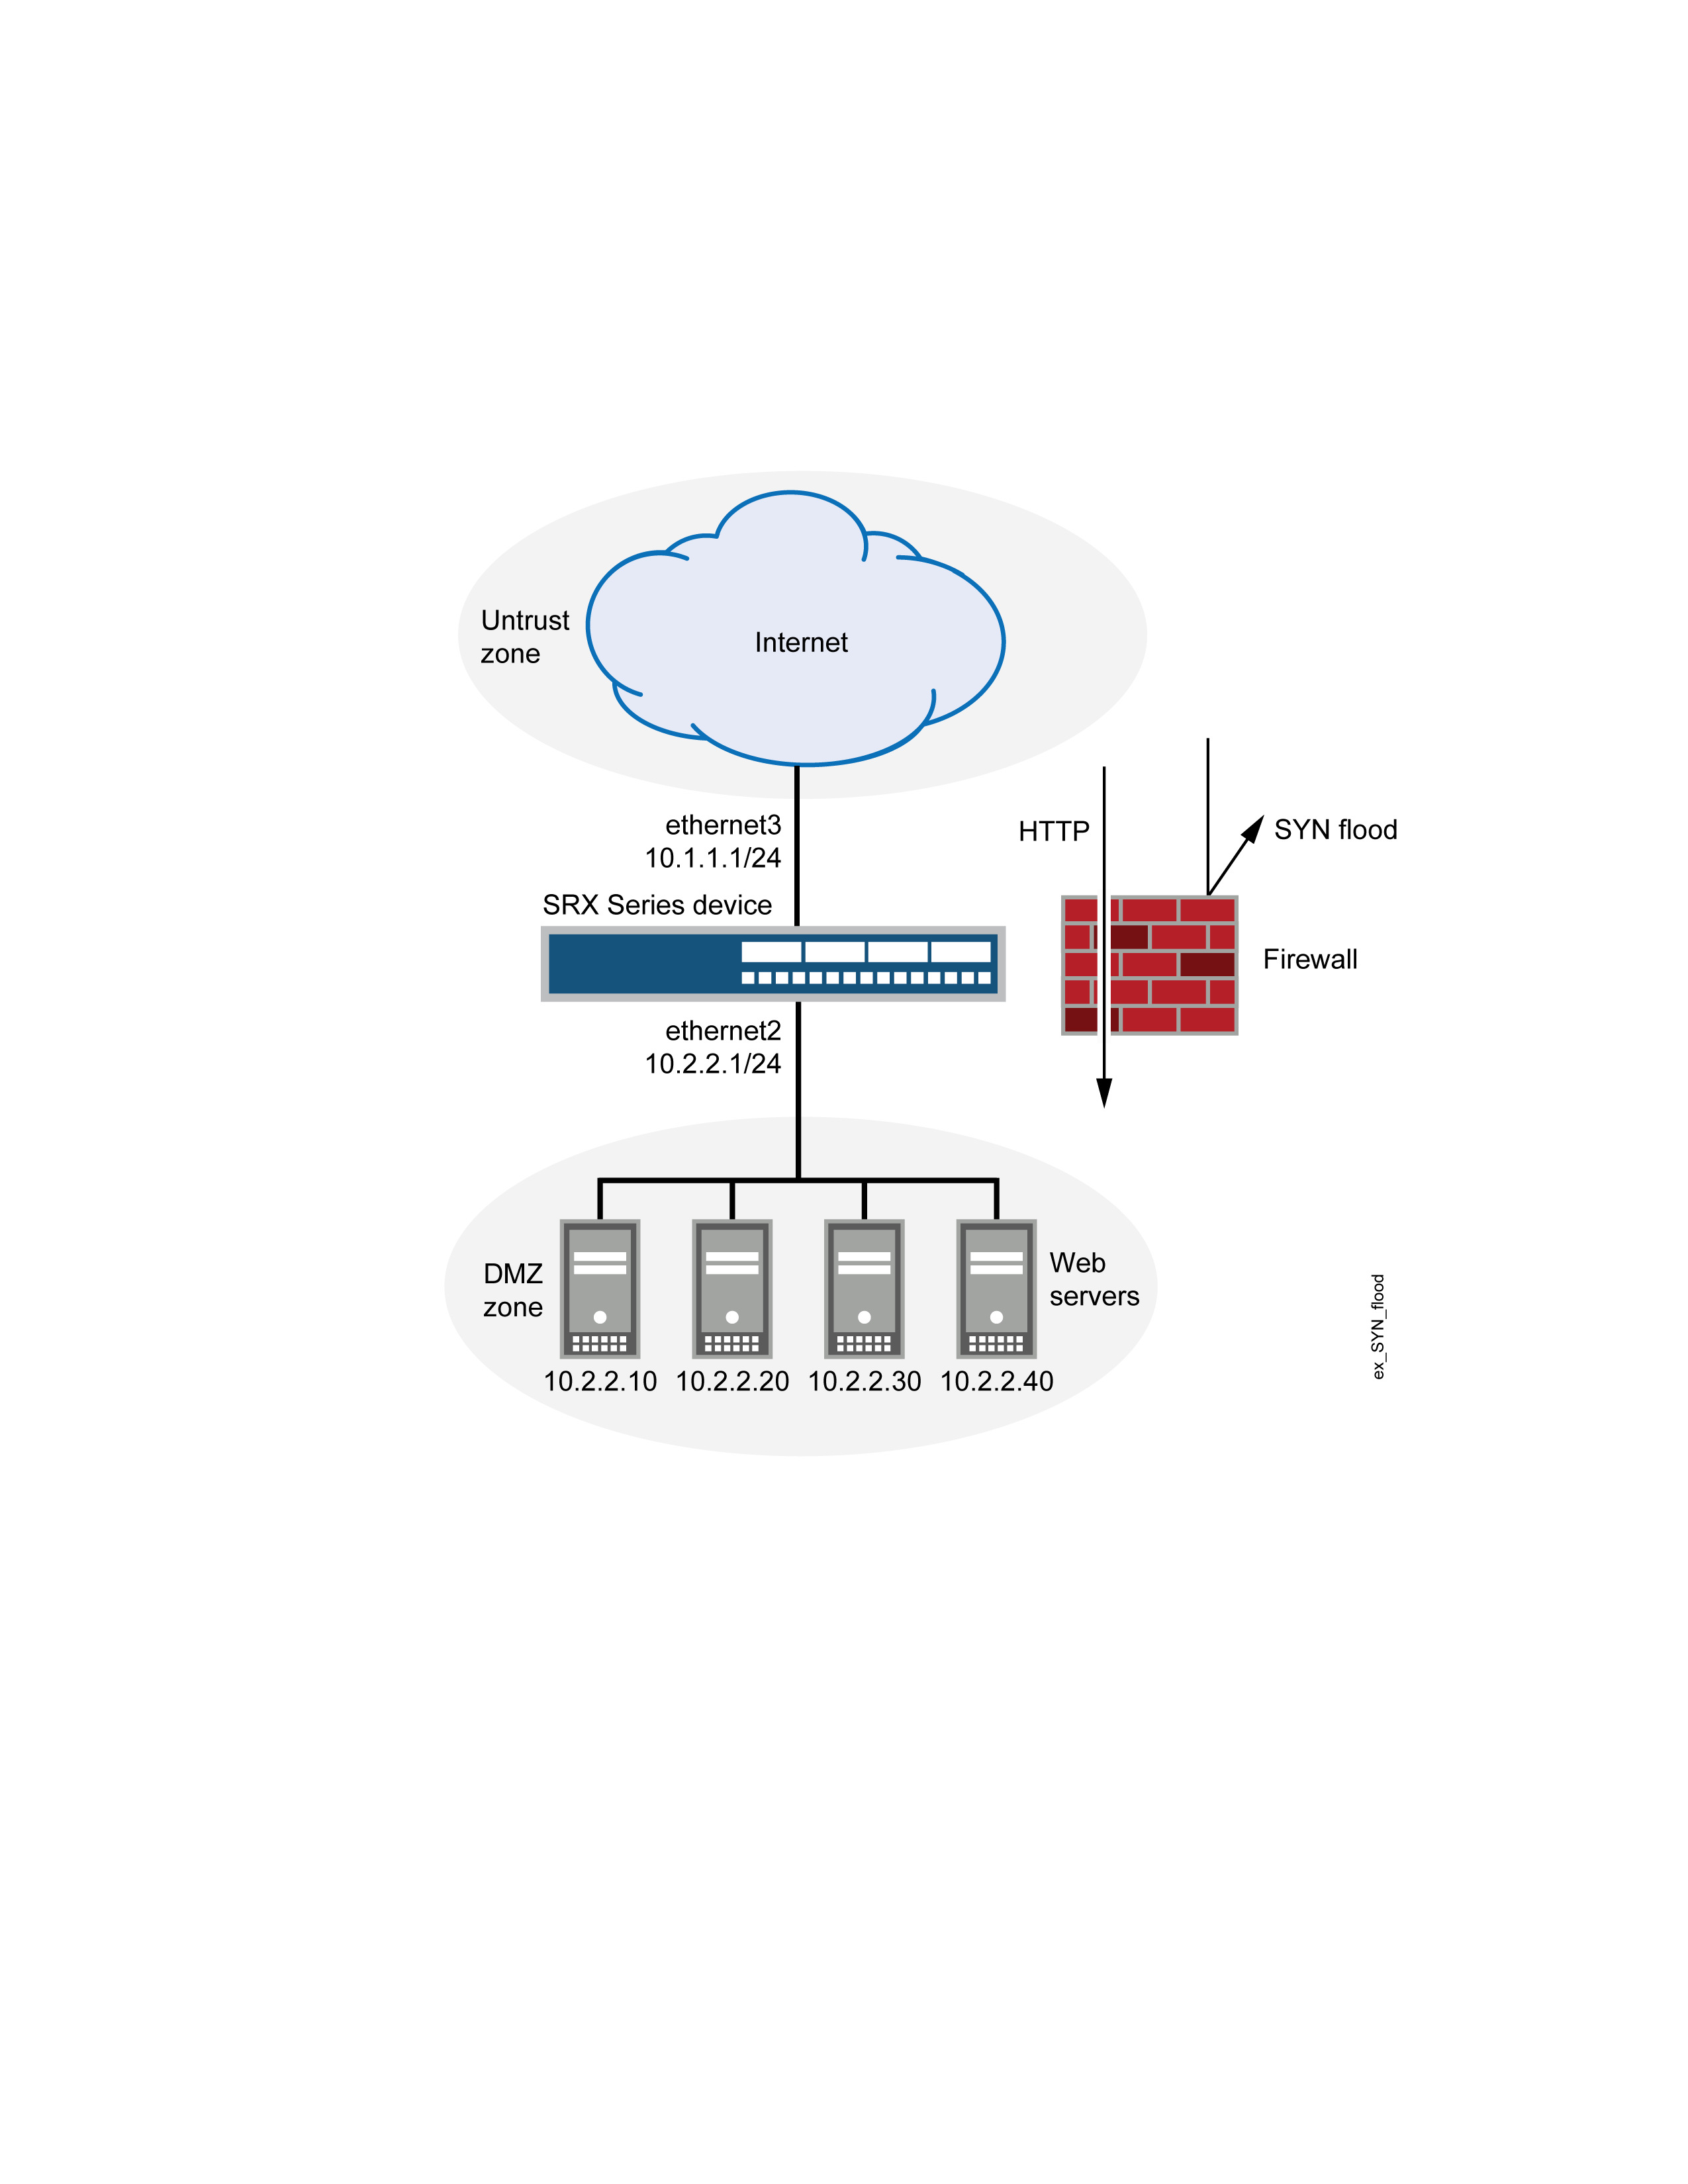
To configure the SYN flood protection parameters with appropriate values for your network, you must first establish a baseline of typical traffic flows. For example, for one week, you run a sniffer on ethernet3—the interface bound to zone_external—to monitor the number of new TCP connection requests arriving every second for the four webservers in the DMZ. Your analysis of the data accumulated from one week of monitoring produces the following statistics:
Average number of new connection requests per server: 250 per second
Average peak number of new connection requests per server: 500 per second
A sniffer is a network-analyzing device that captures packets on the network segment to which you attach it. Most sniffers allow you to define filters to collect only the type of traffic that interests you. Later, you can view and evaluate the accumulated information. In this example, you want the sniffer to collect all TCP packets with the SYN flag set arriving at ethernet3 and destined for one of the four webservers in the DMZ. You might want to continue running the sniffer at regular intervals to see whether there are traffic patterns based on the time of day, day of the week, time of the month, or season of the year. For example, in some organizations, traffic might increase dramatically during a critical event. Significant changes probably warrant adjusting the various thresholds.
Based on this information, you set the following SYN flood protection parameters for zone_external as shown in Table 1.
Parameter |
Value |
Reason for Each Value |
|---|---|---|
Attack threshold |
625 pps |
This is 25% higher than the average peak number of new connection requests per second per server, which is unusual for this network environment. When the number of SYN packets per second for any one of the four webservers exceeds this number, the device begins proxying new connection requests to that server. (In other words, beginning with the 626th SYN packet to the same destination address in one second, the device begins proxying connection requests to that address.) |
Alarm threshold |
250 pps |
When the device proxies 251 new connection requests in one second, it makes an alarm entry in the event log. By setting the alarm threshold somewhat higher than the attack threshold, you can avoid alarm entries for traffic spikes that only slightly exceed the attack threshold. |
Source threshold |
25 pps |
When you set a source threshold, the device tracks the source IP address of SYN packets, regardless of the destination address. (Note that this source-based tracking is separate from the tracking of SYN packets based on destination address, which constitutes the basic SYN flood protection mechanism.) In the one week of monitoring activity, you observed that no more than 1/25 of new connection requests for all servers came from any one source within a one-second interval. Therefore, connection requests exceeding this threshold are unusual and provide sufficient cause for the device to execute its proxying mechanism. (Note that 25 pps is 1/25 of the attack threshold, which is 625 pps.) If the device tracks 25 SYN packets from the same source IP address, then, beginning with the 26th packet, it rejects all further SYN packets from that source for the remainder of that second and for the next second as well. |
Destination threshold |
4000 pps |
When you set a destination threshold, the device runs a separate tracking of only the destination IP address, regardless of the destination port number. Because the four webservers receive only HTTP traffic (destination port 80)—no traffic to any other destination port number reaches them—setting another destination threshold offers no additional advantage. |
Timeout |
20 seconds |
The default value of 20 seconds is a reasonable length of time to hold incomplete connection requests. |
Topology
Configuration
Procedure
CLI Quick Configuration
To quickly configure this example, copy the
following commands, paste them into a text file, remove any line breaks,
change any details necessary to match your network configuration,
copy and paste the commands into the CLI at the [edit] hierarchy
level, and then enter commit from configuration mode.
set interfaces ge-0/0/0 unit 0 family inet address 10.2.2.1/24
set interfaces fe-1/0/0 unit 0 family inet address 10.1.1.1/24
set security zones security-zone zone_dmz interfaces ge-0/0/0.0
set security zones security-zone zone_external interfaces fe-1/0/0.0
set security zones security-zone zone_dmz address-book address ws1 10.2.2.10/32
set security zones security-zone zone_dmz address-book address ws2 10.2.2.20/32
set security zones security-zone zone_dmz address-book address ws3 10.2.2.30/32
set security zones security-zone zone_dmz address-book address ws4 10.2.2.40/32
set security zones security-zone zone_dmz address-book address-set web_servers address ws1
set security zones security-zone zone_dmz address-book address-set web_servers address ws2
set security zones security-zone zone_dmz address-book address-set web_servers address ws3
set security zones security-zone zone_dmz address-book address-set web_servers address ws4
set security policies from-zone zone_external to-zone zone_dmz policy id_1 match source-address any destination-address web_servers application junos-http
set security policies from-zone zone_external to-zone zone_dmz policy id_1 then permit
set security screen ids-option zone_external-syn-flood tcp syn-flood alarm-threshold 250 attack-threshold 625 source-threshold 25 timeout 20
set security zones security-zone zone_external screen zone_external-syn-flood
Step-by-Step Procedure
To configure SYN flood protection parameters:
Set interfaces.
[edit]
user@host# set interfaces ge-0/0/0 unit 0 family inet address 10.2.2.1/24
user@host# set interfaces fe-1/0/0 unit 0 family inet address 10.1.1.1/24
user@host# set security zones security-zone zone_dmz interfaces ge-0/0/0.0
user@host# set security zones security-zone zone_external interfaces fe-1/0/0.0
Define addresses.
[edit]
user@host# set security zones security-zone zone_dmz address-book address ws1 10.2.2.10/32
user@host# set security zones security-zone zone_dmz address-book address ws2 10.2.2.20/32
user@host# set security zones security-zone zone_dmz address-book address ws3 10.2.2.30/32
user@host# set security zones security-zone zone_dmz address-book address ws4 10.2.2.40/32
user@host# set security zones security-zone zone_dmz address-book address-set web_servers address ws1
user@host# set security zones security-zone zone_dmz address-book address-set web_servers address ws2
user@host# set security zones security-zone zone_dmz address-book address-set web_servers address ws3
user@host# set security zones security-zone zone_dmz address-book address-set web_servers address ws4
Configure the policy.
[edit]
user@host# set security policies from-zone zone_external to-zone zone_dmz policy id_1 match source-address any
user@host# set security policies from-zone zone_external to-zone zone_dmz policy id_1 match destination-address web_servers
user@host# set security policies from-zone zone_external to-zone zone_dmz policy id_1 match application junos-http
user@host# set security policies from-zone zone_external to-zone zone_dmz policy id_1 then permit
Configure the screen options.
[edit]
user@host# set security screen ids-option zone_external-syn-flood tcp syn-flood alarm-threshold 250
user@host# set security screen ids-option zone_external-syn-flood tcp syn-flood attack-threshold 625
user@host# set security screen ids-option zone_external-syn-flood tcp syn-flood source-threshold 25
user@host# set security screen ids-option zone_external-syn-flood tcp syn-flood timeout 20
user@host# set security zones security-zone zone_external screen zone_external-syn-flood
Results
From configuration mode, confirm your configuration
by entering the show interfaces, show security zones, show security policies, and show security screen commands. If the output does not display the intended configuration,
repeat the configuration instructions in this example to correct it.
For brevity, this show command output includes only
the configuration that is relevant to this example. Any other configuration
on the system has been replaced with ellipses (...).
[edit]
    user@host# show interfaces
    ge-0/0/0 {
    unit 0 {
        family inet {
        address 10.2.2.1/24;
        }
    }
}
fe-1/0/0 {
unit 0 {
    family inet {
    address 10.1.1.1/24;
    }
}
}
...
[edit]
user@host# show security zones
...
    security-zone zone_dmz {
address-book {
address ws1 10.2.2.10/32;
    address ws2 10.2.2.20/32;
    address ws3 10.2.2.30/32;
    address ws4 10.2.2.40/32;
    address-set web_servers {
    address ws1;
    address ws2;
    address ws3;
    address ws4;
    }
}
interfaces {
    ge-0/0/0.0;
    }
}
security-zone zone_external {
    screen zone_external-syn-flood;
    interfaces {
    fe-1/0/0.0;
}
}
[edit]
user@host# show security policies
from-zone zone_external to-zone zone_dmz {
    policy id_1 {
match {
source-address any;
    destination-address web_servers;
    application junos-http;
    }
then {
permit;
    }
   }
 }
[edit]
    user@host# show security screen
...
ids-option zone_external-syn-flood {
    tcp {
syn-flood {
alarm-threshold 250;
    attack-threshold 625;
    source-threshold 25;
    timeout 20;
}
    }
}
If you are done configuring the device, enter commit from configuration mode.
Verification
Verifying SYN Flood Protection for Webservers in the DMZ
Purpose
Verify SYN flood protection for webservers in the DMZ.
Action
From operational mode, enter the show interfaces, show security zones, show security policies, and show security screen ids-option zone_external-syn-flood commands.
Understanding Allowlists for SYN Flood Screens
Junos OS provides the administrative option to configure a allowlist of trusted IP addresses to which the SYN flood screen will not reply with a SYN/ACK. Instead, the SYN packets from the source addresses or to the destination addresses in the list are allowed to bypass the SYN cookie and SYN proxy mechanisms. This feature is needed when you have a service in your network that cannot tolerate proxied SYN/ACK replies under any condition, including a SYN flood event.
Both IP version 4 (IPv4) and IP version 6 (IPv6) allowlists are supported. Addresses in a allowlist should be all IPv4 or all IPv6. In each allowlist, there can be up to 32 IP address prefixes. You can specify multiple addresses or address prefixes as a sequence of addresses separated by spaces and enclosed in square brackets.
A allowlist can cause high CPU usage on a central point depending on the traffic level. For example, when no screen is enabled, the connections per second (cps) is 492K; when the screen is enabled and the allowlist is disabled, the cps is 373K; and when both the screen and the allowlist are enabled, the cps is 194K. After enabling the allowlist, the cps drops by 40 percent.
Example: Configuring Allowlists for SYN Flood Screens
This example shows how to configure allowlists of IP addresses to be exempted from the SYN cookie and SYN proxy mechanisms that occur during the SYN flood screen protection process.
Requirements
Before you begin, configure a security screen and enable the screen in the security zone. See Example: Enabling SYN Flood Protection for Webservers in the DMZ.
Overview
In this example, you configure allowlists named wlipv4 and wlipv6. All addresses are IP version 4 (IPv4) for wlipv4, and all addresses are IP version 6 (IPv6) for wlipv6. Both allowlists include destination and source IP addresses.
Multiple addresses or address prefixes can be configured as
a sequence of addresses separated by spaces and enclosed in square
brackets, as shown in the configuration of the destination addresses
for wlipv4.
Configuration
Procedure
CLI Quick Configuration
To quickly configure this example, copy the
following commands, paste them into a text file, remove any line breaks,
change any details necessary to match your network configuration,
copy and paste the commands into the CLI at the [edit] hierarchy
level, and then enter commit from configuration mode.
set security screen ids-option js1 tcp syn-flood white-list wlipv4 source-address 1.1.1.0/24
set security screen ids-option js1 tcp syn-flood white-list wlipv4 destination-address 2.2.2.2/32
set security screen ids-option js1 tcp syn-flood white-list wlipv4 destination-address 3.3.3.3/32
set security screen ids-option js1 tcp syn-flood white-list wlipv4 destination-address 4.4.4.4/32
set security screen ids-option js1 tcp syn-flood white-list wlipv6 source-address 2001::1/64
set security screen ids-option js1 tcp syn-flood white-list wlipv6 destination-address 2002::1/64
Step-by-Step Procedure
The following example requires you to navigate various levels in the configuration hierarchy. For instructions on how to do that, seeUsing the CLI Editor in Configuration Mode in the drop-profiles.
To configure the allowlists:
Specify the name of the allowlist and the IP addresses to be exempted from the SYN/ACK.
[edit security screen ids-option js1 tcp syn-flood]
user@host# set white-list wlipv4 source-address 1.1.1.0/24
user@host# set white-list wlipv4 destination-address [2.2.2.2 3.3.3.3 4.4.4.4]
user@host# set white-list wlipv6 source-address 2001::1/64
user@host# set white-list wlipv6 destination-address 2002::1/64
Results
From configuration mode, confirm your configuration
by entering the show security screen command. If the output
does not display the intended configuration, repeat the configuration
instructions in this example to correct it.
[edit]
user@host# show security screen
ids-option js1 {
    tcp {
        syn-flood {
            white-list wlipv4 {
                source-address 1.1.1.0/24;
                destination-address [2.2.2.2/32 3.3.3.3/32 4.4.4.4/32];
            }
            white-list wlipv6 {
                source-address 2001::1/64;
                destination-address 2002::1/64;
            }
        }
    }
}
If you are done configuring the device, enter commit from configuration mode.
Understanding Allowlist for UDP Flood Screens
Junos OS provides the administrative option to configure a allowlist of trusted IP addresses on UDP flood. When UDP flood is enabled, all the UDP packets that are above the threshold value will be dropped. Some of these packets are valid and should not be dropped from the traffic. When you configure allowlist on UDP flood screen, only the source addresses in the list are allowed to bypass the UDP flood detection. This feature is needed when all traffic from addresses in the allowlist groups should bypass UDP flood check.
Both IPv4 and IPv6 allowlists are supported. Addresses in a allowlist should be all IPv4 or all IPv6. In each allowlist, there can be up to 32 IP address prefixes. You can specify multiple addresses or address prefixes as a sequence of addresses separated by spaces and enclosed in square brackets. You can configure single address or subnet address.
Example: Configuring Allowlist for UDP Flood Screens
This example shows how to configure allowlists of IP addresses to be exempted from UDP flood detection that occur during the UDP flood screen protection process.
Requirements
Before you begin, configure a security screen and enable the screen in the security zone.
Overview
In this example, you configure allowlists named wlipv4 and wlipv6. All addresses are IPv4 for wlipv4, and all addresses are IPv6 for wlipv6. Both allowlists
include destination and source IP addresses.
Multiple addresses or address prefixes can be configured as
a sequence of addresses separated by spaces and enclosed in square
brackets, as shown in the configuration of the destination addresses
for wlipv4 and wlipv6.
Configuration
Procedure
CLI Quick Configuration
To quickly configure this example, copy the
following commands, paste them into a text file, remove any line breaks,
change any details necessary to match your network configuration,
copy and paste the commands into the CLI at the [edit] hierarchy
level, and then enter commit from configuration mode.
set security screen white-list wlipv4 address 198.51.100.10/24
set security screen white-list wlipv4 address 198.51.100.11/24
set security screen white-list wlipv4 address 198.51.100.12/24
set security screen white-list wlipv4 address 198.51.100.13/24
set security screen white-list wlipv6 address 2001:db8::1/32
set security screen white-list wlipv6 address 2001:db8::2/32
set security screen white-list wlipv6 address [2001:db8::3/32]
set security screen white-list wlipv6 address [2001:db8::4/32]
set security screen ids-options jscreen udp flood white-list  wlipv4
set security screen ids-options jscreen udp flood white-list  wlipv6
Step-by-Step Procedure
The following example requires you to navigate various levels in the configuration hierarchy. For instructions on how to do that, see Using the CLI Editor in Configuration Mode in the CLI User Guide.
To configure the allowlists:
Specify the name of the allowlist and the IPv4 addresses to bypass UDP flood detection.
[edit security screen]
user@host# set white-list wlipv4 address 198.51.100.10/32
user@host# set white-list wlipv4 address 198.51.100.11/32
user@host# set white-list wlipv4 address 198.51.100.12/32
user@host# set white-list wlipv4 address 198.51.100.13/32
Specify the name of the allowlist and the IPv6 addresses to bypass UDP flood detection.
[edit security screen]
user@host# set white-list wlipv6 address 2001:db8::1/32
user@host# set white-list wlipv6 address 2001:db8::2/32
user@host# set white-list wlipv6 address 2001:db8::3/32
user@host# set white-list wlipv6 address 2001:db8::4/32
Set the UDP flood allowlist option.
[edit security screen]
user@host# set ids-option jscreen udp flood white-list  wlipv4
user@host# set ids-option jscreen udp flood white-list  wlipv6
Results
From configuration mode, confirm your configuration
by entering the show security screen command. If the output
does not display the intended configuration, repeat the configuration
instructions in this example to correct it.
[edit]
user@host#  show security screen
ids-option jscreen {
     udp {
        flood {
            white-list [ wlipv4 wlipv6 ];
        }
    }
}
white-list wlipv4 {
    address [ 198.51.100.11/32 198.51.100.12/32 198.51.100.13/32 198.51.100.14/32 ];
}
    white-list wlipv6 {
        address [ 2001:db8::1/32 2001:db8::2/32 2001:db8::3/32 2001:db8::4/32 ];
    }
If you are done configuring the device, enter commit from configuration mode.
Verification
Verifying Whitelist Configuration
Purpose
Verify that the allowlist is configured properly.
Action
From operational mode, enter the show security
screen white-list wlipv4 and show security screen ids-option
jscreen command.
user@host> show security screen white-list wlipv4

Screen white list:

   198.51.100.10/32
   198.51.100.11/32
   198.51.100.12/32
   198.51.100.13/32

user@host> show security screen ids-option jscreen

Name                                                Value
   ……
   UDP flood threshold                      ##
   UDP flood white-list                       wlipv4
   UDP flood white-list                       wlipv6
Understanding Allowlist for All Screen Options
Junos OS provides the administrative option to configure allowlist for all IP screen options in a security zone. When screen is enabled in a security zone, all IP packets exceeding the threshold value are dropped. Some of these packets are valid from specific sources and should not be dropped from the traffic. When you configure allowlist at a zone level, all the IP addresses from the specific sources are allowed to bypass the attack detection check.
This feature is needed when all IP addresses from a specific source should bypass the attack detection check.
Both IPv4 and IPv6 allowlists are supported. Addresses in a allowlist should be all IPv4 or all IPv6. In each allowlist, there can be up to 32 IP address prefixes. You can specify multiple addresses or address prefixes as a sequence of addresses separated by spaces and enclosed in square brackets. You can configure a single address or a subnet address.
Benefits
-
Global IP allowlist bypasses the IP packet screening check to allow all the IP packets from specific sources.
Understanding SYN Cookie Protection
SYN cookie is a stateless SYN proxy mechanism you can use in conjunction with other defenses against a SYN flood attack.
As with traditional SYN proxying, SYN cookie is activated when the SYN flood attack threshold is exceeded. However, because SYN cookie is stateless, it does not set up a session or policy and route lookups upon receipt of a SYN segment, and it maintains no connection request queues. This dramatically reduces CPU and memory usage and is the primary advantage of using SYN cookie over the traditional SYN proxying mechanism.
When SYN cookie is enabled on Junos OS and becomes the TCP-negotiating proxy for the destination server, it replies to each incoming SYN segment with a SYN/ACK containing an encrypted cookie as its initial sequence number (ISN). The cookie is an MD5 hash of the original source address, destination address, and ISN from the original SYN packet. After sending the cookie, Junos OS drops the original SYN packet and deletes the calculated cookie from memory. If there is no response to the packet containing the cookie, the attack is noted as an active SYN attack and is effectively stopped.
If the initiating host responds with a TCP packet containing the cookie +1 in the TCP ACK field, Junos OS extracts the cookie, subtracts 1 from the value, and recomputes the cookie to validate that it is a legitimate ACK. If it is legitimate, Junos OS starts the TCP proxy process by setting up a session and sending a SYN to the server containing the source information from the original SYN. When Junos OS receives a SYN/ACK from the server, it sends ACKs to the server and to the initiation host. At this point the connection is established and the host and server are able to communicate directly.
The use of SYN cookie or SYN proxy enables the SRX Series Firewall to protect the TCP servers behind it from SYN flood attacks in IPv6 flows.
Figure 4 shows how a connection is established between an initiating host and a server when SYN cookie is active on Junos OS.

SYN Cookie Options
You can set the following parameters for incomplete TCP proxy connection requests:
Attack Threshold—This option allows you to set the number of SYN segments (that is, TCP segments with the SYN flag set) to the same destination address per second required to activate the SYN proxy mechanism. Although you can set the threshold to any number, you need to know the normal traffic patterns at your site to set an appropriate threshold for it. For example, for an e-business site that normally gets 2000 SYN segments per second, you might want to set the threshold to 30,000 SYN segments per second. The valid threshold range is 1 to 1,000,000. For a smaller site that normally gets 20 SYN segments per second, you might consider setting the threshold to 40 SYN segments per second.
Alarm Threshold—This option allows you to set the number of proxied, half-complete TCP connection requests per second after which Junos OS enters an alarm in the event log. The alarm threshold value you set triggers an alarm when the number of proxied, half-completed connection requests to the same destination address per second exceeds that value. For example, if you set the SYN attack threshold at 2000 SYN segments per second and the alarm at 1000, then a total of 3001 SYN segments to the same destination address per second is required to trigger an alarm entry in the log. The valid threshold range is 1 to 1,000,000 and the default alarm threshold value is 512.
Source Threshold—This option allows you to specify the number of SYN segments received per second from a single source IP address—regardless of the destination IP address—before Junos OS begins dropping connection requests from that source.
When you set a SYN attack threshold and a source threshold, you put both the basic SYN flood protection mechanism and the source-based SYN flood tracking mechanism in effect. The valid threshold range is 4 to 1,000,000 and the default alarm threshold value is 4000.
Destination Threshold—This option allows you to specify the number of SYN segments received per second for a single destination IP address before Junos OS begins dropping connection requests to that destination. If a protected host runs multiple services, you might want to set a threshold based on destination IP address only—regardless of the destination port number. The valid threshold range is 4 to 1,000,000 and the default alarm threshold value is 4000.
When you set a SYN attack threshold and a destination threshold, you put both the basic SYN flood protection mechanism and the destination-based SYN flood tracking mechanism in effect.
Timeout—This option allows you to set the maximum length of time before a half-completed connection is dropped from the queue. The default is 20 seconds, and you can set the timeout from 0 to 50 seconds. You might try decreasing the timeout value to a shorter length until you begin to see dropped connections during normal traffic conditions.
When either a source or destination threshold is not configured, the system will use the default threshold value. The default source and destination threshold value is 4000 pps.
Detecting and Protecting Your Network Against SYN Flood Attacks by Enabling SYN Cookie Protection
This example shows how to detect and protect your network against SYN flood attacks by enabling the SYN cookie protection.
Requirements
No special configuration beyond device initialization is required before configuring this feature.
Overview
In this example, you set the external-syn-flood timeout value to 20 and set the security zone for external screen to external-syn-flood. Also, you set the protection mode to syn-cookie.
The SYN cookie feature can detect and protect only against spoofed SYN flood attacks, minimizing the negative impact on hosts that are secured by Junos OS. If an attacker uses a legitimate IP source address, rather than a spoofed IP source, then the SYN cookie mechanism does not stop the attack.
Configuration
Procedure
CLI Quick Configuration
To quickly configure this example, copy the
following commands, paste them into a text file, remove any line breaks,
change any details necessary to match your network configuration,
copy and paste the commands into the CLI at the [edit] hierarchy
level, and then enter commit from configuration mode.
set security screen ids-option external-syn-flood tcp syn-flood timeout 20
set security zones security-zone external screen external-syn-flood
set security flow syn-flood-protection-mode syn-cookie
Step-by-Step Procedure
The following example requires you to navigate various levels in the configuration hierarchy. For instructions on how to do that, see Using the CLI Editor in Configuration Mode in the CLI User Guide. To enable the SYN cookie protection:
Specify the external-syn-flood timeout value.
[edit]
user@host# set security screen ids-option external-syn-flood tcp syn-flood timeout 20
Set the security-zone for external screen.
[edit]
user@host# set security zones security-zone external screen external-syn-flood
Set the protection mode.
[edit]
user@host# set security flow syn-flood-protection-mode syn-cookie
Results
From configuration mode, confirm your configuration
by entering the show security screen, show security
zones, and show security flow commands. If the output
does not display the intended configuration, repeat the configuration
instructions in this example to correct it.
[edit]
user@host# show security screen
    ids-option external-syn-flood {
        tcp {
    syn-flood {
        timeout 20;
            }
        }
    }
[edit]
user@host# show security zones
security-zone zone {
        screen external-syn-flood;
    }
[edit]
user@host# show security flow
    syn-flood-protection-mode syn-cookie;
If you are done configuring the device, enter commit from configuration mode.
Verification
Verifying SYN Cookie Protection
Purpose
Verifying SYN cookie protection.
Action
Enter the show security screen ids-option external-syn-flood and show security zones commands from operational mode.
user@host> show security screen ids-option external-syn-flood
node0:
--------------------------------------------------------------------------
Screen object status:
Name                                         Value
  TCP SYN flood attack threshold             200
  TCP SYN flood alarm threshold              512
  TCP SYN flood source threshold             4000
  TCP SYN flood destination threshold        4000
  TCP SYN flood timeout                      20

user@host> show security zones
Security zone: external
  Send reset for non-SYN session TCP packets: Off
  Policy configurable: Yes
  Screen: external-syn-flood
  Interfaces bound: 0
  Interfaces:
Meaning
The sample output shows that SYN cookie protection is enabled with a source and destination threshold.
Understanding ICMP Flood Attacks
An ICMP flood typically occurs when ICMP echo requests overload the target of the attack with so many requests that the target expends all its resources responding until it can no longer process valid network traffic.
ICMP messages generated in flow mode are limited to 12 messages every 10 seconds. This rate limit is calculated on a per-CPU basis. Once the threshold is reached, no further acknowledgement messages are sent to the device.
When enabling the ICMP flood protection feature, you can set a threshold that, once exceeded, invokes the ICMP flood attack protection feature. (The default threshold value is 1000 packets per second.) If the threshold is exceeded, Junos OS ignores further ICMP echo requests for the remainder of that second plus the next second as well. See Figure 5.
An ICMP flood can consist of any type of ICMP message. Therefore, Junos OS monitors all ICMP message types, not just echo requests.
Junos OS supports ICMP flood protection for both IPv4 and IPv6 traffic.
Protecting Your Network Against ICMP Flood Attacks by Enabling ICMP Flood Protection
This example shows how to protect your network against ICMP flood attacks by enabling ICMP flood protection.
Requirements
No special configuration beyond device initialization is required before enabling ICMP flood protection.
Overview
In this example, you enable ICMP flood protection. The value unit is ICMP packets per second, or pps. The default value is 1000 pps. You specify the zone where a flood might originate.
Configuration
Procedure
CLI Quick Configuration
To quickly configure this example, copy the
following commands, paste them into a text file, remove any line breaks,
change any details necessary to match your network configuration,
copy and paste the commands into the CLI at the [edit] hierarchy
level, and then enter commit from configuration mode.
set security screen ids-option 1000-icmp-flood icmp flood threshold 1000
set security zones security-zone zone screen 1000-icmp-flood
Step-by-Step Procedure
The following example requires you to navigate various levels in the configuration hierarchy. For instructions on how to do that, see Using the CLI Editor in Configuration Mode in the CLI User Guide. To enable ICMP flood protection:
Specify the ICMP flood threshold value.
[edit]
user@host# set security screen ids-option 1000-icmp-flood icmp flood threshold 1000
Set the security zone for zone screen.
[edit]
user@host# set security zones security-zone zone screen 1000-icmp-flood
Results
From configuration mode, confirm your configuration
by entering the show security screen and show security
zones commands. If the output does not display the intended
configuration, repeat the configuration instructions in this example
to correct it.
[edit]
user@host# show security screen
    ids-option 1000-icmp-flood {
        icmp {
        flood threshold 1000;
        }
    }
[edit]
user@host# show security zones
    security-zone zone {
        screen 1000-icmp-flood;
    }
If you are done configuring the device, enter commit from configuration mode.
Verification
Verifying ICMP Flood Protection
Purpose
Verify ICMP flood protection
Action
Enter the show security screen ids-option 1000-icmp-flood and show security zones commands from operational mode.
user@host> show security screen ids-option 1000-icmp-flood
node0:
--------------------------------------------------------------------------
Screen object status:
Name                                         Value
  ICMP flood threshold                       1000

user@host> show security zones
Security zone: zone
  Send reset for non-SYN session TCP packets: Off
  Policy configurable: Yes
  Screen: 1000-icmp-flood
  Interfaces bound: 0
  Interfaces:
Meaning
The sample output shows that ICMP flood protection is enabled and threshold is set.
Understanding UDP Flood Attacks
Similar to an ICMP flood, a UDP flood occurs when an attacker sends IP packets containing UDP datagrams with the purpose of slowing down the victim to the point that the victim can no longer handle valid connections.
After enabling the UDP flood protection feature, you can set a threshold that, once exceeded, invokes the UDP flood attack protection feature. (The default threshold value is 1000 packets per second, or pps.) If the number of UDP datagrams from one or more sources to a single destination exceeds this threshold, Junos OS ignores further UDP datagrams to that destination for the remainder of that second plus the next second as well. See Figure 6.
Junos OS supports UDP flood protection for IPV4 and IPv6 packets.
Protecting Your Network Against UDP Flood Attacks by Enabling UDP Flood Protection
This example shows how to protect your network against UDP flood attacks by enabling UDP flood protection.
Requirements
No special configuration beyond device initialization is required before enabling UDP flood protection.
Overview
In this example, you enable UDP flood protection. The value unit is UDP packets per second, or pps. The default value is 1000 pps. You specify the zone where a flood might originate.
Configuration
Procedure
CLI Quick Configuration
To quickly configure this example, copy the
following commands, paste them into a text file, remove any line breaks,
change any details necessary to match your network configuration,
copy and paste the commands into the CLI at the [edit] hierarchy
level, and then enter commit from configuration mode.
set security screen ids-option 1000-udp-flood udp flood threshold 1000
set security zones security-zone external screen 1000-udp-flood
Step-by-Step Procedure
The following example requires you to navigate various levels in the configuration hierarchy. For instructions on how to do that, see Using the CLI Editor in Configuration Mode in the drop-profiles. To enable UDP flood protection:
Specify the UDP flood threshold value.
[edit]
user@host# set security screen ids-option 1000-udp-flood udp flood threshold 1000
Set the security zone for external screen.
[edit]
user@host# set security zones security-zone external screen 1000-udp-flood
Results
From configuration mode, confirm your configuration
by entering the show security screen and show security
zones commands. If the output does not display the intended
configuration, repeat the configuration instructions in this example
to correct it.
[edit]
user@host# show security screen
    ids-option 1000-udp-flood {
        udp {
        flood threshold 1000;
        }
    }
[edit]
user@host# show security zones
    security-zone external {
         screen 1000-udp-flood;
    }
If you are done configuring the device, enter commit from configuration mode.
Verification
Verifying UDP Flood Protection
Purpose
Verify UDP flood protection.
Action
Enter the show security screen ids-option 1000-udp-flood and show security zones commands from operational mode.
user@host> show security screen ids-option 1000-udp-flood
node0:
--------------------------------------------------------------------------
Screen object status:
Name                                         Value
  UDP flood threshold                        1000

user@host> show security zones
Security zone: external
  Send reset for non-SYN session TCP packets: Off
  Policy configurable: Yes
  Screen: 1000-udp-flood
  Interfaces bound: 0
  Interfaces:
Meaning
The sample output shows that UDP flood protection is enabled and threshold is set.
Understanding Land Attacks
Combining a SYN attack with IP spoofing, a land attack occurs when an attacker sends spoofed SYN packets containing the IP address of the victim as both the destination and the source IP address.
The receiving system responds by sending the SYN-ACK packet to itself, creating an empty connection that lasts until the idle timeout value is reached. Flooding a system with such empty connections can overwhelm the system, causing a denial of service (DoS). See Figure 7.
When you enable the screen option to block land attacks, Junos OS combines elements of the SYN flood defense and IP spoofing protection to detect and block any attempts of this nature.
Junos OS supports land attack protection for both IPv4 and IPv6 packets.
Protecting Your Network Against Land Attacks by Enabling Land Attack Protection
This example shows how to protect your network against attacks by enabling land attack protection.
Requirements
No special configuration beyond device initialization is required before enabling land attack protection.
Overview
This example shows how to enable protection against a land attack. In this example, you set the security screen object name as land and set the security zone as zone.
Configuration
Procedure
CLI Quick Configuration
To quickly configure this example, copy the
following commands, paste them into a text file, remove any line breaks,
change any details necessary to match your network configuration,
copy and paste the commands into the CLI at the [edit] hierarchy
level, and then enter commit from configuration mode.
set security screen ids-option land tcp land
set security zones security-zone zone screen land
Step-by-Step Procedure
The following example requires you to navigate various levels in the configuration hierarchy. For instructions on how to do that, see Using the CLI Editor in Configuration Mode in the CLI User Guide. To enable protection against a land attack:
Specify the screen object name.
[edit]
user@host# set security screen ids-option land tcp land
Set the security zone.
[edit]
user@host# set security zones security-zone zone screen land
Results
From configuration mode, confirm your configuration
by entering the show security screen and show security
zones commands. If the output does not display the intended
configuration, repeat the configuration instructions in this example
to correct it.
[edit]
user@host# show security screen
    ids-option land {
        tcp {
        land;
        }
    }
[edit]
user@host# show security zones
    security-zone zone {
        screen land;
    }
If you are done configuring the device, enter commit from configuration mode.
Verification
Verifying Protection Against a Land Attack
Purpose
Verify protection against a land attack.
Action
Enter the show security screen ids-option land and show security zones commands from operational mode.
user@host> show security screen ids-option land
node0:
--------------------------------------------------------------------------
Screen object status:
Name                                         Value
  TCP land attack                            enabled

user@host> show security zones
Security zone: zone
  Send reset for non-SYN session TCP packets: Off
  Policy configurable: Yes
  Screen: land
  Interfaces bound: 0
  Interfaces:
Meaning
The sample output shows that protection against a land attack is enabled.
Platform-Specific Network DoS Attacks Behavior
Use Feature Explorer to confirm platform and release support for specific features.
Use the following table to review platform-specific behaviors for your platform.
Platform-Specific UDP Flood Screens Behavior
| Platform | Difference |
|---|---|
|
SRX Series Firewalls |
|
Platform-Specific UDP Flood Attacks Behavior
| Platform | Difference |
|---|---|
|
SRX Series Firewalls |
|