Inventory Landing Page Overview
In the Junos Space Network Management Platform UI, you navigate to an inventory page by selecting an application, expanding an application workspace, then selecting a management task. For example, to view the Device Management inventory page, select Devices > Device Management.
The inventory pages display information related to managed objects for a particular task group or task in tabular format. The fields that are displayed are different for different inventory pages, depending on the task group that you selected.
For each managed object, specific data associated with it is stored in the Junos Space Platform database. For example, in the case of devices, device name, interfaces, OS version, platform, IP address, connection, managed status, and so on are stored.
Inventory pages enable you to view and manipulate managed objects individually or collectively. Managed objects include devices, logs, users, jobs, clients, software, licenses, and so on. You can organize your view to display only those objects that you want to see, in the way that you want to see them.
You can select an object or objects by selecting the check box to the left of each object on the inventory page. You can select one, several, or all objects and perform actions on them using the shortcut menu or the Actions menu. Selecting the check box to the left in the first column of the column header row selects or deselects all items. The objects that you select and on which you perform an action remain selected.
The function and implementation of individual inventory pages depends on the Junos Space Platform application design.
Organizing Your View
Before you start working on data that is displayed on various inventory landing pages (ILPs), it would be best to organize your view on the ILP so that Junos Space presents you with only the information that you need. The following sections provide information about how you can organize your view.
Paging Controls
Figure 1 shows the paging controls that appear at the bottom of the inventory page. You can use these controls to browse the inventory when the inventory is too large to fit on one page.

The Page box lets you jump to a specific page of the inventory. Type the page number in the Page box and press Enter to jump to that page. The Show box enables you to customize the number of objects displayed per page. Table 1 describes other table controls.
|
Page Control |
Operation |
|---|---|

|
Advances to the next page of the table |

|
Returns to the previous page of the table |

|
Displays the last page of the table |

|
Displays the first page of the table |

|
Refreshes the table content |
Sorted-by Indicator
The sorted-by indicator is a small arrowhead next to a column name. It displays how the objects are sorted in a column. When you sort a column, the column name is highlighted and the indicator appears.
You can sort inventory data using the Sort Ascending and Sort Descending commands on the column header drop-down menu. Click the down arrow on a table header to view the menu. In Figure 2, the device inventory is sorted by the Name column.
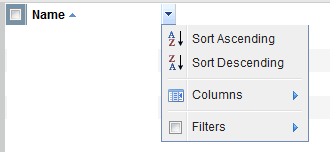
Some columns do not support sorting.
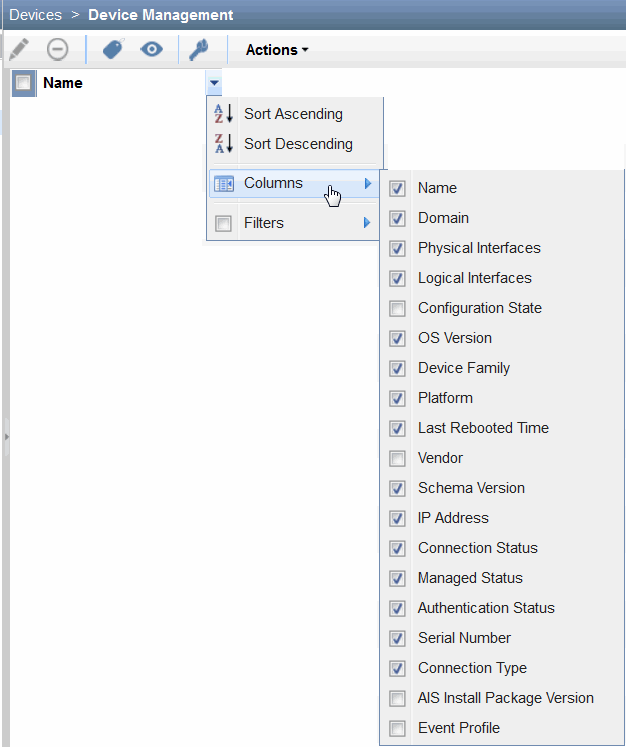
Show or Hide Columns
You can show or hide columns on the inventory page by selecting or not selecting the column name on the Columns cascading menu, as shown in Figure 3. All column header drop-down menus have this option. Only the columns that are selected appear in the inventory table.
Filter Submenus
For information about filtering options in Junos Space Platform Release 17.2R1 and later, see Filter Management in Junos Space Platform User Interface.
Working with Objects on an Inventory Page
To initiate an action on the objects that are available on an inventory page, you can use:
Toolbar Icons
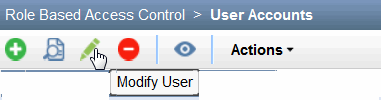
Almost all inventory landing pages provide a toolbar containing icons that provide easy access to frequently used tasks. While some icons are common across inventory landing pages such as the Display Quick View icon (which displays a small window summarizing data about the selected object), most icons are specific to an inventory landing page. For example, in Figure 4, the Modify User icon is specific to the User Accounts inventory landing page.
Actions Menu and Shortcut Menu
You can perform actions on one or more selected items on an inventory page by using the Actions menu, or by right-clicking the items to invoke the shortcut menu. To use the Actions menu, select one or more objects, select an action or subgroup of actions from the Actions menu. (Note that the subgroup has an arrowhead next to its name.) For example, to view the physical interfaces of a device, select that device on the Device Management inventory page, open the Actions menu, expand the Device Inventory subgroup, and select View Physical Inventory.
You can also select one or more items on the inventory page, then right-click. The shortcut menu appears and you can select an action or subgroup of actions.
If you are using Mozilla Firefox earlier versions, the Advanced JavaScript Settings might disable the shortcut menu.
To ensure that you can use the shortcut menu:
-
In Mozilla Firefox, select Tools > Options to display the Options dialog box.
-
In the Options dialog box, click the Content tab.
-
Click Advanced to display the Advanced JavaScript Settings dialog box.
-
Select the Disable or replace context menus option.
-
Click OK in the Advanced JavaScript Settings dialog box.
-
Click OK in the Options dialog box.
If you are using newer versions of Mozilla Firefox, it may not be necessary to perform the preceding steps. By default, you need not change any of the Firefox settings. But, if you have changed the settings or for some reason the shortcut menus do not appear properly, then you need to perform the following steps in the recent versions:
-
Disable or replace context menus—Deselect this option to prevent webpages from disabling or changing the Firefox shortcut menu.
-
In about:config(URL): dom.event.contextmenu.enabled, set it to false to block sites. The default value is true.
Exporting Data
You can export data that is displayed on certain inventory landing pages such as the MD5 Validation Result inventory page (in the Images workspace) as well as export job details pertaining to certain tasks initiated from Junos Space Platform. For example, you can export job details related to device discovery, staging and deployment of device images, and so on.
Not all jobs in Junos Space support the export of job details.
The data is exported as a comma-separated file (CSV) to your computer, allowing you to process the data offline. For example, you can use this data to identify devices on which staging or deployment of an image failed.
To export the data that is displayed on the MD5 Validation Result page as a CSV file:
-
On the Junos Space Platform UI, select Images and Scripts > Images.
The Images page displays the list of device images.
-
Select a device image.
-
Select MD5 Validation Result from the Actions menu.
The MD5 Validation Result page displays the results of verification tasks.
-
Click Export to CSV from the Actions menu.
You are prompted to save the file.
-
Click OK on the File Save dialog box to save the file to your local file system.
-
After you save the file, to return to the MD5 Validation Result page, click the [X] icon on the Exporting Validation Results dialog box to close it.
Navigate to the location where you saved the file and open the file by using an application such as Microsoft Excel. If you are opening this file as an Excel workbook, then filter the data for the Failed status in the Checksum Result column to identify devices in which the images are not staged completely. From the filtered data, see the Device Image Name column to obtain information about the images that are not staged completely.
To export the image deployment job details as a CSV file:
-
On the Junos Space Platform UI, select Jobs > Job Management.
-
Double-click the image deployment job whose details you want to export as a CSV file.
-
Click Export as CSV.
You are prompted to save the file.
-
Click OK on the File Save dialog box to save the file to your local file system.
-
To return to the Job Management page, click OK on the Exporting Device Image Job dialog box.
Use an application such as Microsoft Excel to open the downloaded file from your computer. If you are using Microsoft Excel, you can filter data in the Status column to identify the devices on which the deployment of images failed.