Help us improve your experience.

Let us know what you think.

Do you have time for a two-minute survey?


Replacing the DC Power Supply Module on a Junos Space Appliance

Ensure that you have the following parts and tools available to replace the power supply module from the appliance chassis:

  • (Optional) ESD grounding strap

  • Phillips (+) screwdriver, number 2

  • An antistatic bag or an antistatic mat

Note:

If only one power supply module is installed in your appliance, you must power off the appliance before replacing the power supply module.

This topic has the following sections:

Removing the DC Power Supply Module

To remove the DC power supply module from a Junos Space Appliance, do the following:

  1. Switch off the dedicated facility circuit breaker for the power supply module being removed.
  2. (Optional) Attach an electrostatic discharge (ESD) grounding strap to your bare wrist, and connect the strap to an external ESD point.
  3. Make sure that the voltage across the DC power source cable leads is 0 V and that there is no chance that the cables might become active during the removal process.
  4. Remove the clear plastic cover protecting the terminal studs on the faceplate.
  5. Remove the screws from the terminals, using a Phillips screwdriver, number 2 to loosen and remove the screws. Save the screws.
  6. Remove the cable lugs from the terminals.
  7. Remove the screw on the grounding terminal by using the screwdriver. Save the screw.
  8. Remove the grounding lug from the grounding terminal.
  9. Carefully move the power cables out of the way.
  10. Slide the ejector lever to the right, as shown in Figure 1, until it is in its furthest position.
    Figure 1: Removing a DC Power Supply Module
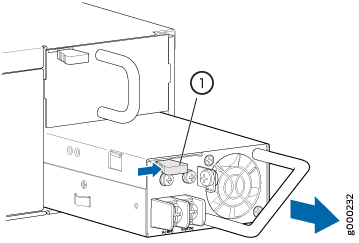
Removing a DC Power Supply Module
      1

    Power supply ejector lever

     
  11. Grasp the handle of the power supply module and pull firmly to slide the power supply module halfway out of the chassis.
  12. Place one hand under the power supply module to support it and slide it completely out of the appliance. Take care not to touch power supply components, pins, leads, or solder connections.
  13. Place the power supply module in the antistatic bag or on the antistatic mat placed on a flat, stable surface.

Installing a DC Power Supply Module

To install a DC power supply module, do the following:

  1. (Optional) Attach an electrostatic discharge (ESD) grounding strap to your bare wrist, and connect the strap to an external ESD point.
  2. Taking care not to touch power supply pins, leads, or solder connections, remove the replacement power supply module from the bag.
  3. Using both hands, slide the replacement power supply module straight into the chassis, as shown in Figure 2, until the power supply is fully seated in the chassis slot and the ejector lever locks.
    Figure 2: Installing a DC Power Supply Module
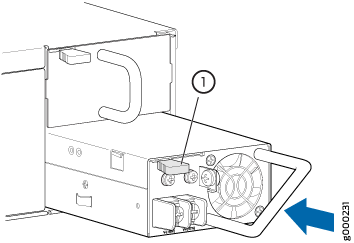
Installing a DC Power Supply Module
      1

    Power supply ejector lever

     
  4. Connect the DC source power to the appliance. For more information, see the Connecting DC Power to the Junos Space Appliance topic.