Connecting DC Power to the Junos Space Appliance
Before connecting the Junos Space Appliance to a DC power source, do the following:
Ensure that you have read the guidelines in the DC Power Electrical Safety Guidelines topic.
Ensure that you have taken the necessary precautions to prevent ESD damage.
Ensure that you have grounded the appliance by connecting the DC power supply grounding cable to earth ground.
CAUTION:Before you connect power to the Junos Space Appliance, in order to meet the safety requirements and ensure proper operation, get a licensed electrician to attach a cable lug to the grounding and power cables that you supply. A cable with an incorrectly attached lug can damage the appliance (for example, by causing a short circuit).
Ensure that you have the following parts and tools available:
(Optional) Electrostatic discharge (ESD) grounding strap
DC power source cables (12-14 AWG) with ends of the wire stripped ~12mm and twisted
Phillips (+) screwdriver, number 1
You connect DC source power to the appliance by attaching power cables from external DC power sources to the terminal studs on the DC power supply module faceplates.
DC-powered Junos Space Appliances are intended for installation only in restricted access locations.
Before you perform the following procedure, ensure that power is removed from the DC circuit. To ensure that all power is off, locate the circuit breaker on the panel board that services the DC circuit, switch the circuit breaker to the OFF position, and tape the switch handle of the circuit breaker in the OFF position.
To connect the DC source power to the Junos Space Appliance, do the following:
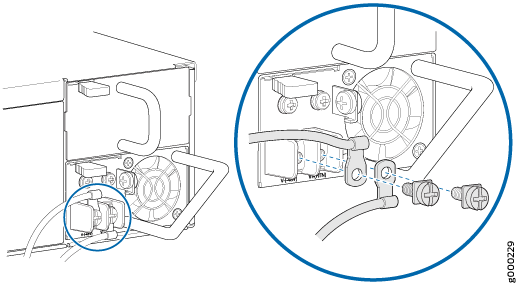
- Connect the stripped and twisted wires to wire clamps
under the DC terminal screws as shown in Figure 1.Figure 1: Connecting a DC Power Supply Module
- Remove the screw on the grounding terminal by using the
screwdriver. Save the screw.
The grounding terminal is located to the right and above the terminals, as shown in Figure 2.
Figure 2: DC Power Supply Grounding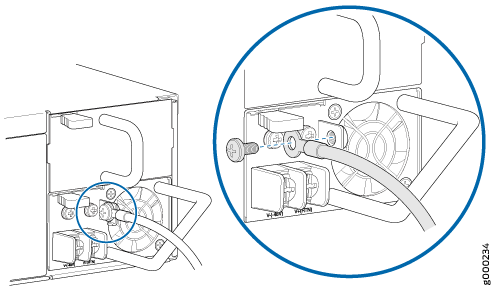
The Junos Space Appliance starts powering on when you supply power to the power supply module. If the power supply module is correctly installed and functioning normally, the LED on the power supply module displays green when the power supply module is powering the appliance, and amber when the power supply module is in standby mode (not powering the appliance).