Add a Device to Routing Director
You must be a superuser or network administrator to adopt or onboard a device (router, switch, or firewall).
A superuser or network administrator can adopt a device [both new devices (greenfield) and devices that are already a part of the network (brownfield device)], and manage the device by using Routing Director. When you adopt a device that is not associated with a network implementation plan, you (superuser or network administrator) must manually update configurations by using configuration templates, apply licenses, and upgrade software. However, if you use a network implementation plan to onboard devices, you can make the changes to the network implementation plan and publish the network implementation plan for the changes to take effect on the devices included in the plan. You also obtain the granular metrics about the device’s health and performance by using the network implementation plan to onboard a device.
The status of a device that is already installed and connected to the network, but is not managed by the Routing Director appears as Disconnected on the Inventory page (Inventory > Devices > Network Inventory). When you adopt a device, the device connects with Routing Director and the status of the device changes to Connected, indicating that the device is managed by Routing Director.
You can add a device to Routing Director by using any of the following methods:
-
Add a Juniper device; see Adopt a Juniper Device.
-
Adopt a Juniper device by using ZTP; see Adopt a Juniper Device Using ZTP.
Add a non-Juniper device; see Add a Non-Juniper Device.
For information on supported non-Juniper devices and OS versions, see Supported Junos OS Releases, Devices, and Browsers.
Before you adopt a device, ensure that:
-
The device can reach the gateway.
Note:If a firewall exists between Routing Director and the device, configure the firewall to allow outbound access on TCP ports 443, 2200, 6800, 4189, and 32,767 from the management port of the device.
-
The device can connect to Routing Director.
Adopt a Juniper Device
What's Next
Connect to the Routing Director GUI and view the status of device onboarding. After the device status changes to Connected on the Inventory page (Inventory > Devices > Network Inventory), you can start managing the device. See Device Management Workflow.
Adopt a Juniper Device Using ZTP
Prerequisites:
-
A network implementation plan should be configured for the device.
-
The device should be returned to zero or in its factory-default settings.
-
A TFTP server reachable from the device
-
A DHCP server reachable from the device, with the ability to respond to the device with the TFTP server and configuration file (script) name
Figure shows the workflow for adopting device using ZTP.
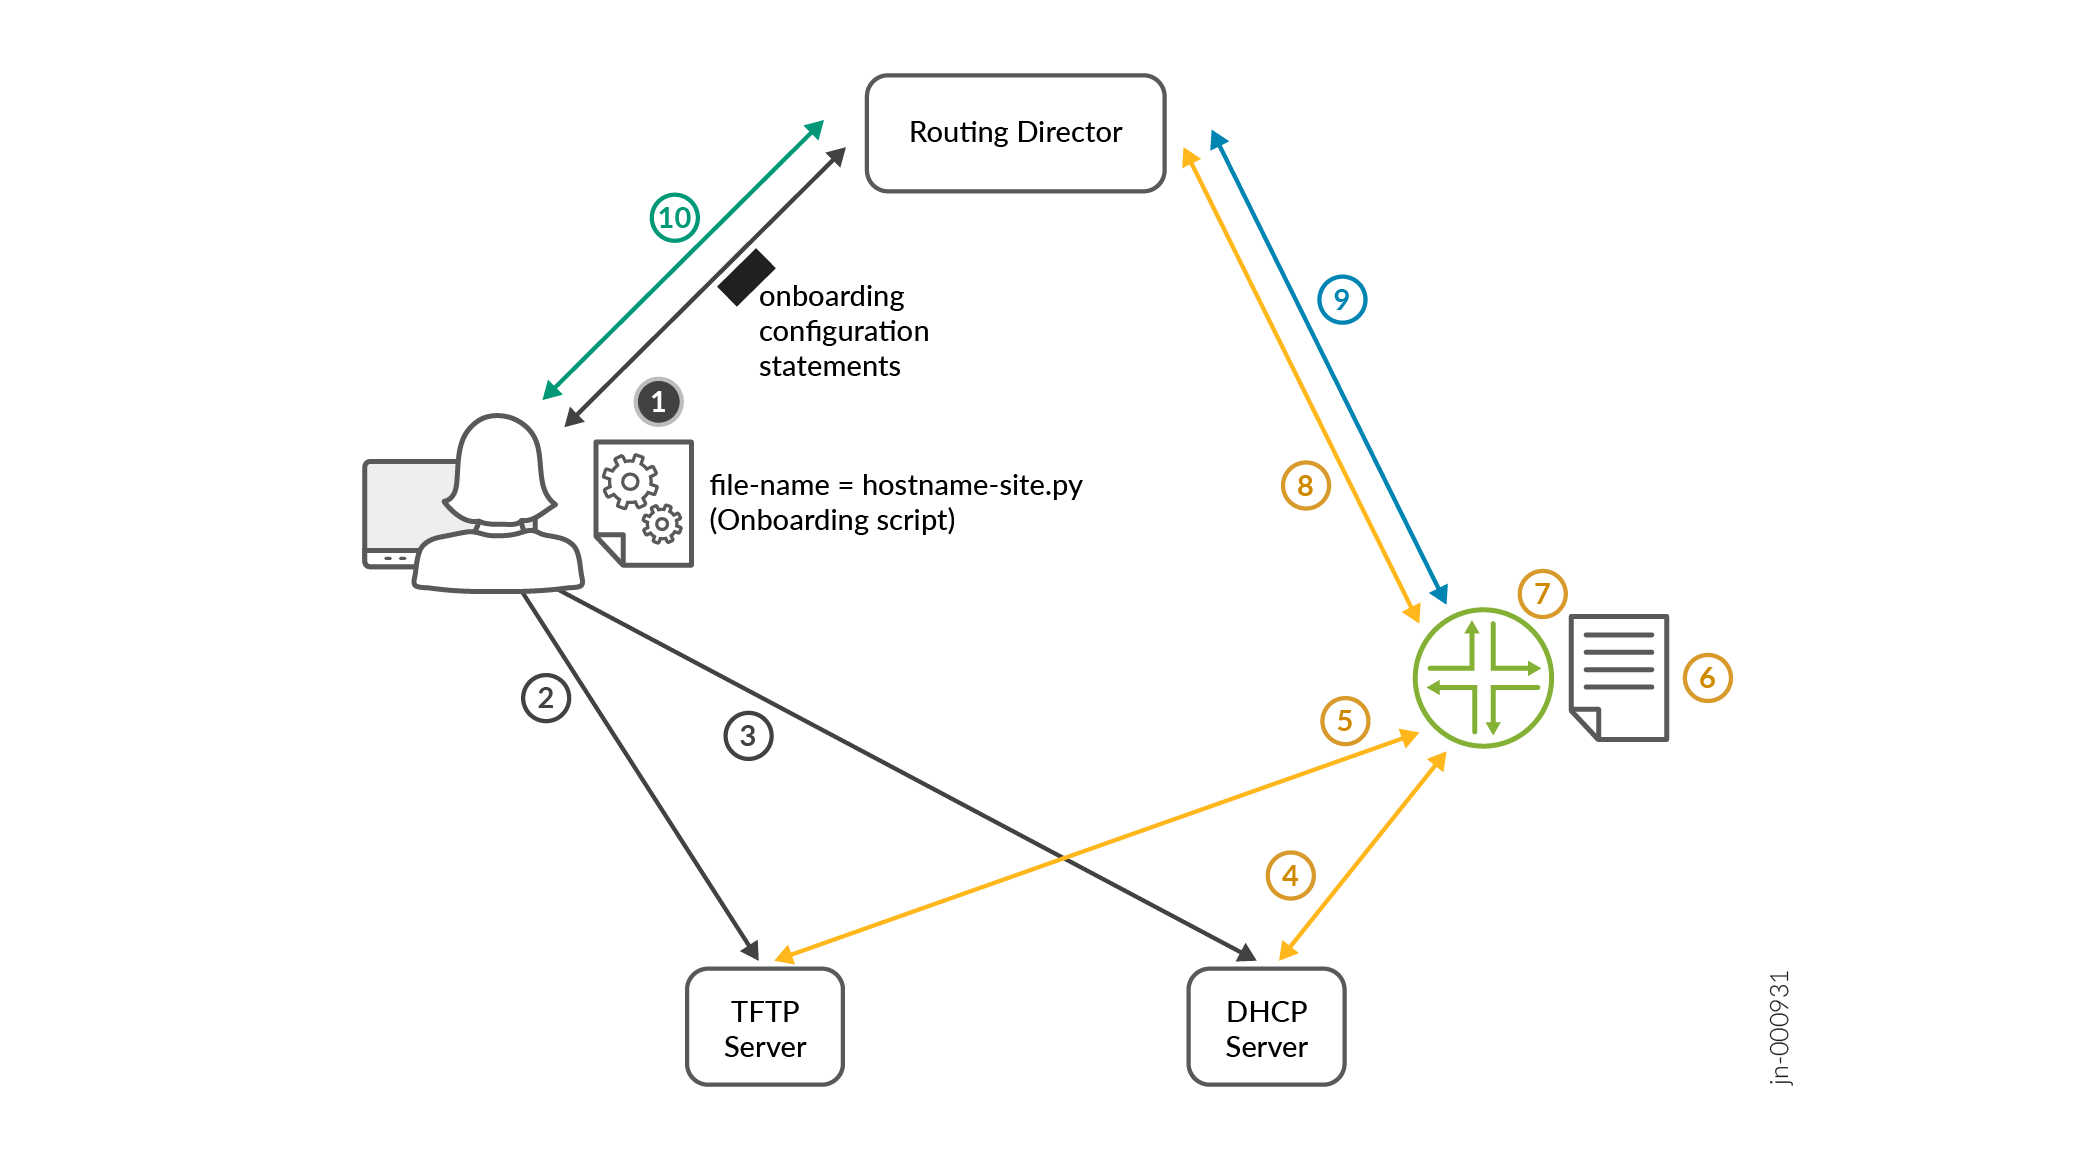
The steps for the workflow are as follows:
Sample Onboarding Script for Committing SSH Configuration on a Device
The following is a sample of the onboarding script that is downloaded from the TFTP server to the device:
#!/usr/bin/python
from jnpr.junos import Device
from jnpr.junos.utils.config import Config
from jnpr.junos.exception import *
import sys

def main():
    config = "set system services ssh protocol-version v2\n\
set system authentication-order password\n\
set system login user jcloud class super-user\n\
set system login user jcloud authentication encrypted-password $6$Oi4IvHbbFYT.XgXP7$43TeEU7V0Uw3CBlN/HFKQT.Xl2wsm6GEBaS9pfE9d3VrINIKBqlYlJfE2cTcHsCSSVboNnVtqJEaLNUBAfbu.\n\
set system login user jcloud authentication ssh-rsa \"ssh-rsa AAAAB3NzaC1yc2EAAAAADAQABAAABgQCuVTpIyaDwBuB8aTVrzxDQO50BS5GtoGnMBkWbYi5EEc0n8eJGmmbINE8auRGGOtY/CEbIHKSp78ptdzME0uQhc7UZm4Uel8C3FRb3qEYjr1AMJMU+hf4L4MYWYXqk+Y9RvnWBzsTO2iEqGU0Jk0y7Mev5z/YI9r8u8MZlWKdQzegBRIkL4HYYOAeAbenNw6ddxRzAP1bPESpmsT+0kChu3jYg8dzKbI+xjDBhQsKCFfO5cXyALjBMI3beaxmXRV02UGCEBl+5Xw6a3OCiP7jplr92rFBjbqgh/bYoJRYz1Rc3AirDjROQuDdpHRn+DuUjPlyV17QR9Qvwn4OAmWM9YKWS/LZ375L8nacOHmlv4f0KETU4LScTFQXR6xiJ6RizEpO338+xmiVq6mOcv5VuXfNApdl8F3LWOxLGFlmieB4cEEyJ7MK9U+TgS7MlcAP+XAeXYM2Vx1b+UCyYoEyDizaRXZvmP5BPpxpb5L2iuXencZMbbpEbnNX/sk3teDc= jcloud@5c96fb73-4e3a-4d8b-8257-7361ef0b95e7\"\n\
set system services outbound-ssh client jcloud secret f72b785d71ea9o017f911a5d6c9o8c95f12a265e19e886f07a364ce12aa99c6c1ca072a1ccc7d39b3f8a7c94e7da761d1396714c0b32ef32b6e7d3c9ab62cf49d8d\n\
set system services outbound-ssh client jcloud services netconf keep-alive retry 12 timeout 5\n\
set system services outbound-ssh client jcloud oc-term.cloud.juniper.net port 2200 timeout 60 retry 1000\n\
set system services outbound-ssh client jcloud device-id 5c96fb73-4e3a-4d8b-8257-7391ef0b95e7.0ad21cc9-1fd6-4467-96fd-1f0750ad2678\n\
set system root-authentication encrypted-password \"$6$OeRp2LWC$/ZLm9CMiR.SeEunv.5sDksFHIkzafuHLf5f7sp1ZANYT0iiz6rk2A1d/4Bq1gmxBhEb1XFtskrocLD7VHvPU10\""
    dev = Device()
    dev.open()
    try:
        with Config(dev, mode="exclusive") as cu:
            print ("Loading and committing configuration changes")
            cu.load(config, format="set", merge=True)
            cu.commit()
    except Exception as err:
        print (err)
    dev.close()


if __name__ == "__main__":
    main()
What's Next
Connect to the Routing Director GUI and view the status of device onboarding on the Inventory page (Inventory > Devices > Network Inventory). After the device status changes to Connected , you can start managing the device. See Device Management Workflow.
Add a Non-Juniper Device
In this release, among non-Juniper devices, Nokia and Cisco devices are supported. For a list of supported Nokia and Cisco devices, see Supported Junos OS Releases, Devices, and Browsers.
|
Field |
Description |
|---|---|
|
Device Name |
Enter the device hostname. |
|
Address/GRPC Port* |
Enter the IPv4 address and gRPC port configured on the device. |
|
MAC* |
Enter the MAC address of the device. |
|
Site |
Click the drop-down list to select a site where the device is deployed. Selecting a site to onboard a device is optional. |
|
Vendor* |
Click the drop-down list to select the vendor of the device—Cisco or Nokia. |
|
Model* |
Enter the device model. For example, Cisco NCS-57C3 |
|
Operating System Name* |
Enter the name of the operating system (OS) deployed on the device. For example, IOS XR. |
|
Version* |
Enter the version of the operating system. For example 7.10.1. For a list of software versions supported on the Cisco and Nokia devices, see Supported Junos OS Releases, Devices, and Browsers . |
|
Timeout (in minutes) |
Enter the time (in minutes) of inactivity after which the device disconnects with Routing Director. |
|
Retry Delay (in minutes) |
If Routing Director is unable to connect with a device, enter the time (in minutes) after which Routing Director retries to connect with the device. |
|
Authorization |
|
|
Insecure* |
This option is disabled by default and the connection between the device and Routing Director is secure (encrypted and/or authenticated). Enable this option when TLS is disabled on the device so that the connection between Routing Director and the device is established without any encryption. The insecure connection is vulnerable to man-in-the-middle attacks and other security threats. We recommend that you use an insecure connection between the Routing Director and the device only during local development and in testing environments where security is not a concern. |
|
Skip Verify* |
This option is disabled by default and the device verifies the identity of Routing Director when Routing Director establishes a connection with the device. Enable this option when TLS is enabled on the device and the device should skip verifying Routing Director's identity when Routing Director establishes a connection. This option is useful when you have a self-signed certificate that cannot be verified against a certificate authority, so that the device skips the verification process. When you skip verifying Routing Director's identity, the connection is vulnerable to man-in-the-middle attacks. Therefore, this option should be enabled only during development or testing the connection between the device and Routing Director. |
|
Certificates—Use this option to enter the username and password for the device to authenticate Routing Director. |
|
|
Certificate* |
Click Browse to upload the TLS certificate for the device. |
|
Key Certificate |
Click Browse to upload the TLS certificate key for the device. |
|
Certificate Authority |
Certificate Authority: Click Browse to upload the TLS root certificate from the certificate authority. |
|
Credentials—Use this option to enter the username and password for the device to authenticate Routing Director. |
|
|
Username |
Enter a username of the device for Routing Director to connect with the device. |
|
Password |
Enter the password for the username. |
|
NETCONF Enabled |
Click to enable or disable (default) NETCONF on Routing Director to establish SSH connections with the device. If you enable NETCONF, enter the SSH port for establishing connection with the device. |
|
Port |
Type the port number that Routing Director can use NETCONF for SSH connections with Routing Director. Range: 1 through 65,535. |
|
Key |
Click Browse to upload the key that Routing Director can use NETCONF for the SSH connections. If you do not assign a key, Routing Director uses the username and password in the device configuration to establish connection with the device. |