About the Route Topology Page
To access this page, click Observability > Routing > Route Topology.
The Route Topology page displays the IGP nodes, adjacencies, and IGP prefixes in your network in graphical and tabular formats. Users with Super User, Network Admin, and Observer roles can monitor the route topology through the interactive topology map that enables you to customize the view of nodes and adjacencies. The route network table lists the IGP-specific nodes, adjacencies, and prefixes in the IGP domain. Networks deploying the IS-IS protocol can also be monitored for anomalies, extending the capabilities of Routing Director to a broader range of IGP environments.
This page does not show real-time data. It displays information for the time period you selected.
To use the route topology map and its features, you must enable Routing Protocol Analytics and configure IGP data collection when you create a device profile. See Route Topology Overview for more information.
We recommend that you enable BGP-LS on the device and enable data collection to get a detailed view of the Route Topology map. See Dynamic Topology for more information.
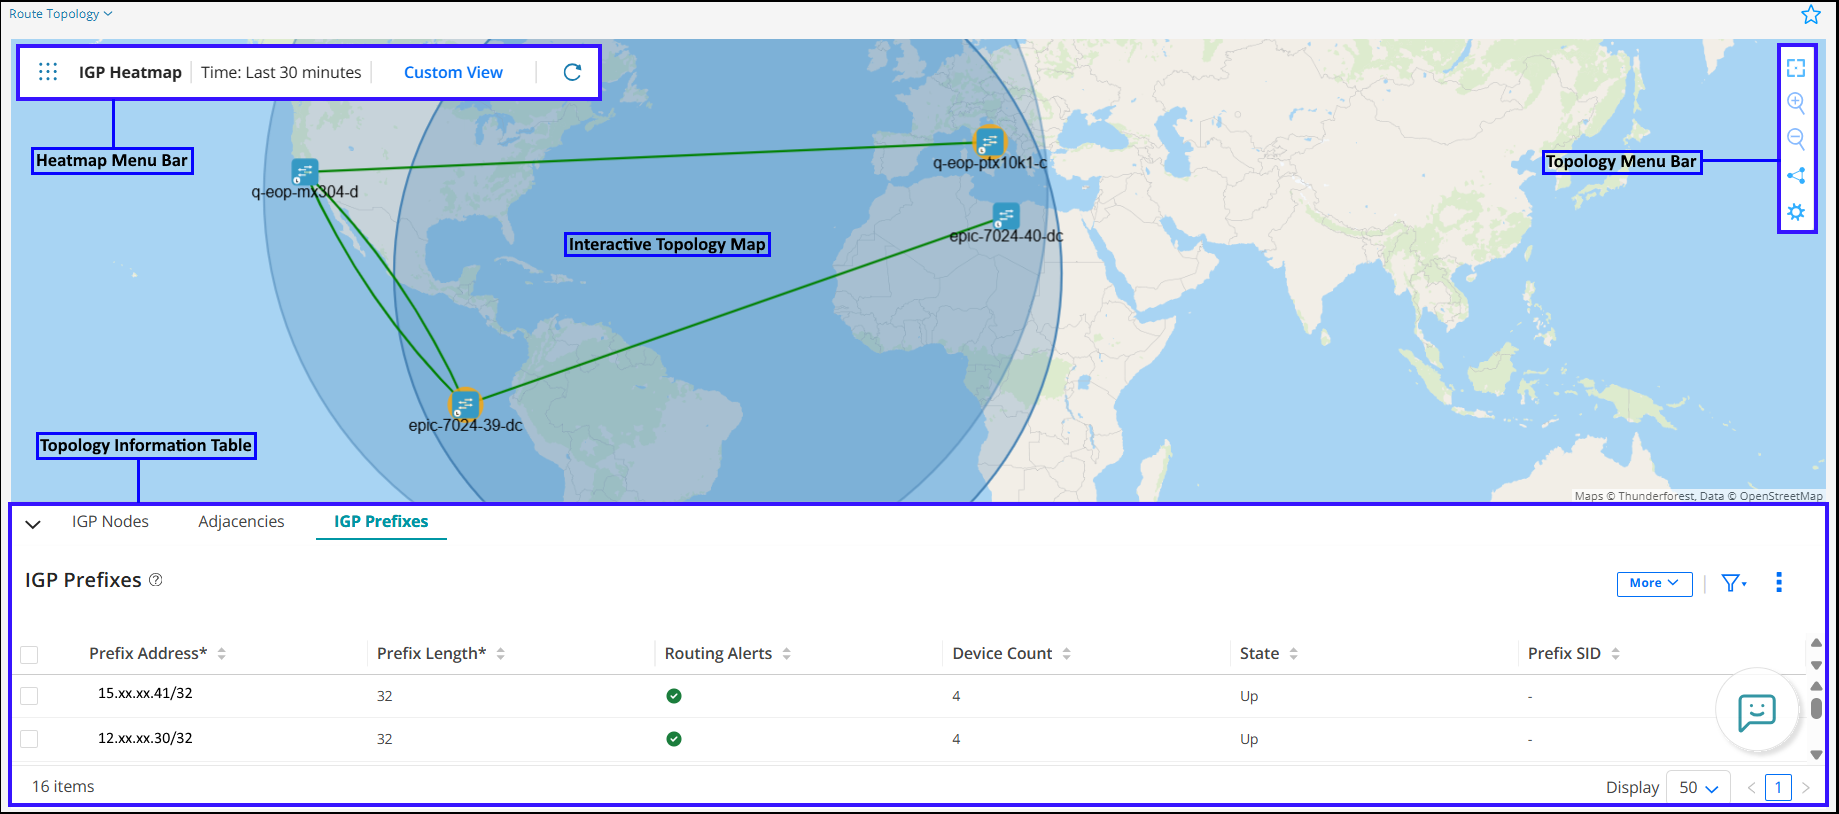
The Route Topology page can be divided into four main components:
-
Interactive Topology Map—View nodes, adjacencies, and prefixes in your network and customize the map display. You can manage the map view, set device positions on the map, customize node and adjacency labels and font size by using menus that appear when you right-click a device, link, or blank space on the map. For more information, see View Route Topology Details.
-
Topology Menu Bar—A vertical bar at the top-right corner of the page, which consists of the following:
-
Reset icon—Center the route topology map so that it zooms to fit the screen.
-
Plus icon—Zoom in (enlarge) to the route topology map.
-
Minus icon—Zoom out (reduce) of the route topology map.
-
Switch to Cluster View/Node View icon—Switch to Cluster View from the default Node View.
In the Node View, all nodes are displayed. When nodes and links are in proximity in the map, they may overlap with each other and clutter the map. To reduce clutter, you can switch to the Cluster View to collapse nodes and links into clusters and bundles, respectively. For more information, see Cluster View.
-
Settings icon—Configure display properties of the topology map. You can configure how nodes are labeled, set the color the of links between adjacencies, and also enable animation while calculating the route topology layout. You can also specify the neighbor (peer) IP address and autonomous system (AS) number so that Routing Director can establish a BGP-LS peering session enabling you to view live changes in your network.
-
-
Heatmap Menu Bar—A horizontal menu bar at the top-left of the route topology map, which consists of the following:
-
Name of the heat map—The IGP heat map is displayed by default.
-
Time—Displays route topology information for the past 30 minutes. Click Custom View to change this setting.
-
Custom View—Configure the following settings to display information on the route topology map:
-
Quick View—Select the heat map that you want to display from the drop-down list.
-
Time Range—Last 30 minutes is selected by default. Click Custom Time Range and enter the time range of your choice to view the anomalies for that period.
Click Render (Load) View.
-
-
Save as Quick View—Select a time range to customize your view of the route topology map. Once you select a time range, click the Save as Quick View button, specify a name, and confirm the operation.
Saved views are stored locally in your browser using Local Storage and will persist across sessions on the same browser and device.
Note:Saved Quick Views are not available across browser restarts and will be lost if you clear browser data or switch browsers or devices.
-
Manage views—You can view, edit, and delete your saved custom topology views.
To manage views:
Click Manage Views from the Custom Views page.
The Manage Quick Views page is displayed with a list of saved quick views.
You can manage a view in the following ways:
Edit—Select a quick view and click the Edit (pencil) icon.
An editable field is displayed allowing you to update the quick view. Click the Tick(✓) icon to save your changes.
Delete—Select a quick view and click the Delete (trashcan) icon.
A confirmation message appears asking you to confirm the delete action. Click OK to save changes.
-
Refresh (icon)—The route topology map displays the route topology information for the past 30 minutes (by default). Click the Refresh icon to refresh the route topology map.
If you have configured the Custom View option, you will not be able to refresh the route topology map.
-
-
Topology Information Table—Displays detailed information about IGP nodes, adjacencies, and prefixes. You can perform the following common functions from the IGP Nodes, Adjacencies, and IGP Prefixes tabs on the Route Topology page:
-
Hide/Show the topology information table—To display or hide the route table, click the collapsible arrow icon present in the top left-corner of the table.
-
Download—To download the data displayed in the IGP Nodes tab to your local system, click Download. The data is downloaded to your local system as a comma-separated values (CSV) file. You cannot download data from the Adjacencies and IGP Prefixes tabs.
-
Show/Hide Columns—Choose to show or hide one or more columns in the table on each tab.
Hover over the vertical ellipsis icon and select Show/Hide Columns. In the list that appears, select the Column-Name check boxes corresponding to the columns you want to display in the table.
Only the selected columns are displayed in the table.
-
Reset Preference—Resets the displayed columns to the default set of columns in the table for each tab and reloads the route topology map.
Hover over the vertical ellipsis icon and select Reset Preference.
Only the default columns are displayed in the table. Routing Director also reloads the route topology map to the default view if you reposition devices without saving the coordinates or links.
-
Access various tabs in the topology information table—IGP Nodes, Adjacencies, and IGP Prefixes tabs.
-
Figure 1 shows all the components of the Route Topology page.
Navigation in the Topology Page
Table 1 lists the navigation functions in the Route Topology Page.
|
Function |
Method |
|---|---|
|
Drag and drop |
Select an element, drag to the required position on the screen, and then release. |
|
Select an element |
Click a link or device to select it. |
|
Select multiple elements |
Do one of the following:
|
Zoom in and out  |
Do one of the following:
|
Reset route topology view  |
Click the reset icon in the route topology menu bar to resize and center the topology map to fit the visible area. |
|
Right-click to access functions |
Right-click any blank space in the route topology map or on a map element to access context-specific menus. |
Collapse/expand pane  |
When a left, right, up, or down slider appears at the margin of a pane, you can click it to collapse or expand the pane. |
|
Resize panes |
Click and drag any of the pane margins to resize the panes. |