ON THIS PAGE
Create an SQS Queue and Configure S3 ObjectCreated Notifications
Finding the S3 Bucket that contains the Data that you want to Collect
Creating the SQS Queue that is used to Receive ObjectCreated Notifications
Creating an Identity and Access Management (IAM) User in the AWS Management Console
Amazon AWS S3 REST API Log Source Parameters for Amazon AWS Route 53 when using an SQS Queue
Configuring an Amazon AWS Route 53 Log Source by using an S3 Bucket with an SQS Queue
You can collect AWS Route 53 Resolver query logs from multiple accounts or regions in an Amazon S3 bucket. Configure a log source on the JSA Console so that Amazon AWS Route 53 can communicate with JSA by using the Amazon AWS S3 REST API protocol and a Simple Queue Service (SQS) queue.
Using the Amazon AWS S3 REST API protocol and a Simple Queue Service (SQS) queue instead of with a directory prefix has the following advantages:
-
You can use one log source for an S3 bucket, rather than one log source for each region and account.
-
There is a reduced chance of missing files because this method uses ObjectCreate notifications to determine when new files are ready.
-
It's easy to balance the load across multiple Event Collectors because the SQS queue supports connections from multiple clients.
-
Unlike the directory prefix method, the SQS queue method does not require that the file names in the folders be in a string that is sorted in ascending order based on the full path. File names from custom applications don't always conform to this method.
-
You can monitor the SQS queue and set up alerts if it gets over a certain number of records. These alerts provide information about whether JSA is either falling behind or not collecting events.
-
You can use IAM Role authentication with SQS, which is Amazon's best practice for security.
-
Certificate handling is improved with the SQS method and does not require the downloading of certificates to the Event Collector.
- Configure Resolver query logging. In Step 5 of that procedure , select S3 bucket as the destination for query logs.
- Create the SQS queue that is used to receive ObjectCreated notifications.
- Create an Amazon AWS Identity and Access Management (IAM) user and then apply the AmazonS3ReadOnlyAccess policy.
- Configure the security credentials for your AWS user account.
- Amazon AWS S3 REST API log source parameters for Amazon AWS Route 53 when using a SWS queue.
Configuring Resolver Query Logging
Create an SQS Queue and Configure S3 ObjectCreated Notifications
Before you can add a log source in JSA, you must create an SQS queue and configure S3 ObjectCreated notifications in the AWS Management Console when using the Amazon AWS S3 REST API protocol.
Complete the following procedures:
Finding the S3 Bucket that contains the Data that you want to Collect
You must find and note the region for S3 bucket that contains the data that you want to collect.
- Log in to the AWS Management Console as an administrator.
- Click Services, and then go to S3.
- From the AWS Region column in the Buckets list, note the region where the bucket that you want to collect data from is located. You need the region for the Region Name parameter value when you add a log source in JSA.
- Enable the check box beside the bucket name, and then from the panel that opens to the right, click Copy Bucket ARN to copy the value to the clipboard. Save this value or leave it on the clipboard. You need this value when you set up SQS queue permissions.
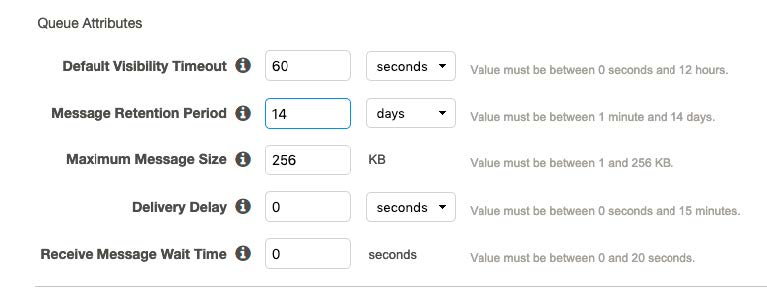
Creating the SQS Queue that is used to Receive ObjectCreated Notifications
You must create an SQS queue and configure S3 ObjectCreated notifications in the AWS Management Console when using the Amazon AWS S3 REST API protocol.
You must complete Finding the S3 Bucket that contains the data that you want to collect. The SQS Queue must be in the same region as the AWS S3 bucket that the queue is collecting from.
-
Click Standard Queue, select Configure
Queue, and then change the default values for the following
Queue Attributes.
-
Default Visibility Timeout - 60 seconds (You can use a lower value. In the case of load balanced collection, duplicate events might occur with values of less than 30 seconds. This value can't be 0.)
-
Message Retention Period - 14 days (You can use a lower value. In the event of an extended collection, data might be lost.)
Use the default value for the remaining Queue Attributes.
More options such as Redrive Policy or SSE can be used depending on the requirements for your AWS environment. These values should not affect the data collection.
-
Setting up SQS Queue Permissions
You must set up SQS queue permissions for users to access the queue.
Before you begin
You must complete Creating the SQS queue that is used to receive ObjectCreated notifications.
You can set the SQS queue permissions by using either the Permissions Editor or a JSON policy document.
Creating ObjectCreated Notifications
-
Click the Properties tab, and in the
Events pane, click Add notification.
Configure the parameters for the new event.
The following table shows an example of an ObjectCreated notification parameter configuration:
Table 3: Example: New ObjectCreated notification parameter configuration Parameter
Value
Name
Type a name of your choosing.
Events
Select All object create events.
Prefix
AWSLogs/
Tip:You can choose a prefix that contains the data that you want to find, depending on where the data is located and what data that you want to go to the queue. For example, AWSLogs/, CustomPrefix/AWSLogs/, AWSLogs/123456789012/.
Suffix
json.gz
Send to
SQS queue
Tip:You can send the data from different folders to the same or different queues to suit your collection or JSA tenant needs. Choose one or more of the following methods:
-
Different folders that go to different queues
-
Different folders from different buckets that go to the same queue
-
Everything from a single bucket that goes to a single queue
-
Everything from multiple buckets that go to a single queue
SQS
The Queue Name from step 4 of Creating the SQS queue that is used to receive the Object Create notifications..
Figure 1: Example: Events
In the example in figure 1 of a parameter configuration, notifications are created for AWSLogs/ from the root of the bucket. When you use this configuration, All ObjectCreated events trigger a notification. If there are multiple accounts and regions in the bucket, everything gets processed. In this example, json.gz is used. This file type can change depending on the data that you are collecting. Depending on the content in your bucket, you can omit the extension or choose an extension that matches the data you are looking for in the folders where you have events set up.
After approximately 5 minutes, the queue that contains data displays. In the Messages Available column, you can view the number of messages.
Figure 2: Number of available messages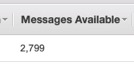
-
-
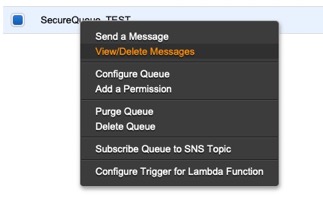
Right-click the Queue Name from step 4 of Creating the SQS queue that is used to receive
the Object Create notifications, then select View/Delete Messages to view the
messages.
Figure 3: SecureQueue TEST list
Sample message:
{ "Records":[ { "eventVersion":"2.1", "eventSource":"aws:s3", "awsRegion":"us-east-2", "eventTime":"2018-12-19T01:51:03.251Z", "eventName":"ObjectCreated:Put", "userIdentity":{ "principalId":"AWS:AIDAIZLCFC5TZD36YHNZY" }, "requestParameters":{ "sourceIPAddress":"52.46.82.38" }, "responseElements":{ "x-amz-request-id":"6C05F1340AA50D21", "x-amz-id-2":"9e8KovdAUJwmYu1qnEv+urrO8T0vQ+UOpkPnFYLE6agmJSn745 /T3/tVs0Low/vXonTdATvW23M=" }, "s3":{ "s3SchemaVersion":"1.0", "configurationId":"test_SQS_Notification_1", "bucket":{ "name":"myBucketName", "ownerIdentity":{ "principalId":"A2SGQBYRFBZET" }, "arn":"arn:aws:s3:::myBucketName" }, "object":{ "key":"AWSLogs/123456789012/CloudTTrail/eu-west- 3/2018/12/19/123456789012_CloudTrail_eu-west-3_TestAccountTrail _us-east-2_20181219T014838Z.json.gz", "size":713, "eTag":"1ff1209e4140b4ff7a9d2b922f57f486", "sequencer":"005C19A40717D99642" } } } ] } -
Set a User or Role permission to access
the SQS queue and for permission to download from the target bucket. The user or user
role must have permission to read and delete from the SQS queue. For information about
adding, managing and changing permissions for IAM users, see the IAM Users documentation. After JSA reads the notification, and
then downloads and processes the target file, the message must be deleted from the
queue.
Sample Policy:
{
"Version": "2012-10-17",
"Statement": [
{
"Sid": "VisualEditor0",
"Effect": "Allow",
"Action": [
"sqs:DeleteMessage",
"sqs:ReceiveMessage",
"s3:GetObject"
],
"Resource": [
"arn:aws:s3:::<bucket_name>/AWSLogs/*",
"arn:aws:sqs:us-east-2:<AWS_account_number>:<queue_name>"
]
}
]
}
You can add multiple buckets to the S3 queue. To ensure that all objects are accessed, you must have a trailing /* at the end of the folder path that you added.
You can add this policy directly to a user, a user role, or you can create a minimal access user with sts:AssumeRole permissions only. When you configure a log source in JSA, configure the assume Role ARN parameter for JSA to assume the role. To ensure that all files waiting to be processed in a single run (emptying the queue) can finish without retries, use the default value of 1 hour for the API Session Duration parameter.
When you use assumed roles, ensure that the ARN of the user that is assuming the rule is in the Trusted Entities for that role. From the Trusted entities pane, you can view the trusted entities that can assume the role. In addition, the user must have permission to assume roles in that (or any) account.
{
"Version": "2012-10-17",
"Statement": [
{
"Sid": "VisualEditor0",
"Effect": "Allow",
"Action": "sts:AssumeRole",
"Resource": "*"
}
]
}
The following image example shows a sample Amazon AWS CloudTrail log source configuration in JSA.
Tip:Use the Amazon AWS S3 REST API log source parameter values for your DSM when you configure your log source.
Figure 4: Example: Amazon AWS CloudTrail log source configuration in JSA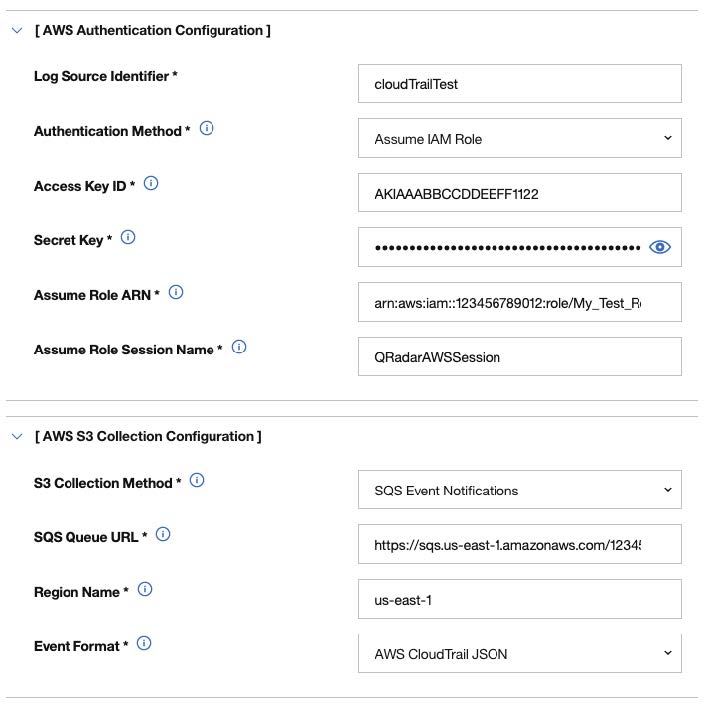
Creating an Identity and Access Management (IAM) User in the AWS Management Console
An Amazon administrator must create a user and then apply the s3:listBucket and s3:getObject permissions to that user in the AWS Management Console. The JSA user can then create a log source in JSA.
The minimum required permissions are s3:listBucket and s3:getObject. You can assign other permissions to the user as needed.
Sample policy:
{
"Version": "2012-10-17",
"Statement": [
{
"Sid": "VisualEditor0",
"Effect": "Allow",
"Action": [
"s3:GetObject",
"s3:ListBucket"
],
"Resource": [
"arn:aws:s3:::<bucket_name>",
"arn:aws:s3:::<bucket_name>/AWSLogs/<AWS_account_number>/<DSM_name>/us-east-1/*"
]
}
]
}
For more information about permissions that are related to bucket operations, go to the AWS documentation website.
- Log in to the AWS Management Console as an administrator.
- Click Services.
- From the list, select IAM.
- Click Users > Add user.
- Create an Amazon AWS IAM user and then apply the AmazonS3ReadOnlyAccess policy.
Configuring Security Credentials for your AWS User Account
Amazon AWS S3 REST API Log Source Parameters for Amazon AWS Route 53 when using an SQS Queue
If you want to collect AWS Route 53 Resolver query logs from multiple accounts or regions in an Amazon S3 bucket, add an Amazon AWS Route 53 log source on the JSA Console by using the Amazon AWS S3 REST API protocol and a Simple Queue Service (SQS) queue.
The following table describes the parameters for an Amazon AWS Route 53 log source that uses the Amazon AWS S3 REST API protocol:
|
Parameter |
Value |
|---|---|
|
Log Source type |
Amazon AWS Route 53 |
|
Protocol Configuration |
Amazon AWS S3 REST API |
|
Log Source Identifier |
Type a unique name for the log source. The Log Source Identifier can be any valid value and does not need to reference a specific server. The Log Source Identifier can be the same value as the Log Source Name. If you have more than one Amazon AWS Route 53 log source that is configured, you might want to identify the first log source as awsroute53-1, the second log source as awsroute53-2, and the third log source as awsroute53-3. |
|
Authentication Method |
Access Key ID / Secret Key Standard authentication that can be used from anywhere. For more information about configuring security credentials, see Configuring security credentials for your AWS user account. Assume IAM Role Authenticate with keys and then temporarily assume a role for access. This option is available only when you use the SQS Event Notifications collection method. For more information about creating IAM users and assigning roles, see Creating an Identity and Access Management (IAM) user in the AWS Management Console. |
|
Access Key ID |
If you selected Access Key ID / Secret Key for the Authentication Method, the Access Key ID parameter is displayed. The Access Key ID that was generated when you configured the security credentials for your AWS user account. This value is also the Access Key ID that is used to access the AWS S3 bucket. |
|
Secret Key ID |
If you selected Access Key ID / Secret Key for the Authentication Method, the Secret Key ID parameter is displayed. The Secret Key that was generated when you configured the security credentials for your AWS user account. This value is also the Decret Key ID that is used to access the AWS S3 bucket. |
|
Event Format |
Select LINEBYLINE. The log source collects JSON formatted events. |
|
S3 Collection Method |
Select SQS Event Notifications. |
|
SQS Queue URL |
Enter the full URL, starting with https://, of the SQS queue that is set up to receive notifications for ObjectCreate events from S3. |
|
Region Name |
The region that the SQS Queue or the S3 Bucket is in. Example: us-east-1, eu-west-1, ap-northeast-3 |
|
Use as a Gateway Log Source |
Select this option for the collected events to flow through the JSA traffic analysis engine and for JSA to automatically detect one or more log sources. |
|
Log Source Identifier Pattern |
This option is available when Use as a Gateway Log Source is set to yes. Use this option if you want to define a custom Log Source Identifier for events being processed. This field accepts key value pairs to define the custom Log Source Identifier, where the key is the Identifier Format String, and the value is the associated regex pattern. You can define multiple key value pairs by entering a pattern on a new line. When multiple patterns are used, they are evaluated in order until a match is found and a custom Log Source Identifier can be returned. |
|
Show Advanced Options |
Select this option if you want to customize the event data. |
|
File Pattern |
This option is available when you set Show Advanced Options to Yes. Type a regex for the file pattern that matches the files that you want to pull; for example, .*? \.json\.gz |
|
Local Directory |
This option is available when you set Show Advanced Options to Yes. The local directory on the Target Event Collector. The directory must exist before the AWS S3 REST API PROTOCOL attempts to retrieve events. |
|
S3 Endpoint URL |
This option is available when you set Show Advanced Options to Yes. The endpoint URL that is used to query the AWS REST API. If your endpoint URL is different from the default, type your endpoint URL. The default is http:/s3.amazonaws.com |
|
Use S3 Path-Style Access |
Forces S3 requests to use path-style access. This method is deprecated by AWS. However, it might be required when you use other S3 compatible APIs. For example, the https://s3.region.amazonaws.com/bucket-name/key- name path-style is automatically used when a bucket name contains a period (.). Therefore, this option is not required, but can be used. |
|
Use Proxy |
If JSA accesses the Amazon Web Service by using a proxy, enable Use Proxy. If the proxy requires authentication, configure the Proxy Server, Proxy Port, Proxy Username, and Proxy Password fields. If the proxy does not require authentication, configure the Proxy IP or Hostname field. |
|
Recurrence |
How often a poll is made to scan for new data. When using the SQS event collection method, SQS Event Notifications can have a minimum value of 10 (seconds). Because SQS Queue polling can occur more often, a lower value can be used. Type a time interval to determine how frequently the poll is made for new data. The time interval can include values in hours (H), minutes (M), or days (D). For example, 2H = 2 hours, 15M = 15 minutes, 30 = seconds. |
|
EPS Throttle |
The maximum number of events per second that are sent to the flow pipeline. The default is 5000. Ensure that the EPS Throttle value is higher than the incoming rate or data processing might fall behind. |
For more information about the Amazon AWS S3 REST API protocol, see Amazon AWS S3 REST API Protocol Configuration Options.