
Adopt Apstra Edge in Data Center Assurance
For Data Center Assurance to connect to Apstra Data Center Director through Apstra Edge, you need to adopt Apstra Edge in Data Center Assurance. After Apstra Edge is adopted successfully, Data Center Assurance generates a registration code for the edge. This registration code can be used only once and must be configured in Apstra Data Center Director to complete edge registration.
The edge registration code is for one-time use only. After the Apstra Edge registers with Data Center Assurance on first boot, the code is no longer valid. After the first reboot, Apstra uses a stored secret.
The docker container on which the edge runs can be installed anywhere in the data center - either on the same virtual machine (VM) on which Apstra is running or on a different VM. If edge is installed on the same VM as Apstra is installed, you need to take care during upgrades to ensure that the edge installation is not removed.
After the edge is initialized and configured, the status of the edge will be displayed in Data Center Assurance as Registered. The Cloud Connectivity status indicates that the edge is connected with the cloud and Apstra Connectivity status indicates that the edge is connected with Apstra Controller. That is, you can monitor the connectivity status between Data Center Assurance and Apstra Edge, and between Apstra Edge and Apstra from the Data Center Assurance UI without having to access Apstra.
To adopt Apstra Edge:
- Log in to HPE Mist Networking Data Center Assurance and select your organisation if prompted.
- Navigate to the DC Edges page.
Click Adopt Apstra Edge.
The Adopt Apstra Edge wizard opens.
The Adopt Apstra Edge wizard guides you through each step of the Edge onboarding workflow.
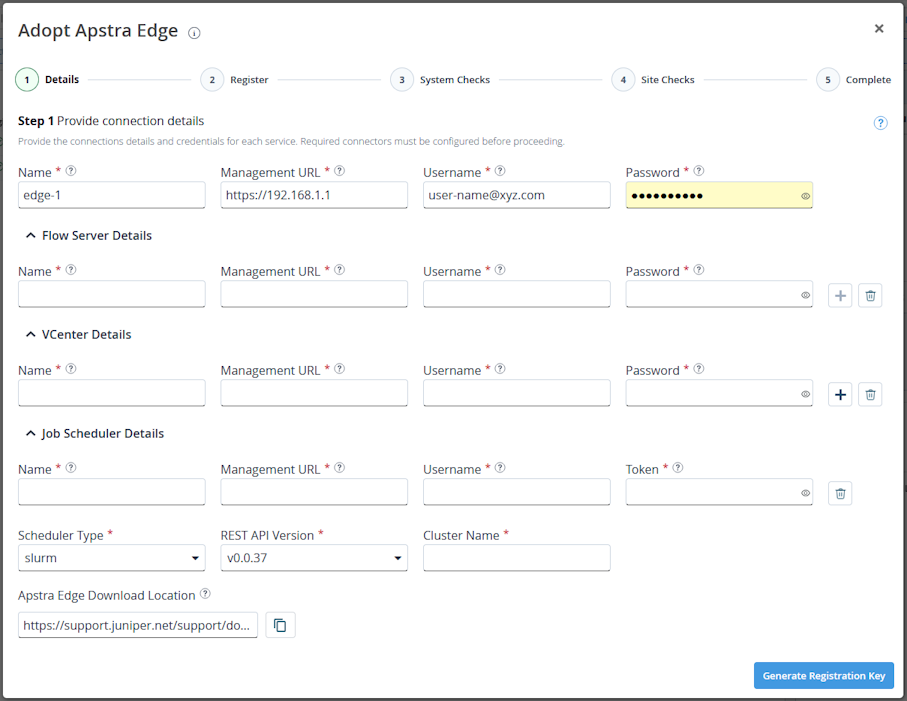
Step 1 Enter Apstra Edge Details
Provide details about the Apstra Edge connections.
Step 2 Register the Apstra Edge on Data Center Director
Before you can receive data in Data Center Assurance, Apstra Edge must be installed and registered with your Apstra Data Center Director instance.
A key is generated in order to register the Apstra Edge on your Data Center Director instance. Copy this registration key and follow the steps below.
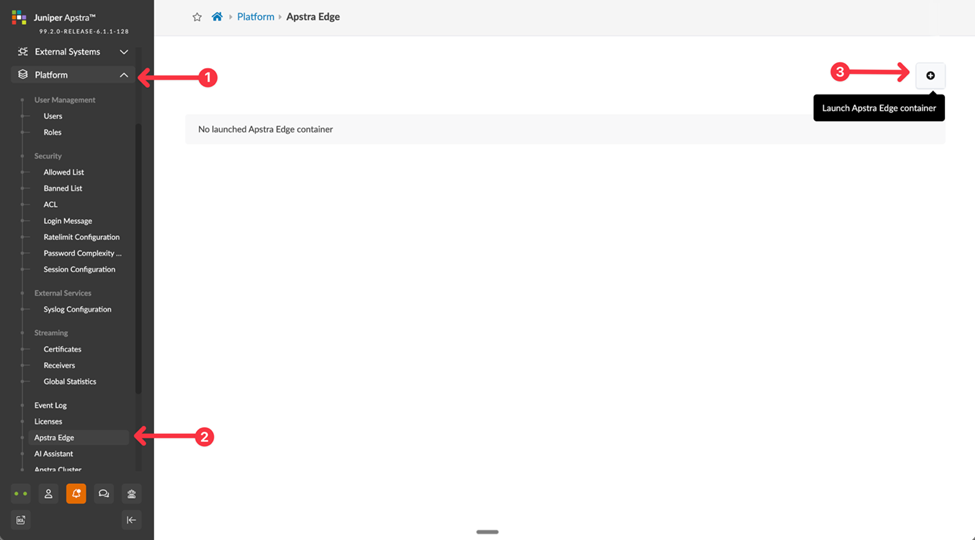
-
Navigate to Platform>Apstra
Edge.
Figure 2: Register Apstra Edge on Data Center Director
-
Leave all other fields at their default values and click
Create.
This action registers the Apstra Edge device using the Edge version included in the Data Center Director install package.
Figure 3: Registration Key for Apstra Edge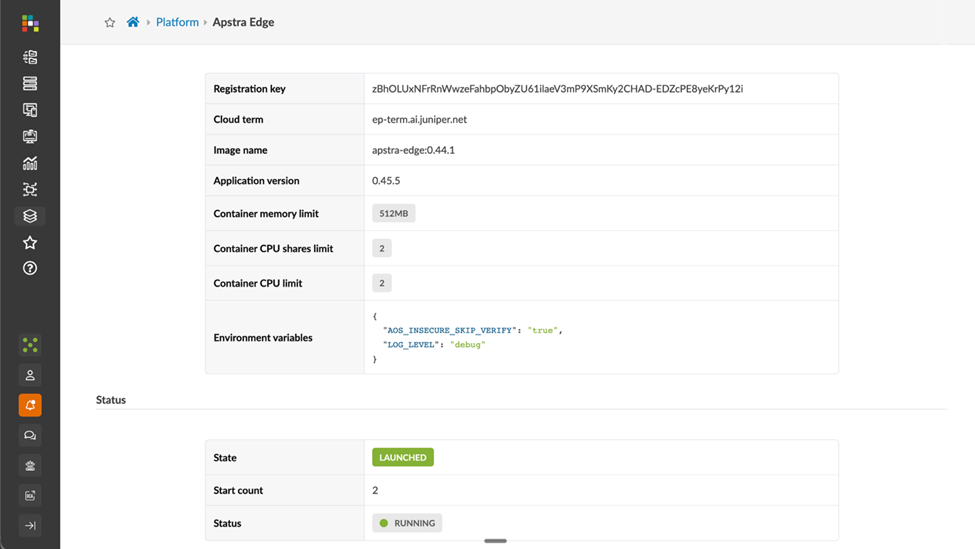 Note:
Note:If you enter an incorrect registration key, you must delete the Apstra Edge from Data Center Assurance and restart the onboarding process.
-
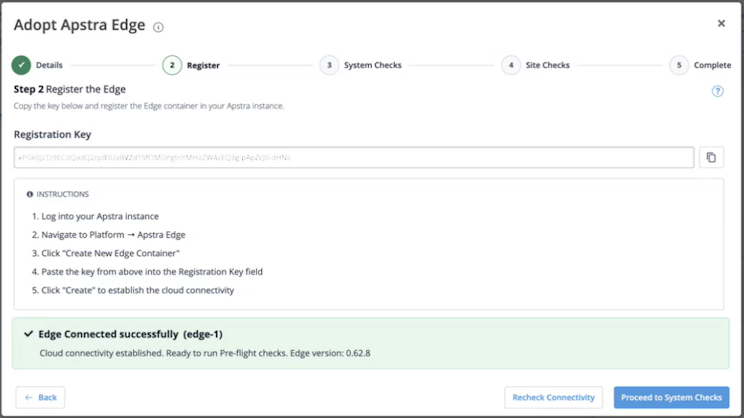
Return to the Adopt Apstra Edge wizard on Data Center Assurance. After the
Edge has been successfully registered on Data Center Director, a message is
displayed confirming cloud connectivity.
Figure 4: Apstra Edge Registration
A site corresponding to the blueprint deployed in the data center is created on the Sites page.
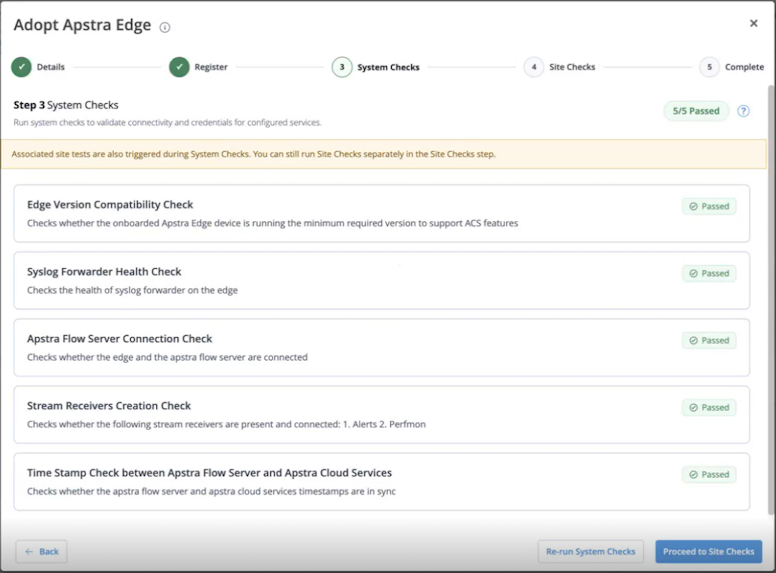
Step 3 Run System Checks on the Apstra Edge (Optional)
The pre-flight checks feature verifies whether certain prerequisites and configuration requirements are met, and provides actionable guidance on how to resolve potential issues.
In this step, run pre-flight checks on the Edge level to verify whether the configuration requirements for the Apstra Edge are met.
-
Running System Checks is an optional step. Click Skip to skip the Edge-level pre-flight check and go to the next step.
-
The onboarded Apstra Edge must be running version 0.44.1 or above to run pre-flight checks.
-
Once all the system checks pass, click Proceed to Site
Checks.
Figure 5: System Checks on Apstra Edge
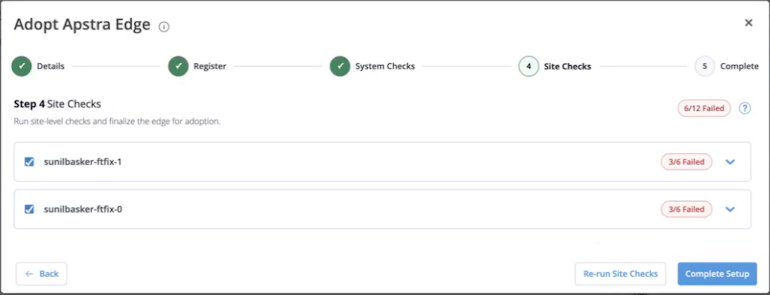
Step 4 Run Site Checks on the Blueprints (Optional)
Run pre-flight checks on the blueprint level to verify whether the configuration requirements for the sites are met.
-
Running Site Checks is an optional step. Click Skip to skip the site-level pre-flight check and go to the next step.
-
The onboarded Apstra Edge must be running version 0.44.1 or above to run pre-flight checks.
-
Once all the site checks pass, click Complete
Setup.
Figure 6: Site Checks on Blueprints
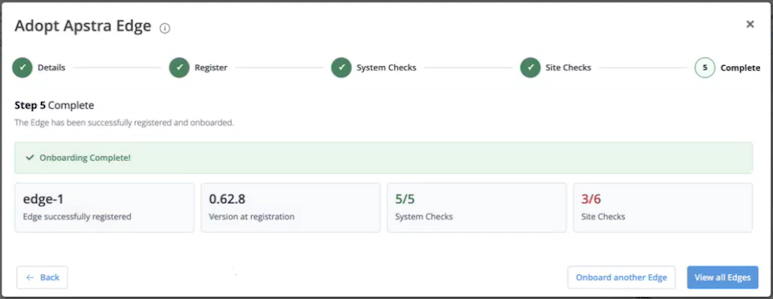
Step 5 Complete Edge Adoption
Verify that the Edge configuration is completed correctly.
-
The wizard displays the registration status of the Edge, the Edge version,
and the pass/fail results of the system and site checks. Click the cards to
go back to any of the steps as required.
Figure 7: Edge Adoption Complete
Manage Onboarded Apstra Edges
The DC Edges page displays the list of onboarded Edge devices along with their version and connection details.
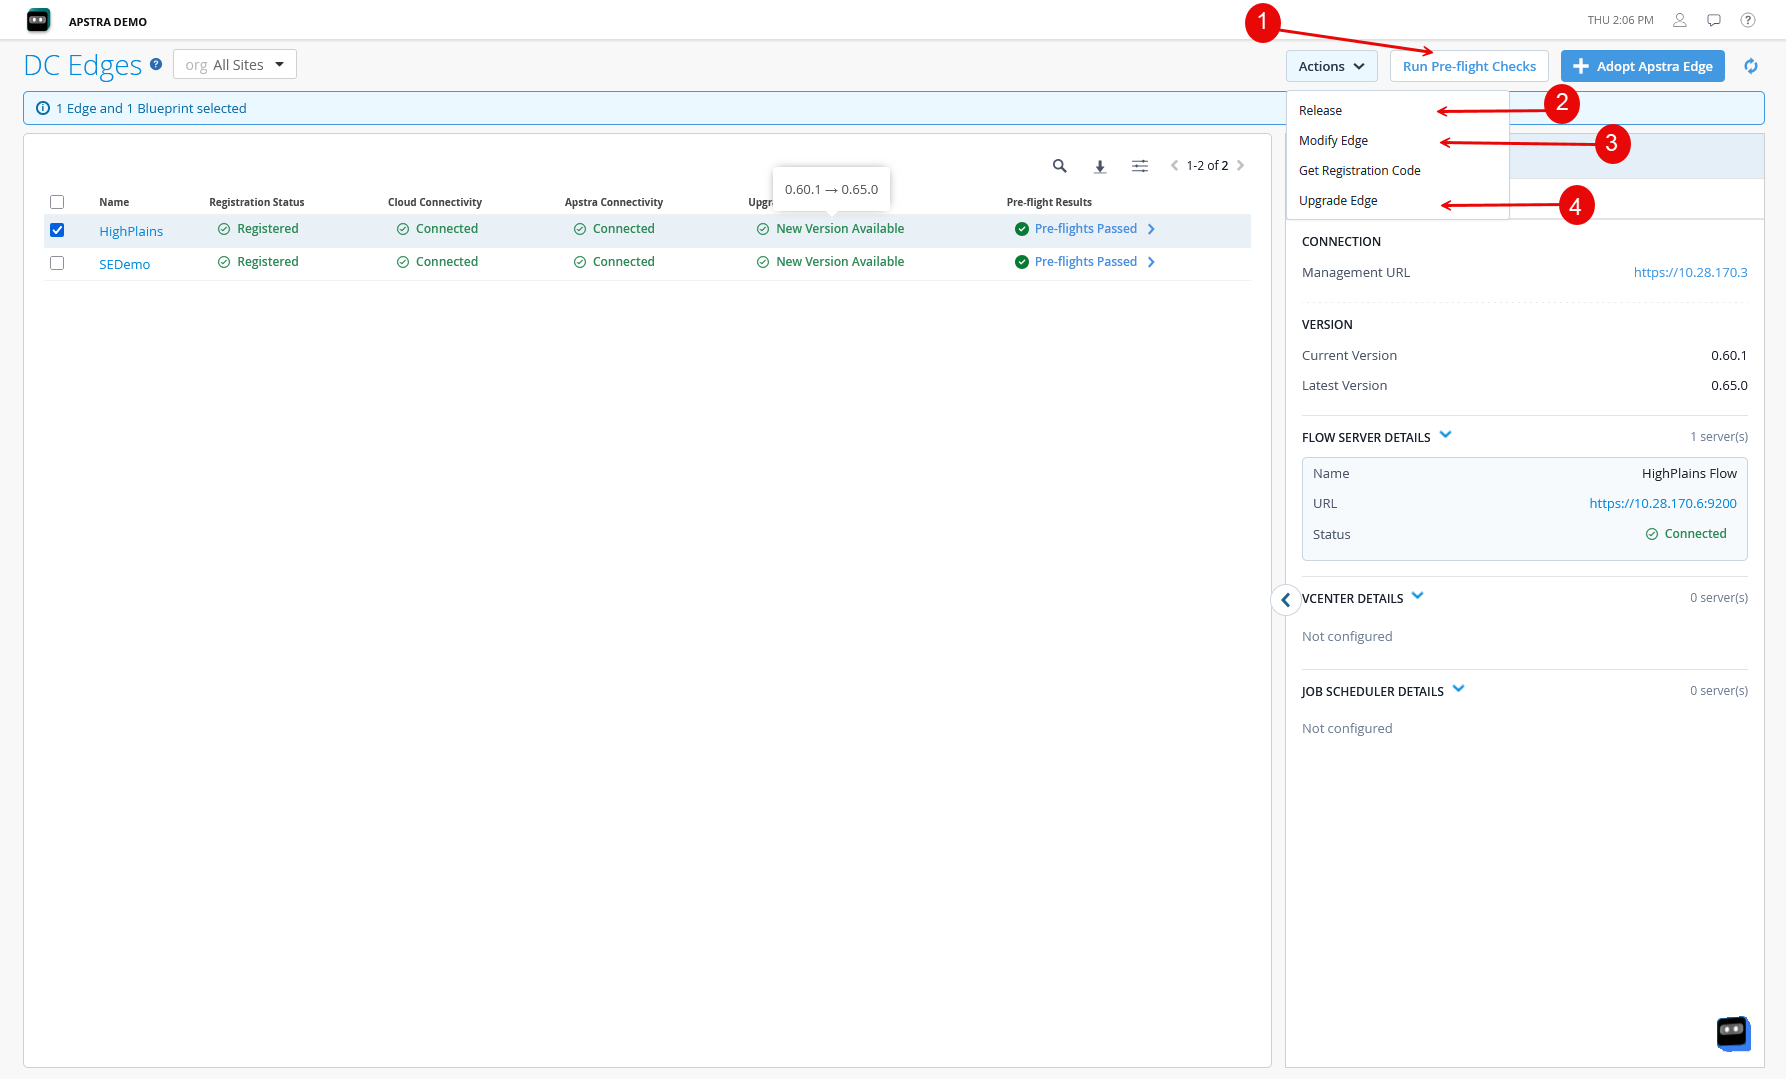
After an Apstra Edge has been onboarded, Data Center Assurance allows you to perform the following actions:
Run Pre-flight Checks
You can run the pre-flight checks at any point after onboarding. To run pre-flight checks on an adopted Edge, select the Edge device or blueprint from the DC Edges page and click Run Pre-flight Checks. For more information, see Pre-Flight Checks.
Delete Apstra Edge
To delete an adopted Edge, select the Edge from the DC Edges page, click Actions>Release.
The Confirm Release dialog box appears with a pre-deletion check list of configured DC Hub content packs or Marvis Minis. Ensure that you do not want to retain these configurations before proceeding with deletion. If there are no content packs or Marvis Minis configurations found, you can click Release to delete the Apstra Edge.
Deleting the adopted Edge from Data Center Assurance also removes the connectivity with edge. Once the Edge is deleted, the action is not reversible and Data Center Assurance will not be able to receive information from Data Center Director. To resume receiving information, you must perform the Edge onboarding process again.
Modify Apstra Edge
To modify an adopted Edge, select the Edge from the DC Edges page, click Actions>Modify Edge.
The Modify Apstra Edge dialog box opens with the Edge connection details. Modify the fields as necessary and click Modify. The onboarded Apstra Edge will be updated with the modified connection details.
Upgrade Apstra Edge
When an Edge is registered and onboarded for the first time, it runs the latest version of Edge available in the Data Center Director install package. Ensure that the Edge version is up-to-date to use the latest Data Center Assurance features.
The Upgrade Status column displays New Version Available when a higher Edge version is available. To perform a remote Edge upgrade on an adopted Edge, select the Edge device or blueprint from the DC Edges page and click Upgrade Edge. For more information, see Upgrade Apstra Edge from Data Center Assurance.
Note:The install package of every new Data Center Director release includes the latest Edge version as on the day of the release. When you upgrade the Data Center Director instance, the Edge version is automatically upgraded to the version available in the Data Center Director install package.
For Apstra Edge version 0.63.0 or later, the Edge service may generate and clean
up temporary files in the container's /tmp directory during
normal operation. Ensure that /tmp is configured to be a
disk-backed filesystem and not as a memory-backed filesystem (tmpfs).