How to Install Contrail Command and Provision Your Contrail Cluster
Use this document to install Contrail Command—the graphical user interface for Contrail Networking—and provision your servers or VMs as nodes in a Contrail cluster. Servers or VMs are provisioned into compute nodes, control nodes, orchestrator nodes, Contrail Insights nodes, Contrail Insights Flows nodes, or service nodes to create your Contrail cluster using this procedure.
Contrail Insights and Contrail Insights Flows were previously named Appformix and Appformix Flows.
When to Use This Document
We strongly recommend Contrail Command as the primary interface for configuring and maintaining Contrail Networking.
You should, therefore, complete the procedures in this document as an initial configuration task in your Contrail Networking environment.
Server Requirements
A Contrail Networking environment can include physical servers or VMs providing server functions, although we highly recommended using physical servers for scalability and availability reasons whenever possible.
Each server in a Contrail environment must have a minimum of:
64 GB memory.
300 GB hard drive.
4 CPU cores.
At least one Ethernet port.
For additional information on server requirements for Contrail Networking, see Server Requirements and Supported Platforms.
Software Requirements
Contrail Command and Contrail Networking
Contrail Command and Contrail Networking are updated simultaneously and always run the same version of Contrail Networking software.
Each Contrail Networking release has software compatibility requirements based on the orchestration platform version, the deployer used to deploy the orchestration platform, the supported server operating system version, and other software requirements.
For a list of supported platforms for all Contrail Networking releases and additional environment-specific software requirements, see Contrail Networking Supported Platforms List.
Contrail Insights and Contrail Insights Flows
Starting in Contrail Release 2005, the Contrail Insights and Contrail Insights Flows images that support a Contrail Networking release are automatically provisioned within Contrail Command. When you download your version of Contrail Command, Contrail Command pulls the Contrail Insights and Contrail Insights Flows images for your Contrail Networking version automatically from within the Juniper Contrail registry. You do not, therefore, need to separately download any individual Contrail Insights software or have awareness of Contrail Insights or Contrail Insights version numbers for your installation.
How to Obtain Contrail Images
The procedures used in this document download the Contrail Command, Contrail Insights, and Contrail Insights Flows software from the Juniper Networks Contrail docker private secure registry at hub.juniper.net. Email mailto:contrail-registry@juniper.net to obtain access credentials to this registry.
You will need to know the Container Tags for your Contrail image to retrieve Contrail images from the Contrail registry. See README Access to Contrail Registry 21XX.
Contrail Networking images are also available at the Contrail Downloads page. Enter Contrail Networking as the product name.
Contrail Insights and Contrail Insights Flows images are also available at the Contrail Insights Download page. Enter Contrail Insights as the product name.
How to Install Contrail Command
Contrail Command is a single pane-of-glass GUI interface for Contrail Networking. For an optimized Contrail Networking experience, we strongly recommend installing Contrail Command before creating your Contrail clusters. Contrail Command is installed using these instructions.
For additional information on Contrail Command, see Understanding Contrail Networking Components.
- Before You Begin
- Preparing Your Contrail Command Server for the Installation
- Installing Contrail Command
Before You Begin
Ensure your Contrail Command server—the server that will host Contrail Command—is a virtual machine (VM) or a physical x86 server that meets these minimum system requirements:
4 vCPUs
32 GB RAM
100 GB disk storage with all user storage in the “/” partition.
If the “/home” partition exists, remove it and increase the “/” partition by the amount of freed storage.
Meets the specifications listed in Server Requirements.
Runs a version of CentOS that supports your version of Contrail Networking.
For a list of CentOS versions that are supported with Contrail Networking and orchestration platform combinations, see Contrail Networking Supported Platforms List.
You can install CentOS with updated packages using the
yum updatecommand.Has access to the Contrail Container registry at hub.juniper.net. This access is needed because the Contrail Command deployer, which includes the Contrail Command docker images, is retrieved from this registry during this installation procedure.
If you do not have access to the Contrail Container registry, email mailto:contrail-registry@juniper.net to obtain access credentials. See README Access to Contrail Registry 21XX for additional information about accessing this registry.
Has an active connection to the Internet.
Includes at least one active IP interface attached to the management network. Contrail Command manages Contrail and orchestrator clusters over a management IP interface.
Obtain the container tag for the release that you are installing. A container tag is necessary to identify the Contrail Command container files in the hub.juniper.net repository that are installed during this procedure.
The container tag for any Contrail Release 21-based image can be found in README Access to Contrail Registry 21XX.
Preparing Your Contrail Command Server for the Installation
To prepare your servers or VMs for the installation:
Installing Contrail Command
To install Contrail Command onto a server:
How to Provision Servers into the Contrail Cluster
Use this procedure to provision servers into your Contrail cluster. A Contrail cluster is a collection of interconnected servers that have been provisioned as compute nodes, control nodes, orchestrator nodes, Contrail Insights nodes, Contrail Insights Flows nodes, or service nodes in a cloud networking environment.
Before You Begin
Before you begin:
Plan your topology.
Ensure an out-of-band management network is established.
Ensure Contrail Command is installed. See How to Install Contrail Command.
Ensure all servers hosting Contrail cluster functions meet the specifications listed in Server Requirements.
How to Provision the Contrail Cluster
To provision the Contrail cluster:
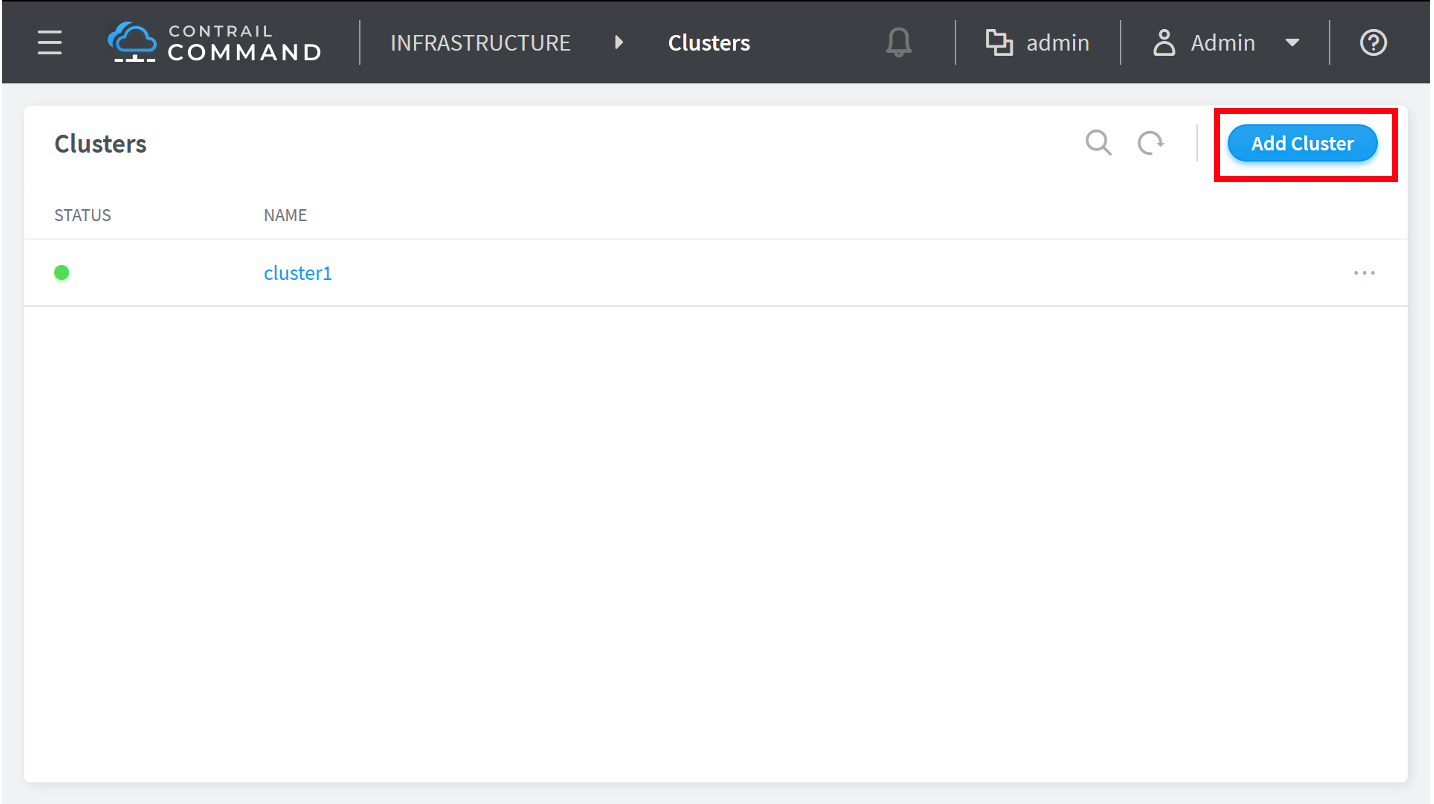
- You are placed into the Infrastructure > Clusters menu upon login. Click the Add Cluster button to start the cluster provisioning
process.Figure 1: Clusters
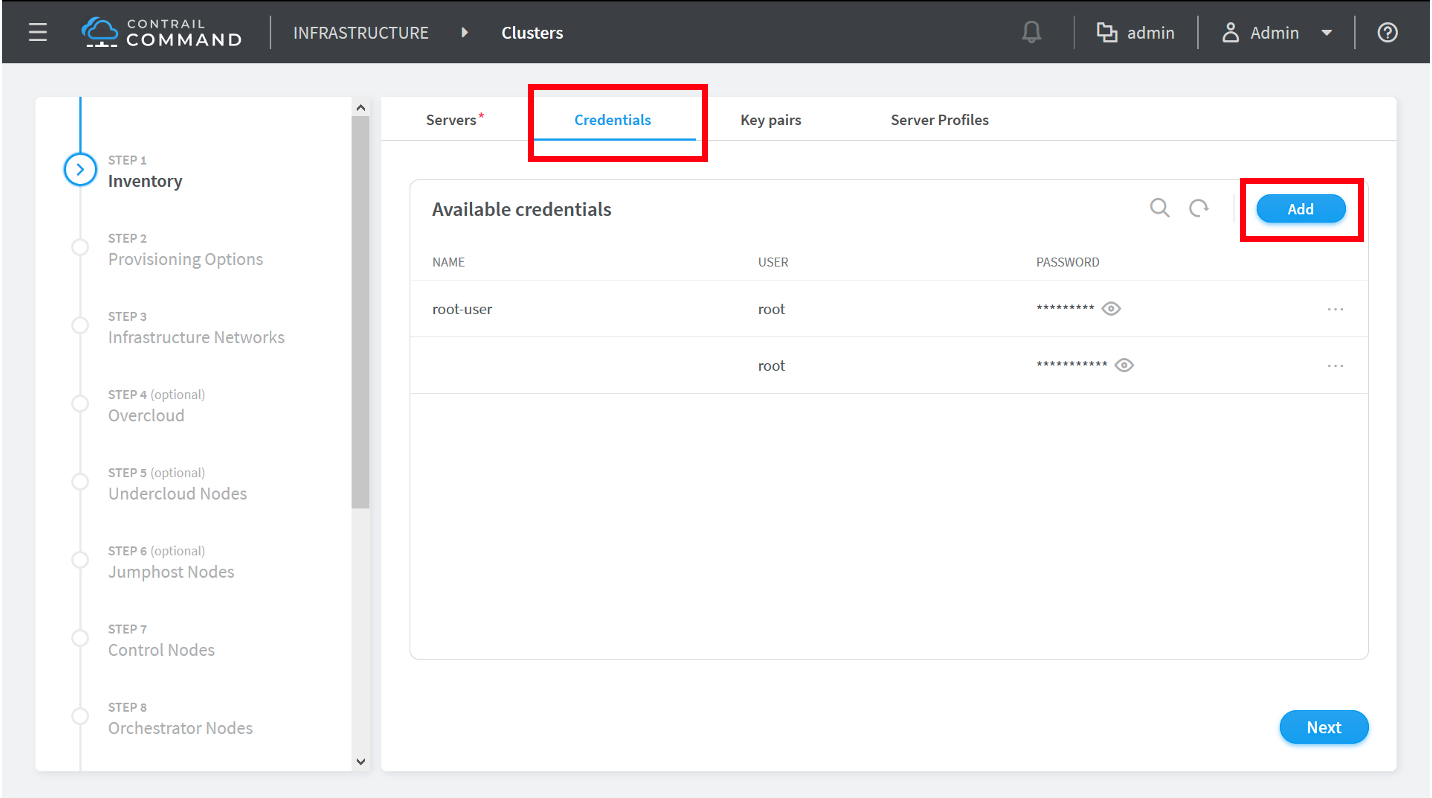
- Click the Credentials tab to
move to the Credentials box, then the Add button to add access credentials for a device that
will be added to the cluster.Figure 2: Available Credentials
- In the Add box, add the access
credentials for a device in your cluster. Click the Add button to complete the process and add the access credentials.Figure 3: Add Dialog
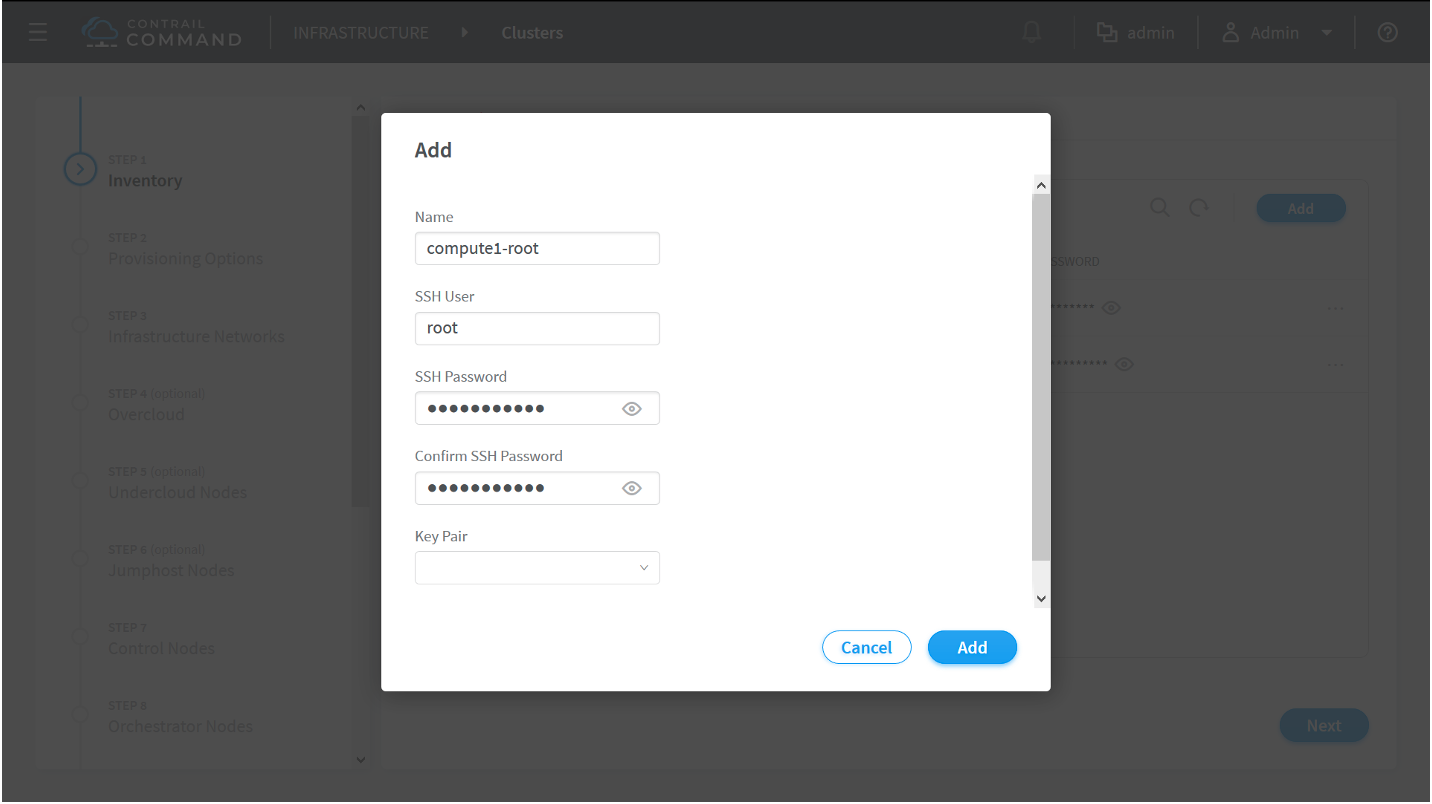
Repeat steps 4 and 5 to add the access credentials for each server or VM in your cluster.
- Click the Add button in the Available Servers box.Figure 4: Available Servers
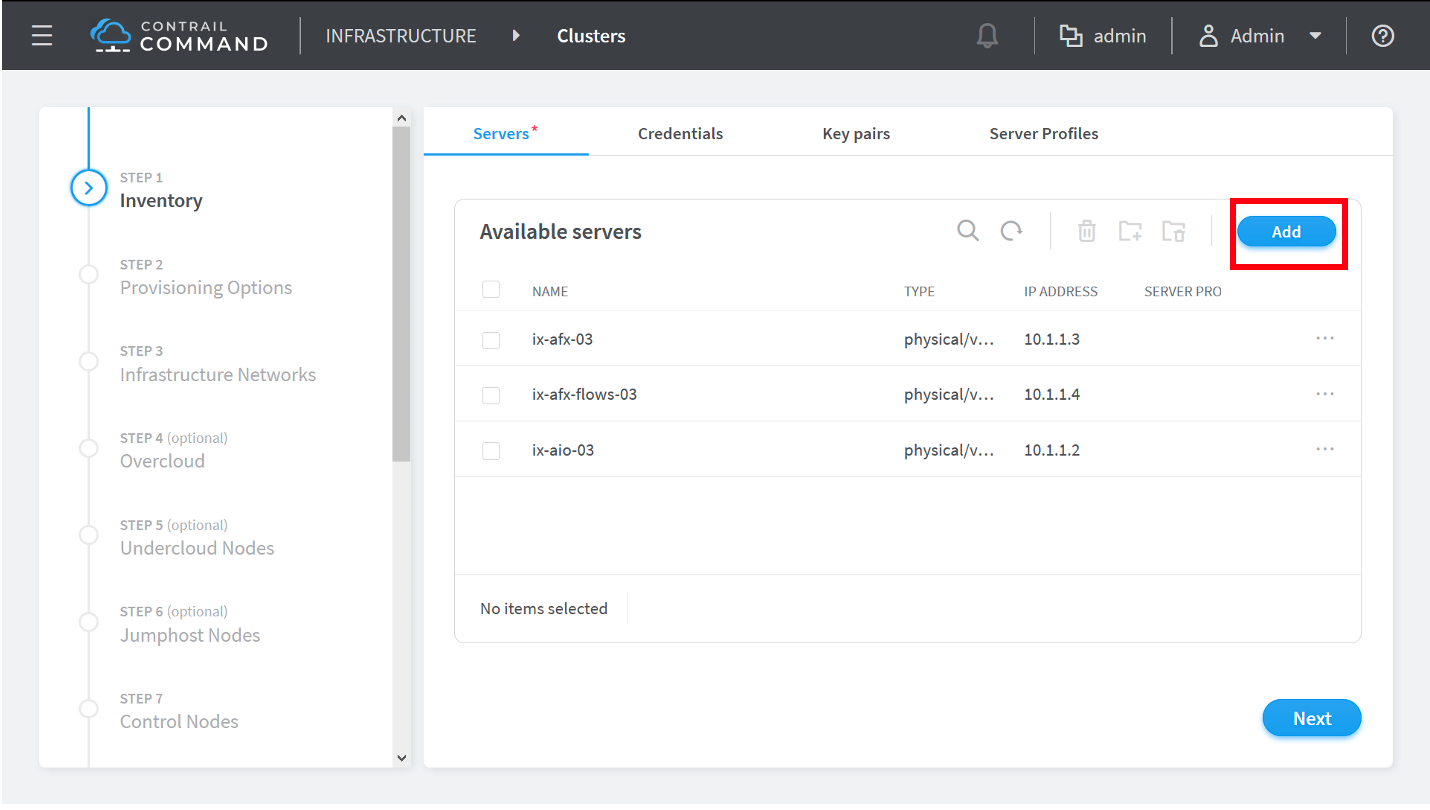
The Create Server dialog box appears.
- Complete the fields in the Create Server dialog box for each physical server or
VM in your Contrail cluster. Each physical server or VM that will
function as a compute node, control node, orchestrator node, Contrail
Insights node, Contrail Insights Flows node, or service node in your
cluster must be added as a server at this stage of the provisioning
process.Figure 5: Create Server
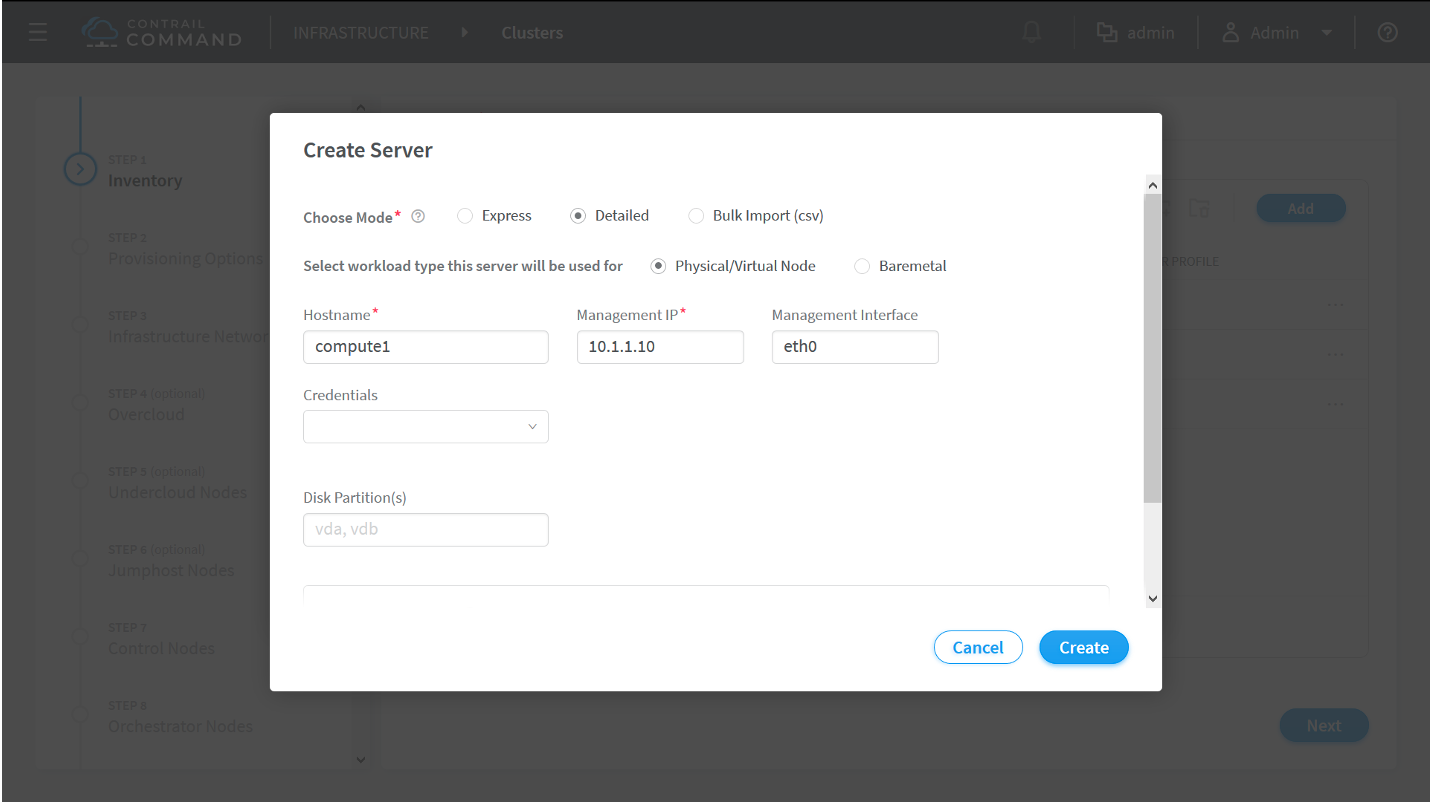
Field descriptions:
Choose Mode—Options include: Express, Detailed, or Bulk Import (CSV). We recommend using the Detailed or Bulk Import (CSV) modes in most environments to ensure all server field data is entered and to avoid performing manual configuration tasks later in the procedure.
Express—includes a limited number of required fields to enter for each server or VM.
Detailed—provides all fields to enter for each server or VM.
Bulk Import (CSV)—Import the physical server or VM fields from a CSV file.
Select workload type this server will be used for
Physical/Virtual Node—A virtualized physical server or a VM. This is the option used for most servers or VMs in Contrail Networking environments.
Baremetal—A non-virtualized server.
Hostname—the name of the physical server or VM.
Management IP—the management IP address of the physical server or VM.
Management Interface—the name of the management-network facing interface on the physical server or VM.
Credentials—Select any credentials that appear in the drop-down menu.
Disk Partition(s)—(Optional) Specify the disk partitions that you want to use.
This field is often left blank.
Name (Network interfaces)—the name of a network-facing interface on the physical server or VM.
IP Address (Network interfaces)—the IP address of the network-facing interface on the physical server or VM.
Click Add in the Network Interfaces box to add additional network interfaces for the server or VM.
Click the Create button after completing all fields to add the server or VM.
Repeat this step for each physical server or VM that will function as a compute node, control node, orchestrator node, Contrail Insights node, Contrail Insights Flows node, or service node in the Contrail cluster.
- You are returned to the Infrastructure > Clusters > Servers menu after adding the final server. Click the Next button to proceed to the Provisioning Options page.Figure 6: Available Servers

- Complete the fields
on the Provisioning Options page.Figure 7: Provisioning Options
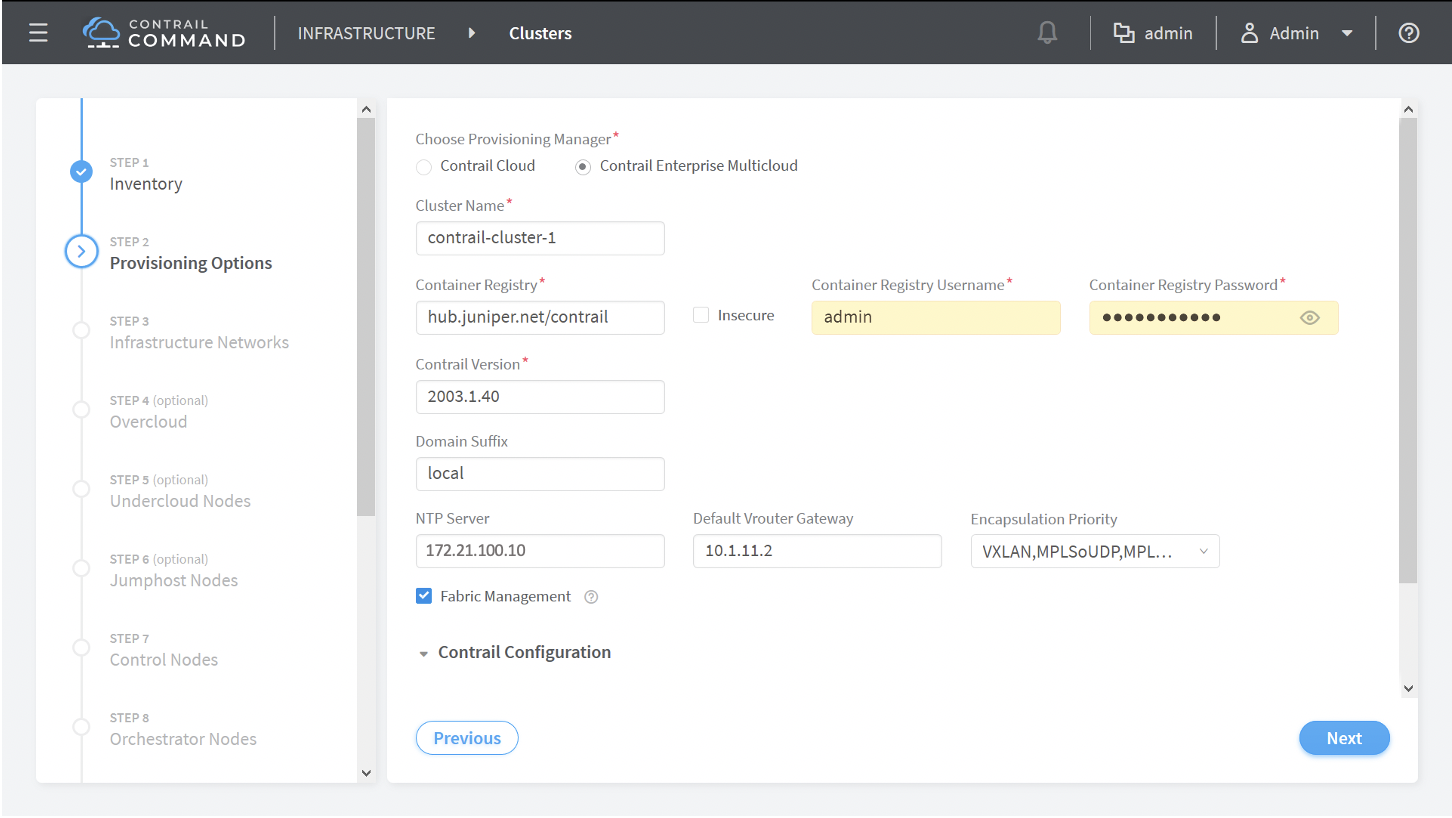
Field Descriptions:
Choose Provisioning Manager
Contrail Cloud—Contrail Cloud Provisioning Manager. Do not use this provisioning manager option.
Contrail Enterprise Multicloud—(Default) Contrail Enterprise Multicloud Provisioning Manager. Select Contrail Enterprise Multicloud as your provisioning manager.
The remaining steps of this procedure assume Contrail Enterprise Multicloud is selected as the provisioning manager.
Cluster Name—Name the Contrail cluster.
Container Registry—Path to the container registry to obtain the Contrail Networking image. The path to the Juniper container registry is hub.juniper.net/contrail and is set as the default container registry path. Enter this path or the path to the repository used by your organization.
Insecure checkbox—This option should only be selected if you want to connect to an insecure registry using a non-secure protocol like HTTP.
This box is unchecked by default. Leave this box unchecked to connect to the Juniper container registry at hub.juniper.net/contrail or to access any other securely-accessible registry.
Container Registry Username—Username to access the container registry.
The Juniper container registry is often used in this field to obtain the Contrail Networking image. Email mailto:contrail-registry@juniper.net to receive a registry username and password combination to access the Juniper container registry.
Container Registry Password—Password to access the container registry.
The Juniper container registry is often used in this field to obtain the Contrail Networking image. Email mailto:contrail-registry@juniper.net to receive a registry username and password combination to access the Juniper container registry.
Contrail Version—Specify the version of the Contrail Networking image to use for the upgrade that is in the repository.
You can use the latest tag to retrieve the most recent image in the repository, which is the default setting. You can also specify a specific release in this field using the version’s release tag.
See README Access to Contrail Registry 21XX to obtain the release tag for any Contrail Networking Release 21XX release tag.
Domain Suffix—(Optional) Domain name for the cluster.
NTP Server—The IP address of the NTP server.
Default vRouter Gateway—The IP address of the default vRouter gateway.
This address is typically the IP address of the interface on the leaf device in the fabric that connects to the server’s network-facing interface.
Encapsulation Priority—Select the Encapsulation priority order from the drop down menu.
Select VXLAN, MPLSoUDP, MPLSoGRE in most Contrail Networking environments.
Fabric Management checkbox—Select this option if your deploying in an environment using Openstack for orchestration.
-
To fill the Contrail Configuration details, click Add. This adds the Key-Value pair to the Contrail Configuration section as shown below:
Figure 8: Contrail configuration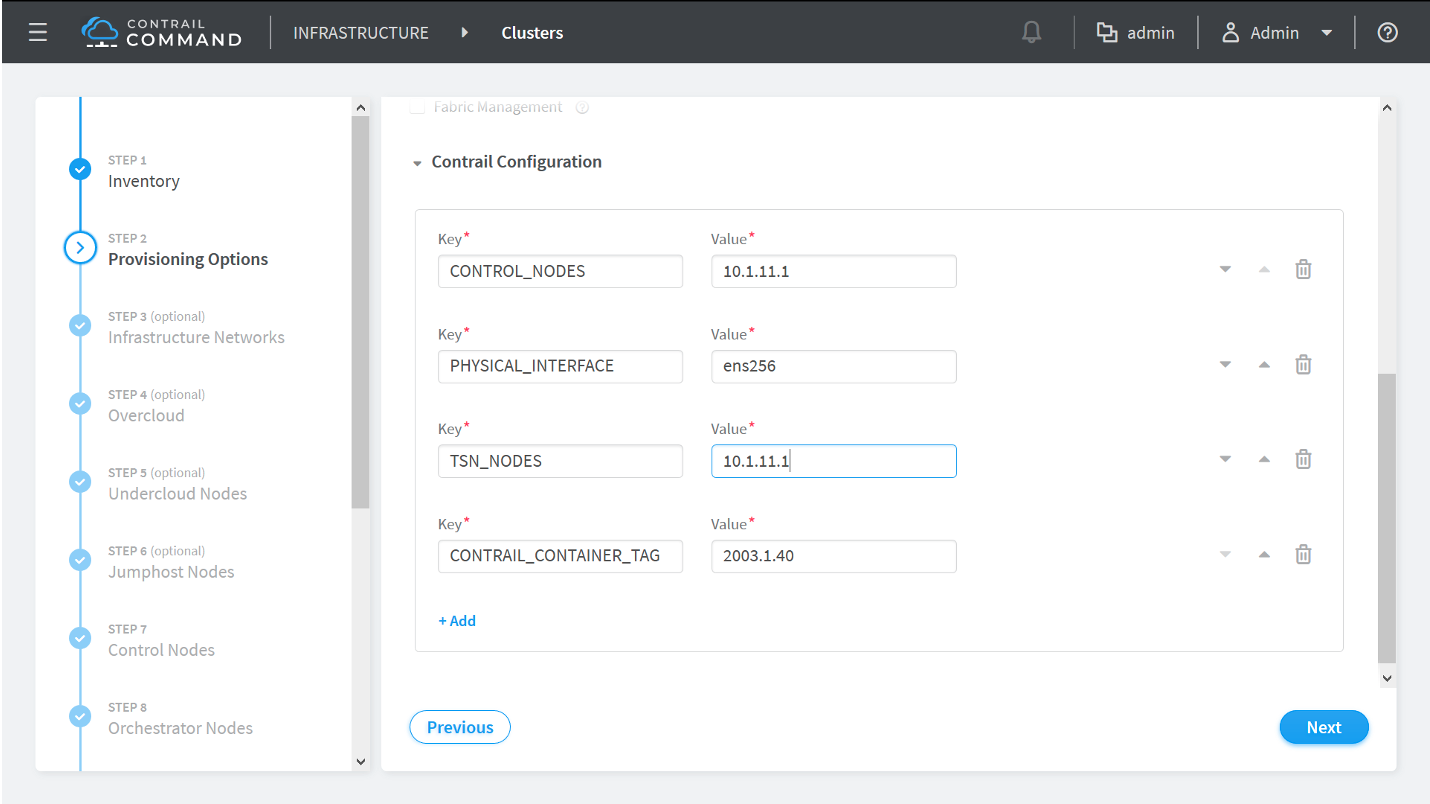
Enter the Key/Value pair details following the table given below:
Table 1: Contrail Configuration Section Key
Value
CONTROL_NODES
List of comma-separated fabric underlay interface IP addresses of the Contrail Control node. For example, using Value as '10.1.11.1' implies you’ll be installing the control node on the Contrail Cluster server. This IP address is therefore the IP address that connects the Contrail Cluster server to the fabric underlay.
PHYSICAL_INTERFACE
Name of the interface that connects to the fabric underlay.
TSN_NODES
This field is 'OPTIONAL'. It specifies the list of comma-separated fabric underlay interface IP addresses of the Contrail Service node. For example, you will be installing the service node, '10.1.11.1' on the Contrail Cluster server. This IP address is therefore the IP address that connects the Contrail Cluster server to the fabric underlay.
CONTRAIL_CONTAINER_TAG
The container tag for the desired Contrail and OpenStack release combination as specified in README Access to Contrail Registry 21XX.
API__DEFAULTS__enable_latency_stats_log
(Optional. Available starting in Contrail Networking Release 2008) Enable logging and storing of latency statistics in Contrail Networking and Contrail Insights for calls to Cassandra, Zookeeper, and Keystone from the API server.
API__DEFAULTS__enable_api_stats_log
(Optional Available starting in Contrail Networking Release 2008) Enable logging and storing of latency statistics and call time statistics in Contrail Networking and Contrail Insights for Rest API calls.
For more information about the key-value descriptions, see the following references:
Click the Next button to proceed to the Control Nodes provisioning page.
- From the Control Nodes provisioning
page, assign any server that you created in step 8 as a control node by clicking
the > icon next to the server to move it
into the Assigned Control Nodes box.
You have the option to remove roles from a control node within the Assigned Control Nodes. There is no need to remove control node roles in most deployments and you should only remove roles if you are an expert user familiar with the consequences.
Figure 9: Assigned Control Nodes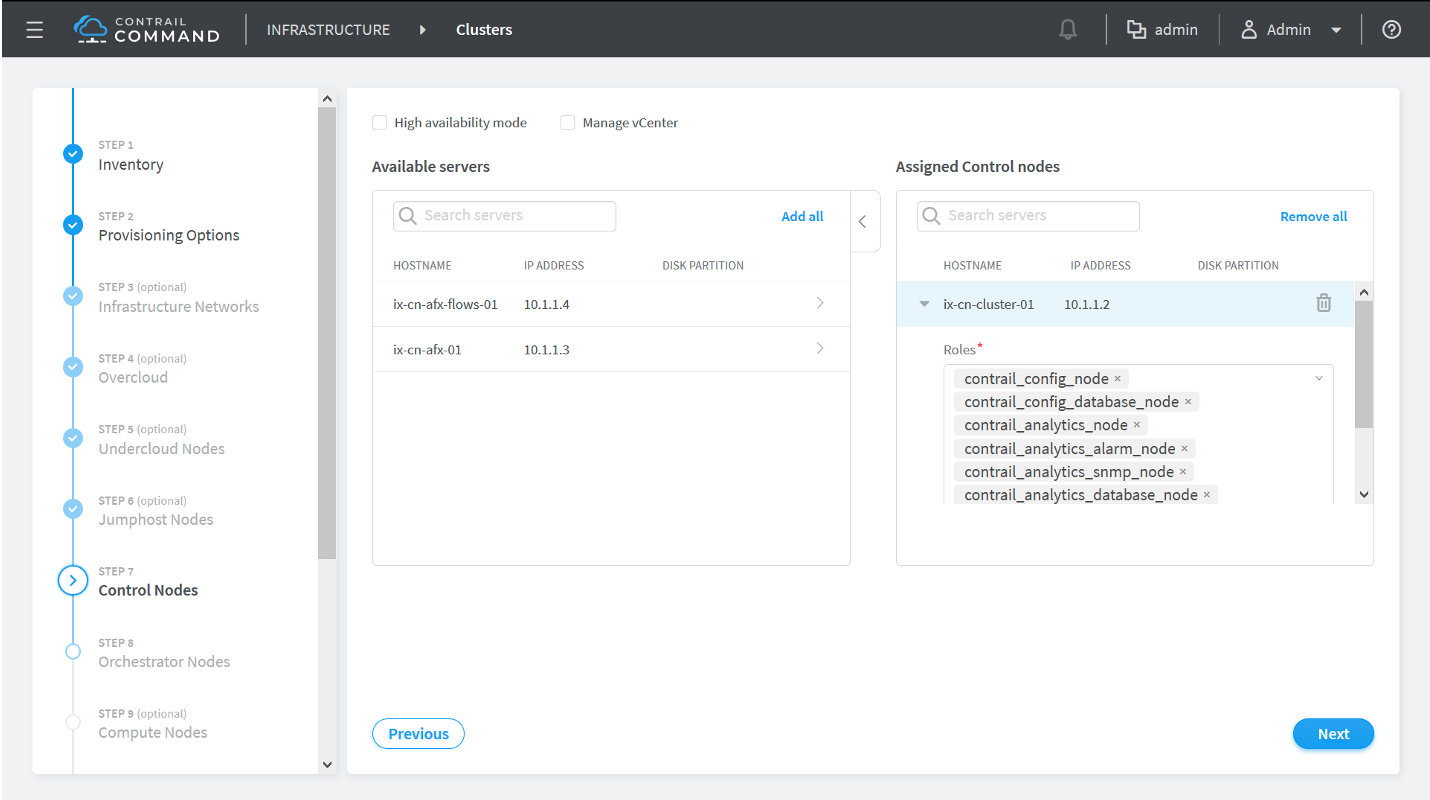
(Installations using VMWare vCenter only) Complete the following steps to install a control node that is integrated with VMware vCenter. For additional information on vCenter integration with Contrail Networking, see Understanding VMware-Contrail Networking Fabric Integration.
Note:Starting from Contrail Networking Release 21.4.L3, Juniper has stopped VMWare support with Contrail Networking.
Prerequisites:
Installed vCenter version 6.5 or later.
Installed ESX version 6.5 or later.
A vCenter license with Distributed Virtual Switch (DVS) support.
Login credentials for vCenter.
To perform the integration:
Select the Manage vCenter check box.
The vCenter Credentials section is displayed.
Enter the following information:
Enter the vCenter IP address in the vCenter IP Address field.
In the Data Center Name field, enter the name of the data center under vCenter that CVFM will work on.
Enter the vCenter username in the Username field.
Enter the vCenter password in the Password field.
Click >, next to the name of the server, to assign a server from the Available Servers table as a control node. The server is then added to the Assigned Control Nodes table.
Note that the
contrail_vcenter_fabric_manager_nodeis added to the list of roles.Click Next.
After assigning all control nodes, click the Next button to move to the Orchestrator Nodes provisioning page.
- Select your orchestration platform from the Orchestrator Type drop-down menu.
Assign any one of the servers that you created in step 8 as an orchestrator node by clicking the > icon next to the server to move it into the Assigned nodes box.
Figure 10: Assigned nodes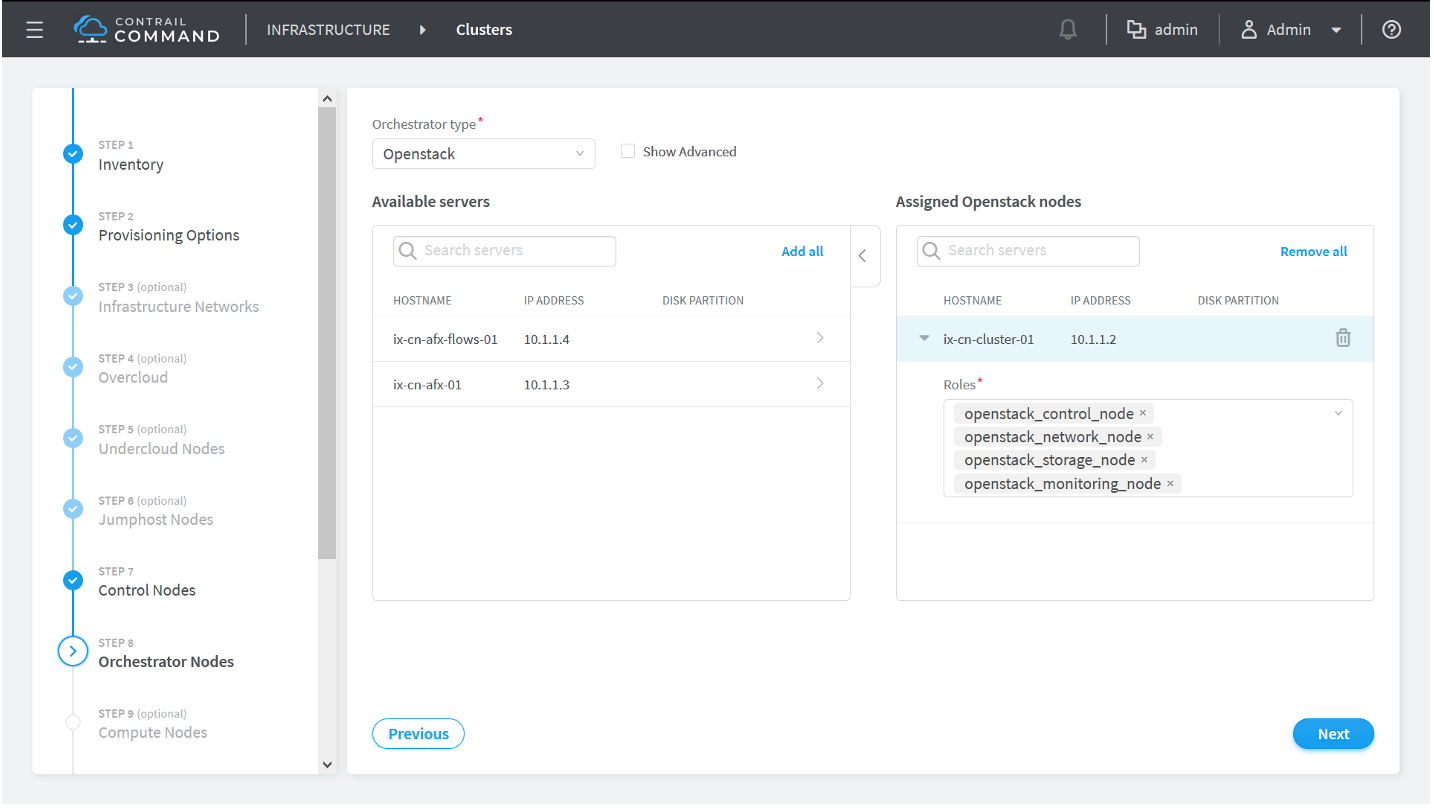
The remaining processes for this step depend on your orchestration platform:
Openstack
Click the Show Advanced box then scroll to Kolla Globals and click +Add.
Add the following Kolla global Key and Value pairs in most environments:
Table 2: Kolla Globals Key Value Pairs Key
Value
enable_haproxy
no
enable_ironic
no
enable_swift
yes
swift_disk_partition_size
20GB
After assigning all orchestrator nodes and Kolla global keys and values, click the Next button to progress to the Compute Nodes provisioning page.
Kubernetes
Select the Kubernetes nodes from the list of available servers and assign corresponding roles to the servers.
By default, the Kubernetes nodes are assigned the kubernetes_master_node, kubernetes_kubemanager_node, and kubernetes_node roles.
After assigning roles to all nodes, click the Next button to progress to the Compute Nodes provisioning page.
- Assign any server that you created in step 8 as a compute node by clicking
the > icon next to the server to move it
into the Assigned Compute nodes box.
Enter the default vRouter gateway IP Address in the Default Vrouter Gateway box after moving the server into the Assigned Compute nodes box.
Figure 11: Assigned Compute nodes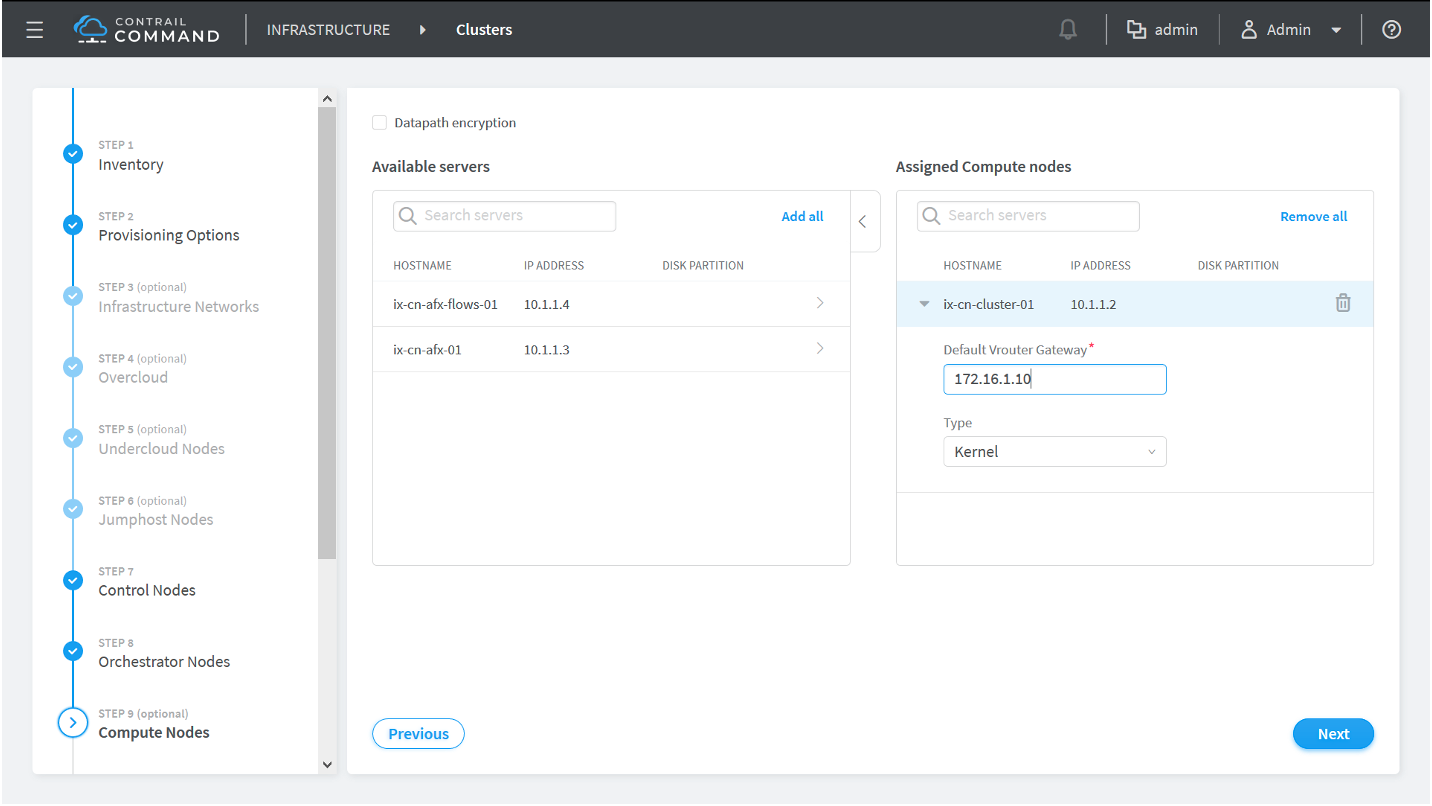
After assigning all compute nodes, click the Next button to progress to the Contrail Service Nodes provisioning page.
- Contrail Insights Flows is an optional product that isn’t
used in all environments. If your are not using Contrail Insights
Flows in your environment, simply click the Next button without assigning a server as an Appformix Flows node in
this step.Note:
Appformix Flows was renamed Contrail Insights Flows. The Appformix Flows naming is still used on this Contrail Command page.
If you are using Contrail Insights Flows in your environment, make the following configuration selections:
Appformix Flows Node Provisioning Type:
Out-of-Band—(Default) The Appformix Flows node is managed from an out-of-band management network.
In-Band—The Appformix Flows node is managed from an in-band connection.
Virtual IP Address—The virtual IP address management address on the Appformix Flows node that connects the node to the management network.
(Contrail Insights and Contrail Insights Flows on same server only) Starting in Contrail Networking Release 2008, you can enable Contrail Insights and Contrail Insights Flows on the same server node.
Perform these steps if you are enabling Contrail Insights and Contrail Insights Flows on the same node:
- From the AppFormix Flows Configuration Parameters box, click the +Add option to open the Key and Value configuration
options.
Add the following key value pairs:
Key: health_port
Value: 8205
Key: kafka_broker_port
Value: 9195
Key: zookeeper_client_port
Value: 3281
Key: redis_port
Value: 6479
Figure 12: AppFormix Flows Configuration Parameters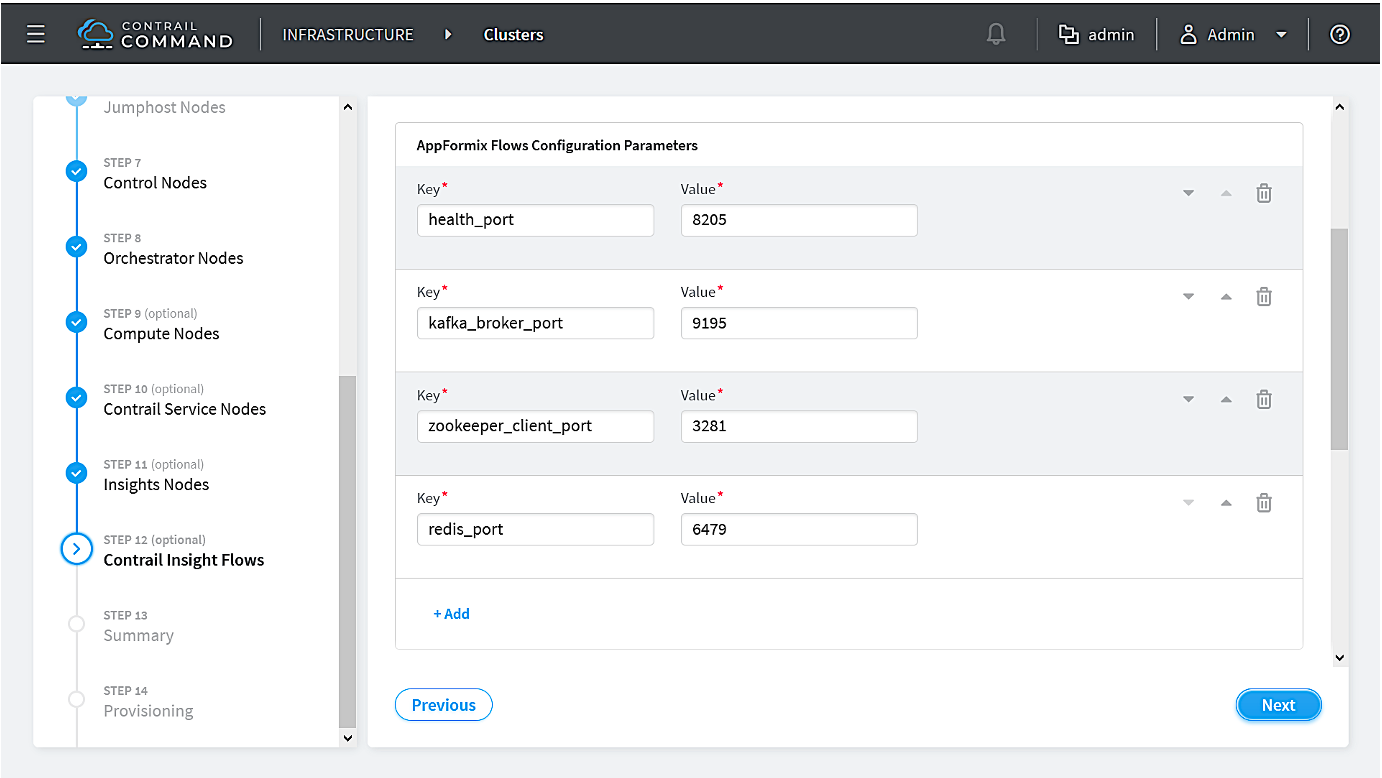
Click the > icon next to the server or VM in the Available servers box to move it into the Assigned AppFormix Flows Nodes box.
Figure 13: Available servers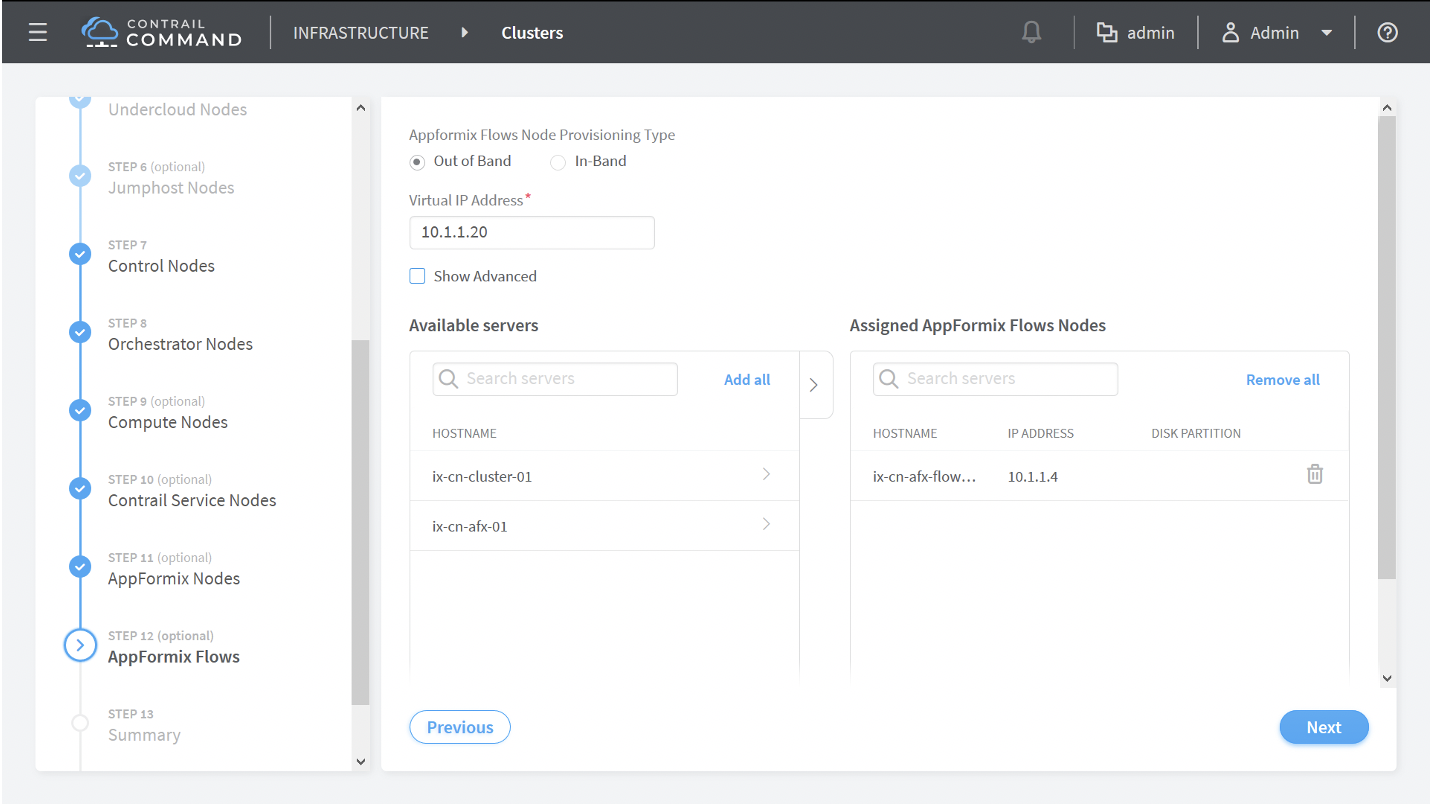
Click the Next button to progress to the Summary page.
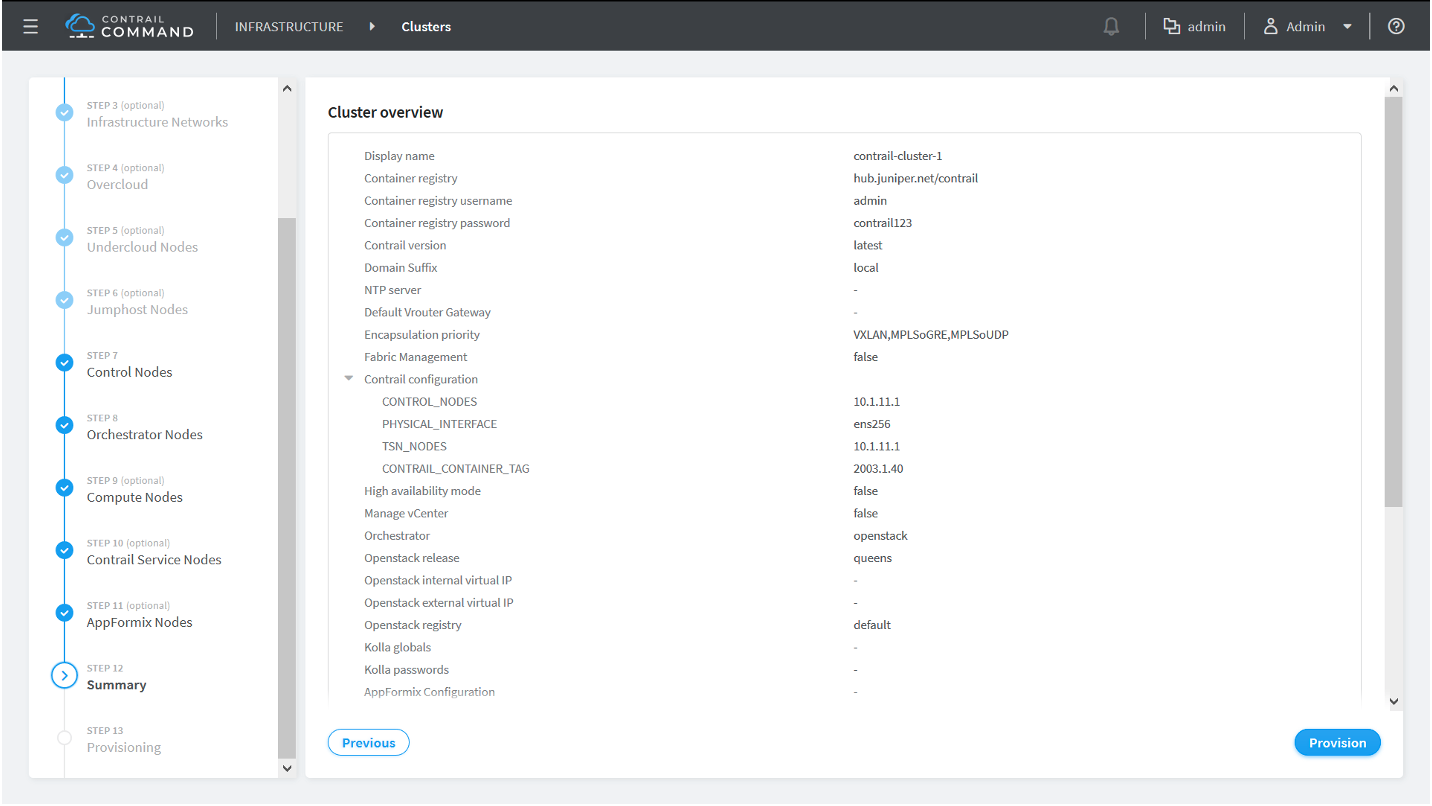
- Review your settings in the Cluster overview screen.Figure 14: Cluster Overview
Click any tab in the Nodes Overview box to review any configuration.
Figure 15: Nodes Overview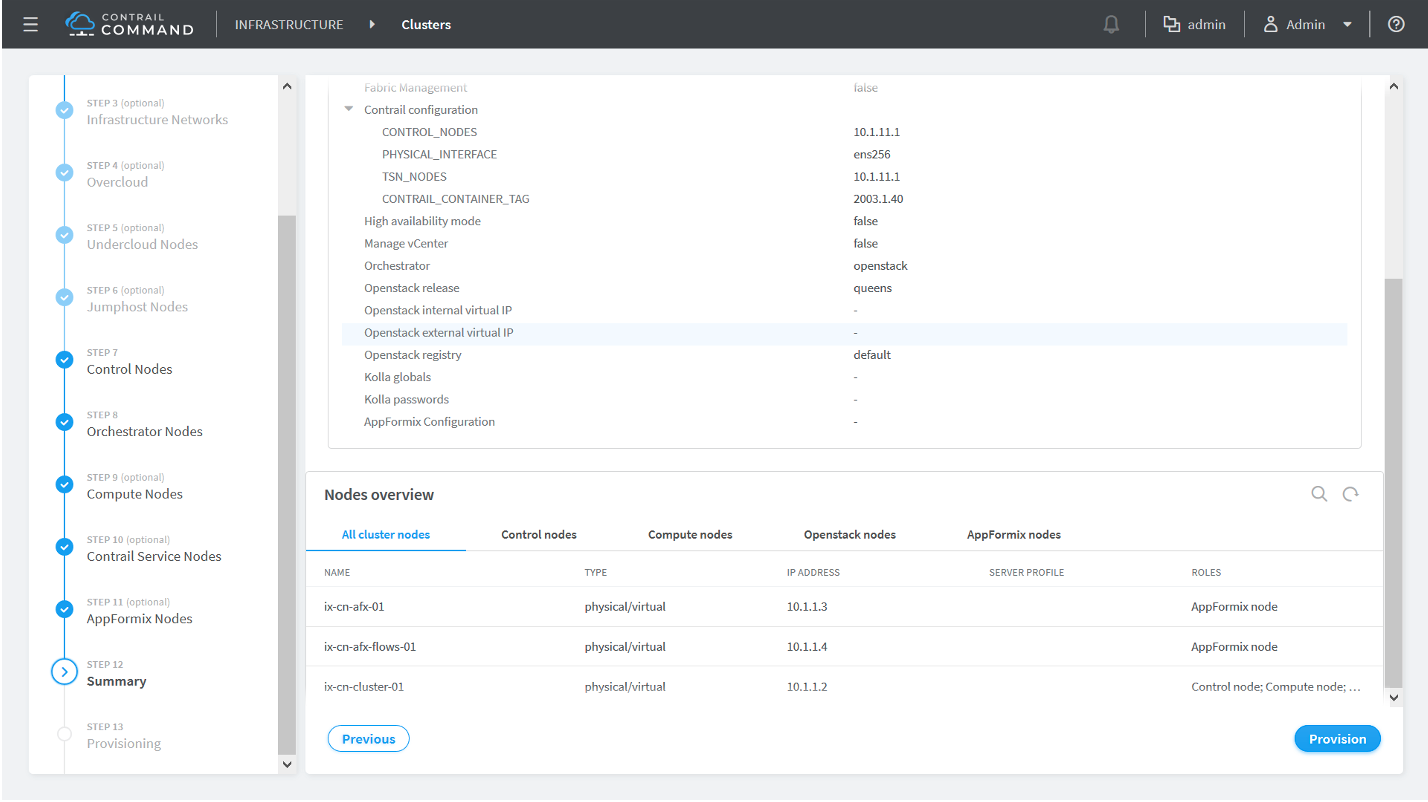
Click the Provision button after verifying your settings to provision the cluster.
The cluster provisioning process begins. This provisioning process time varies by environment and deployment. It has routinely taken 90 minutes or more in our testing environments.
Sample command_servers.yml Files for Installing Contrail Command
- Minimal command_servers.yml file
- Complete command_servers.yml File
- Disaster Recovery and Troubleshooting
Minimal command_servers.yml file
The following sample file has the minimum configuration that you need when you install Contrail Command.
For security purposes, we strongly recommend creating unique username and password combinations in your environment. Username and password combinations are provided in this example for illustrative purposes only.
---
# Required for Appformix and Appformix Flows installations in Release 2003 and earlier
user_command_volumes:
- /opt/software/appformix:/opt/software/appformix
- /opt/software/xflow:/opt/software/xflow
command_servers:
server1:
ip: <IP Address> # IP address of server where you want to install Contrail Command
connection: ssh
ssh_user: root
ssh_pass: <contrail command server password>
sudo_pass: <contrail command server root password>
ntpserver: <NTP Server address>
registry_insecure: false
container_registry: hub.juniper.net/contrail
container_tag: <container_tag>
container_registry_username: <registry username>
container_registry_password: <registry password>
config_dir: /etc/contrail
contrail_config:
            database:
                type: postgres
                dialect: postgres
                password: contrail123
            keystone:
                assignment:
                    data:
                    users:
                        admin:
                          password: contrail123
insecure: true
client:
password: contrail123
Complete command_servers.yml File
The following sample file has an exhaustive list of configurations and supporting parameters that you can use when you install Contrail Command.
For security purposes, we strongly recommend creating unique username and password combinations in your environment. Username and password combinations are provided in this example for illustrative purposes only.
---
# Required for Appformix and Appformix Flows installations in Release 2003 and earlier
user_command_volumes:
- /opt/software/appformix:/opt/software/appformix
- /opt/software/xflow:/opt/software/xflow

# User defined volumes
#user_command_volumes:
#  - /var/tmp/contrail:/var/tmp/contrail

command_servers:
    server1:
        ip: <IP Address>
        connection: ssh
        ssh_user: root
        ssh_pass: <contrail command server password>
        sudo_pass: <contrail command server root password>
        ntpserver: <NTP Server address>

        # Specify either container_path
        #container_path: /root/contrail-command-051618.tar
        # or registry details and container_name
        registry_insecure: false
        container_registry: hub.juniper.net/contrail
        container_name: contrail-command
        container_tag: <container_tag>
        container_registry_username: <registry username>
        container_registry_password: <registry password>
        config_dir: /etc/contrail

        # contrail command container configurations given here go to /etc/contrail/contrail.yml
        contrail_config:
            # Database configuration. PostgreSQL supported
            database:
                type: postgres
                dialect: postgres
                host: localhost
                user: root
                password: contrail123
                name: contrail_test
                # Max Open Connections for DB Server
                max_open_conn: 100
                connection_retries: 10
                retry_period: 3s

            # Log Level
            log_level: debug

            # Cache configuration
            cache:
              enabled: true
              timeout: 10s
              max_history: 100000
              rdbms:
                enabled: true

            # Server configuration
            server:
              enabled: true
              read_timeout: 10
              write_timeout: 5
              log_api: true
              address: ":9091"

              # TLS Configuration
              tls:
                  enabled: true
                  key_file: /usr/share/contrail/ssl/cs-key.pem
                  cert_file: /usr/share/contrail/ssl/cs-cert.pem

              # Enable GRPC or not
              enable_grpc: false

              # Static file config
              # key: URL path
              # value: file path. (absolute path recommended in production)
              static_files:
                  /: /usr/share/contrail/public

              # API Proxy configuration
              # key: URL path
              # value: String list of backend host
              #proxy:
              #    /contrail:
              #    - http://localhost:8082

              notify_etcd: false

              # VNC Replication
              enable_vnc_replication: true

            # Keystone configuration
            keystone:
                local: true
                assignment:
                    type: static
                    data:
                      domains:
                        default: &default
                          id: default
                          name: default
                      projects:
                        admin: &admin
                          id: admin
                          name: admin
                          domain: *default
                        demo: &demo
                          id: demo
                          name: demo
                          domain: *default
                      users:
                        admin:
                          id: admin
                          name: Admin
                          domain: *default
                          password: contrail123
                          email: admin@juniper.nets
                          roles:
                          - id: admin
                            name: admin
                            project: *admin
                        bob:
                          id: bob
                          name: Bob
                          domain: *default
                          password: bob_password
                          email: bob@juniper.net
                          roles:
                          - id: Member
                            name: Member
                            project: *demo
                store:
                    type: memory
                    expire: 36000
                insecure: true
                authurl: https://localhost:9091/keystone/v3

            # disable authentication with no_auth true and comment out keystone configuraion.
            #no_auth: true
            insecure: true

            etcd:
              endpoints:
                - localhost:2379
              username: ""
              password: ""
              path: contrail

            watcher:
              enabled: false
              storage: json

            client:
              id: admin
              password: contrail123
              project_name: admin
              domain_id: default
              schema_root: /
              endpoint: https://localhost:9091

            compilation:
              enabled: false
              # Global configuration
              plugin_directory: 'etc/plugins/'
              number_of_workers: 4
              max_job_queue_len: 5
              msg_queue_lock_time: 30
              msg_index_string: 'MsgIndex'
              read_lock_string: "MsgReadLock"
              master_election: true

              # Plugin configuration
              plugin:
                  handlers:
                      create_handler: 'HandleCreate'
                      update_handler: 'HandleUpdate'
                      delete_handler: 'HandleDelete'

            agent:
              enabled: true
              backend: file
              watcher: polling
              log_level: debug

         # The following are optional parameters used to patch/cherrypick
         # revisions into the contrail-ansible-deployer sandbox. These configs
         # go into the /etc/contrail/contrail-deploy-config.tmpl file
#        cluster_config:
#            ansible_fetch_url: "https://review.opencontrail.org/Juniper/contrail-ansible-deployer refs/changes/80/40780/20"
#            ansible_cherry_pick_revision: FETCH_HEAD
#            ansible_revision: GIT_COMMIT_HASH
Disaster Recovery and Troubleshooting
This section lists commonly seen errors and failure scenarios and procedures to fix them.
Problem
Description
Recovering the Galera Cluster Upon Server Shutdown—In an OpenStack HA setup provisioned using Kolla and OpenStack Rocky, if you shut down all the servers at the same time and bring them up later, the Galera cluster fails.
Solution
To recover the Galera cluster, follow these steps:
Edit the /etc/kolla/mariadb/galera.cnf file to remove the
wsrepaddress on one of the controllers as shown here.wsrep_cluster_address = gcomm:// #wsrep_cluster_address = gcomm://10.x.x.8:4567,10.x.x.10:4567,10.x.x.11:4567
Note:If all the controllers are shut down in the managed scenario at the same time, you must select the controller that was shut down last.
Docker start mariadb on the controller on which you edited the file.
Wait for a couple of minutes, ensure that the mariadb container is not restarting, and then Docker start mariadb on the remaining controllers.
Restore the /etc/kolla/mariadb/galera.cnf file changes and restart the mariadb container on the previously selected controller.
Problem
Description
Containers from Private Registry Not Accessible—You might have a situation in which containers that are pulled from a private registry named CONTAINER_REGISTRY are not accessible.
Solution
To resolve, check to ensure that REGISTRY_PRIVATE_INSECURE is set to True.