Step 2: Up and Running
Now that you've deployed the Virtual Lightweight Collector (vLWC), let’s get you up and running with Juniper Support Insights (JSI) on Juniper Support Portal!
Access Juniper Support Insights
To access Juniper Support Insights (JSI), you must register on the User Registration portal. You also require a user role (Super Admin, Admin or Standard) assigned. To get a user role assigned, contact Juniper Customer Care or your Juniper Services team.
JSI supports the following user roles:
- Standard—The Standard users can view the device onboarding details, operational dashboards, and reports.
- Admin— The Admin users can onboard devices, perform JSI management functions, view the operational dashboards and reports.
-
Super Admin—The Super Admin users can perform all the functions as a regular admin, and also manage the JSI roles to grant and revoke access (from Insights menu > Advanced Settings > User Role Management page).
Note:Users managed by the super admin must be associated with the same account as the LWC.
To locate a user, the super admin must enter the full email address (example: jsiuser@email.com) in the search field of the User Role Management page. If searching for the user by their full email address does not yield any results, contact your Juniper Services team for assistance.
-
RCS Operator—The RCS Operator users can view device onboarding details, operational dashboards, and reports. In addition, they can receive and approve RCS requests.
-
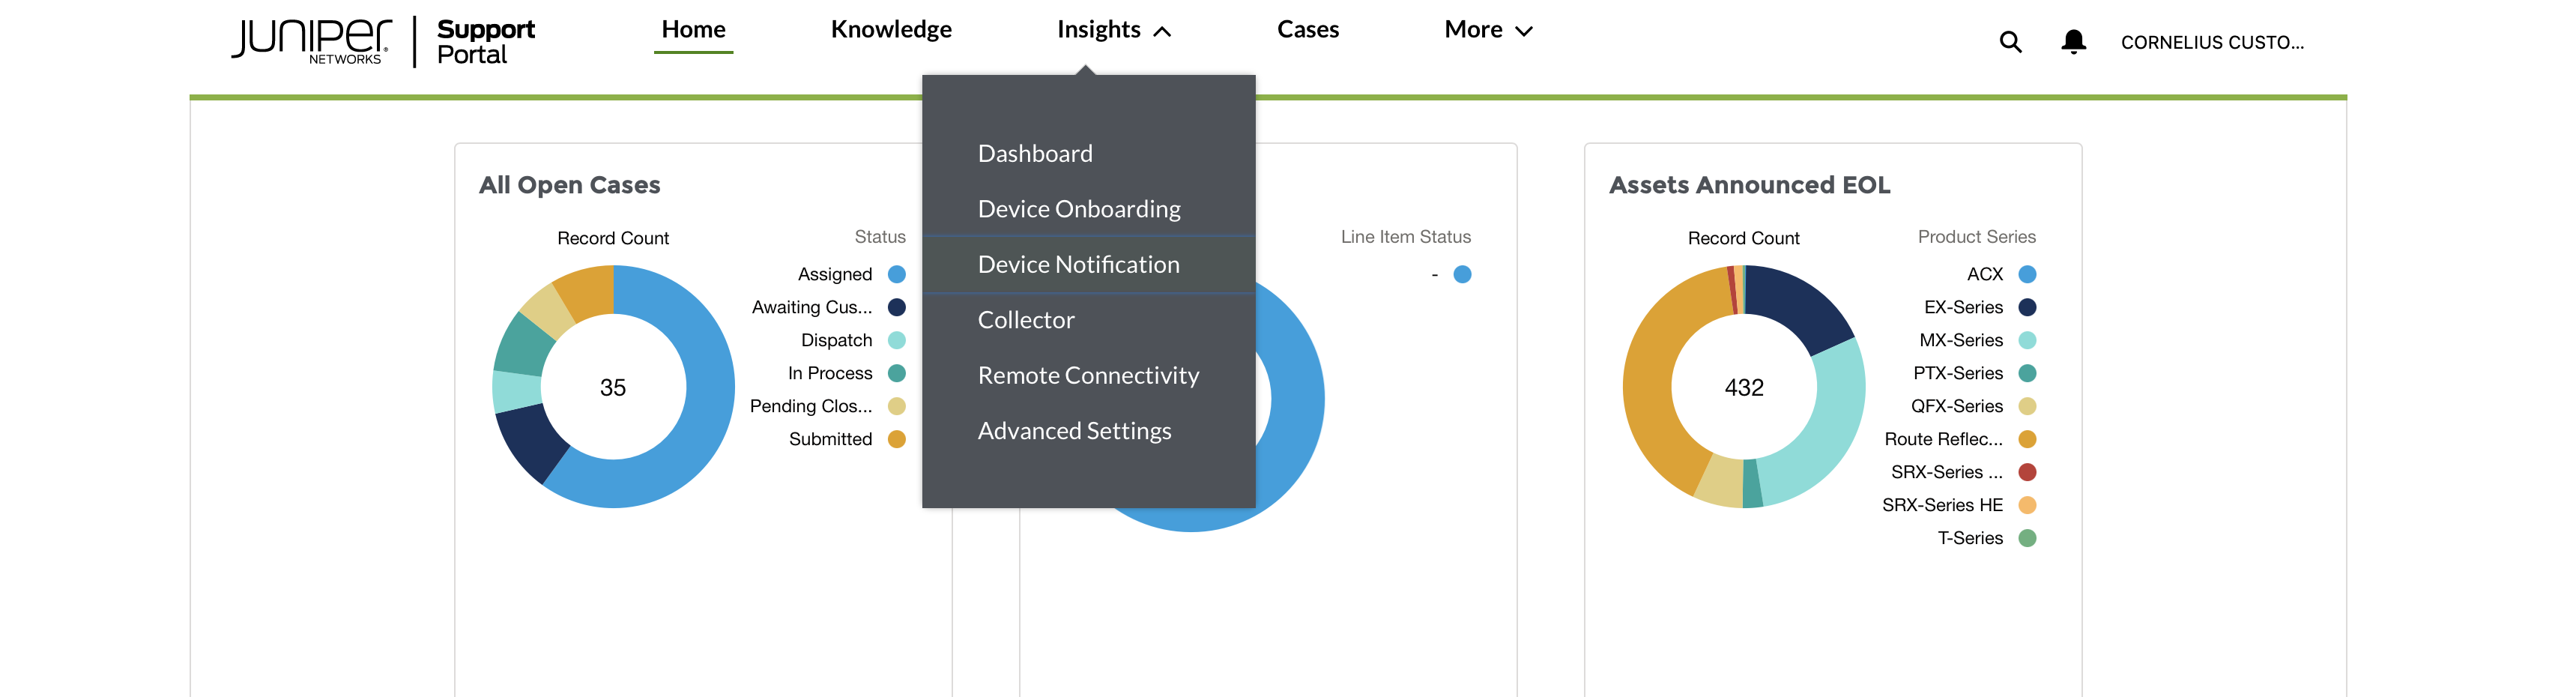
On the Insights menu, click:
- Dashboards to view of a set of operational dashboards and reports.
- Device Onboarding to perform device onboarding to initiate data collection.
- Device Notifications to view notifications about device onboarding, data collection, and errors.
- Collector to view the details of the vLWC associated with the account.
- Remote Connectivity to view and manage Remote Connectivity Suite requests for a seamless device data collection process.
View the Virtual Lightweight Collector Connection Status
You can view the Virtual Lightweight Collector (vLWC) connection status on the following portals:
-
Juniper Support Portal
-
The vLWC Captive Portal webpage and vLWC JSI Shell. The Captive Portal webpage and JSI Shell provides a more detailed view, and has options that let you change the vLWC configuration settings and perform troubleshooting.
View the Connection Status on Juniper Support Portal
Here's how to view the vLWC connection status on Juniper Support Portal:
View the Connection Status on the Captive Portal
See Configure Network Settings through Captive Portal for more information.
View the Connection Status on the JSI Shell
Onboard Devices
You must be an admin user to onboard a device.
Ensure that the NETCONF SSH subsystem is configured on your Juniper devices (on port 22) to onboard these devices to JSI. JSI supports NETCONF SSH sessions on port 22 only. JSI NETCONF sessions on other ports, such as port 830, are currently not supported.
For information on Junos configurations and permissions required for JSI, see the FAQ - What permissions does the JSI user need in Junos to operate JSI?
Here's how to onboard devices to JSI:
-
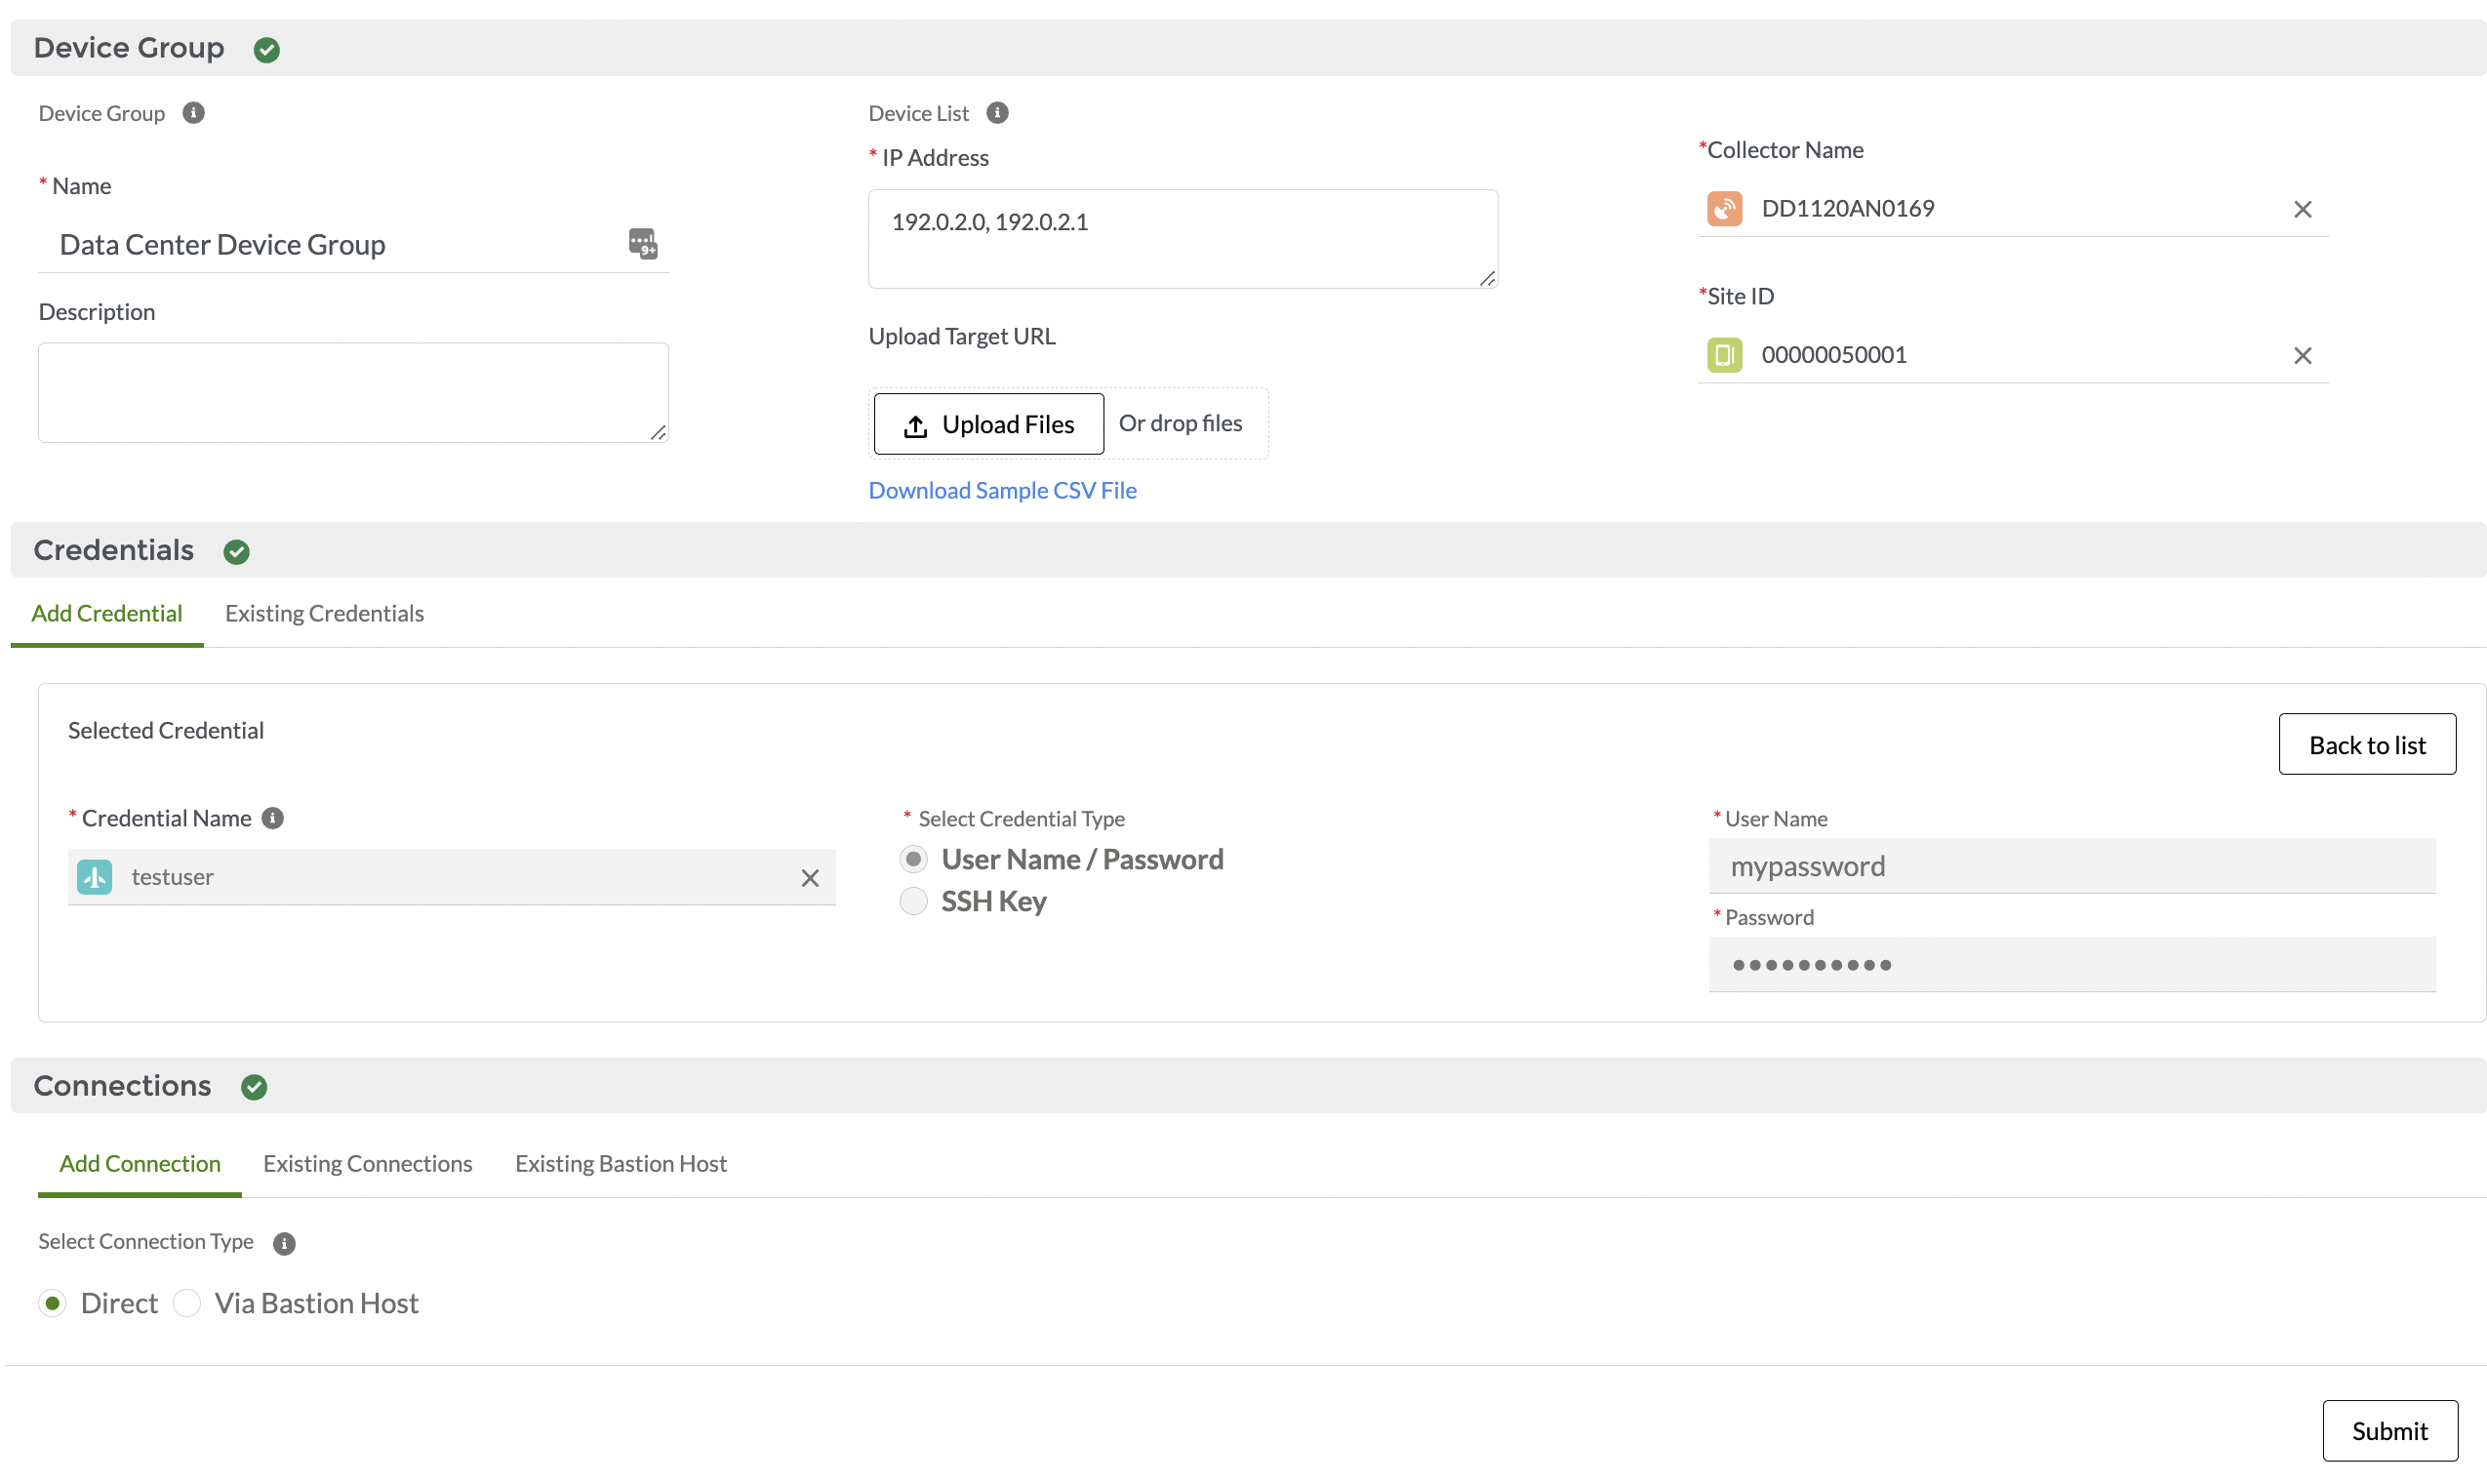
Click New Device Group. The following image
represents the device onboarding page with some sample data filled in.
View Notifications
Here's how to view notifications on Juniper Support Portal:
-
Click a Notification ID to view the content of the
notification.

View Operational Dashboards and Reports
The JSI operational dashboards and reports are dynamically updated based on a periodic (daily) device data collection, which is initiated when you onboard a device. The dashboards and reports provide a set of current, historic, and comparative data insights into the devices' health, inventory, and lifecycle management. The insights include the following:
-
Software and hardware systems inventory (chassis to component level detail covering serialized and non-serialized items).
-
Physical and logical interface inventory.
-
Configuration change based on commits.
-
Core files, alarms, and Routing Engine health.
-
End of Life (EOS) and End of Service (EOS) exposure.
Juniper manages these operational dashboards and reports.
Here's how to view the dashboards and reports on Juniper Support Portal:
Dashboards and reports are customized based on the end-user type:
-
Customer—Displays data insights for the devices associated with the customer account.
-
Partner—Displays a consolidated view with device insights from all supported customers.
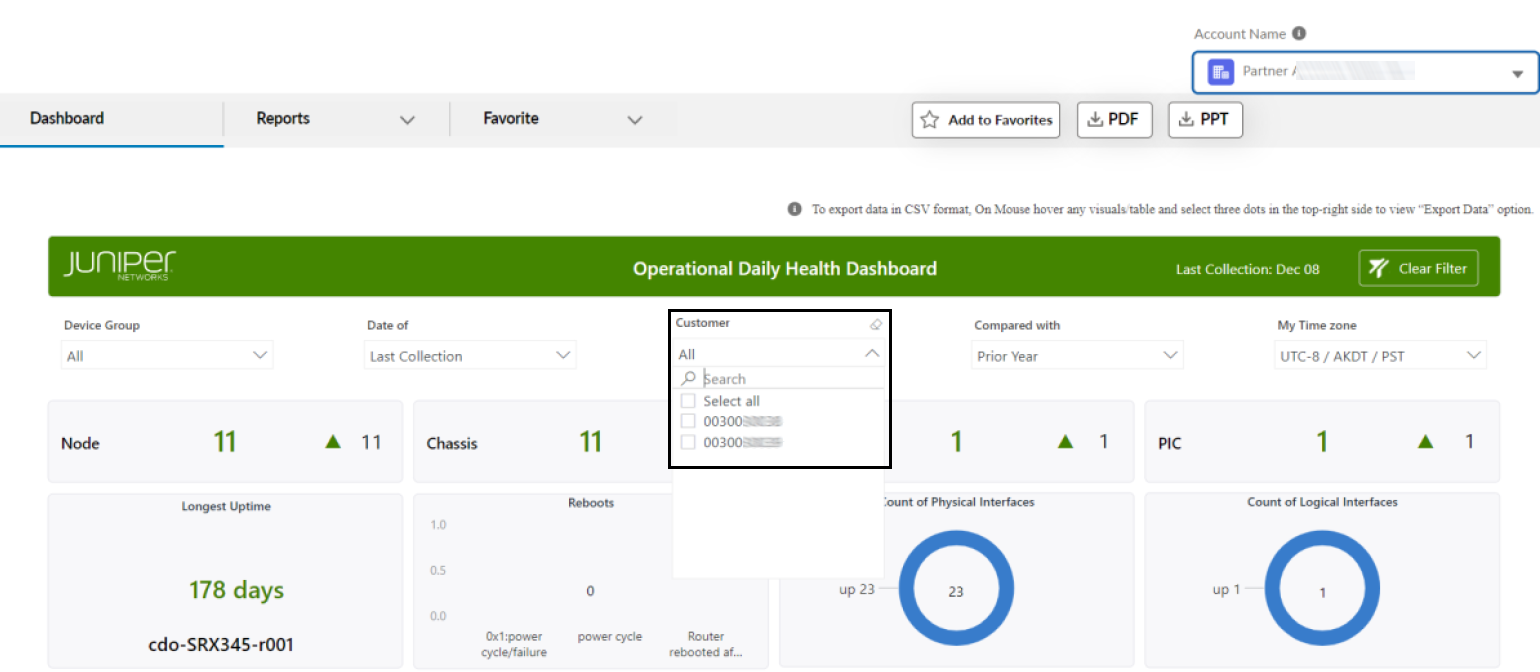
You can filter the view to display insights specific to individual customers.
To view insights specific to individual customers, select the customer ID from the Customer drop-down, as shown;
-
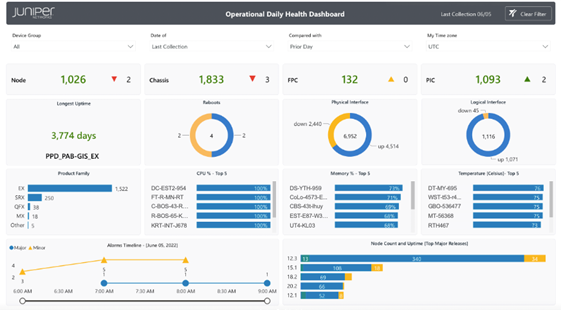
Click Insights >
Dashboard.
The Operational Daily Health Dashboard is displayed. This dashboard includes charts that summarize the KPIs associated with the account, based on the last collection date.
-
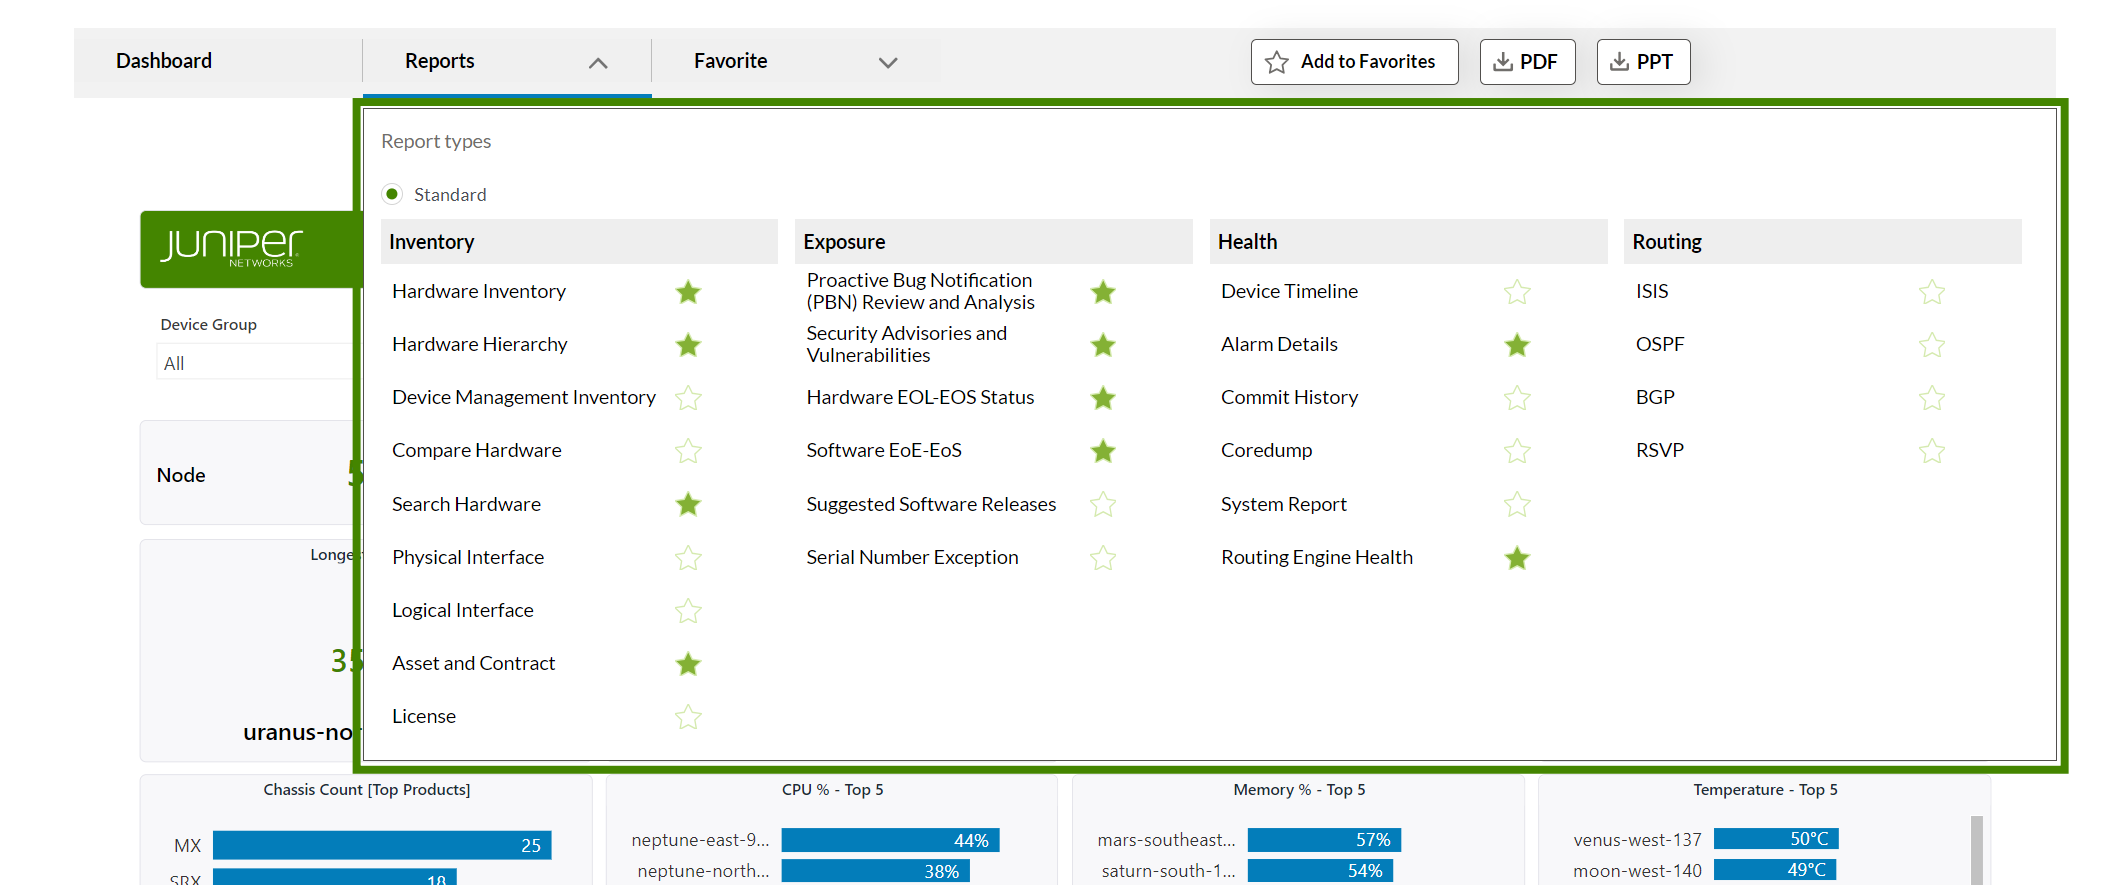
From the Reports menu on the left, select the
dashboard or report you want to view.
The reports typically consist of a set of filters, an aggregated summary view, and a detailed tabular view based on the data collected. A JSI report has the following features:
- Interactive views—Organize the data in a meaningful way. For example, you can create a segmented view of the data, click through, and mouse-over for additional details.
- Filters—Filter data based on your
user
type (customer or partner) and requirements.
Data filtering based on end-user type:
-
Customer—View and filter device groups associated with your customer account IDs.
-
Partner—View and filter device groups associated with all customer account IDs that you are authorized to access.
-
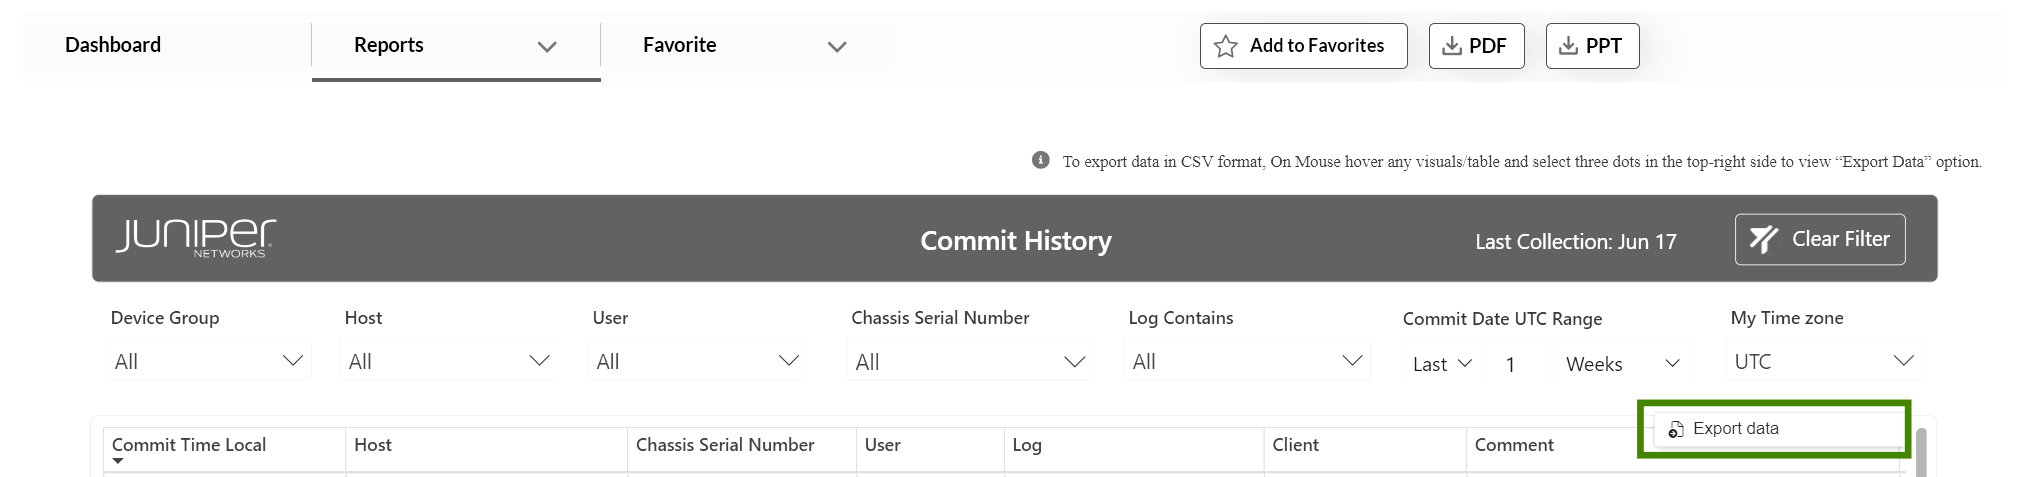
- Favorites—Tag reports as favorites for ease of access.
- PDF, PTT, and Data formats—Export the reports as PDF or PTT files, or in data format. In data format, you can download the report fields and values for each report component (for example, chart or table) by using the Export Data option as shown below:
Prepare for a Remote Connectivity Suite Request
The JSI Remote Connectivity Suite (RCS) is a cloud-based solution that streamlines the support and troubleshooting process between Juniper support and customers by making the device data collection process seamless. Instead of iterative exchanges between Juniper support and the customer to obtain the right device data, RCS retrieves this in the background automatically. This timely access to essential device data facilitates swift troubleshooting of the issue.
RCS is supported on devices connected directly or through Bastion Host via SOCKS5 proxy, but is not supported on devices connected through Bastion Host using connection hopping. Ensure your device connection method is compatible before initiating an RCS request.
At a high level, the RCS request process involves the following steps:
-
Submit a technical support case through the customer portal.
-
A Juniper support engineer will contact you about your technical support case. If necessary, the Juniper support engineer may propose an RCS request to retrieve device data.
-
Depending on the rules from the RCS settings (Ask Approval enabled), you may receive an email containing a link to authorize the RCS request.
-
If you consent to share the device data, click the link in the email, and approve the request.
-
-
The RCS request will be scheduled for a specified time and the device data is securely relayed to Juniper support.
-
You must have JSI administrator privileges to configure RCS device settings, and approve or deny RCS requests.
-
RCS uses the Secure Copy Protocol (SCP) for file collection. SCP is enabled by default and does not require any configuration changes.
View RCS Requests
Here's how to view RCS requests on Juniper Support Portal:
-
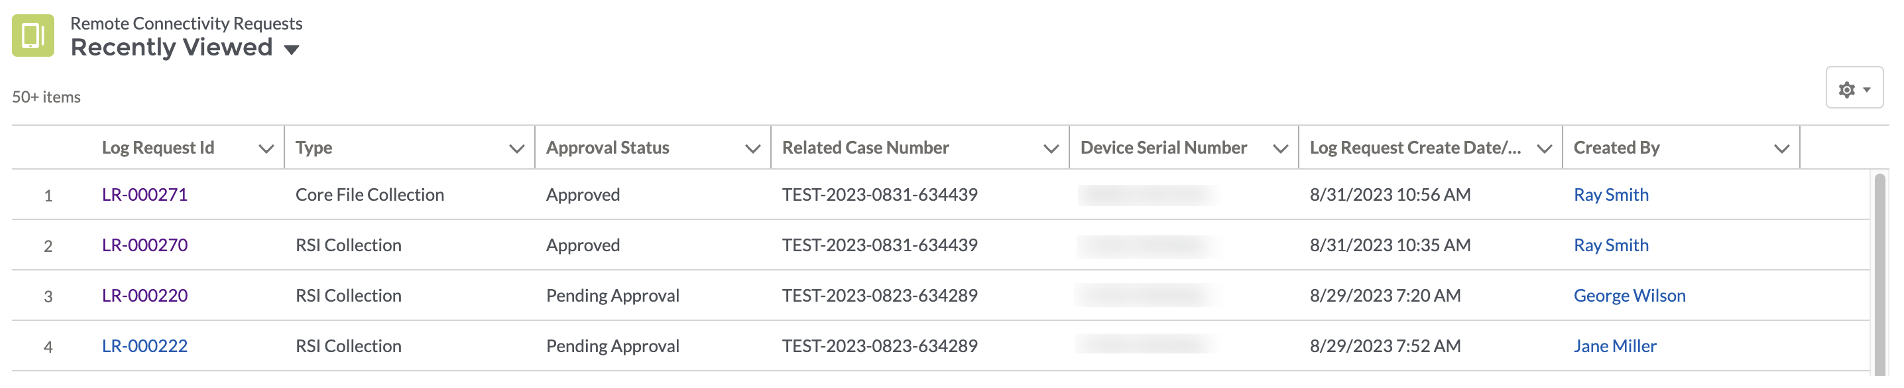
On Juniper Support Portal, click Insights > Remote Connectivity to open the Remote Connectivity Requests Lists page.
The Remote Connectivity Requests Lists page lists all the RCS requests made. You can use the drop-down list on the top left corner of the page to customize your viewing preference.
-
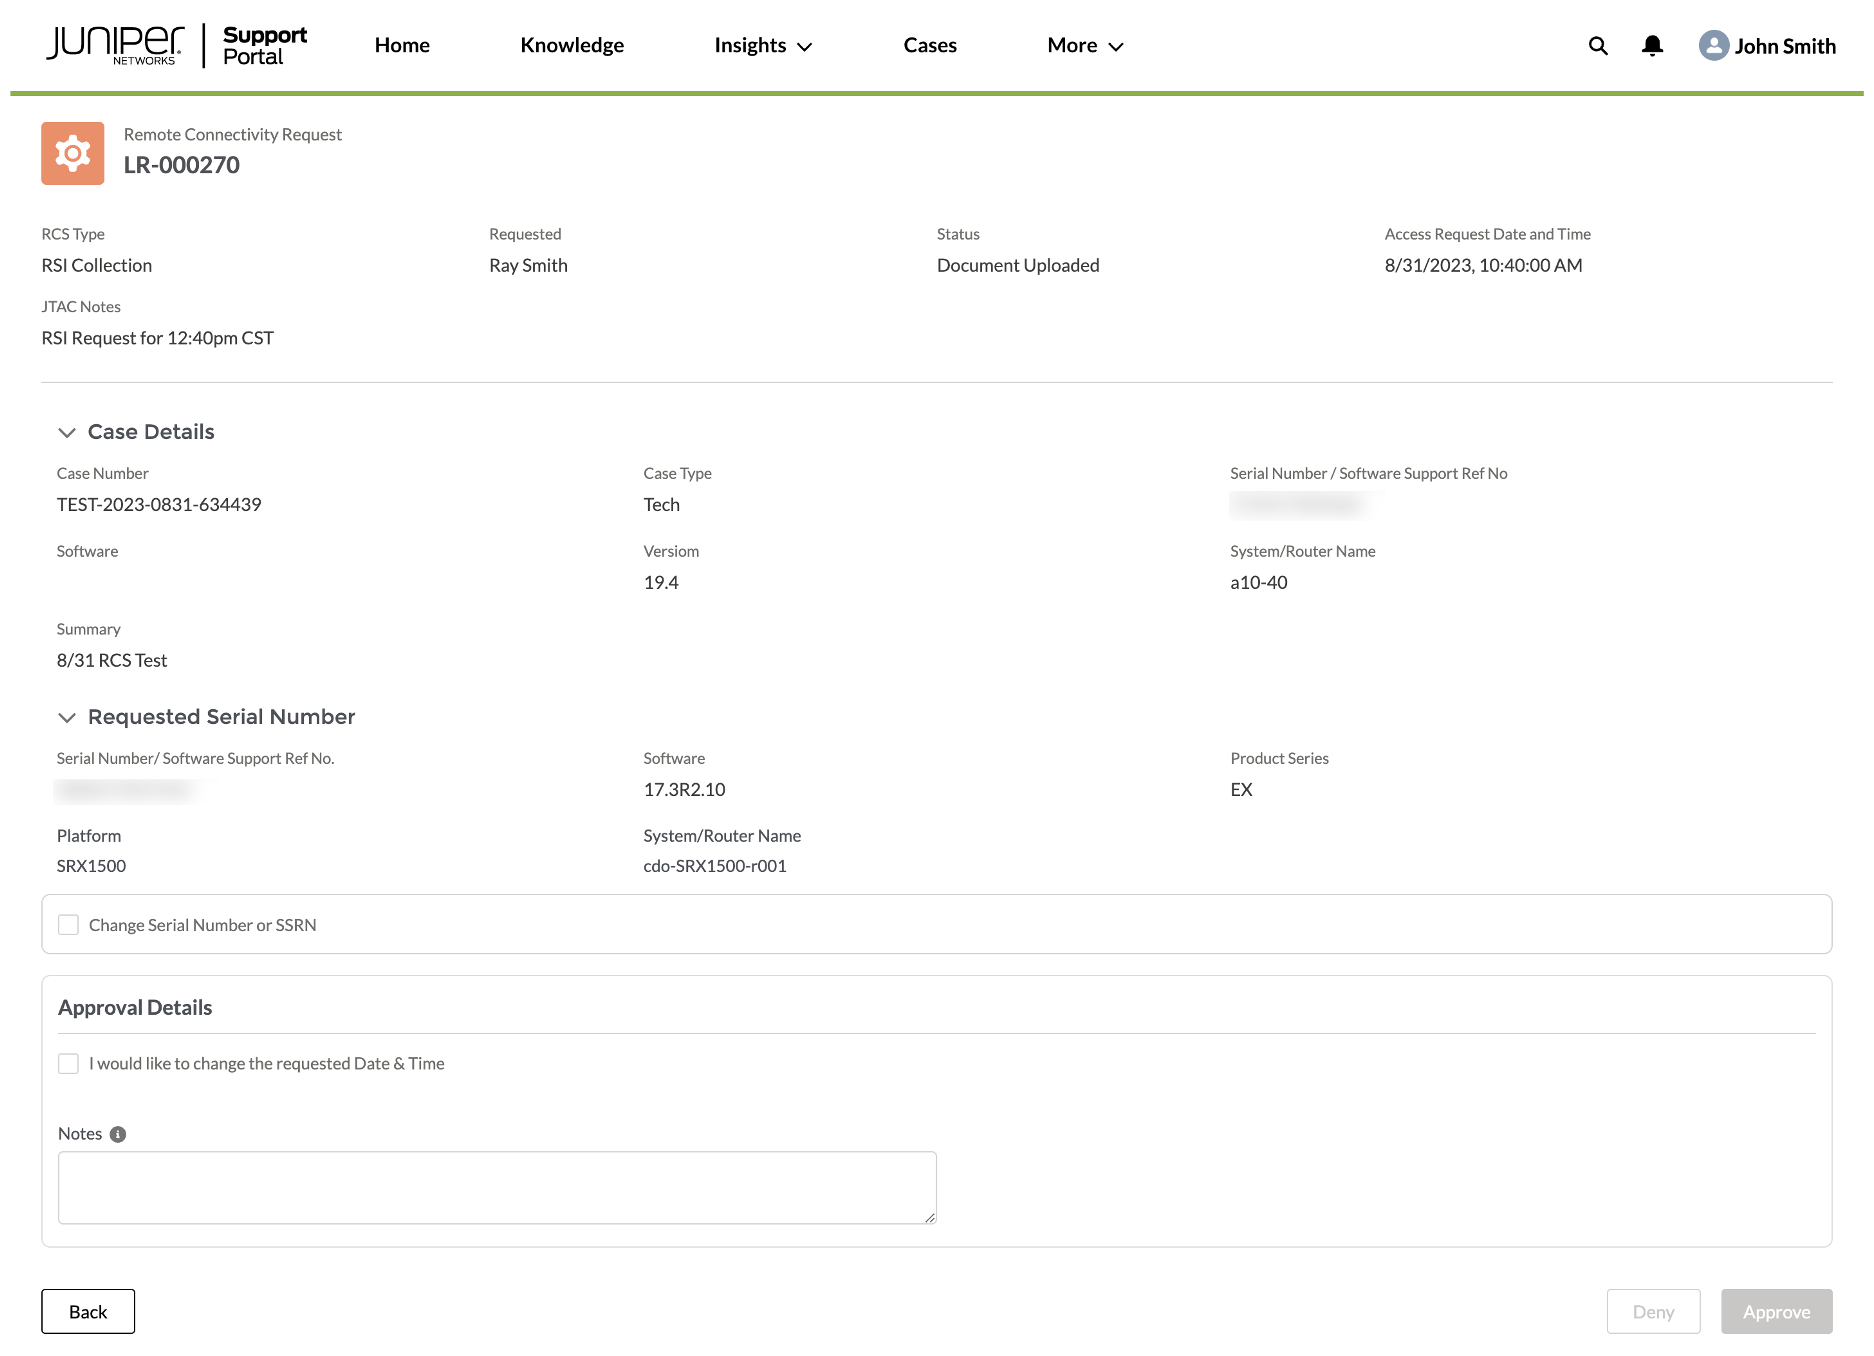
Click the Log Request Id of an RCS request to open the Remote Connectivity Requests Detail page.
From the Remote Connectivity Requests Detail page, you can view the RCS request details and perform the following tasks:
-
Modify the serial number.
You modify the serial number if you provided RCS authorization for the wrong serial number during case creation. Click Change Serial Number or SSRN to enter the correct serial number of the device.
Note:-
You must enter the serial number of a JSI-connected device to avail the RCS feature.
-
The updated serial number must be of the same product family as the original device.
If you want to authorize RCS for a different product family, create a separate case. JTAC has separate support teams for each product family. Opening a separate support case for the desired product family helps the support teams assist you with a quicker solution.
The Case Details section displays the serial number of the device for which the case was opened, and the RCS request was initially authorized.
The Requested Serial Number section displays the updated serial number of the device for which the RCS request is initiated.
-
-
Adjust the requested date and time (set to a future date/time).
Note:If the time zone is not specified in your user profile, the default time zone is Pacific Time (PT).
-
Append notes.
-
Approve or deny the RCS request.
-
Configure RCS Device Settings
You can configure both RCS collection and core file collection preferences from the RCS settings page. Here's how to configure the Remote Connectivity RSI Collection settings on Juniper Support Portal:
-
On Juniper Support Portal, click Insights > Remote Connectivity to open the Remote Connectivity Requests Lists page.
-
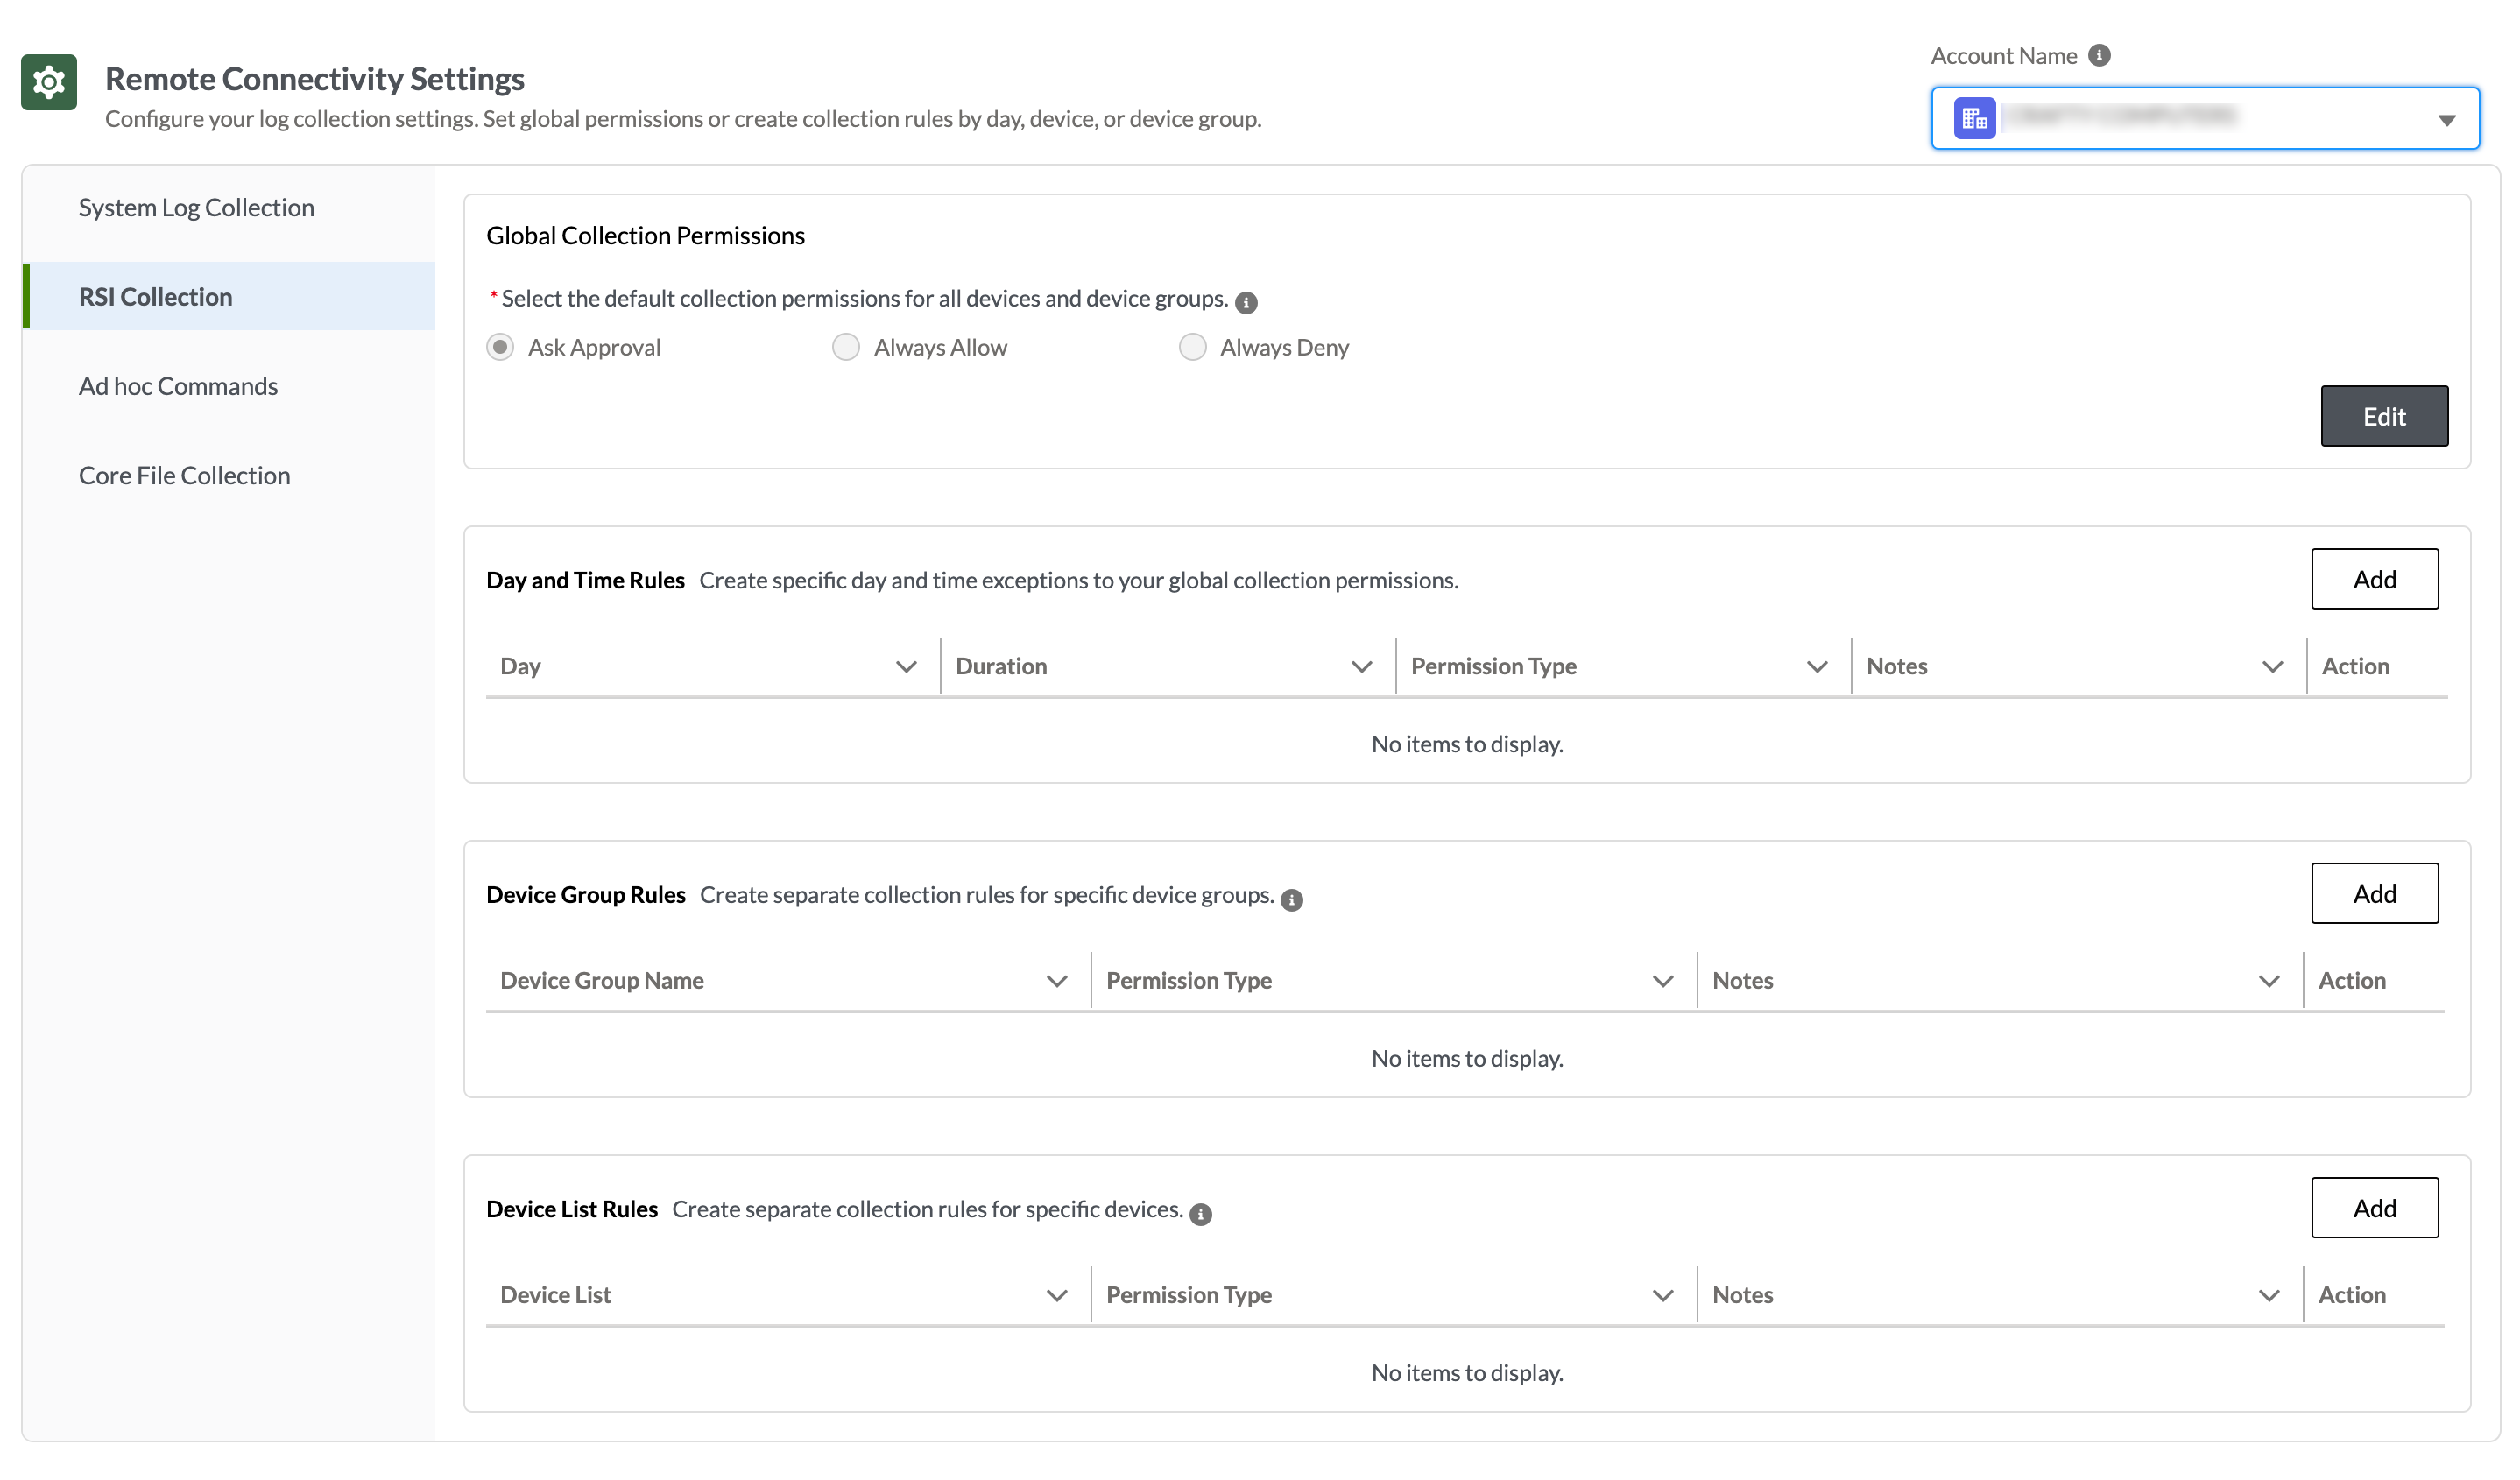
Click Settings on the top right corner of the page. The Remote Connectivity RSI Collection Settings page opens. This page enables you to set global collection permissions and create permission exceptions based on different criteria.
-
Global collection permissions are configured at an account level. For multiple JSI-connected accounts, you can select the account using the Account Name drop-down list on the top right corner of the page.
-
To configure global collection permission, click Edit in the Global Collection Permissions section and change permission to one of the following:
-
Ask Approval—An approval request is sent to the customer when Juniper support initiates an RCS request. This is the default setting when no permission is explicitly selected.
-
Always Allow—RCS requests initiated by Juniper support are automatically approved.
-
Always Deny—RCS requests initiated by Juniper support are automatically declined.
Note:When you have the global collection permission, and one or more exceptions configured with conflicting permissions, the following order of precedence will apply:
-
Device list rules
-
Device group rules
-
Day and time rules
-
Global collection permission
-
-
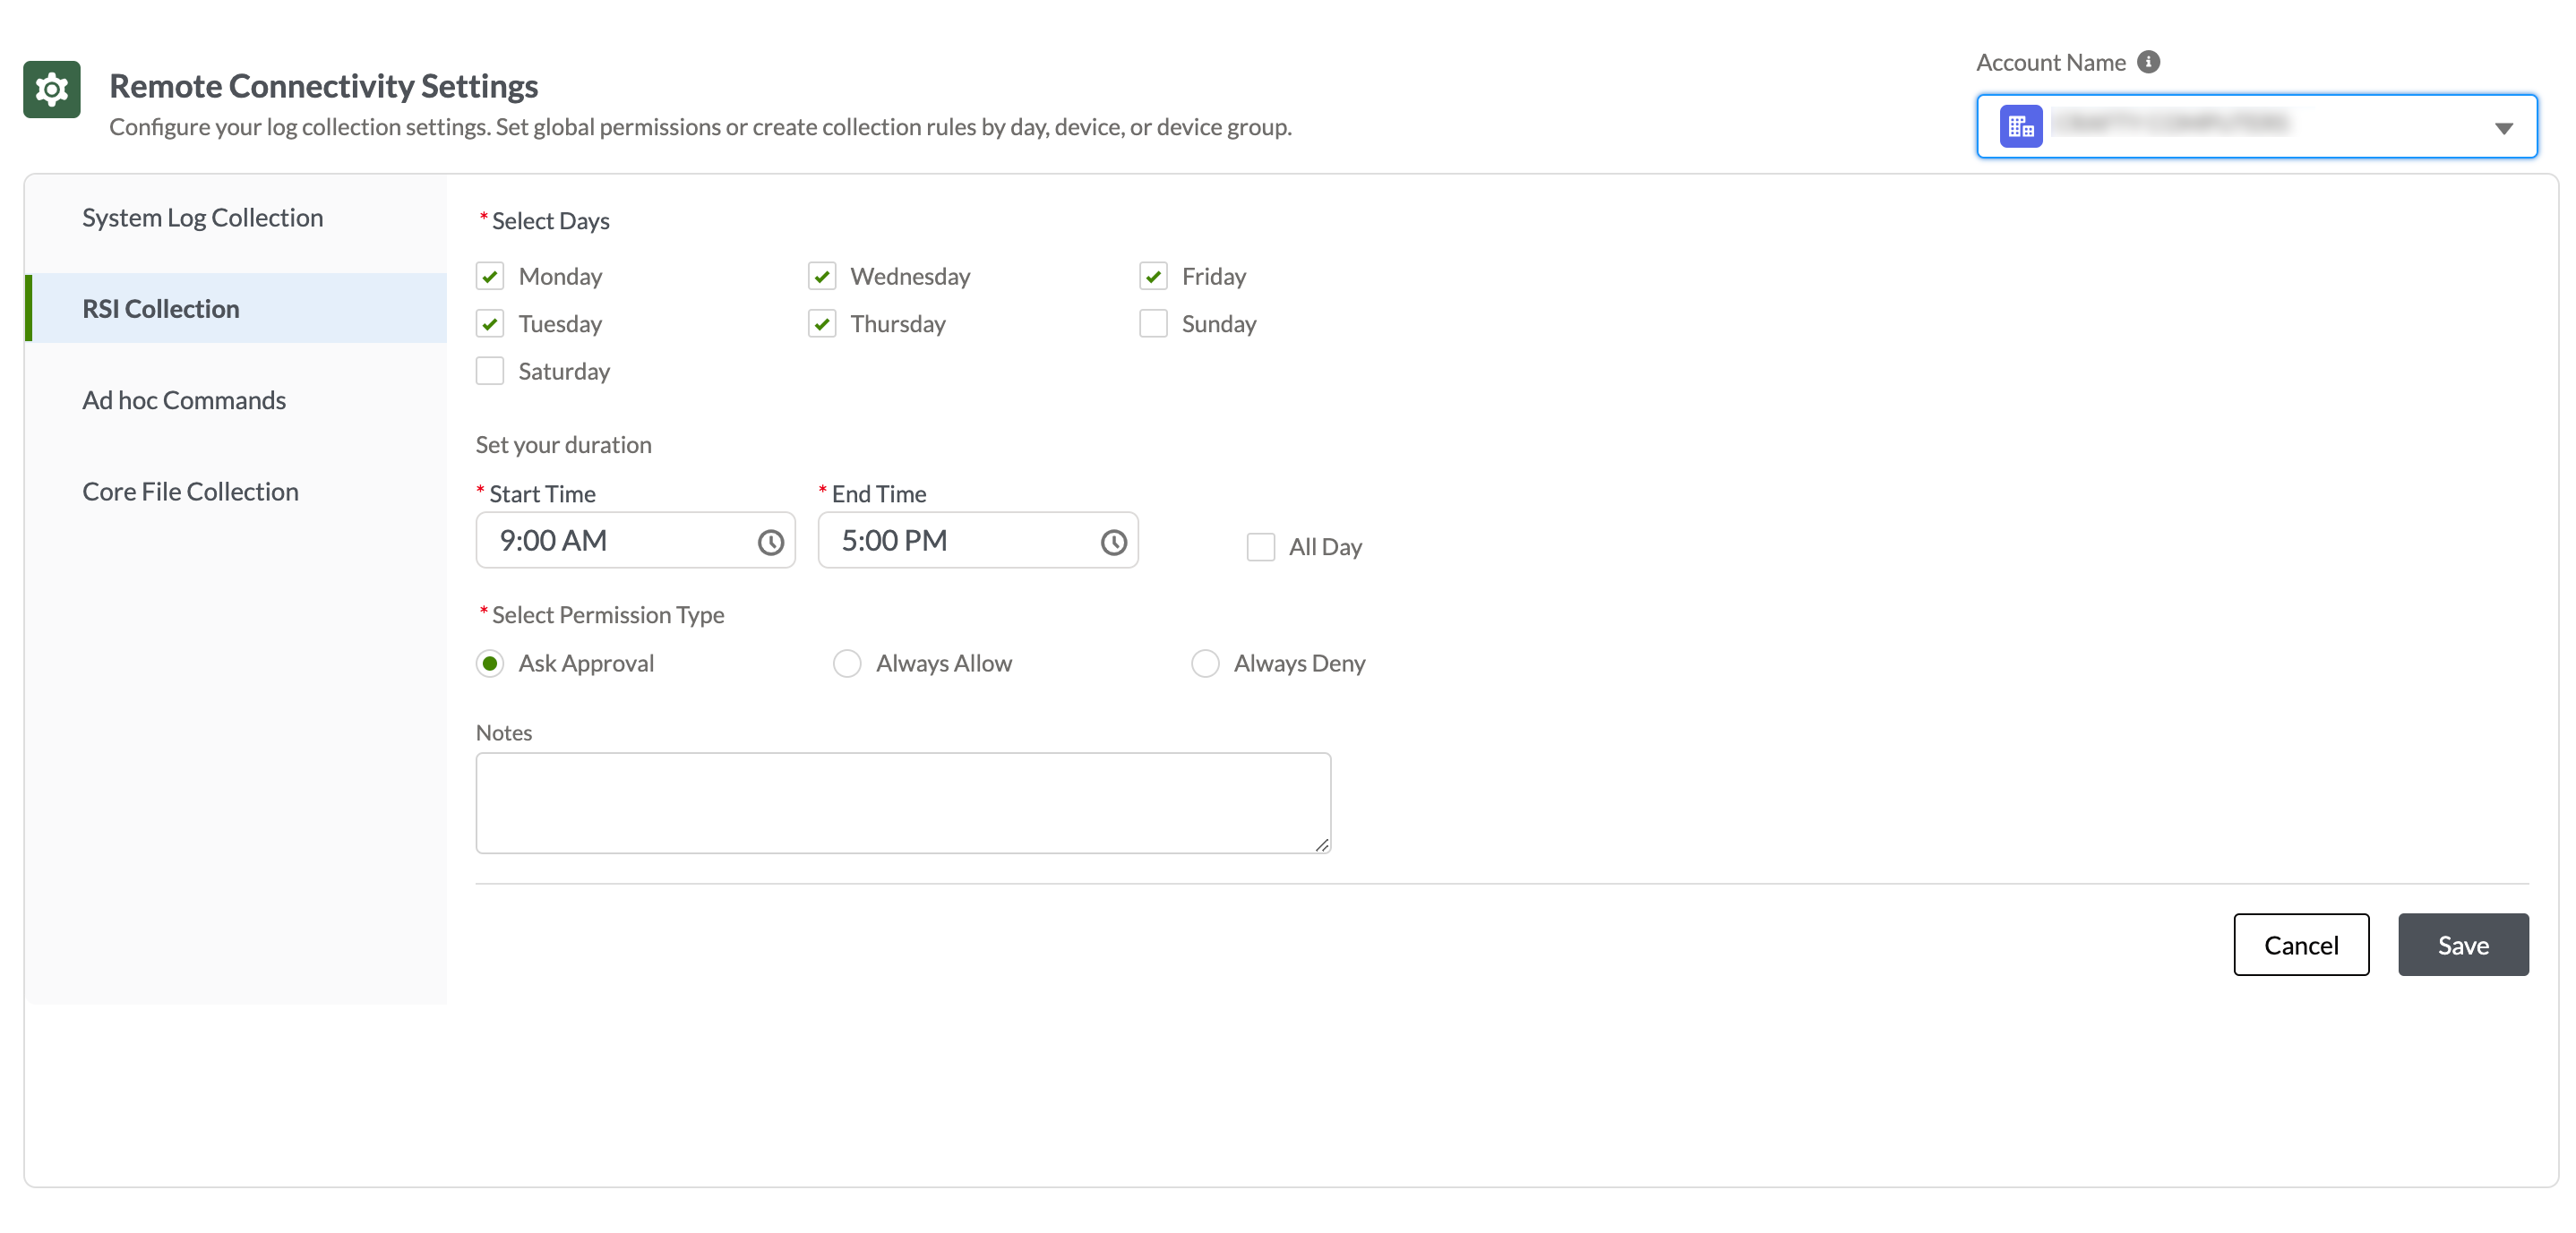
To create exceptions based on specific day and time, click Add in the Date and Time Rules section. The Day and Time Rules Settings page opens.
You can configure an exception based on days and duration, and click Save to save the exception and return to the Remote Connectivity RSI Collection Settings page.
-
Note:
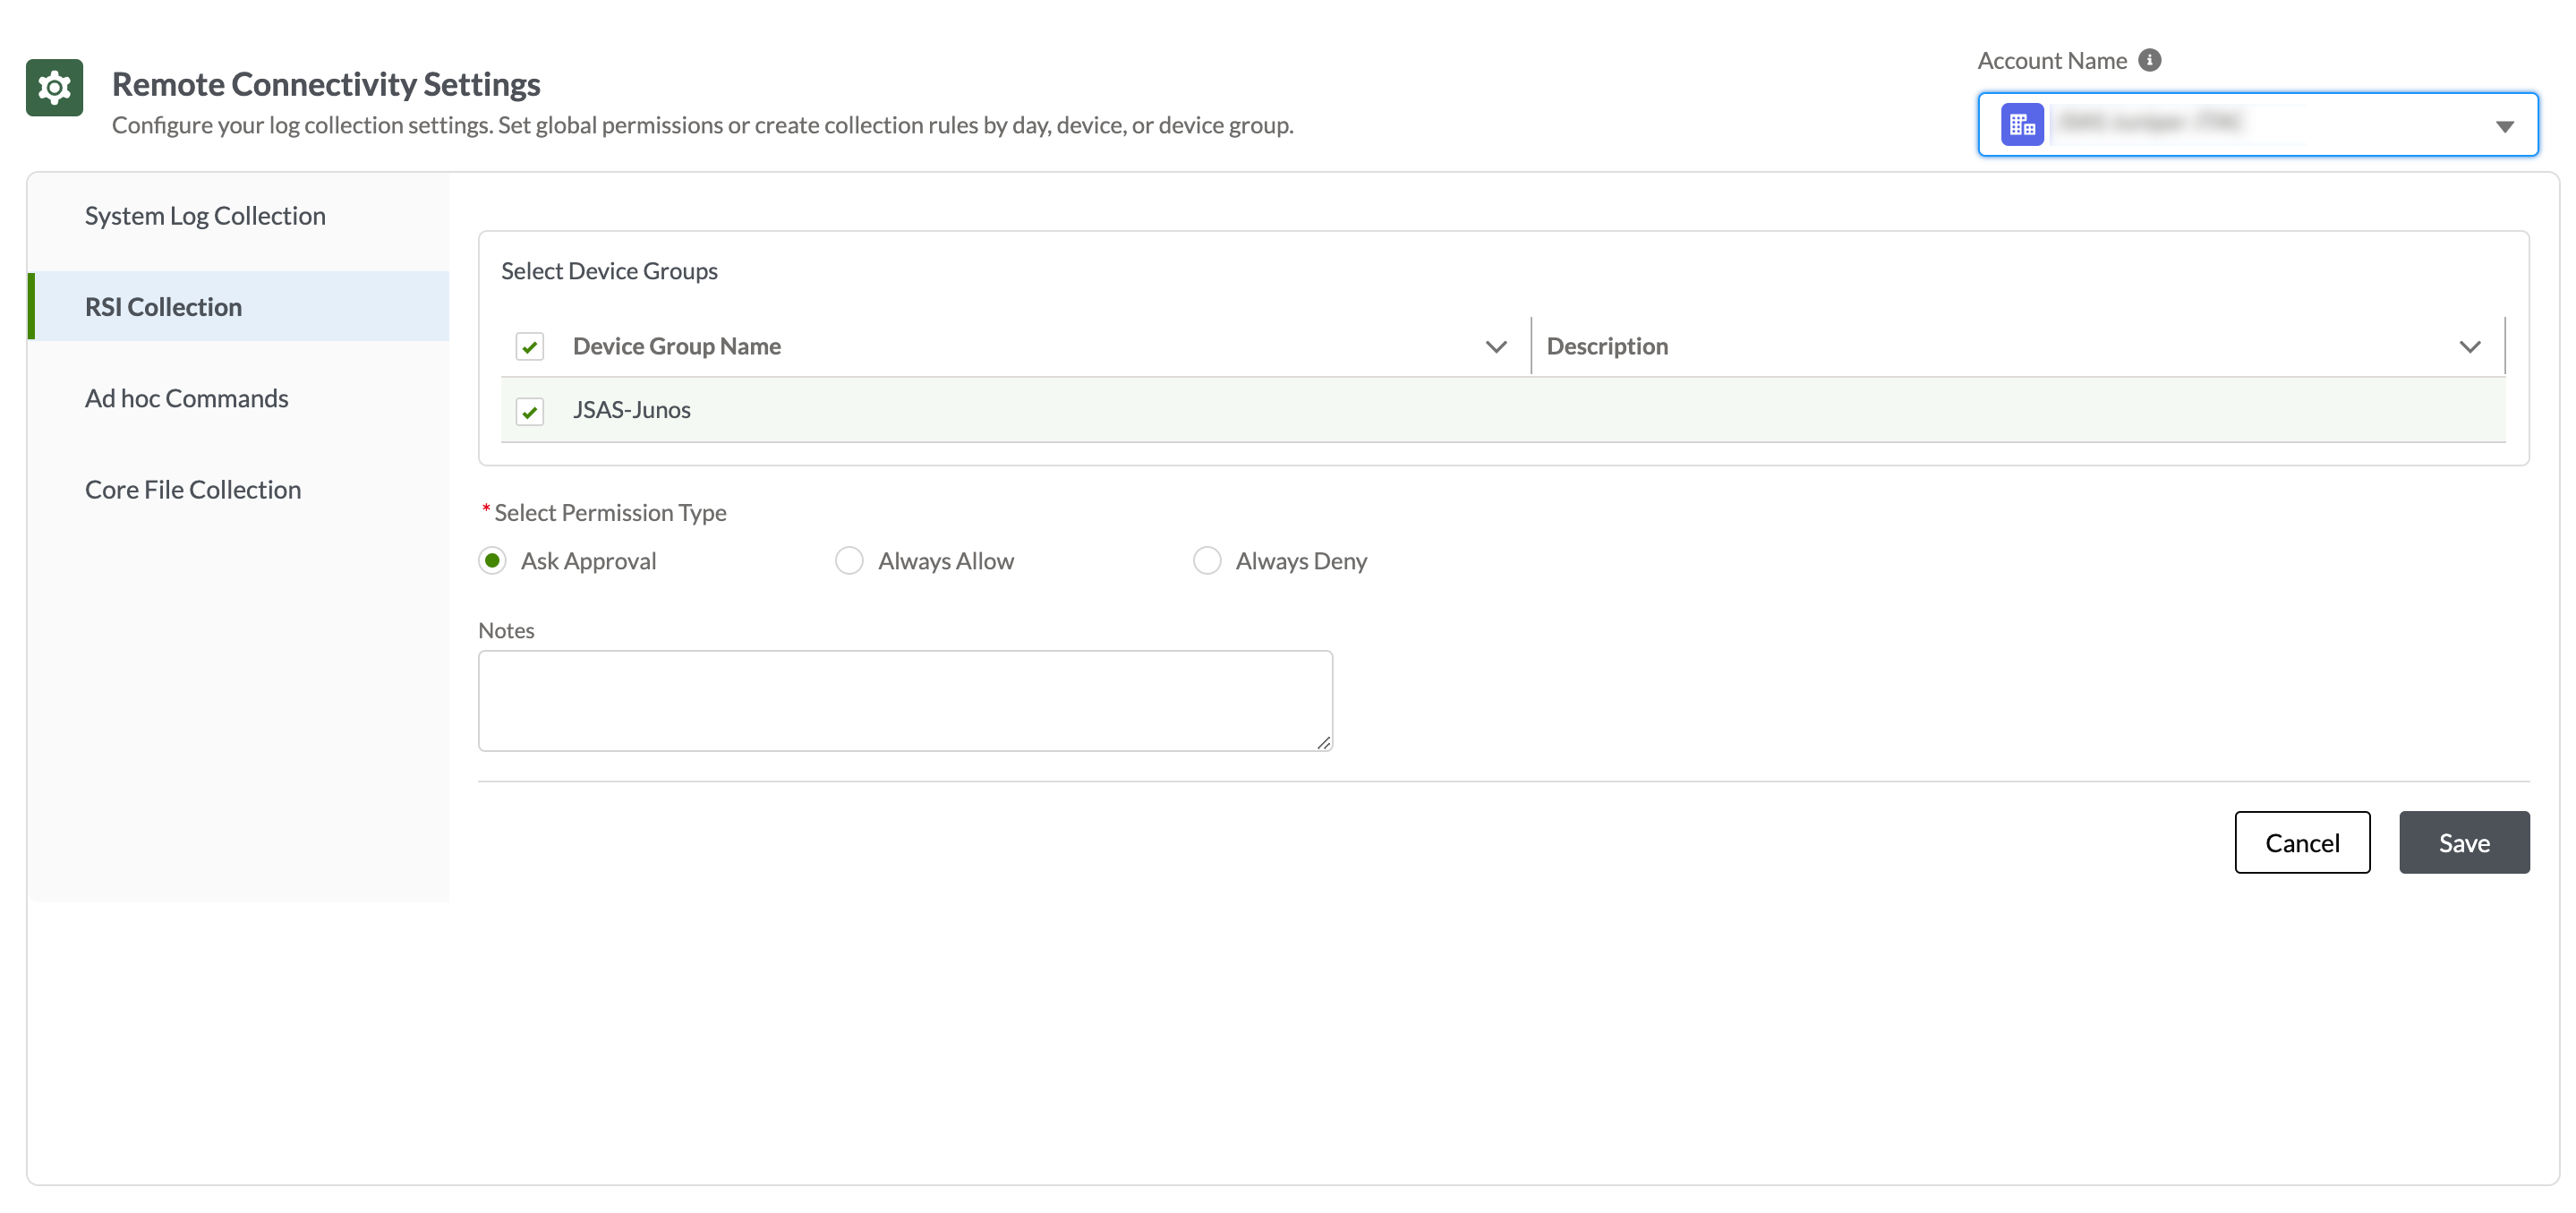
Before configuring collection rules for device groups, ensure that a device group already exists for the account.
To create separate collection rules for specific device groups, click Add in the Device Group Rules section. The Device Group Rules Settings page opens.
You can configure the collection rule for a specific device group, and click Save to save the rule and return to the Remote Connectivity RSI Collection Settings page.
-
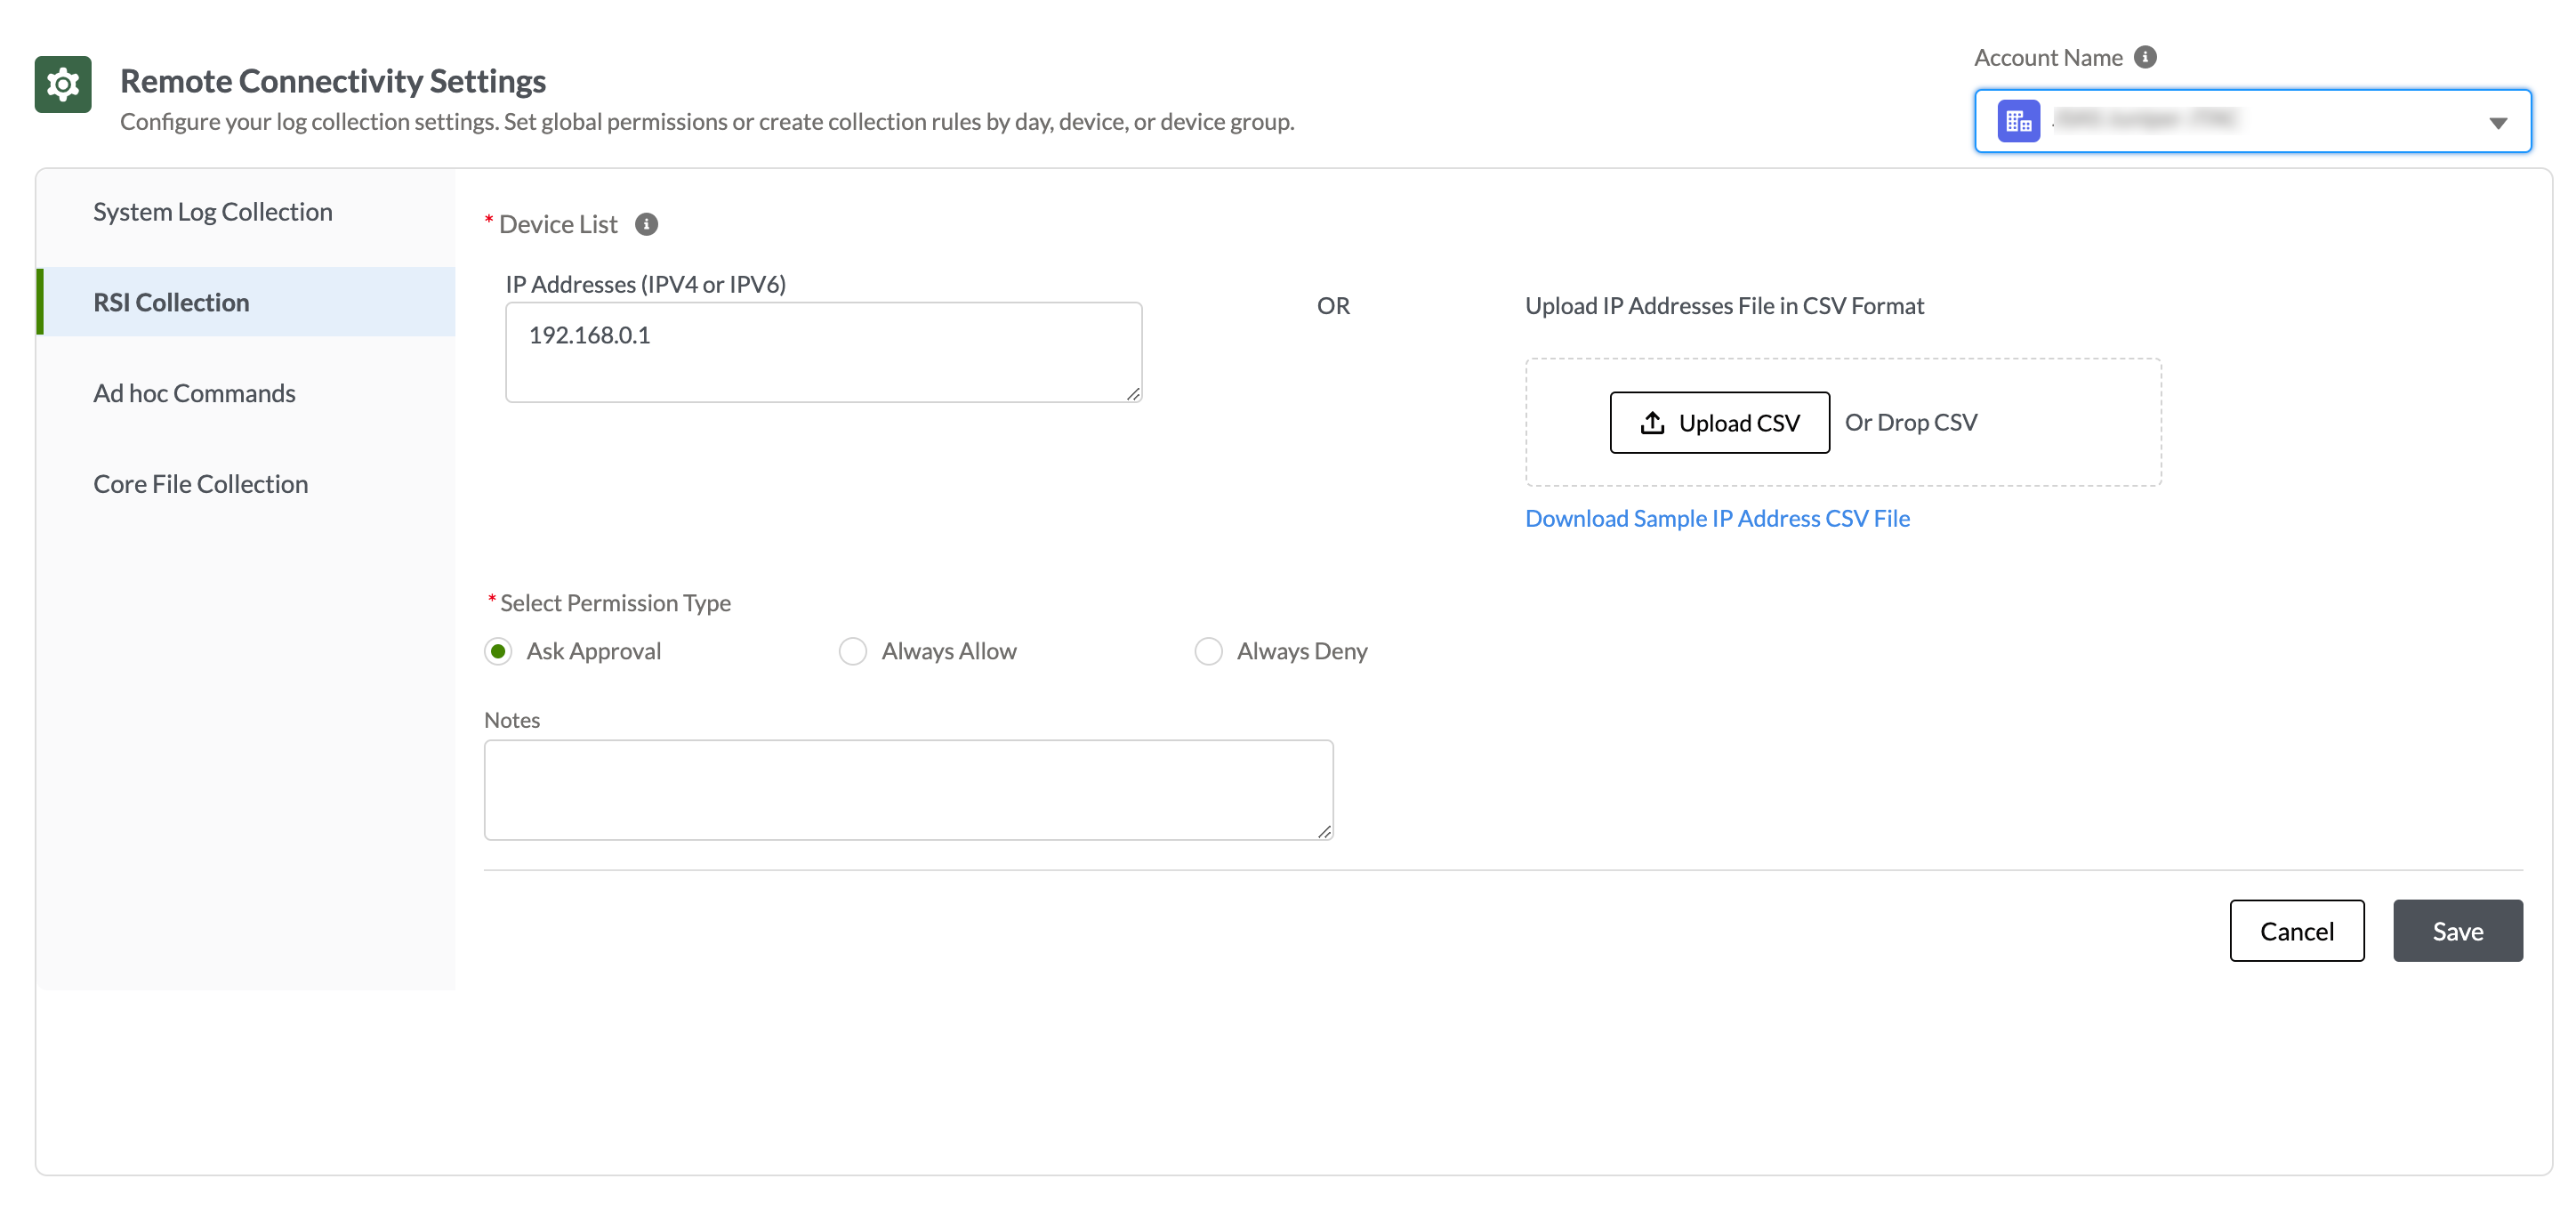
To create separate collection rules for individual devices, click Add in the Device List Rules section. The Device List Rules Settings page opens.
You can configure the collection rule for individual devices, and click Save to save the rule and return to the Remote Connectivity RSI Collection Settings page.