Step 1: Begin
Meet Contrail Service Orchestration
Contrail Service Orchestration (CSO) is a comprehensive software platform that simplifies the deployment of software-defined WAN (SD-WAN) and next-generation firewall (NGFW) services, also called Security Services. You access CSO through a graphical user interface (GUI). Its built-in automation capabilities make it easy to provision, manage, and monitor your WAN, campus, and branch networks.
You can subscribe to our cloud-delivered CSO software-as-a-service (SaaS) or deploy CSO as an on-premises software on your own hardware infrastructure.
This Day One+ guide walks you through the essential steps for deploying the SD-WAN services and NGFW (Security Services) with CSO On-Premises version. The on-premises version of CSO enables you (the customer) to install CSO on your own hardware infrastructure. Therefore, you are responsible for the maintenance and administration of CSO and the underlying hardware infrastructure. Based on your role (Service Provider (SP) Administrator, Operating Company (OpCo) Administrator or Tenant Administrator), we'll show you how to use CSO's intuitive GUI to add tenants and assign CSO licenses, and deploy the SD-WAN and NGFW services.
To understand the terminology used in CSO, see CSO Terminology.
Role-Based Access Control
CSO supports role-based access control (RBAC), which lets users have access rights only to the information they need to do their jobs and prevents them from accessing information that doesn't pertain to them.
CSO has the following types of role scopes:
Service Provider—Applicable to CSO on-premises deployments, in which you (or your company) function as the Service Provider administrator. In CSO SaaS deployments, Juniper Networks acts as the service provider.
OpCo—Short for "Operating Company", an OpCo is a service provider who has multiple large tenants. A single instance of CSO can have multiple OpCos, each with multiple tenants. Tenants managed by one OpCo are isolated from tenants of another OpCo.
Tenant—A tenant is an enterprise customer with many branches (sites) who subscribes to the service provider’s (Juniper Networks) or OpCo’s offerings. Sites are provisioned within a tenant. One tenant cannot see the sites or assets of another.
Here's an overview of the predefined roles in CSO:
Role | Role Scope | Access Privilege |
|---|---|---|
SP Admin | Service Provider | Users with the SP Admin role have full access to the Administration Portal UI and API capabilities. They can add one or more users with SP Admin, SP Operator, and custom roles. They can onboard tenants, and invite the tenant administrators during the tenant onboarding process. They can also add tenant administrators or operators by switching the scope to a specific tenant. |
SP Operator | Service Provider | Users with the SP Operator role have read-only access to the Administration Portal and APIs. |
OpCo Admin | Operating Company | Users with the OpCo Admin role have full access to the OpCo’s Administration Portal. OpCo Admins can add users, onboard tenants, and much more. An OpCo Admin is the highest level of administrator available for CSO SaaS. |
OpCo Operator | Operating Company | Users with the OpCo Operator role have read-only access to the OpCo’s Administration Portal. |
Tenant Admin | Tenant | Users with the Tenant Admin role have full access to the Customer Portal. They can add one or more users with the Tenant Administrator or Tenant Operator roles. |
Tenant Operator | Tenant | Users with the Tenant Operator role have read-only access to the Customer Portal. |
SD-WAN Service
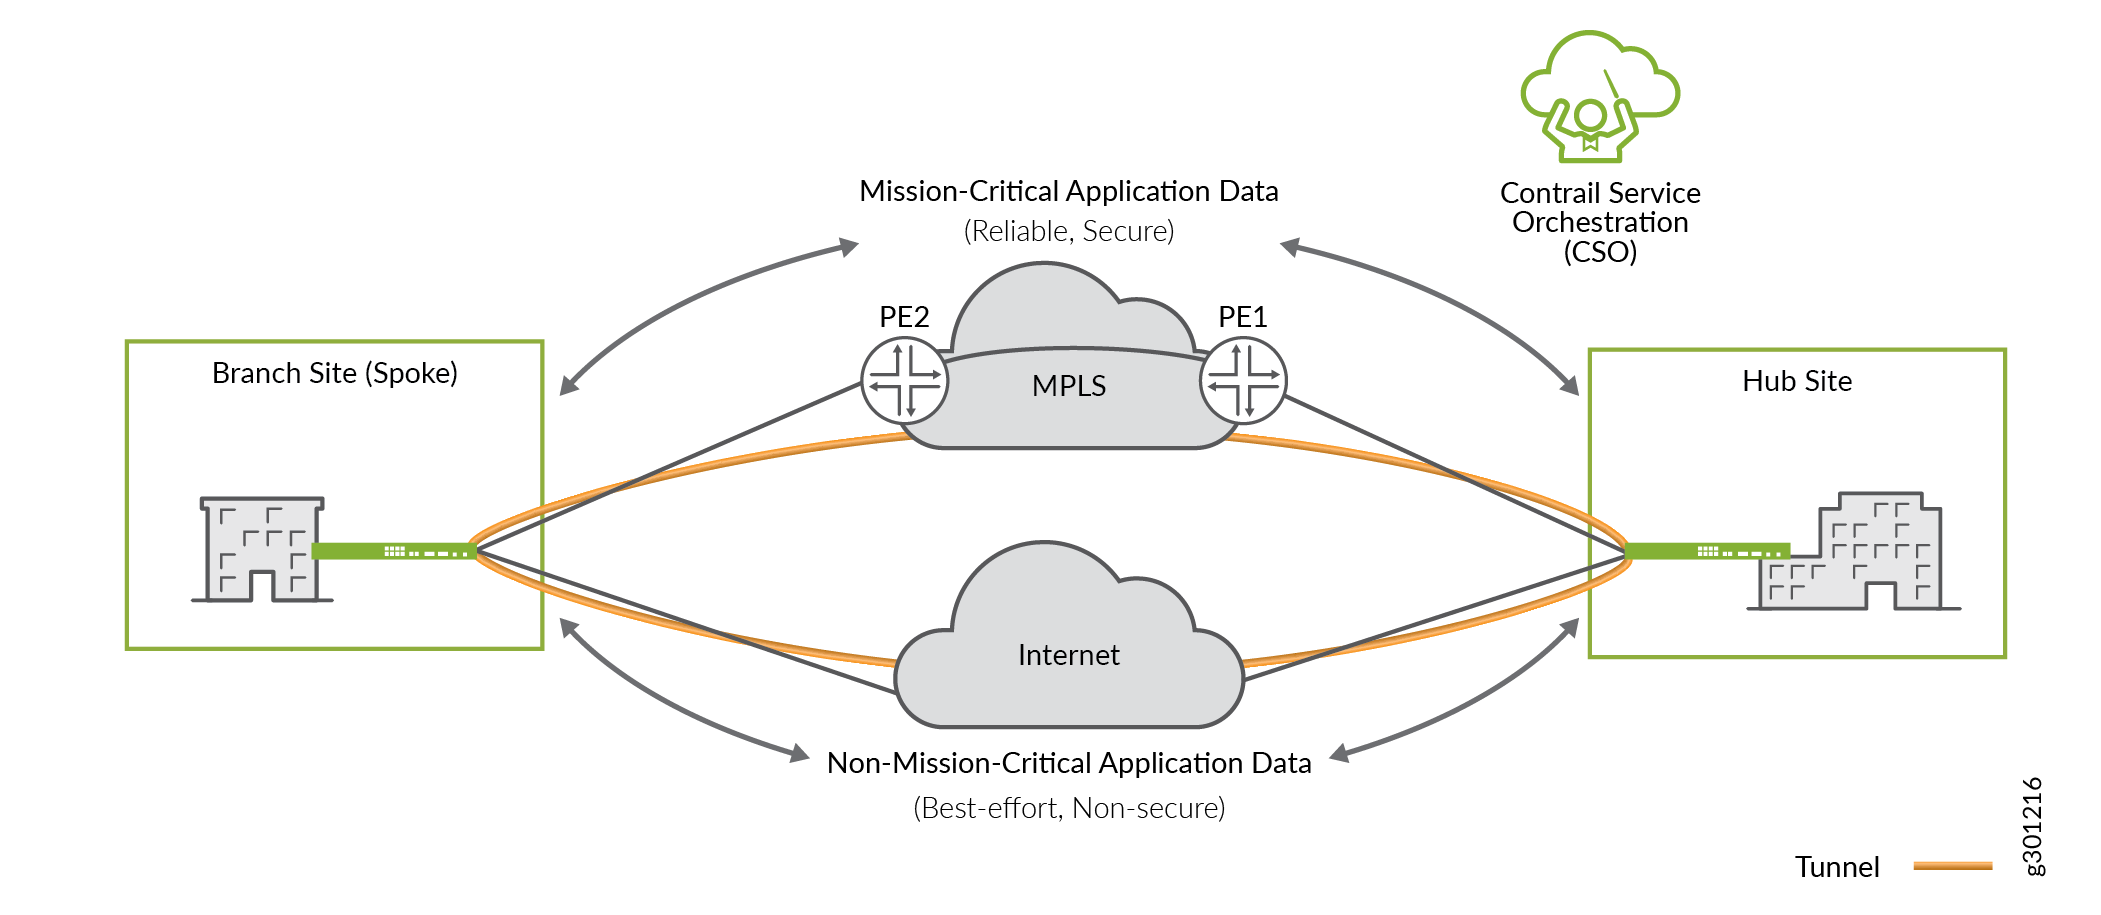
If you deploy the SD-WAN service, CSO intelligently routes traffic through the optimal path based on the criteria you specify in CSO. For example, you can ensure that mission-critical application data is sent over the MPLS link (reliable and secure path) and the non-mission-critical application data is sent over the Internet link (best-effort, non-secure path). CSO also performs load balancing automatically and manages network congestion to route traffic efficiently.
Here's an illustration of a simple SD-WAN deployment:

This example shows how SD-WAN is applied using CSO in a topology that has one branch site and one hub site. CSO builds one tunnel for the WAN links going over the MPLS network and a second tunnel for the WAN links going over the Internet.
CSO supports the following SD-WAN services for a site:
Secure SD-WAN Essentials—This service is ideal for small enterprises looking to manage simple WAN connectivity with comprehensive NGFW security services at the branch sites, using link-based application steering. The SD-WAN Essentials service allows Internet traffic to break out locally, thus avoiding the need to backhaul web traffic over VPN or MPLS links. You can create site-to-site VPN between branch sites (with or without hubs).
Secure SD-WAN Advanced—Provides the complete SD-WAN service. This service is ideal for enterprises with one or more data centers, requiring flexible topologies and dynamic application steering. Site-to-site connectivity can be established by using a hub in a hub-and-spoke topology or through static or dynamic mesh VPN tunnels.
NGFW Service (Security Services)
If you deploy the NGFW service (Security Services) at a branch site, you can implement network security at this site using an SRX Series NGFW device as the CPE. You don't need to modify your existing network infrastructure to use the NGFW service. You only need to connect the SRX Series NGFW device to an OAM hub for monitoring and management.
Here's an illustration of a simple NGFW deployment:

Before You Begin
Before you begin, ensure that you’ve:
Received the account activation e-mail (Subject line: CSO Account Created) that contains the CSO URL and login credentials.
Activated your account by following the instructions specified in the account activation e-mail.
Installed Google Chrome (version 60 or later) or Mozilla Firefox (version 78 or later) to access the CSO GUIs.
If you’re deploying CSO as an on-premises solution, you need to first install CSO. See the Installation and Upgrade Guide for the installation procedure.
Log In to CSO
- Click the URL in the account activation e-mail to access
CSO.
The CSO login page opens.
- Log in with the username (the e-mail address to which
the activation e-mail was sent) and the password that you set up.
If two-factor authentication is enabled, you are prompted for a verification
code.
If you’re an SP or OpCo user, you’re taken to the Administration Portal. If you’re a tenant user, you're taken to the Customer Portal.
Once you’re redirected to the portal, you’ll see the Welcome screen. Click Go to Dashboard to view the CSO home page.
CSO Home Page
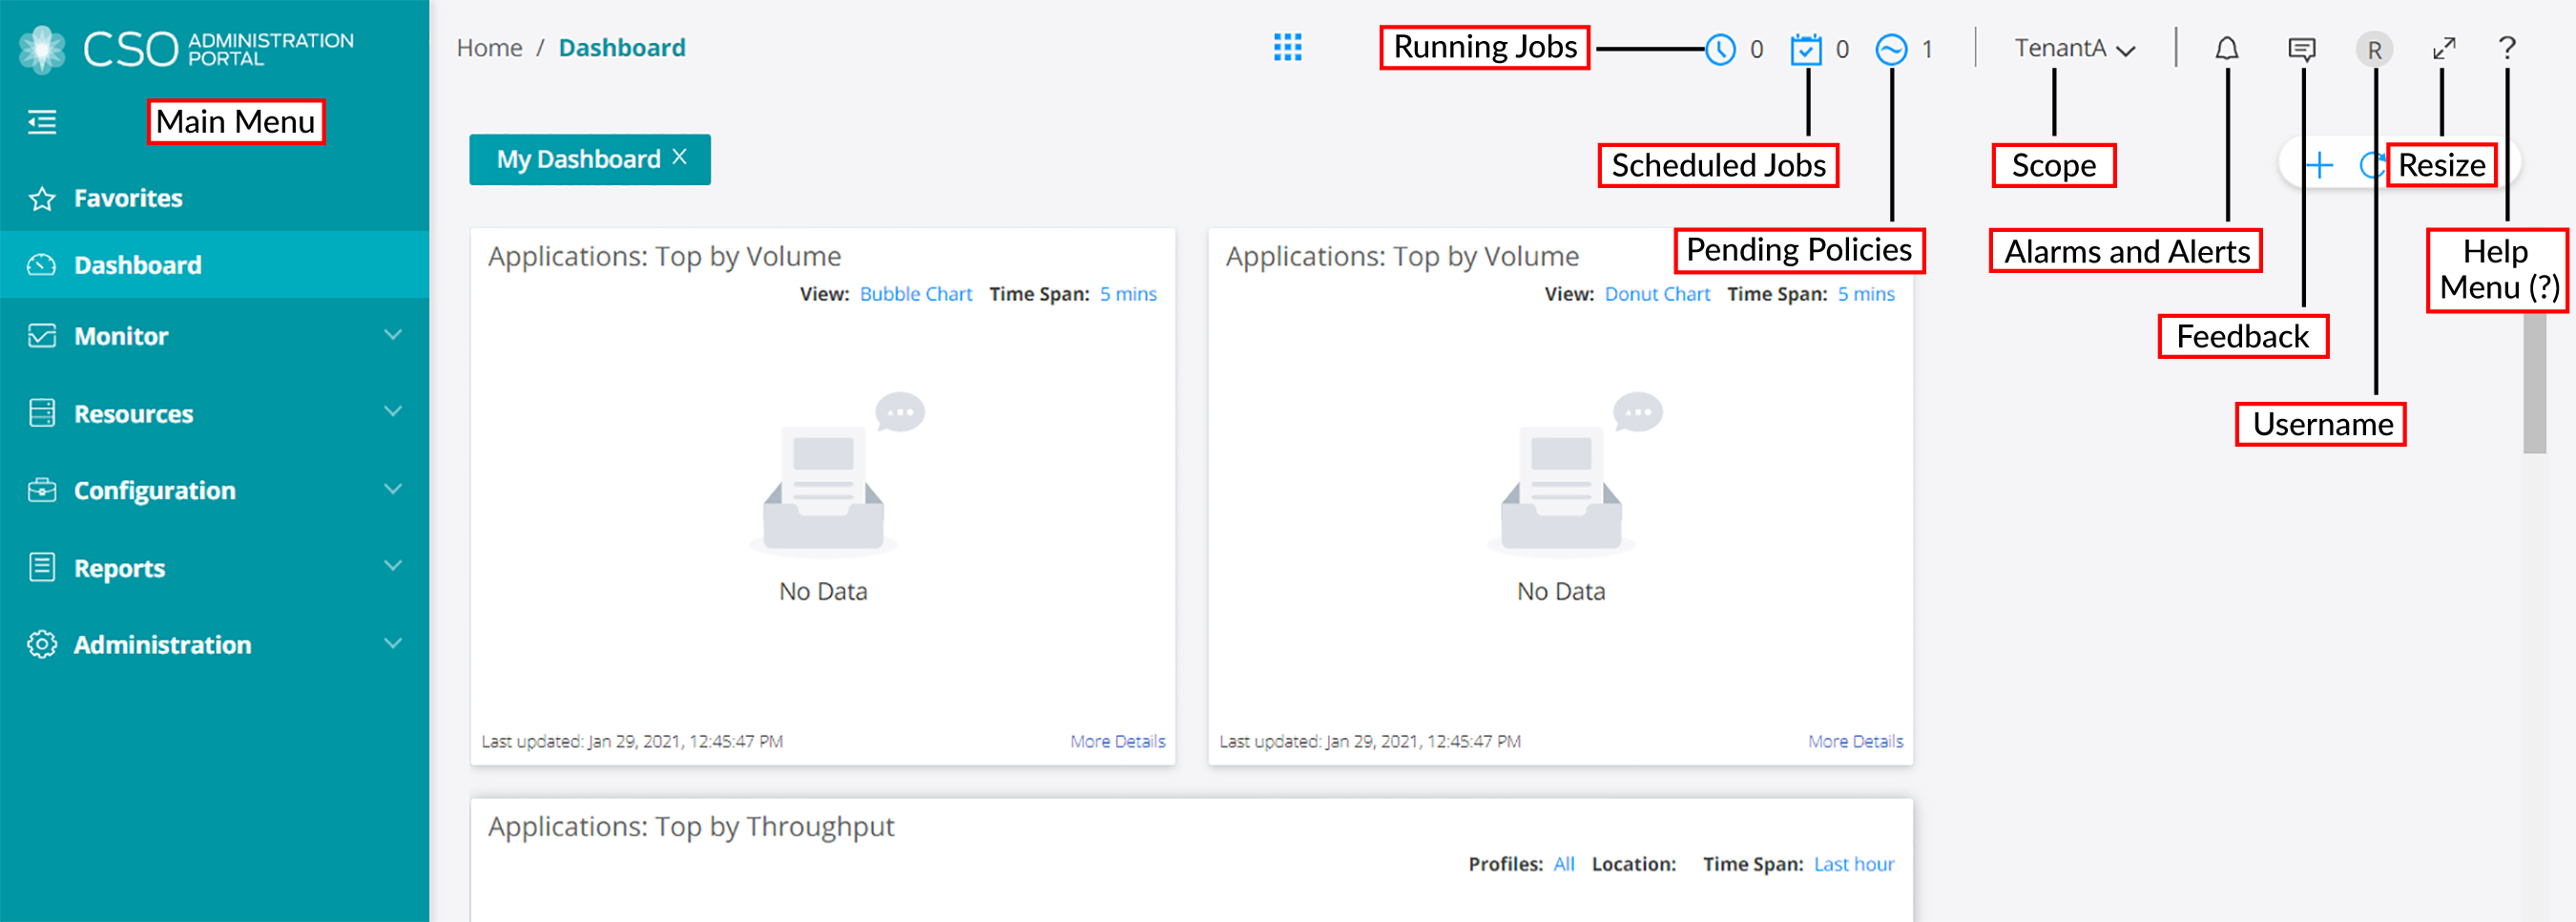
Here’s an illustration that shows the GUI elements on the CSO home page:

Let's explore the GUI elements on the CSO home page.
GUI Element | Description |
|---|---|
Left-nav Bar | |
Main Menu | Shows the main menu options available in the portals Note: There are different options for OpCo Administrators and Tenant Administrators. |
Banner | |
Running Jobs | Shows the list of jobs that are currently in progress |
Scheduled Jobs | Shows the list of jobs that are scheduled |
Pending Policies | Shows the list of policies that are due for deployment on the devices managed by CSO Note: This icon is available only in the Customer Portal. |
Scope | Displays the name of the OpCo or tenant. Click the down arrow to view the scope (OpCo scope or tenant scope) that you’re currently in. |
Alarms and Alerts | Shows the following two tabs:
|
Feedback | Click this icon to provide feedback (through e-mail) about the product or report any issues that you’re facing |
Username | Hover over the icon to see the username of the user currently logged in to CSO |
Resize | Click this icon to resize the page to full screen |
Help Menu (?) | Click this icon to access the various embedded help panels and online help |
