Maintaining the SRX5800 Cooling System
Maintaining the Fan Trays on the SRX5800 Firewall
Purpose
For optimum cooling, verify the condition of the fans.
Action
Monitor the status of the fans. A fan tray contains multiple fans that work in unison to cool the firewall components. If one fan fails, the host subsystem adjusts the speed of the remaining fans to maintain proper cooling. A major alarm is triggered when a fan fails, and a minor alarm and major alarm is triggered when a fan tray is removed.
To display the status of the cooling system, issue the
show chassis environmentcommand.user@host> show chassis environment
Note:In the Junos OS command-line interface (CLI):
The
show chassis environmentcommand output displays the fan trays asUpper Fan TrayandBottom Fan Tray.The
show chassis hardwarecommand output displays the fan trays asFan Tray 0for the upper fan tray andFan Tray 1for the bottom fan tray.
The fan numbers are stamped into the fan tray sheet metal next to each fan.
Replacing an SRX5800 Firewall Fan Tray
The fan trays are hot-insertable and hot-removable. To replace a fan tray, perform the following procedures in sequence:
Removing an SRX5800 Firewall Fan Tray
Before you begin to remove the fan tray:
Ensure you understand how to prevent electrostatic discharge (ESD) damage. See Prevention of Electrostatic Discharge Damage.
Ensure that you have the following available:
ESD grounding strap
Phillips (+) number 2 screwdriver
To prevent overheating, install the replacement fan tray immediately after removing the existing fan tray. Do not operate the firewall for more than two minutes without both fan trays installed.
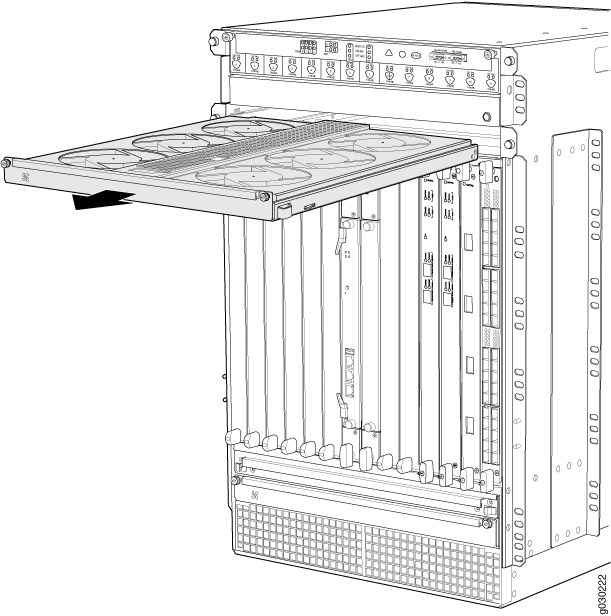
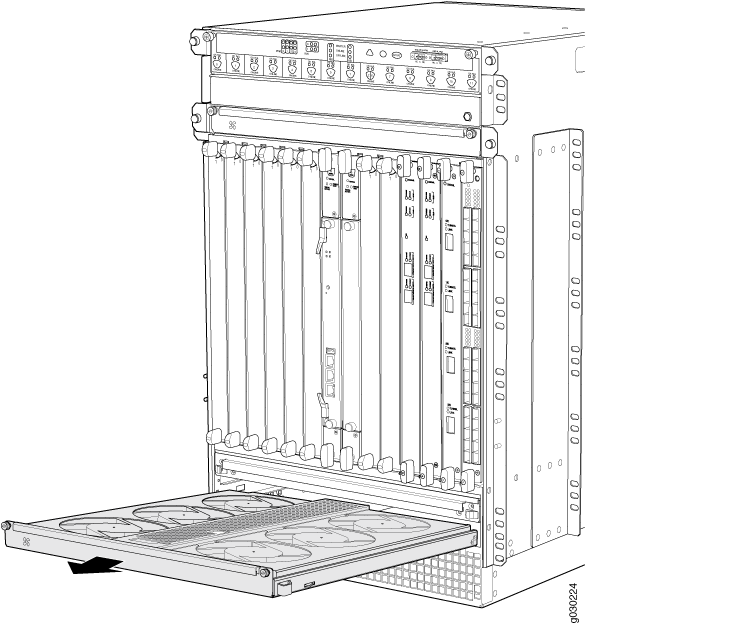
To remove the upper or bottom fan tray (see Figure 1 and Figure 2):


Installing an SRX5800 Firewall Fan Tray
Before you begin to install the fan tray:
Ensure you understand how to prevent electrostatic discharge (ESD) damage. See Prevention of Electrostatic Discharge Damage.
Ensure that you have the following available:
ESD grounding strap
Phillips (+) number 2 screwdriver
To prevent overheating, install the replacement fan tray immediately after removing the existing fan tray. Do not operate the firewall for more than two minutes without both fan trays installed.
- Attach an ESD grounding strap to your bare wrist, and connect the strap to one of the ESD points on the chassis.
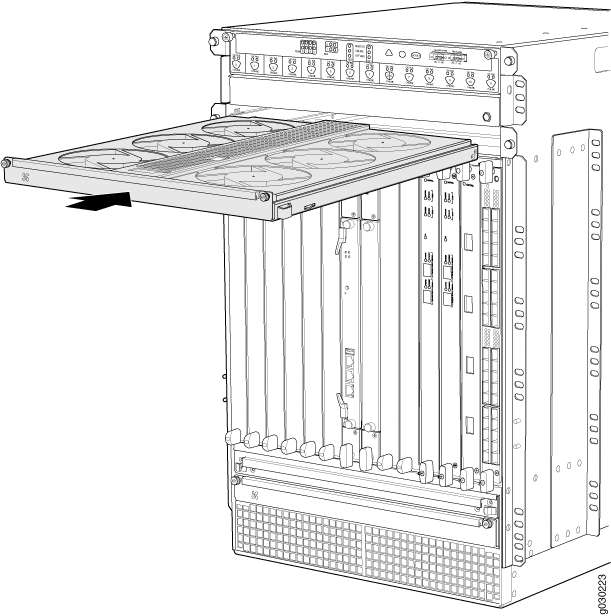
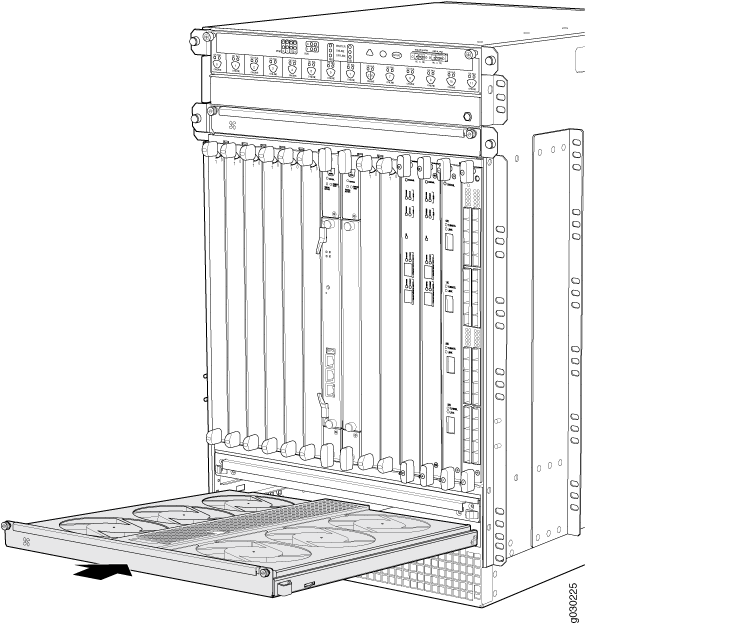
- Grasp the fan tray on each side and insert it straight into the chassis. Note the correct orientation by the "this side up" label on the top surface of the fan tray.
- Using the Phillips (+) number 2 screwdriver tighten the captive screws on each side of the fan tray faceplate to secure it in the chassis.
- Lower the cable manager back into position, if necessary.


Maintaining the Air Filter on the SRX5800 Firewall
Purpose
For optimum cooling, verify the condition of the air filters.
Action
Regularly inspect the air filter. A dirty air filter restricts airflow in the unit, impeding the ventilation of the chassis. The filter degrades over time. Periodically replace the filter in use, as well as spares. We recommend that you replace the filter every six months. Discard used filters, do not attempt to clean and reuse them.
Note:Air filters will not be replaced by Juniper Networks under the Juniper Networks Hardware Replacement Support Plan, you need to purchase them for replacement.
CAUTION:Always keep the air filter in place while the firewall is operating. Because the fans are very powerful, they could pull small bits of wire or other materials into the firewall through the unfiltered air intake. This could damage the firewall components.
The shelf life of polyurethane filter varies from two years to five years depending on the storage conditions. Store in a cool, dry, and dark environment. Wrap the media in plastic and store in an environment with relative humidity between 40%- 80% and temperature between 40°F (4° C) to 90°F (32° C). Note that if the material flakes, or becomes brittle when rubbed or deformed, it is no longer usable.
Replacing the SRX5800 Firewall Air Filter
You should change the air filter every six months. To replace the air filter, perform the following procedures in sequence:
Removing the SRX5800 Firewall Air Filter
Before you begin to remove the air filter:
-
Ensure you understand how to prevent electrostatic discharge (ESD) damage. See Prevention of Electrostatic Discharge Damage.
Ensure that you have the following available:
-
ESD grounding strap
Do not run the firewall for more than two minutes without the air filter in place.
Always keep the air filter in place while the firewall is operating, except during replacement. Because the fans are very powerful, they could pull small bits of wire or other materials into the firewall through the unfiltered air intake. This could damage the firewall components.
To remove the air filter (see Figure 5):

Installing the SRX5800 Firewall Air Filter
Before you begin to install the air filter:
-
Ensure you understand how to prevent electrostatic discharge (ESD) damage. See Prevention of Electrostatic Discharge Damage.
Ensure that you have the following available:
-
ESD grounding strap
You should change the air filter every six months.
To install the air filter (see Figure 6):
- Attach an ESD grounding strap to your bare wrist, and connect the strap to one of the ESD points on the chassis.
- Ensure the air filter is right side up.
- Place the air filter into the air filter tray.
- Insert the air filter tray into the chassis by sliding it straight into the chassis until it stops.
- Lower the cable manager back into position.
- Rearrange the cables in the cable manager.

