Returning the SRX5400 Chassis or Components
Contacting Customer Support
Once you have located the serial numbers of the firewall or component, you can return the firewall or component for repair or replacement. For this, you need to contact Juniper Networks Technical Assistance Center (JTAC).
You can contact JTAC 24 hours a day, 7 days a week, using any of the following methods:
On the Web: Using the Service Request Manager link at https://support.juniper.net/support/
By telephone:
From the US and Canada: 1-888-314-JTAC
From all other locations: 1-408-745-9500
Note:If contacting JTAC by telephone, enter your 12-digit service request number followed by the pound (#) key if this is an existing case, or press the star (*) key to be routed to the next available support engineer.
Return Procedure for the SRX5400 Firewall
If a problem cannot be resolved by the JTAC technician, a Return Materials Authorization (RMA) is issued. This number is used to track the returned material at the factory and to return repaired or new components to the customer as needed.
Do not return any component to Juniper Networks, Inc. unless you have first obtained an RMA number. Juniper Networks, Inc. reserves the right to refuse shipments that do not have an RMA. Refused shipments will be returned to the customer via collect freight.
For more information about return and repair policies, see the customer support Web page at https://www.juniper.net/support/guidelines.html .
To return a firewall or component to Juniper Networks for repair or replacement:
For more information about return and repair policies, see the customer support webpage at https://www.juniper.net/support/guidelines.html .
For product problems or technical support issues, open a support case using the Case Manager link at https://support.juniper.net/support/ or call 1-888-314-JTAC (within the United States) or 1-408-745-9500 (outside the United States).
Listing the SRX5400 Firewall Component Serial Numbers with the CLI
Before contacting Juniper Networks, Inc. to request a Return Materials Authorization (RMA), you must find the serial number on the firewall or component. To display all of the firewall components and their serial numbers, enter the following command-line interface (CLI) command:
user@host> show chassis hardware
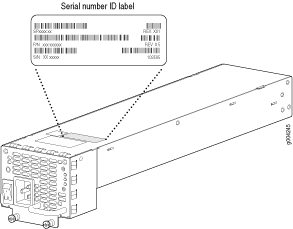
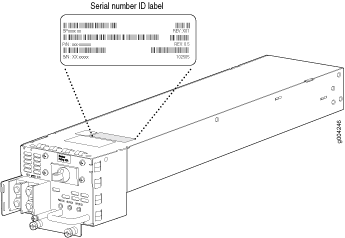
Most components also have a small rectangular serial number ID label (see Figure 1) attached to the component body.

Locating the SRX5400 Firewall Chassis Serial Number Label
The chassis serial number is located on the right side, top corner of the chassis.
Locating the SRX5400 Firewall Power Supply Serial Number Labels
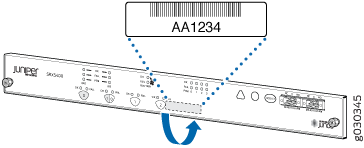
Locating the SRX5400 Firewall Craft Interface Serial Number Label
The serial number is located on the back of the craft interface panel (see Figure 4).
Information You Might Need to Supply to JTAC
When requesting support from JTAC by telephone, be prepared to provide the following information:
Your existing case number, if you have one
Details of the failure or problem
Type of activity being performed on the firewall when the problem occurred
Configuration data displayed by one or more
showcommandsYour name, organization name, telephone number, fax number, and shipping address
Required Tools and Parts for Packing the SRX5400 Firewall
To remove components from the firewall or the firewall from a rack, you need the following tools and parts:
2.5-mm flat-blade (–) screwdriver, for detaching alarm relay terminal block
7/16-in. (11 mm) nut driver
Blank panels to cover empty slots
Electrostatic bag or antistatic mat, for each component
Electrostatic discharge (ESD) grounding wrist strap
Flat-blade (–) screwdriver
Mechanical lift, if available
Phillips (+) screwdrivers, numbers 1 and 2
Rubber safety cap for fiber-optic interfaces or cable
Wire cutters
Packing the SRX5400 Firewall for Shipment
To pack the firewall for shipment:
Packing SRX5400 Firewall Components for Shipment
Follow these guidelines for packing and shipping individual components of the firewall:
When you return a component, make sure that it is adequately protected with packing materials and packed so that the pieces are prevented from moving around inside the carton.
Use the original shipping materials if they are available.
Place the individual component in an electrostatic bag.
Write the Return Materials Authorization (RMA) number on the exterior of the box to ensure proper tracking.
Do not stack any of the firewall components during packing.