ON THIS PAGE
1-Port VDSL2 Annex A Mini-Physical Interface Module (SRX-MP-1VDSL2-R) Overview
1-Port VDSL2 Annex A Mini-Physical Interface Module (SRX-MP-1VDSL2-R) Hardware Specifications
1-Port VDSL2 Annex A Mini-Physical Interface Module (SRX-MP-1VDSL2-R) LEDs
1-Port VDSL2 Annex A Mini-Physical Interface Module (SRX-MP-1VDSL2-R) Supported Profiles
1-Port VDSL2 Annex A (SRX-MP-1VDSL2-R) Mini-Physical Interface Module Cable Specifications
1-Port VDSL2 Annex A Mini-Physical Interface Module (SRX-MP-1VDSL2-R) Basic Configuration
1-Port VDSL2 Annex A Mini-Physical Interface Module (SRX-MP-1VDSL2-R)
1-Port VDSL2 Annex A Mini-Physical Interface Module (SRX-MP-1VDSL2-R) Overview
Very-high-bit-rate digital subscriber line (VDSL) technology is part of the xDSL family of modem technologies, which provide faster data transmission over a single flat untwisted or twisted pair of copper wires. The 1-Port VDSL2 Annex A Mini-PIM carries the Ethernet backplane. When the Mini-PIM is plugged into the chassis, the Mini-PIM connects to one of the ports of the baseboard switch. The 1-Port VDSL2 Annex A Mini-PIM on the SRX Series Services Gateway provides ADSL backward compatibility.
The 1-Port VDSL2 Annex A Mini-PIM is compatible with the ITU-T G.993.2 (VDSL2) standard.
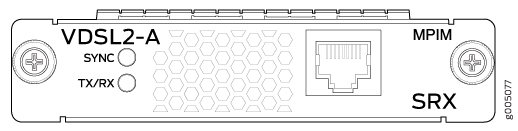
Figure 1 shows the 1-Port VDSL2 Annex A (SRX-MP-1VDSL2-R) Mini-PIM.
The following features are supported on the 1-Port VDSL2 Annex A Mini-Physical Interface Module (Mini-PIM):
ADSL/ADSL2/ADSL2+ backward compatibility with Annex-A, Annex-M support
Packet Mode Transfer (PTM) or Ethernet in the First Mile (EFM) (802.3ah) support
Operation, Administration, and Maintenance (OAM) support for ADSL/ADSL2/ADSL2+ mode
Asynchronous Transfer Mode (ATM) quality of service (QoS) (supported only when the VDSL2 Mini-PIM is operating in ADSL2 mode)
Multilink Point-to-Point Protocol (MLPPP) (supported only when the VDSL2 Mini-PIM is operating in ADSL2 mode)
Support for a maximum of 10 permanent virtual connections (PVCs) (only in ADSL/ADSL2/ADSL2+ mode)
Dying Gasp support (ADSL and VDSL2 mode)
1-Port VDSL2 Annex A Mini-Physical Interface Module (SRX-MP-1VDSL2-R) Hardware Specifications
Table 1 gives the hardware specifications of the 1-Port VDSL2 Annex A Mini-Physical Interface Module (Mini-PIM).
Description |
Value |
|---|---|
Dimensions (H x W x L) |
3.75 in. x 5.9 in. x 0.80 in.(9.5 cm x 14.5 cm x 2.0 cm) |
Weight |
4.0 oz (114 g) |
Connector type |
RJ-11 |
Form factor |
Mini-PIM |
Environmental operating temperature |
32°F through 113°F (0° C through 40° C) |
Storage temperature |
–40°F through 158°F (–40° C through 70° C) |
Relative humidity |
5% to 90% noncondensing |
1-Port VDSL2 Annex A Mini-Physical Interface Module (SRX-MP-1VDSL2-R) LEDs
The 1-Port VDSL2 Annex A Mini-Physical Interface Module (Mini-PIM) has two LEDs. Table 2 describes the LED states.
LED |
Color |
State |
Description |
|---|---|---|---|
SYNC |
Green |
On |
Indicates that the VDSL interface is trained. |
Blinking |
Indicates training is in progress. |
||
TX/RX |
Green |
Blinking |
Indicates that traffic is passing through. |
Off |
Indicates that no traffic is passing through. |
1-Port VDSL2 Annex A Mini-Physical Interface Module (SRX-MP-1VDSL2-R) Supported Profiles
A profile is a table that contains a list of preconfigured VDSL2 settings. Table 3 lists the different profiles supported on the 1-Port VDSL2 Annex A Mini-PIM, along with their data rates.
Profiles |
Data Rate |
|---|---|
8a |
50 |
8b |
50 |
8c |
50 |
8d |
50 |
12a |
68 |
12b |
68 |
17a |
100 |
Auto |
Auto mode (default) |
1-Port VDSL2 Annex A (SRX-MP-1VDSL2-R) Mini-Physical Interface Module Cable Specifications
The 1-Port VDSL2 (Annex A) Mini-Physical Interface Module (Mini-PIM) requires a standard RJ-11 cable.
Figure 2 shows the RJ-11 cable design.
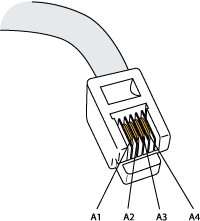
Table 4 shows the pin assignments of the RJ-11 cable.
Pin |
Signal |
|---|---|
A1 |
Ground |
A2 |
RX (data input) |
A3 |
Tx (data output) |
A4 |
Vcc (power) |
1-Port VDSL2 Annex A Mini-Physical Interface Module (SRX-MP-1VDSL2-R) Basic Configuration
To enable the 1-Port VDSL2 Annex A Mini-Physical Interface Module (Mini-PIM) installed on the services gateway, you must configure the basic settings for the PIM. You can perform the configuration tasks for this using either the J-Web interface or the CLI.
Using the J-Web Interface
To perform basic configuration for the 1-Port VDSL2 (Annex A) Mini-Physical Interface Module (Mini-PIM) and to configure network interfaces for the services gateway using the J-Web interface:
For more information, in the J-Web interface, select Configure>Interfaces and click Help.
Using the CLI
To perform basic configuration of the 1-Port VDSL2 Annex A Mini-PIM and to configure network interfaces for the services gateway with the CLI:
Verify that the 1-Port VDSL2 interface is installed on the device:
show chassis hardwareVerify the status of the interface:
show interfaces terseAssign the port an IP address:
set interfaces pt-1/0/0 unit 0 family inet address interface address/destination prefixAdd or select a security zone; for example, Zone1:
set security zones security-zone trust interfaces pt-1/0/0.0
host-inbound-traffic system-services all
Add or select security zones for host inbound traffic options protocols:
set security zones security-zone trust interfaces pt-1/0/0.0
host-inbound-traffic protocols all
Set security policies:
set security policies default-policy permit-all
Upgrading the Firmware on the VDSL2 Mini-PIM
To upgrade the firmware on the VDSL2 Mini-PIM using the CLI: