ON THIS PAGE
1-Port Serial Mini-Physical Interface Module (SRX-MP-1SERIAL-R) Overview
1-Port Serial Mini-Physical Interface Module (SRX-MP-1SERIAL-R) Hardware Specifications
1-Port Serial Mini-Physical Interface Module (SRX-MP-1SERIAL-R) LEDs
1-Port Serial Mini-Physical Interface Module Interface Cables
1-Port Serial Mini-Physical Interface Module (SRX-MP-1SERIAL-R) Basic Configuration
1-Port Serial Mini-Physical Interface Module (SRX-MP-1SERIAL-R)
1-Port Serial Mini-Physical Interface Module (SRX-MP-1SERIAL-R) Overview
Serial WAN links are bidirectional links and require very few control signals. In a basic serial setup, the data circuit-terminating equipment (DCE) is responsible for establishing, maintaining, and terminating a connection. A modem is a typical DCE device. A serial cable connects the DCE to a telephony network where, ultimately, a link is established with data terminal equipment (DTE). DTE is typically where a link terminates.
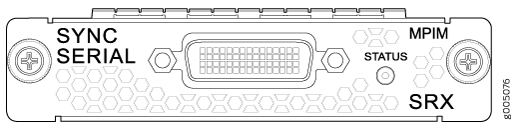
Figure 1 shows the front panel of the 1-Port Serial Mini-Physical Interface Module (Mini-PIM).
The 1-Port Serial Mini-Physical Interface Module (Mini-PIM) provides the following key features:
Autoselection of operational modes based on DTE or DCE cables
Local and remote loopback diagnostics
Configurable clock rate for the transmit (TX) clock and receive (RX) clock
Complete configuration and management by using the CLI and the J-Web interface
The 1-Port Serial Mini-Physical Interface Module (Mini-PIM) supports the following standards:
TIA/EIA 530
V.35
X.21
RS-232
RS-449
1-Port Serial Mini-Physical Interface Module (SRX-MP-1SERIAL-R) Hardware Specifications
Table 1 lists the physical specifications of the 1-Port Serial Mini-Physical Interface Module (Mini-PIM).
Description |
Value |
|---|---|
Dimensions (H x W x L) |
0.8 in. x 3.75 in. x 5.9 in.(2.0 cm x 9.5 cm x 14.5 cm) |
Weight |
3.04 oz (86 g) |
Connector type |
60-pin Synchronous Serial (socket) |
Form factor |
Mini-PIM |
1-Port Serial Mini-Physical Interface Module (SRX-MP-1SERIAL-R) LEDs
The 1-Port Serial Mini-Physical Interface Module (Mini-PIM) has one LED located to the right of the serial port. Table 2 describes the LED states.
Name |
Color |
State |
Description |
|---|---|---|---|
STATUS |
Green |
On |
Online with no alarms or failures. |
Off |
Device has detected a failure. |
1-Port Serial Mini-Physical Interface Module Interface Cables
Table 3 lists the cables that you can order from Juniper Networks to connect to a port on the synchronous 1-Port Serial Mini-Physical Interface Module (Mini-PIM). The device to which you are connecting and the serial interface types determine which type of cable you need.
Product Number |
Interface Type |
Length |
Connector Type |
|---|---|---|---|
JX-CBL-EIA530-DCE |
EIA530 cable (DCE) |
3.04 m (10 ft) |
Socket |
JX-CBL-EIA530-DTE |
EIA530 cable (DTE) |
3.04 m (10 ft) |
Plug |
JX-CBL-RS232-DCE |
RS232 cable (DCE) |
3.04 m (10 ft) |
Socket |
JX-CBL-RS232-DTE |
RS232 cable (DTE) |
3.04 m (10 ft) |
Plug |
JX-CBL-RS449-DCE |
RS449 cable (DCE) |
3.04 m (10 ft) |
Socket |
JX-CBL-RS449-DTE |
RS449 cable (DTE) |
3.04 m (10 ft) |
Plug |
JX-CBL-V35-DCE |
V.35 cable (DCE) |
3.04 m (10 ft) |
Socket |
JX-CBL-V35-DTE |
V.35 cable (DTE) |
3.04 m (10 ft) |
Plug |
JX-CBL-X21-DCE |
X.21 cable (DCE) |
3.04 m (10 ft) |
Socket |
JX-CBL-X21-DTE |
X.21 cable (DTE) |
3.04 m (10 ft) |
Plug |
EIA-530A DCE and DTE Cable Pinouts
- EIA-530A DCE Cable Pinouts for the 1-Port Serial Mini-Physical Interface Module
- EIA-530A DTE Cable Pinouts for the 1-Port Serial Mini-Physical Interface Module
EIA-530A DCE Cable Pinouts for the 1-Port Serial Mini-Physical Interface Module
Table 4 gives the EIA-530A DCE cable pinouts.
LFH-60 Pin |
DB-25 Pin |
LFH-60 Pairing |
Description |
|---|---|---|---|
15 |
1 |
- |
Shield Ground |
1 |
2 |
2 |
Transmit Data (A) |
60 |
3 |
59 |
Receive Data (A) |
37 |
4 |
38 |
Request to Send (A) |
48 |
5 |
47 |
Clear to Send (A) |
33 |
6 |
- |
Data Set Ready (A) |
57 |
7 |
- |
Signal Ground |
13 |
8 |
14 |
Received Line Signal Detector (A) |
51 |
9 |
52 |
Receive Clock (B) |
14 |
10 |
13 |
Received Line Signal Detector (B) |
6 |
11 |
5 |
Terminal Timing (B) |
55 |
12 |
56 |
Transmit Clock (B) |
47 |
13 |
48 |
Clear to Send (B) |
2 |
14 |
1 |
Transmit Data (B) |
56 |
15 |
55 |
Transmit Clock (A) |
59 |
16 |
60 |
Receive Data (B) |
52 |
17 |
51 |
Receive Clock (A) |
45 |
18 |
- |
Local Loopback |
38 |
19 |
37 |
Request to Send (B) |
9 |
20 |
- |
Data Terminal Ready (A) |
4 |
23 |
- |
Signal Ground |
5 |
24 |
6 |
Terminal Timing (A) |
26 to 25 |
- |
- |
- |
30 to 29 |
- |
- |
- |
EIA-530A DTE Cable Pinouts for the 1-Port Serial Mini-Physical Interface Module
Table 5 gives the EIA-530A DTE cable pinouts.
LFH-60 Pin |
DB-25 Pin |
LFH-60 Pairing |
Description |
|---|---|---|---|
15 |
1 |
- |
Shield Ground |
60 |
2 |
59 |
Transmit Data (A) |
1 |
3 |
2 |
Receive Data (A) |
48 |
4 |
47 |
Request to Send (A) |
37 |
5 |
38 |
Clear to Send (A) |
9 |
6 |
- |
Data Set Ready (A) |
57 |
7 |
- |
Signal Ground |
13 |
8 |
14 |
Received Line Signal Detector (A) |
6 |
9 |
5 |
Receive Clock (B) |
14 |
10 |
13 |
Received Line Signal Detector (B) |
51 |
11 |
52 |
Terminal Timing (B) |
55 |
12 |
56 |
Transmit Clock (B) |
38 |
13 |
37 |
Clear to Send (B) |
59 |
14 |
60 |
Transmit Data (B) |
56 |
15 |
55 |
Transmit Clock (A) |
2 |
16 |
1 |
Receive Data (B) |
5 |
17 |
6 |
Receive Clock (A) |
41 |
18 |
- |
Local Loopback |
47 |
19 |
48 |
Request to Send (B) |
33 |
20 |
- |
Data Terminal Ready (A) |
4 |
23 |
- |
Signal Ground |
52 |
24 |
51 |
Terminal Timing (A) |
26 to 25 |
- |
- |
- |
30 to 29 |
- |
- |
- |
18 to 17 |
- |
- |
- |
RS-232 DCE and DTE Cable Pinouts
- RS-232 DCE Cable Pinouts for the 1-Port Serial Mini-Physical Interface Module
- RS-232 DTE Cable Pinouts for the 1-Port Serial Mini-Physical Interface Module
RS-232 DCE Cable Pinouts for the 1-Port Serial Mini-Physical Interface Module
Table 6 gives the RS-232 DCE cable pinouts.
LFH-60 Pin |
DB-25 Pin |
LFH-60 Pairing |
Description |
|---|---|---|---|
15 |
1 |
- |
Frame Ground |
1 |
2 |
- |
Transmit Data |
60 |
3 |
- |
Receive Data |
37 |
4 |
- |
Request to Send |
48 |
5 |
- |
Clear to Send |
33 |
6 |
- |
Data Set Ready |
57 |
7 |
- |
Signal Ground |
13 |
8 |
- |
Data Carrier Detect |
56 |
15 |
- |
Transmit Clock |
52 |
17 |
- |
Receive Clock |
45 |
18 |
- |
Local Loopback |
9 |
20 |
- |
Data Terminal Ready |
5 |
24 |
- |
Terminal Clock |
22 to 21 |
- |
- |
- |
RS-232 DTE Cable Pinouts for the 1-Port Serial Mini-Physical Interface Module
Table 7 gives the RS-232 DTE cable pinouts.
LFH-60 Pin |
DB-25 Pin |
LFH-60 Pairing |
Description |
|---|---|---|---|
15 |
1 |
- |
Frame Ground |
60 |
2 |
- |
Transmit Data |
1 |
3 |
- |
Receive Data |
48 |
4 |
- |
Request to Send |
37 |
5 |
- |
Clear to Send |
9 |
6 |
- |
Data Set Ready |
57 |
7 |
- |
Signal Ground |
13 |
8 |
- |
Data Carrier Detect |
56 |
15 |
- |
Transmit Clock |
5 |
17 |
- |
Receive Clock |
41 |
18 |
- |
Local Loopback |
33 |
20 |
- |
Data Terminal Ready |
52 |
24 |
- |
Terminal Clock |
22 to 21 |
- |
- |
- |
18 to 17 |
- |
- |
- |
RS-422/449 (EIA-449) DCE and DTE Cable Pinouts
- RS-422/449 (EIA-449) DCE Cable Pinouts for the 1-Port Serial Mini-Physical Interface Module
- RS-422/449 (EIA-449) DTE Cable Pinouts for the 1-Port Serial Mini-Physical Interface Module
RS-422/449 (EIA-449) DCE Cable Pinouts for the 1-Port Serial Mini-Physical Interface Module
Table 8 gives the RS-422/449 DCE cable pinouts.
LFH-60 Pin |
DC-37 (DB-37) Pin |
LFH-60 Pairing |
Description |
|---|---|---|---|
15 |
1 |
- |
Shield Ground |
1 |
4 |
2 |
Send Data (A) |
56 |
5 |
55 |
Send Timing (A) |
60 |
6 |
59 |
Receive Data (A) |
37 |
7 |
38 |
Request to Send (A) |
52 |
8 |
51 |
Receive Timing (A) |
48 |
9 |
47 |
Clear to Send (A) |
45 |
10 |
- |
Local Loopback |
33 |
11 |
34 |
Data Mode (A) |
9 |
12 |
10 |
Terminal Ready (A) |
13 |
13 |
14 |
Receive Ready (A) |
5 |
17 |
6 |
Terminal Timing (A) |
36 |
19 |
- |
Signal Ground |
4 |
20 |
- |
Receive Common |
2 |
22 |
1 |
Send Data (B) |
55 |
23 |
56 |
Send Timing (B) |
59 |
24 |
60 |
Receive Data (B) |
38 |
25 |
37 |
Request to Send (B) |
51 |
26 |
52 |
Receive Timing (B) |
47 |
27 |
48 |
Clear to Send (B) |
34 |
29 |
33 |
Data Mode (B) |
10 |
30 |
9 |
Terminal Ready (B) |
14 |
31 |
13 |
Receiver Ready (B) |
6 |
35 |
5 |
Terminal Timing (B) |
57 |
37 |
- |
Send Common |
26 to 25 |
- |
- |
- |
RS-422/449 (EIA-449) DTE Cable Pinouts for the 1-Port Serial Mini-Physical Interface Module
Table 9 gives the RS-422/449 DTE cable pinouts.
LFH-60 Pin |
DC-37 (DB-37) Pin |
LFH-60 Pairing |
Description |
|---|---|---|---|
15 |
1 |
- |
Shield Ground |
60 |
4 |
59 |
Send Data (A) |
56 |
5 |
55 |
Send Timing (A) |
1 |
6 |
2 |
Receive Data (A) |
48 |
7 |
47 |
Request to Send (A) |
5 |
8 |
6 |
Receive Timing (A) |
37 |
9 |
38 |
Clear to Send (A) |
41 |
10 |
- |
Local Loopback |
9 |
11 |
10 |
Data Mode (A) |
33 |
12 |
34 |
Terminal Ready (A) |
13 |
13 |
14 |
Receive Ready (A) |
52 |
17 |
51 |
Terminal Timing (A) |
36 |
19 |
- |
Signal Ground |
4 |
20 |
- |
Receive Common |
59 |
22 |
60 |
Send Data (B) |
55 |
23 |
56 |
Send Timing (B) |
2 |
24 |
1 |
Receive Data (B) |
47 |
25 |
48 |
Request to Send (B) |
6 |
26 |
5 |
Receive Timing (B) |
38 |
27 |
37 |
Clear to Send (B) |
10 |
29 |
9 |
Data Mode (B) |
34 |
30 |
33 |
Terminal Ready (B) |
14 |
31 |
13 |
Receiver Ready (B) |
51 |
35 |
52 |
Terminal Timing (B) |
57 |
37 |
- |
Send Common |
26 to 25 |
- |
- |
|
18 to 17 |
- |
- |
V.35 DCE and DTE Cable Pinouts
- V.35 DCE Cable Pinouts for the 1-Port Serial Mini-Physical Interface Module
- V.35 DTE Cable Pinouts for the 1-Port Serial Mini-Physical Interface Module
V.35 DCE Cable Pinouts for the 1-Port Serial Mini-Physical Interface Module
Table 10 gives the V.35 DCE cable pinouts.
LFH-60 Pin |
M/34 Pin |
LFH-60 Pairing |
Description |
|---|---|---|---|
15 |
A |
- |
Frame Ground |
57 |
B |
- |
Signal Ground |
37 |
C |
- |
Request to Send |
48 |
D |
- |
Clear to Send |
33 |
E |
- |
Data Set Ready |
13 |
F |
- |
Received Line Signal Detector |
9 |
H |
- |
Data Terminal Ready |
45 |
K |
- |
Test Mode |
1 |
P |
2 |
Transmit Data (A) |
60 |
R |
59 |
Receive Data (A) |
2 |
S |
1 |
Transmit Data (B) |
59 |
T |
60 |
Receive Data (B) |
5 |
U |
6 |
Terminal Timing (A) |
52 |
V |
51 |
Receive Timing (A) |
6 |
W |
5 |
Terminal Timing (B) |
51 |
X |
52 |
Receive Timing (B) |
56 |
Y |
55 |
Transmit Timing (A) |
55 |
AA |
56 |
Transmit Timing (B) |
22 to 21 |
- |
- |
- |
26 to 25 |
- |
- |
V.35 DTE Cable Pinouts for the 1-Port Serial Mini-Physical Interface Module
Table 11 describes the V.35 DTE cable pinouts.
LFH-60 Pin |
M/34 Pin |
LFH-60 Pairing |
Description |
|---|---|---|---|
15 |
A |
- |
Frame Ground |
57 |
B |
- |
Signal Ground |
48 |
C |
- |
Request to Send |
37 |
D |
- |
Clear to Send |
9 |
E |
- |
Data Set Ready |
13 |
F |
- |
Received Line Signal Detector |
33 |
H |
- |
Data Terminal Ready |
41 |
K |
- |
Test Mode |
60 |
P |
59 |
Transmit Data (A) |
1 |
R |
2 |
Receive Data (A) |
59 |
S |
60 |
Transmit Data (B) |
2 |
T |
1 |
Receive Data (B) |
52 |
U |
51 |
Terminal Timing (A) |
5 |
V |
6 |
Receive Timing (A) |
51 |
W |
52 |
Terminal Timing (B) |
6 |
X |
5 |
Receive Timing (B) |
56 |
Y |
55 |
Transmit Timing (A) |
55 |
AA |
56 |
Transmit Timing (B) |
22 to 21 |
- |
- |
- |
26 to 25 |
- |
- |
- |
18 to 17 |
- |
- |
- |
X.21 DCE and DTE Cable Pinouts
- X.21 DCE Cable Pinouts for the 1-Port Serial Mini-Physical Interface Module
- X.21 DTE Cable Pinouts for the 1-Port Serial Mini-Physical Interface Module
X.21 DCE Cable Pinouts for the 1-Port Serial Mini-Physical Interface Module
Table 12 gives the X.21 DCE cable pinouts.
LFH-60 Pin |
DB-15 Pin |
LFH-60 Pairing |
Description |
|---|---|---|---|
15 |
1 |
- |
Shield Ground |
1 |
2 |
2 |
Transmit Data (A) |
37 |
3 |
38 |
Control (A) |
60 |
4 |
59 |
Receive (A) |
48 |
5 |
47 |
Indicate (A) |
52 |
6 |
51 |
Signal Element Timing (A) |
57 |
8 |
- |
Signal Ground |
2 |
9 |
1 |
Transmit Data (B) |
38 |
10 |
37 |
Control (B) |
59 |
11 |
60 |
Receive (B) |
47 |
12 |
48 |
Indicate (B) |
51 |
13 |
52 |
Signal Element Timing (B) |
30 to 29 |
- |
- |
- |
X.21 DTE Cable Pinouts for the 1-Port Serial Mini-Physical Interface Module
Table 13 gives the X.21 DTE cable pinouts.
LFH-60 Pin |
DB-15 Pin |
LFH-60 Pairing |
Description |
|---|---|---|---|
15 |
1 |
- |
Shield Ground |
60 |
2 |
59 |
Transmit Data (A) |
48 |
3 |
47 |
Control (A) |
1 |
4 |
2 |
Receive (A) |
37 |
5 |
38 |
Indicate (A) |
5 |
6 |
6 |
Signal Element Timing (A) |
57 |
8 |
- |
Signal Ground |
59 |
9 |
60 |
Transmit Data (B) |
47 |
10 |
48 |
Control (B) |
2 |
11 |
1 |
Receive (B) |
38 |
12 |
37 |
Indicate (B) |
6 |
13 |
5 |
Signal Element Timing (B) |
30 to 29 |
- |
- |
- |
18 to 17 |
- |
- |
- |
1-Port Serial Mini-Physical Interface Module (SRX-MP-1SERIAL-R) Basic Configuration
To enable the 1-Port Serial Mini-Physical Interface Module (Mini-PIM) installed on the services gateway, you must configure the basic settings for the PIM. You can perform the configuration tasks for this using either the J-Web interface or the CLI.
Using the J-Web Interface
To perform basic configuration of the 1-Port Serial Mini-PIM and to configure network interfaces for the services gateway using the J-Web interface:
Using the CLI
To perform basic configuration for the 1-Port Serial Mini-PIM and to configure network interfaces for the services gateway with the CLI:
Verify that the serial interface is installed on the device:
show chassis hardwareVerify the status of the interface:
show interfaces terseAssign the port an IP address:
set interfaces se-1/0/0 unit 0 family inet address interface address/destination prefixAdd or select a security zone; for example, Trust:
set security zones security-zone trust interfaces se-1/0/0.0
host-inbound-traffic system-services all
Add or select security zones for host inbound traffic protocol options:
set security zones security-zone trust interfaces se-1/0/0.0
host-inbound-traffic protocols all
Set security policies:
set security policies default-policy permit-all