Help us improve your experience.

Let us know what you think.

Do you have time for a two-minute survey?


Installing the Front Doors on the PTX5000

Installing the Front Door on a PTX5000 in a Four-Post Rack

Optionally, you can install a door over the front card cage of the PTX5000. Captive thumbscrews secure the door in a closed position.

CAUTION:

You can install the front door any time after you have installed the chassis into the rack and grounded the router. Perform the procedures described inInstalling the PTX5000 Mounting Hardware for a Four-Post Rack or Cabinet, Installing the PTX5000 By Using a Mechanical Lift, and Connecting the PTX5000 to Earth Ground before proceeding.

Before you begin, ensure that you have the following parts and tools available to install the front door on a PTX5000 in a four-post rack.

  • Electrostatic discharge (ESD) grounding strap

  • Phillips (+) screwdriver, number 2

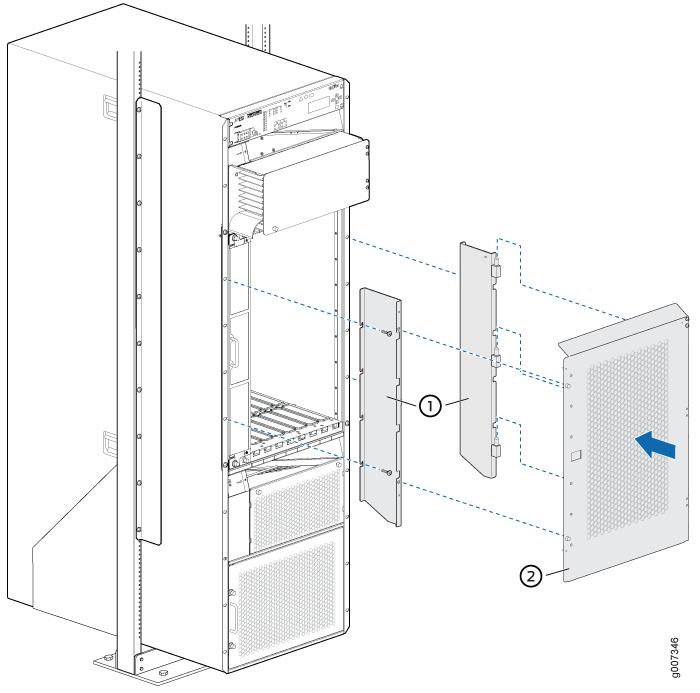
To install the front door on a PTX5000 in a four-post rack (see Figure 1):
  1. 1. Attach an electrostatic discharge (ESD) grounding strap to your bare wrist, and connect the strap to the approved ESD site grounding point.
  2. Partially loosen the mounting screws that secure the chassis to the front of the four-post rack, beginning with the fourth hole from the top of the chassis, ending with the seventh hole from the top of the chassis. Do this for both front-mounting flanges. When you are done, there should be four screws loosened on each side of the chassis.
  3. Attach the side panels to the front mounting flanges, by using the cutouts in the side panel mounting holes to slide the panel behind the loosened screws. Tighten the screws completely using the Phillips (+) screwdriver.
  4. Attach the door to the side panels by placing the door on the hinges. Ensure that the door opens and closes properly, and the captive screws on the door align correctly with the holes in the side panels.
    Note:

    If the door is not aligned properly, loosen the screws securing the side panels to the front-mounting flanges, and adjust the panels until the door closes correctly, then tighten the screws completely using the screwdriver.

Figure 1: Installing the Front Door on a PTX5000 in a Four-Post RackInstalling the Front Door on a PTX5000 in a Four-Post Rack
  1

Side panels

  2

Door

Installing the Front Door on a PTX5000 in an Open-Frame Rack

You can install a door over the front card cage of the PTX5000. Captive thumbscrews secure the door in a closed position.

Note:

If you plan to install the PTX5000 in an open-frame rack, you can install the door before the chassis is mounted in the rack. However, this procedure assumes that the router has been installed in the rack and grounded. If you install the door before grounding the router, ensure that you use proper site grounding.

Before you begin, ensure that you have the following parts and tools available to install the front door on a PTX5000 in an open-frame rack.

  • Electrostatic discharge (ESD) grounding strap

  • Phillips (+) screwdriver, number 2

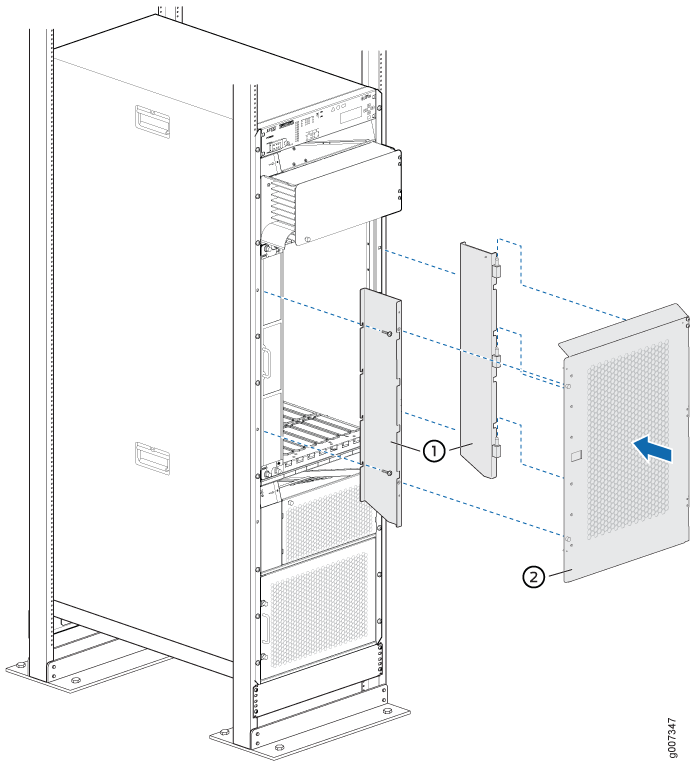
To install the front door on a PTX5000 in an open-frame rack (see Figure 2 and Figure 3):

  1. Attach an electrostatic discharge (ESD) grounding strap to your bare wrist, and connect the strap to the approved ESD site grounding point.
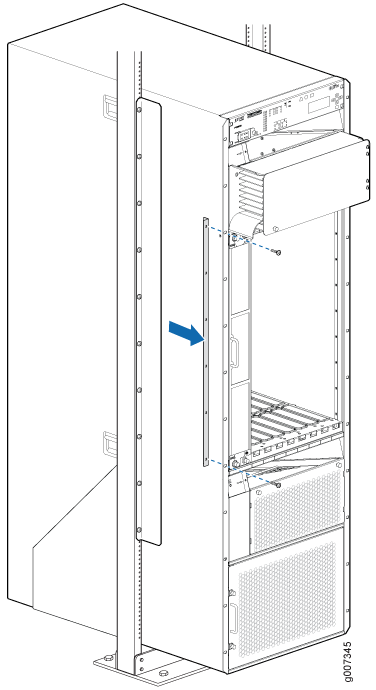
  2. Using the provided UNC 12–24 screws, attach the long mounting brackets to the rear of each front-mounting flange. Insert screws only at the top and bottom of each bracket. The top screw should be inserted at the third front-mounting flange hole from the top of the chassis. Line up the edge of the mounting bracket with the flange edge of the router chassis. Tighten the screws completely using the Phillips (+) screwdriver.
    Figure 2: Installing Brackets on the Front-Mounting FlangesInstalling Brackets on the Front-Mounting Flanges
  3. Partially install the remaining screws, and attach the side panels to the front mounting flanges. Use the cutouts in the side panel mounting holes to slide the panel behind the partially installed screws (seeFigure 3). Tighten the screws completely.
  4. Attach the door to the side panels by placing the door on the hinges. Ensure that the door opens and closes properly, and the captive screws on the door align correctly with the holes in the side panels.
    Note:

    If the door is not aligned properly, loosen the screws securing the side panels to the front-mounting flanges, and adjust the panels until the door closes correctly, then tighten the screws completely using the screwdriver.

Figure 3: Installing the Front Door on a PTX5000 Router in an Open-Frame RackInstalling the Front Door on a PTX5000 Router in an Open-Frame Rack
  1

Side panels

  2

Door