
ON THIS PAGE
Unpack the PTX12008
Unpack the PTX12008 by following the recommended procedure and check that you have received all the components.
Unpack the PTX12008
We ship the PTX12008 in a cardboard box that has a pallet base with foam cushioning between the layers. The router chassis is bolted to the pallet base.
The PTX12008 has maximum protection inside the shipping carton. Do not unpack the router until you are ready to mount it.
To unpack the router, you need the following tools:
-
A box cutter or knife to cut the straps that secure the shipping box to the pallet—not provided
-
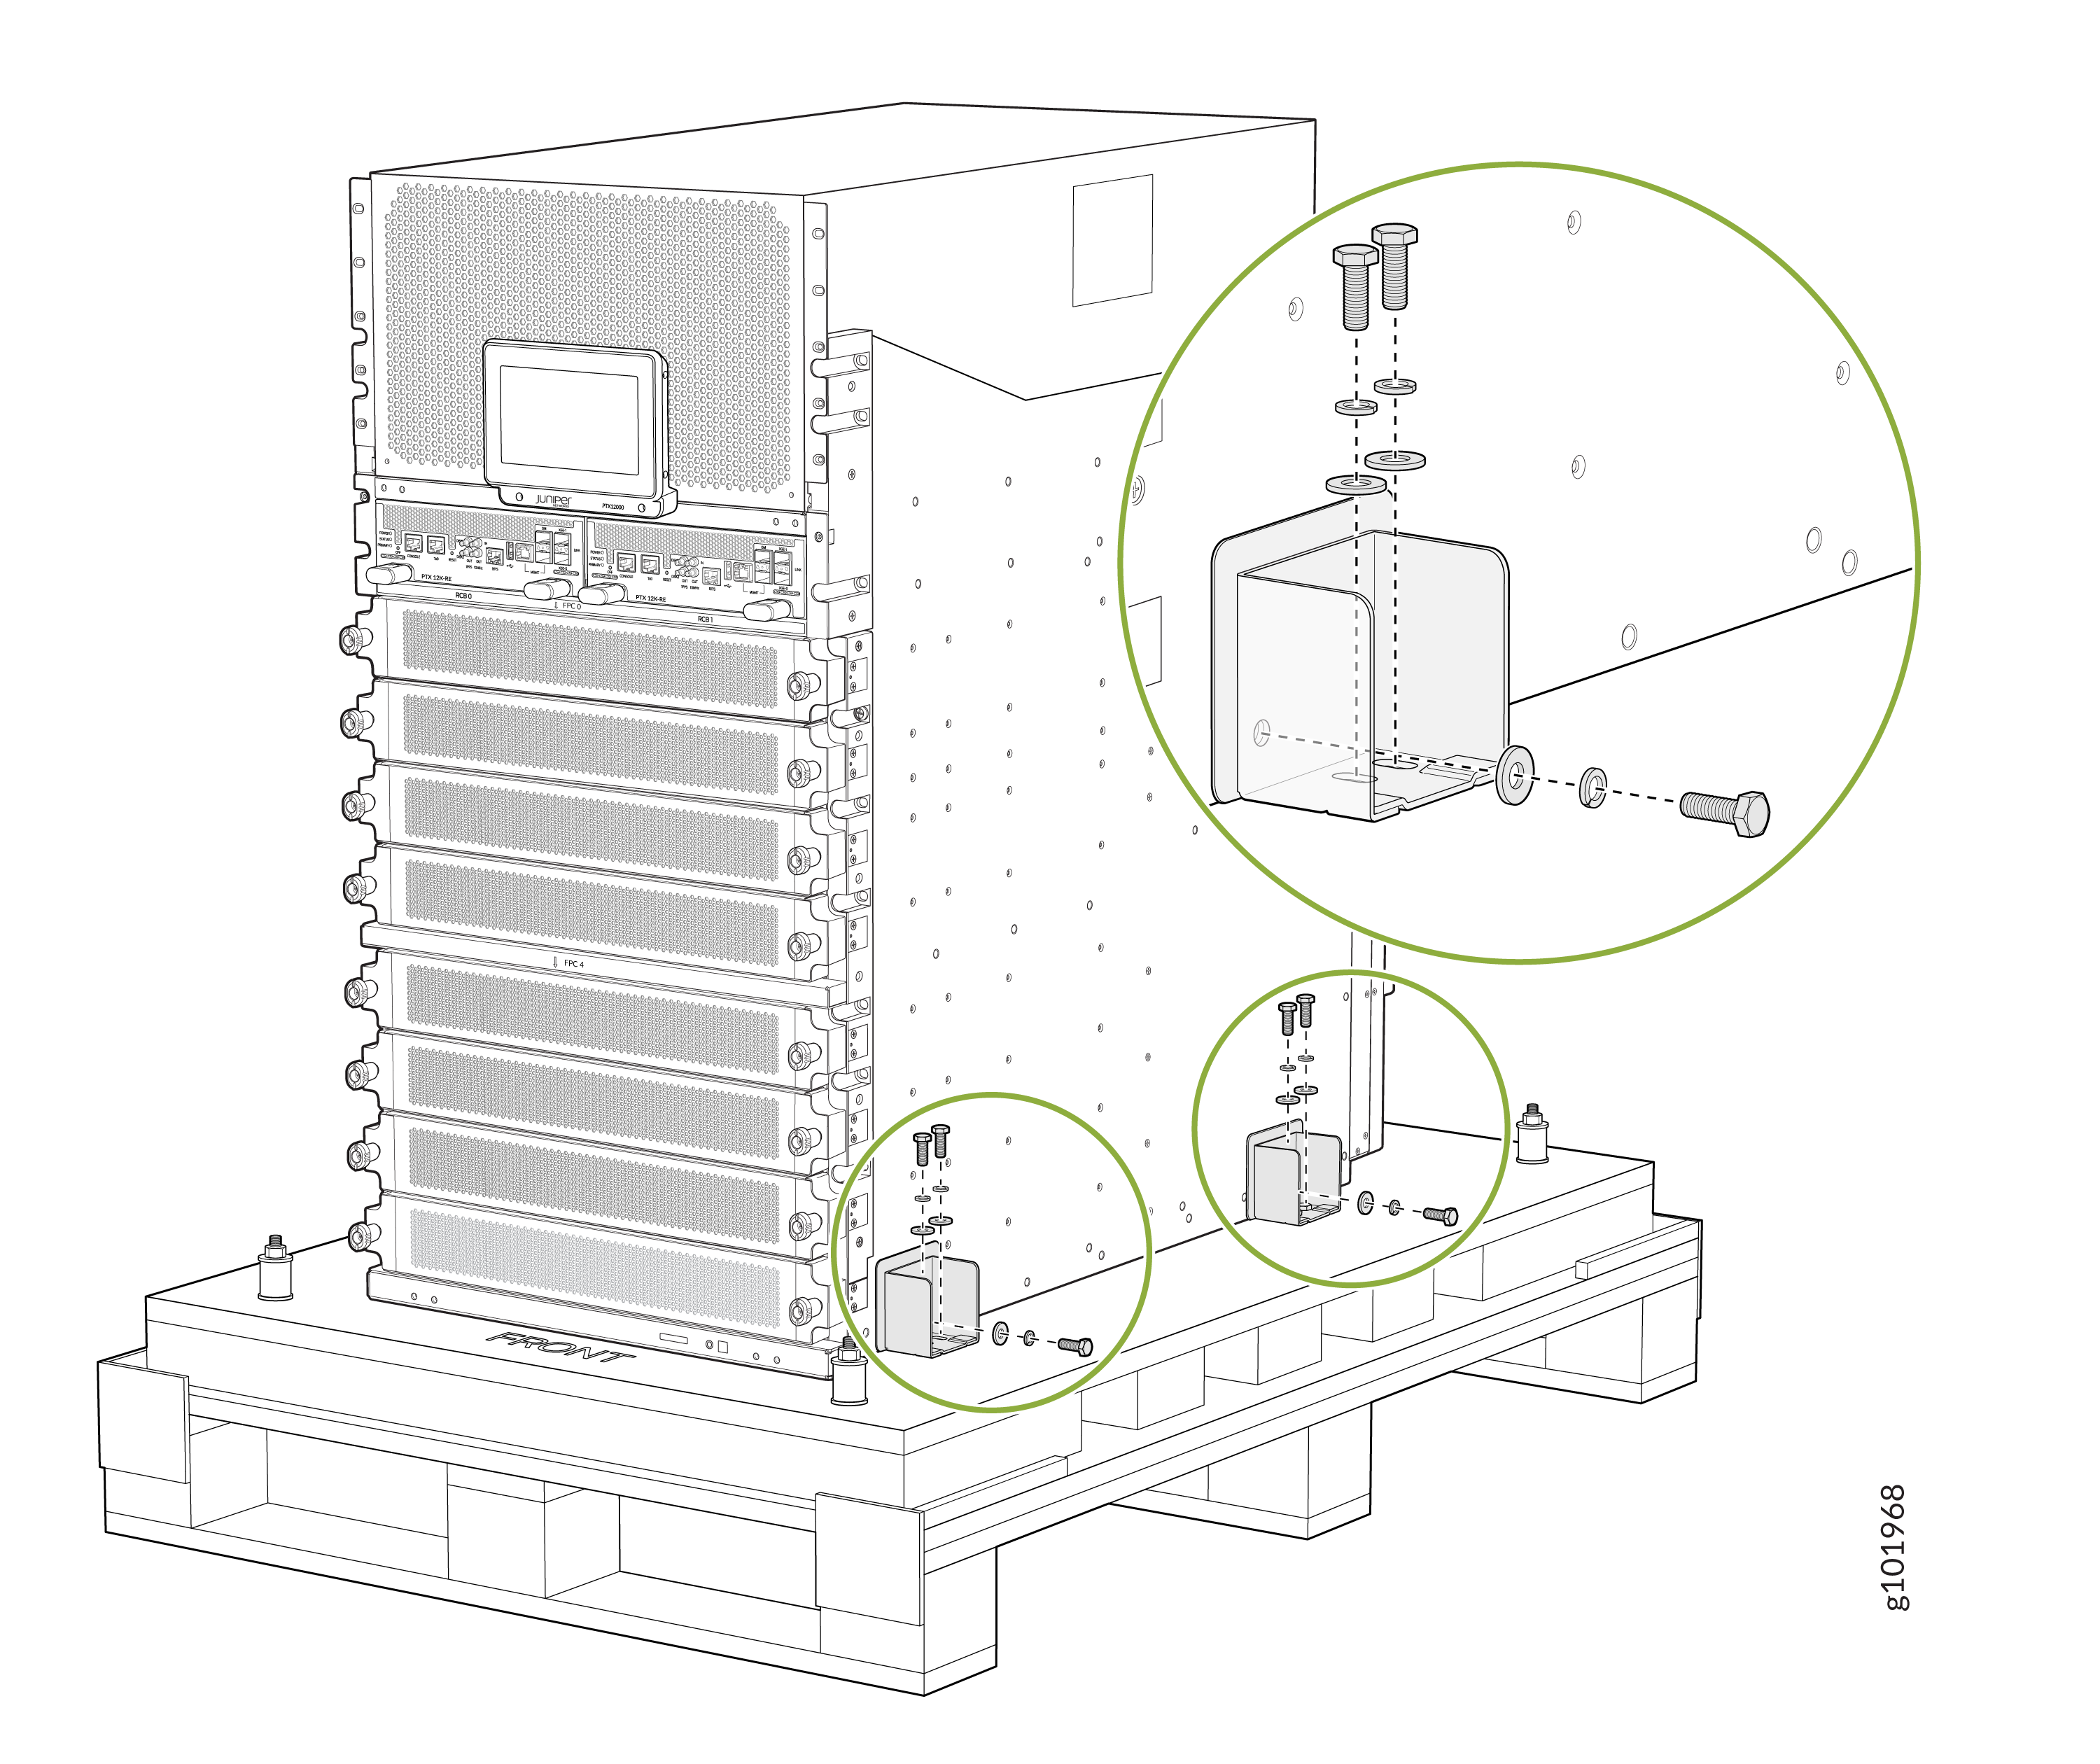
A 7/16-in. (11-mm) open-end or socket wrench to remove the bracket bolts from the shipping pallet
The chassis ships in a cardboard box that has a two-layer wooden pallet base with foam cushioning between the layers. The router chassis is bolted to the pallet base.
To unpack the router:
-
Remove the top cover.
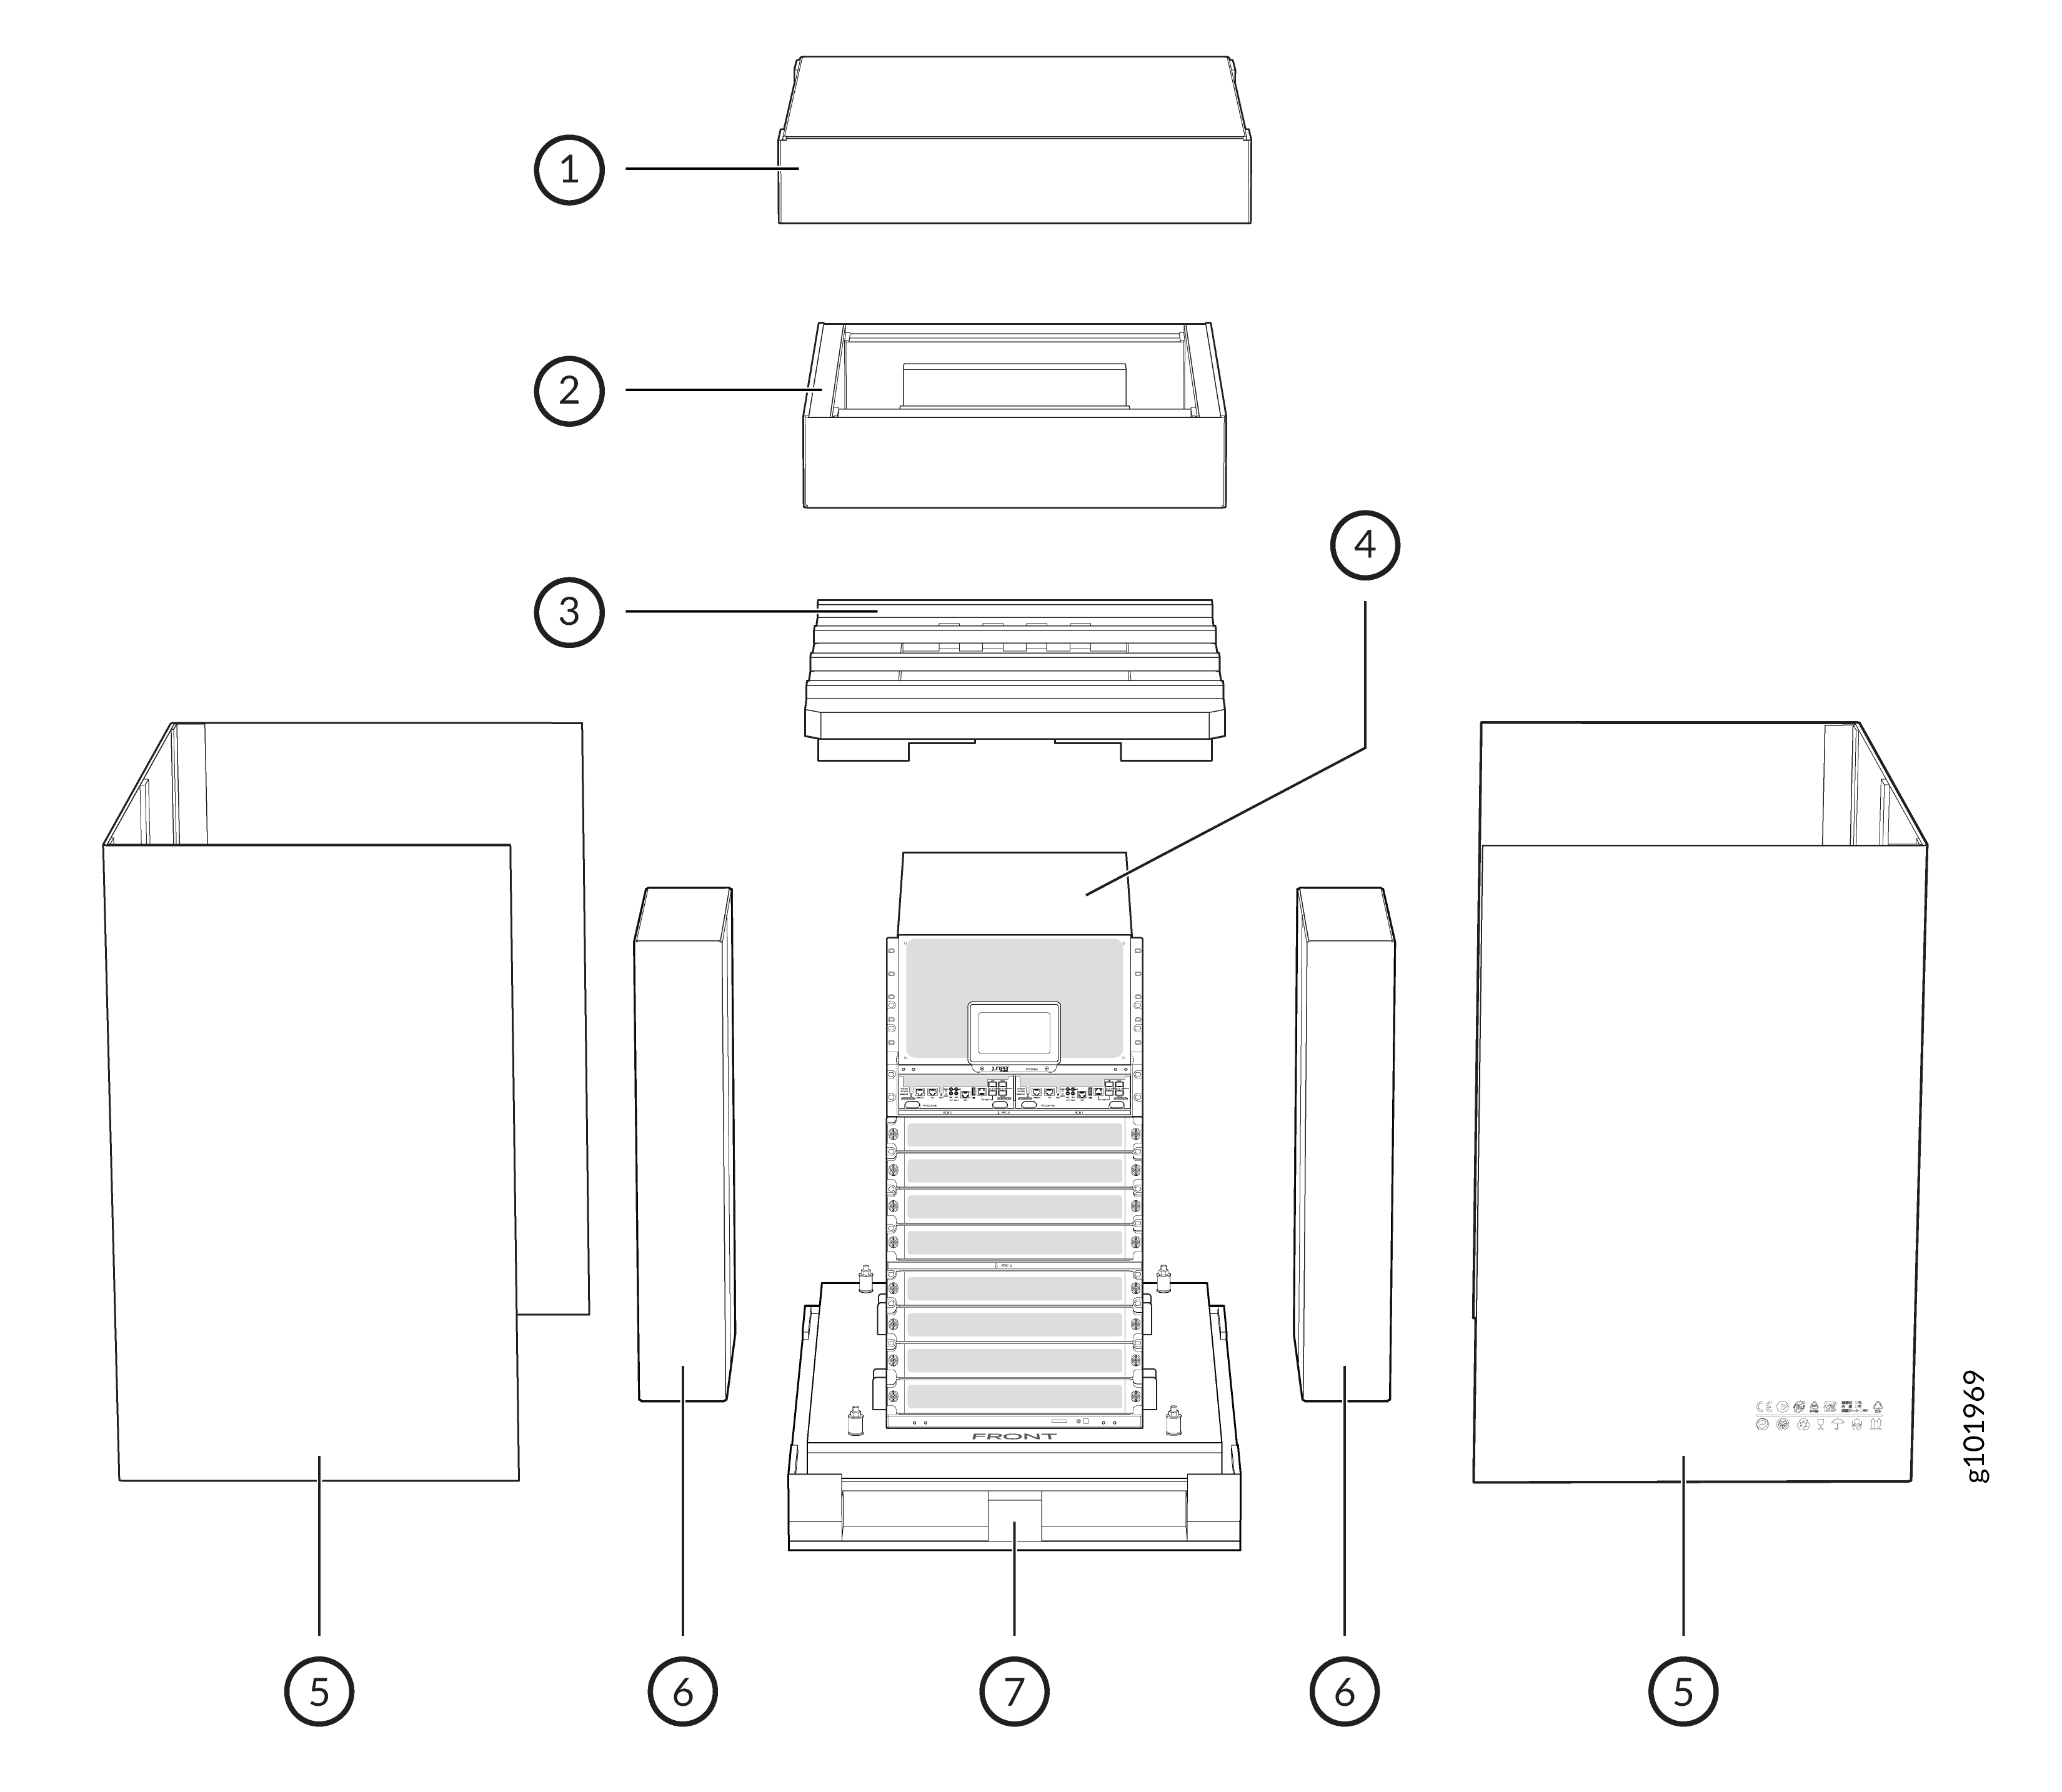 1—
1—Top cover
5—Side panels of the shipping box
2—Accessory box
6—Cardboard box
3—Foam cushioning
7—Shipping pallet
4—Chassis
-
Use a 7/16-in. (11-mm) open-end or socket wrench to remove the four sets of
bracket bolts that secure the chassis to the shipping pallet.
Packing List for the PTX12008
The shipment includes a packing list. Check the parts you receive in the shipping carton against the items on the packing list. We ship the parts according to the configuration that you order. See PTX12008 Configurations.
You must order the Flexible PIC Concentrator (FPC) separately.
If any component on the packing list is missing, contact your customer service representative or contact Juniper customer care from within the U.S. or Canada by telephone at 1-888-314-5822. For international-dial or direct-dial options in countries without toll-free numbers, see https://www.juniper.net/support/requesting-support.html.
|
Configuration |
Component |
Quantity |
|---|---|---|
|
Base configuration with AC/HVAC/HVDC power supply modules (PSMs) |
Chassis |
1 |
|
Status panel |
1 |
|
|
Switch Interface Boards (SIBs) |
3 |
|
|
3.7 kilowatt (kW) AC/HVAC/HVDC or 3 kW AC/HVAC/HVDC PSMs depending on your selection |
12 |
|
|
Fan trays |
3 |
|
|
Routing and Control Board (RCB) |
1 |
|
|
FPC slot covers |
8 |
|
|
PSM slot covers |
8 |
|
|
RCB slot cover |
1 |
|
|
PTX12K-RMK rack mount kit |
1 |
|
|
Front door |
1 |
|
|
Cable management system |
1 |
|
|
Base configuration with DC PSMs |
Chassis |
1 |
|
Status panel |
1 |
|
|
SIBs |
3 |
|
|
DC PSMs |
12 |
|
|
Fan trays |
3 |
|
|
RCB |
1 |
|
|
FPC slot covers |
8 |
|
|
PSM slot covers |
8 |
|
|
RCB slot cover |
1 |
|
|
PTX12K-RMK rack mount kit |
1 |
|
|
Front door |
1 |
|
|
Cable management system |
1 |
|
|
Premium configuration with AC/HVAC/HVDC PSMs |
Chassis |
1 |
|
Status panel |
1 |
|
|
SIBs |
9 |
|
|
3.7 kW AC/HVAC/HVDC or 3 kW AC/HVAC/HVDC PSMs depending on your selection |
20 |
|
|
Fan trays |
3 |
|
|
RCBs |
2 |
|
|
FPC slot covers |
8 |
|
|
PTX12K-RMK rack mount kit |
1 |
|
|
Front door |
1 |
|
|
Cable management system |
1 |
|
|
Premium configuration with DC PSMs |
Chassis |
1 |
|
Status panel |
1 |
|
|
SIBs |
9 |
|
|
DC PSMs |
20 |
|
|
Fan trays |
3 |
|
|
RCBs |
2 |
|
|
FPC slot covers |
8 |
|
|
PTX12K-RMK rack mount kit |
1 |
|
|
Front door |
1 |
|
|
Cable management system |
1 |
|
Component |
Quantity |
|---|---|
|
Mounting tray |
1 |
|
Mounting tray brackets |
2 |
|
Phillips M4x8mm flat-head screws |
36 |
|
Phillips M4x8mm pan head screws |
10 |
|
Rear side brackets |
2 |
|
FPC ejector tool storage tray |
1 |
|
Component |
Quantity |
|---|---|
|
Mounting tray |
1 |
|
Mounting tray rear support |
1 |
|
Rear side brackets |
2 |
|
Front upper side brackets |
2 |
|
Rear upper bracket |
2 |
|
Phillips M4x8mm flat-head screws |
10 |
|
Phillips M4x8mm pan head screws |
18 |
|
Phillips M5x8mm pan head screws |
10 |
|
Phillips 8-32x.375" flat-head screws |
80 |
|
FPC ejector tool storage tray |
1 |
|
Component |
Quantity |
|---|---|
|
Lower SIB shipping bracket |
1 |
|
Upper SIB shipping bracket |
1 |
|
Fan tray mount shipping bracket |
1 |
|
Rack mount rear side brackets |
2 |
|
Power shelf support brackets |
2 |
|
M4x8mm pan head screws |
20 |
|
6-32x0.25" flat-head screws |
12 |
|
Component |
Quantity |
|---|---|
|
Warranty card |
1 |
|
End User License Agreement (EULA) |
1 |
|
Documentation roadmap card |
1 |