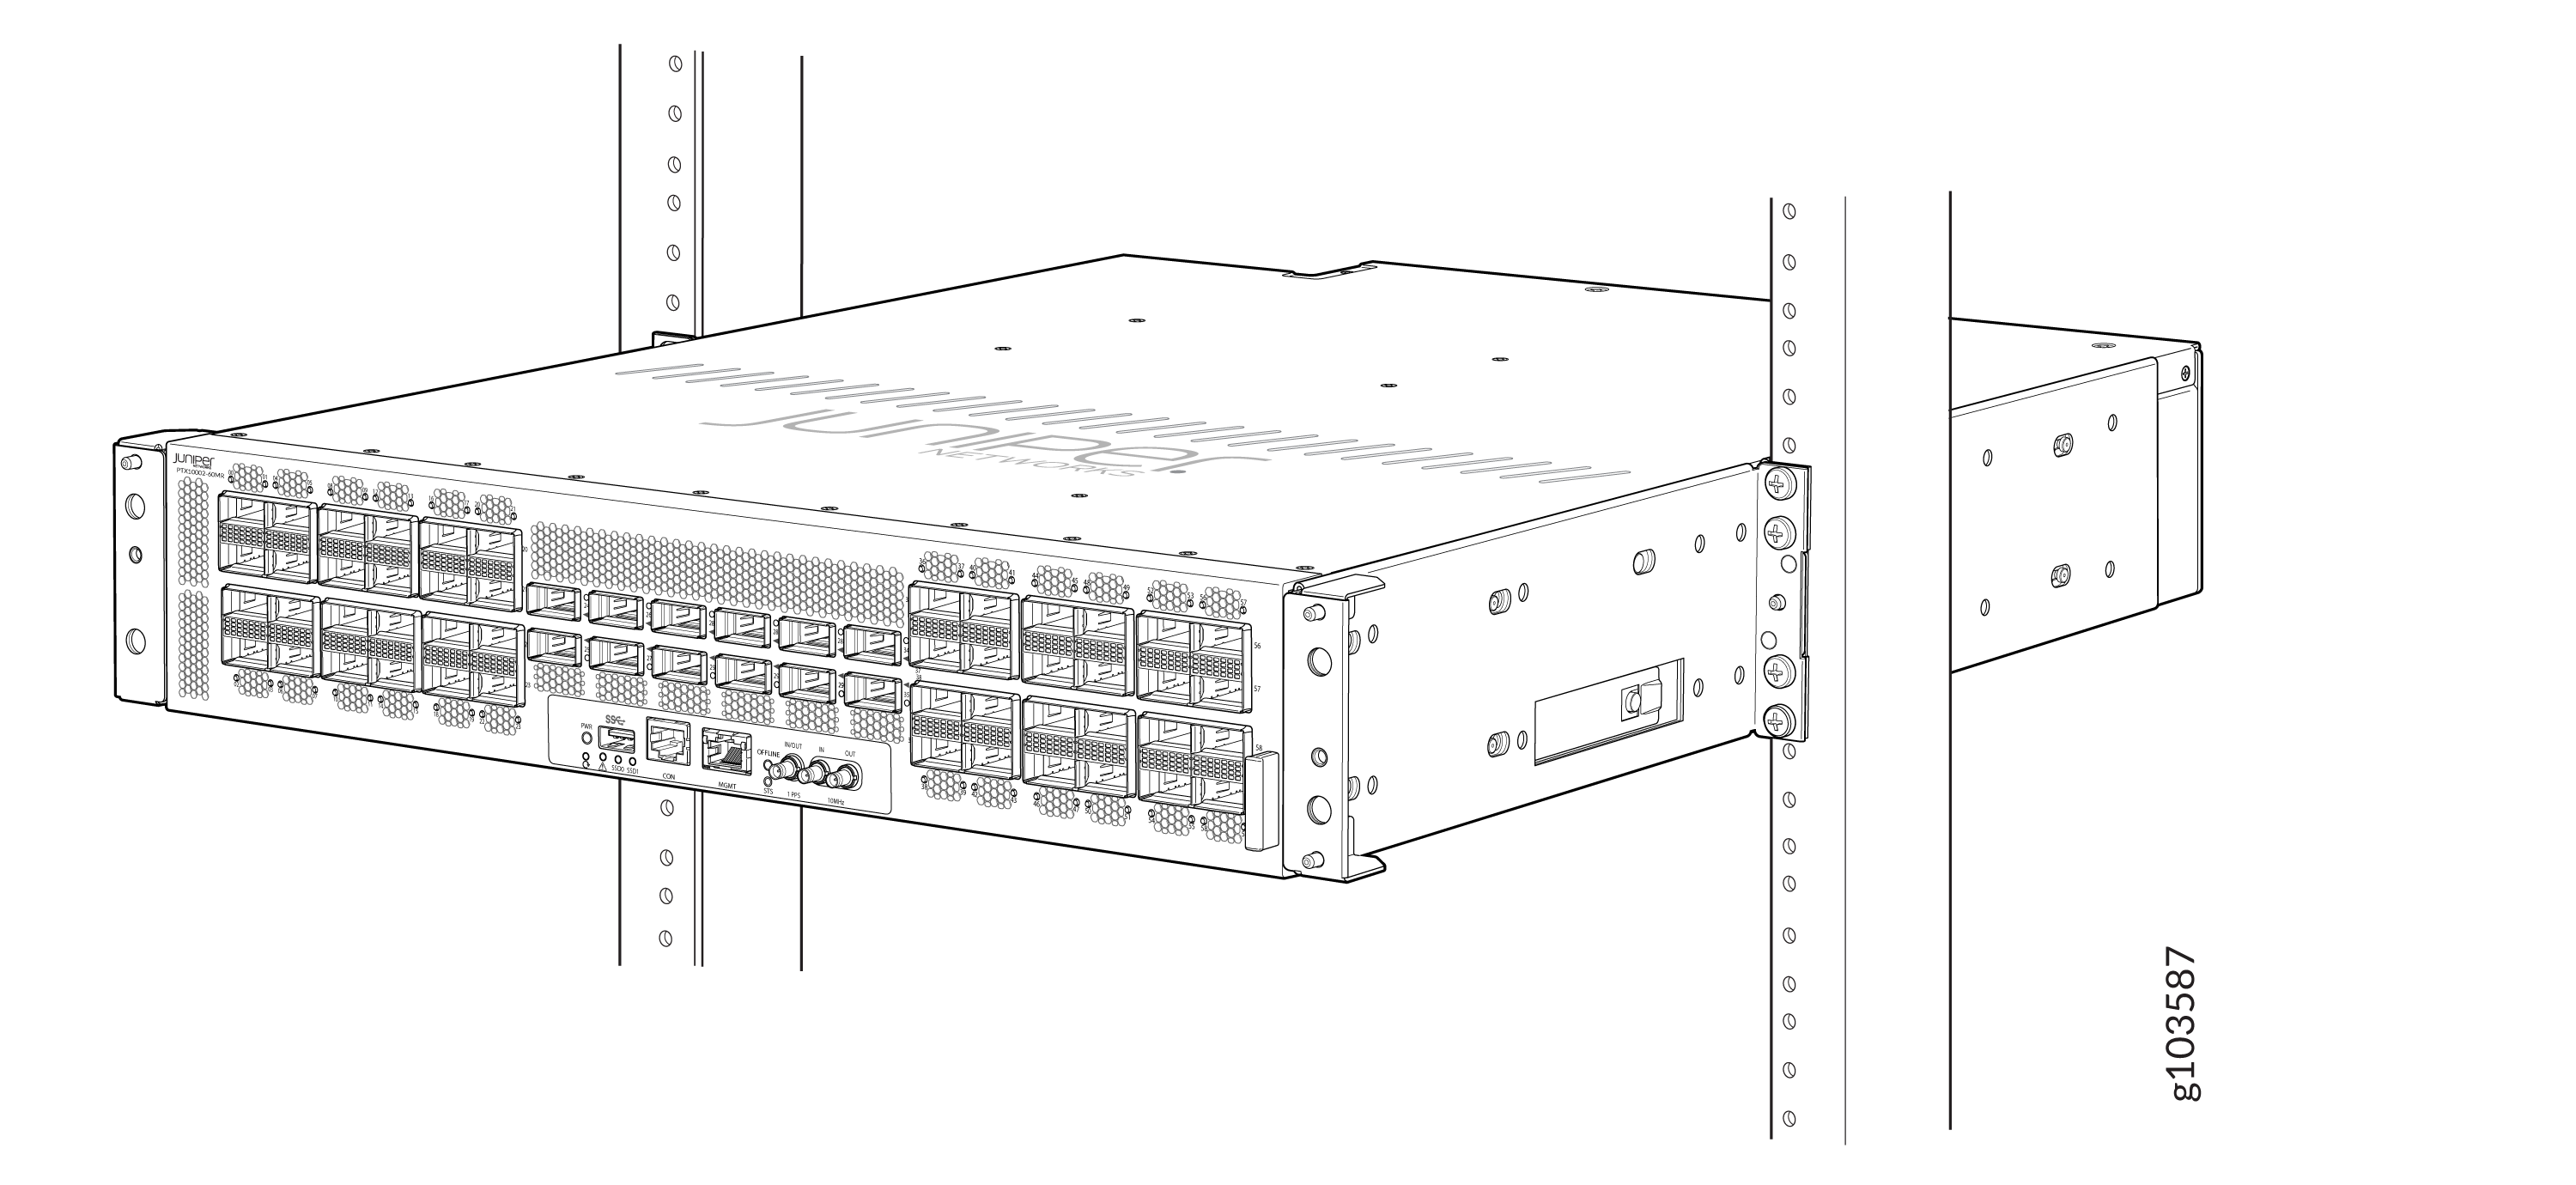
Install the PTX10002-60MR
This topic guides you through the steps to install the PTX10002-60MR in a 19-inch wide four-post rack or in a cabinet that has a 19-inch wide four-post rack.
You can mount the PTX10002-60MR in a 19-inch wide four-post rack or in a cabinet that has a 19-inch wide four-post rack. Use the rack mount kit shipped with the device. The remainder of this topic uses rack to mean rack or cabinet.
Complete these prerequisites before you mount the device:
-
Prepare the site for installation as described in Site Electrical Wiring Guidelines.
-
Ensure that the site has adequate clearance for both airflow and hardware maintenance.
-
Unpack the device as described in Unpack the PTX10002-60MR.
A qualified technician must verify that the rack is strong enough to support the device's weight before mounting the device. Have the technician also verify that the rack has adequate support at the installation site.
If you are installing more than one device on a rack, install the first device at the bottom of the rack.
Do not install line cards in the chassis until after you mount the chassis securely on a rack.
Mount the PTX10002-60MR on a Square-Hole Four-Post Rack
Before you mount the router on a square-hole four-post rack:
-
Verify that the site meets the requirements described in General Site Guidelines.
-
Place the rack in its permanent location, allowing adequate clearance for airflow and maintenance, and secure the rack to the building structure.
-
Read Safety Information, with particular attention to Chassis and Component LIfting Guidelines.
-
Ensure that you have taken the necessary precautions to prevent electrostatic discharge (ESD) damage (see Prevention of Electrostatic Discharge Damage).
-
Unpack the router from the shipping carton (see Unpack the PTX10002-60MR).
Ensure that you have the following parts and tools available:
-
A Phillips (+) screwdriver, number 2—not provided
-
An ESD grounding strap—not provided
-
The four-post mounting kit provided with the router that includes the following:
-
Front-mounting rails—2
-
Rear-mounting rails—2
-
Mounting brackets—2
-
Have one person to support the weight of the router while another person secures the router to the rack posts.
To mount the router on a square-hole four-post rack:
-
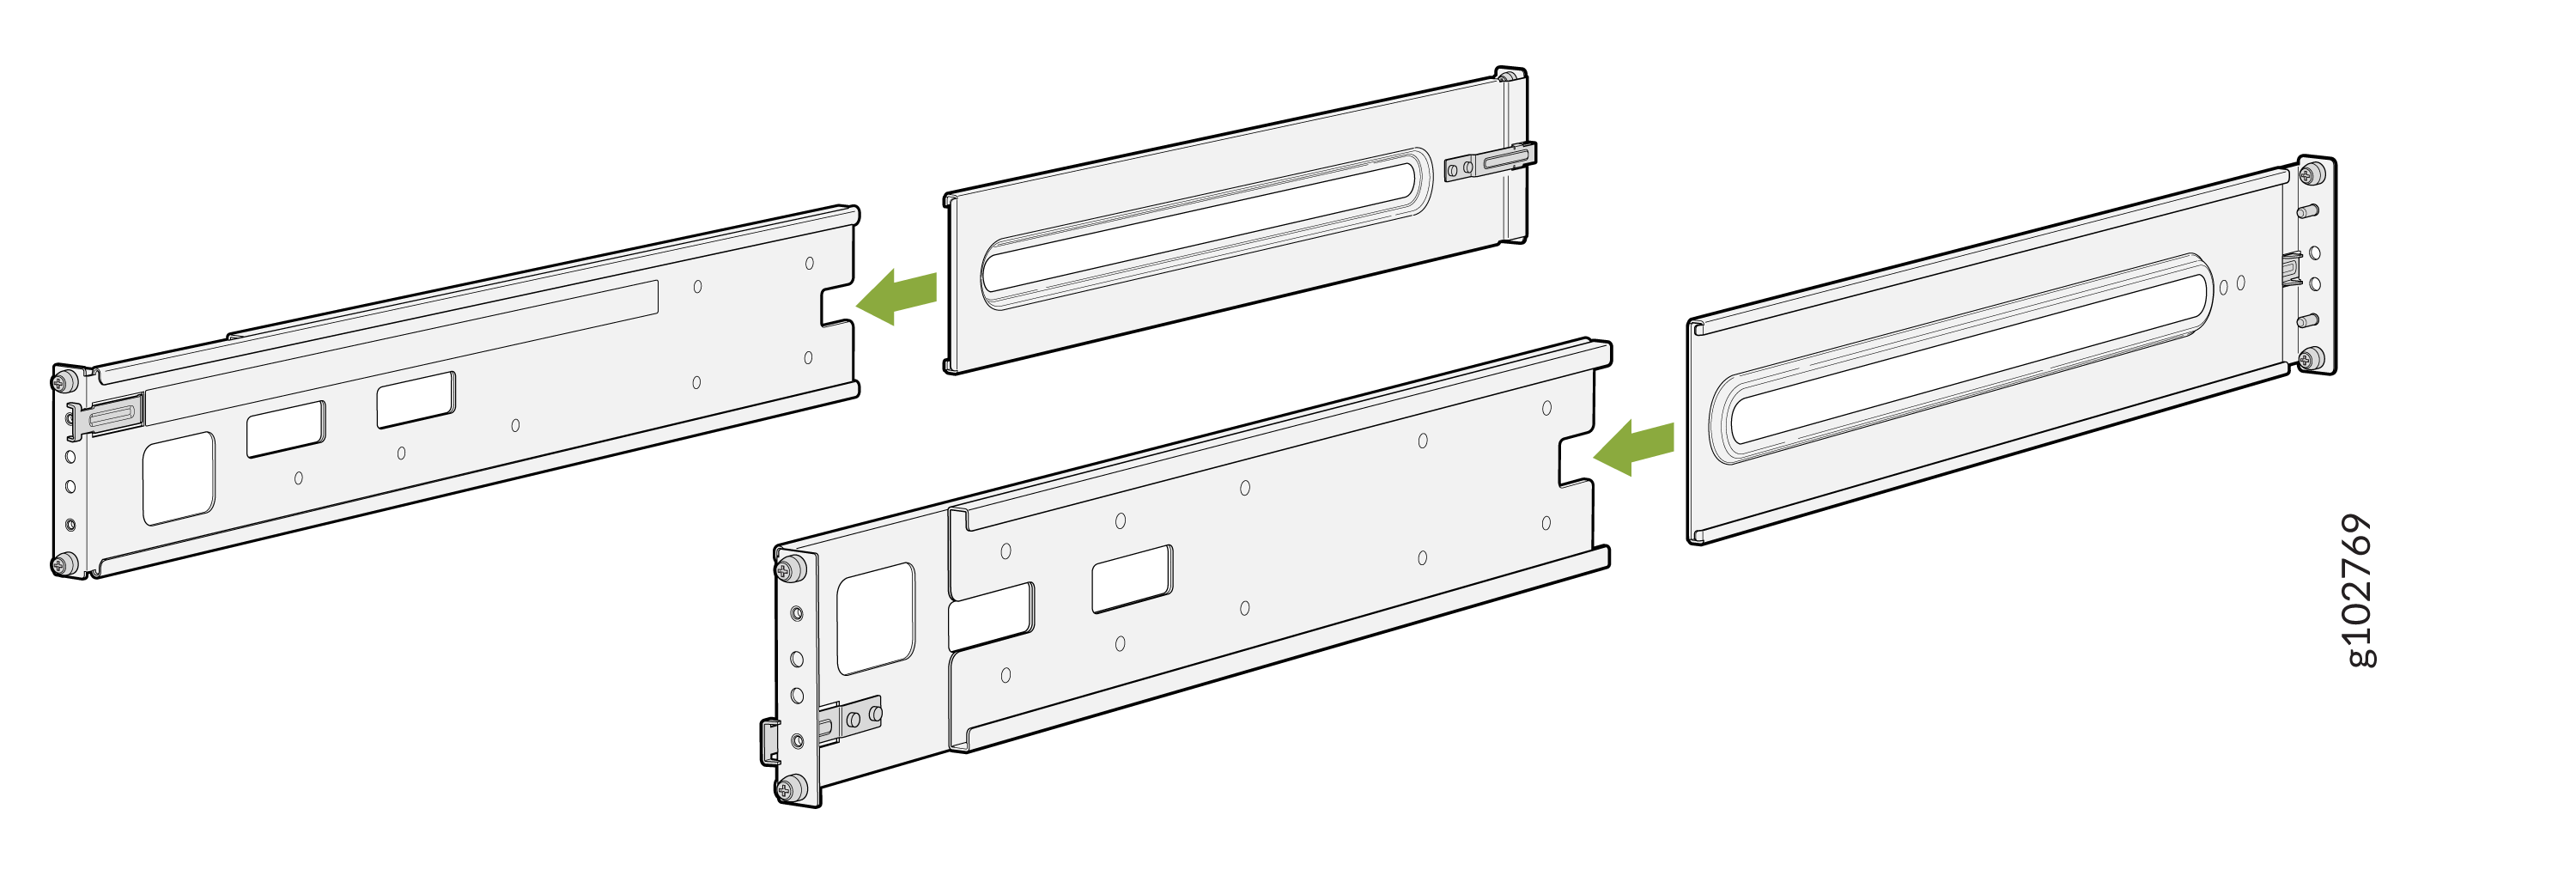
Assemble both the right and left mounting rails. Align the rear-mounting
rails with the guides on the front-mounting rails and gently slide the
rear-mounting rails into the front-mounting rails.
Figure 1: Assemble the Mounting Rails
-
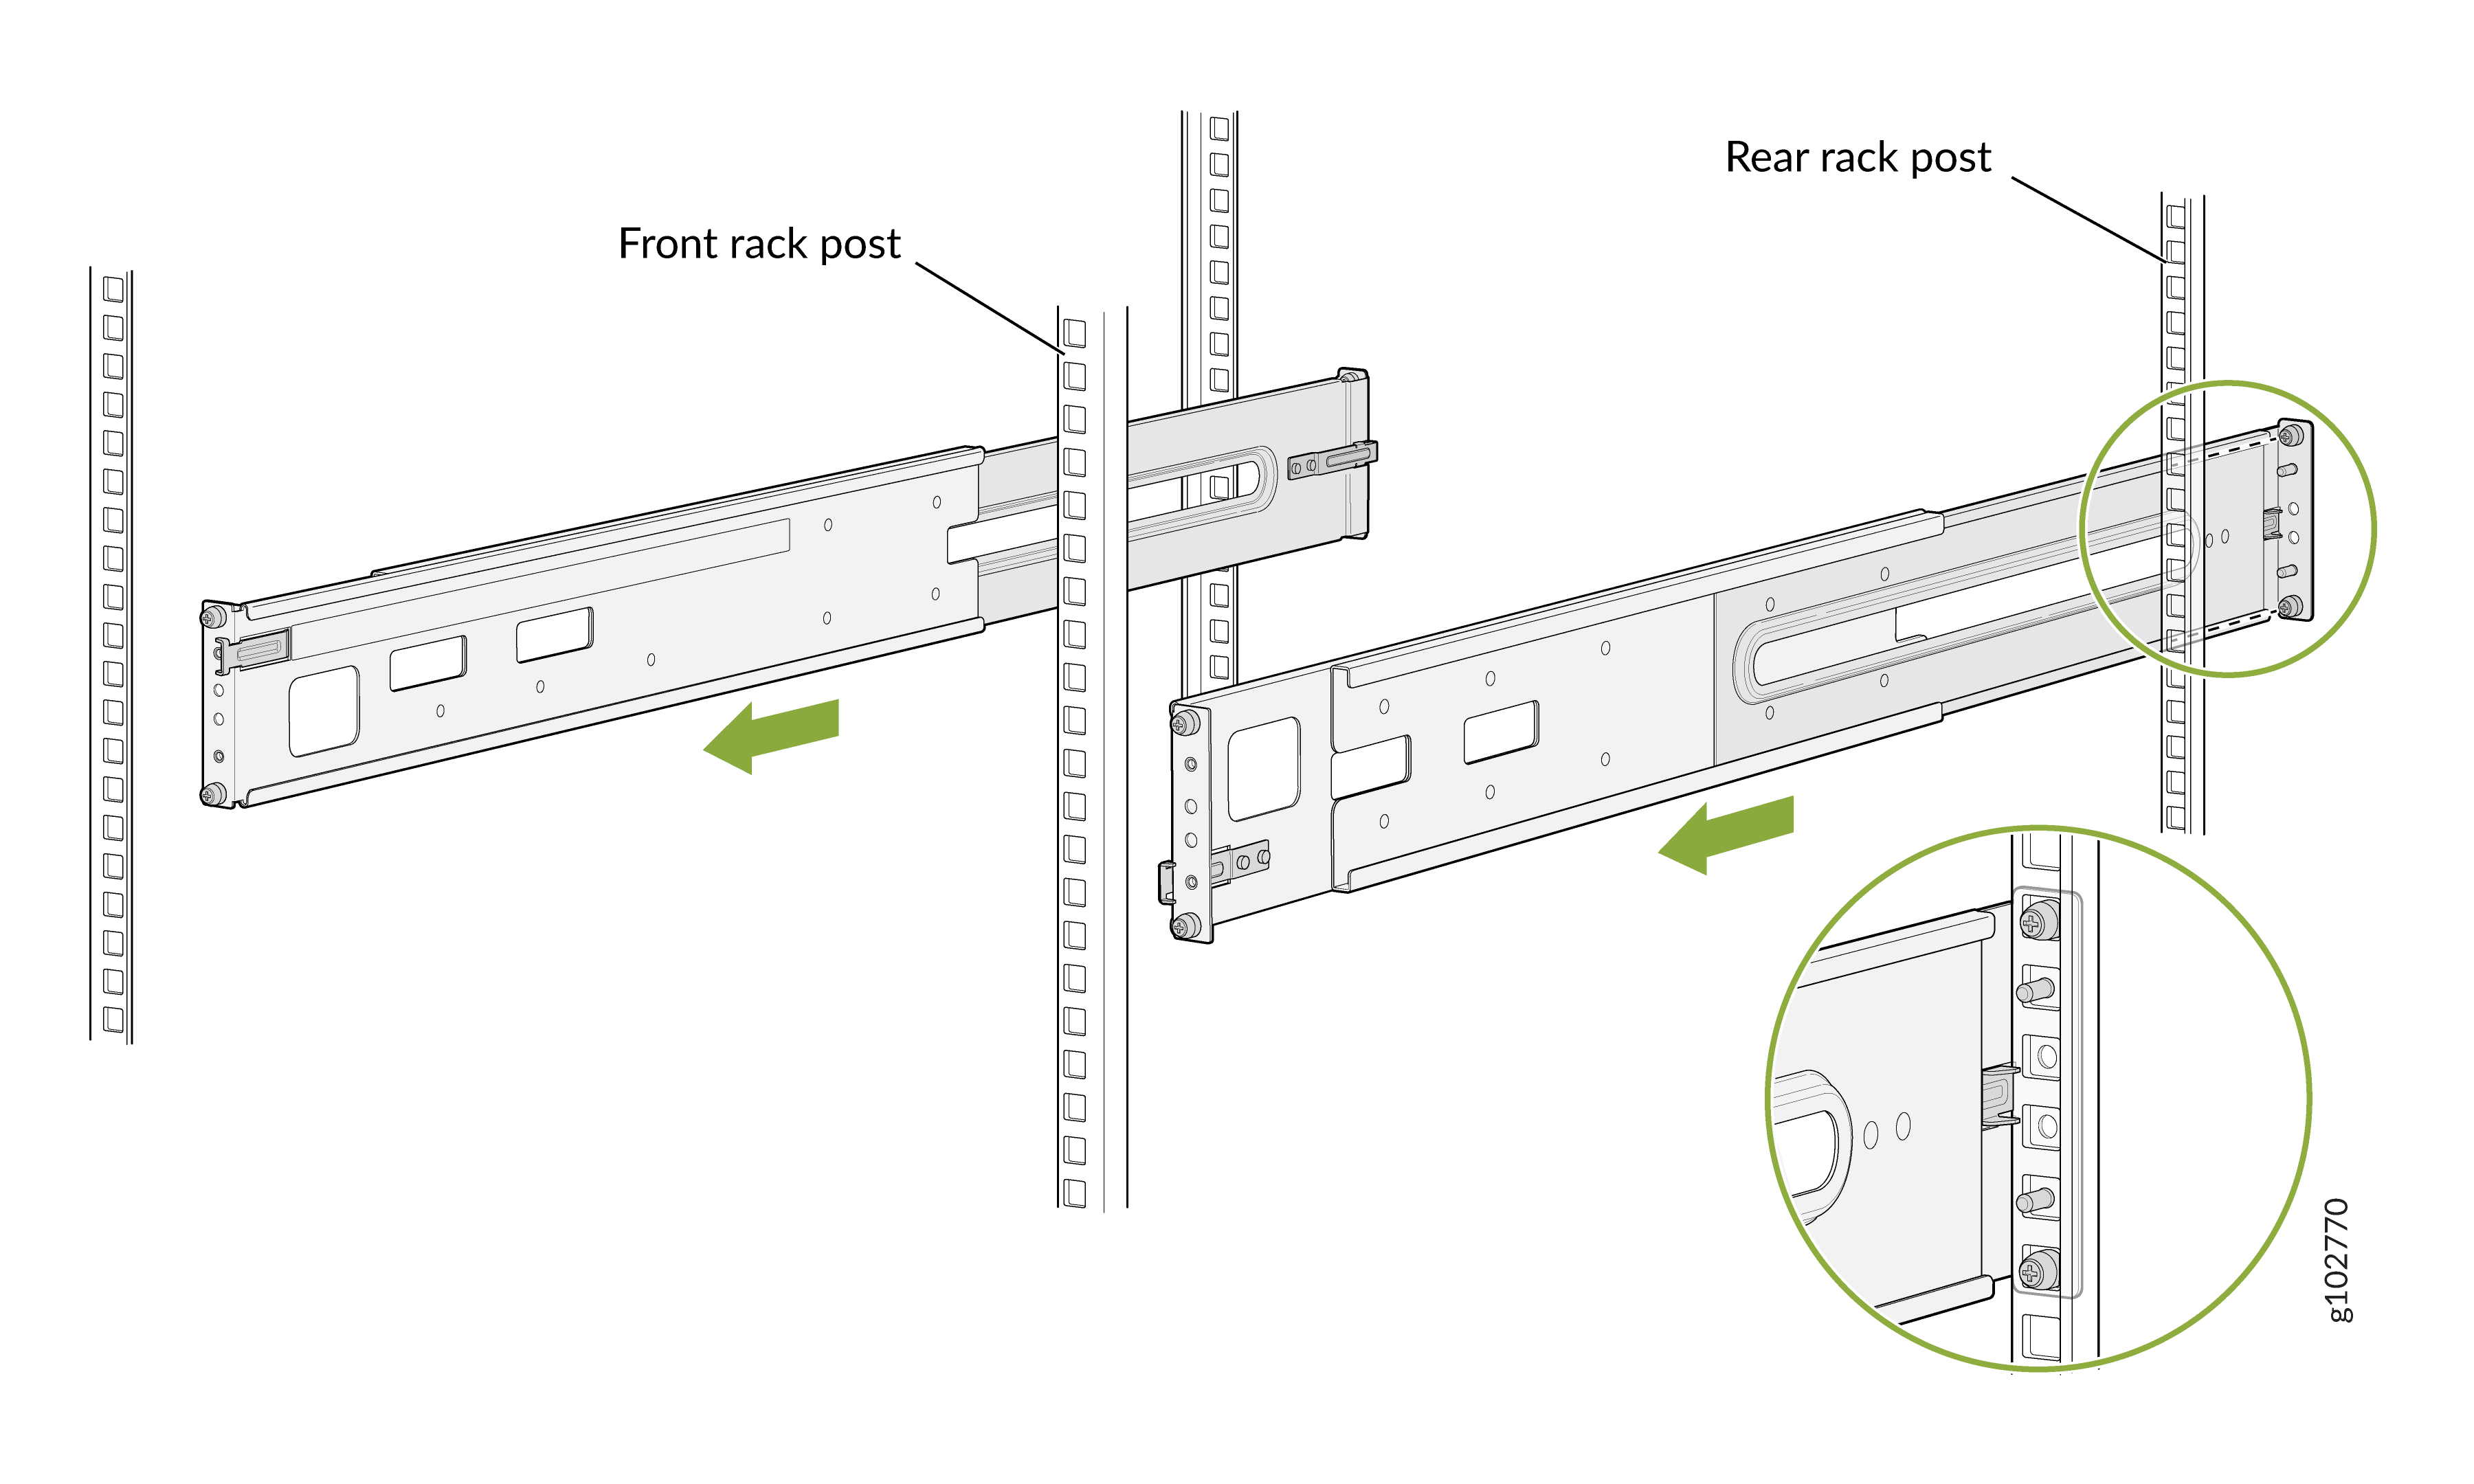
Attach the rear-mounting rails to the rack posts—tighten the thumb screws
by using the screwdriver.
Figure 2: Attach the Rear-Mounting Rails to the Rack Posts
-
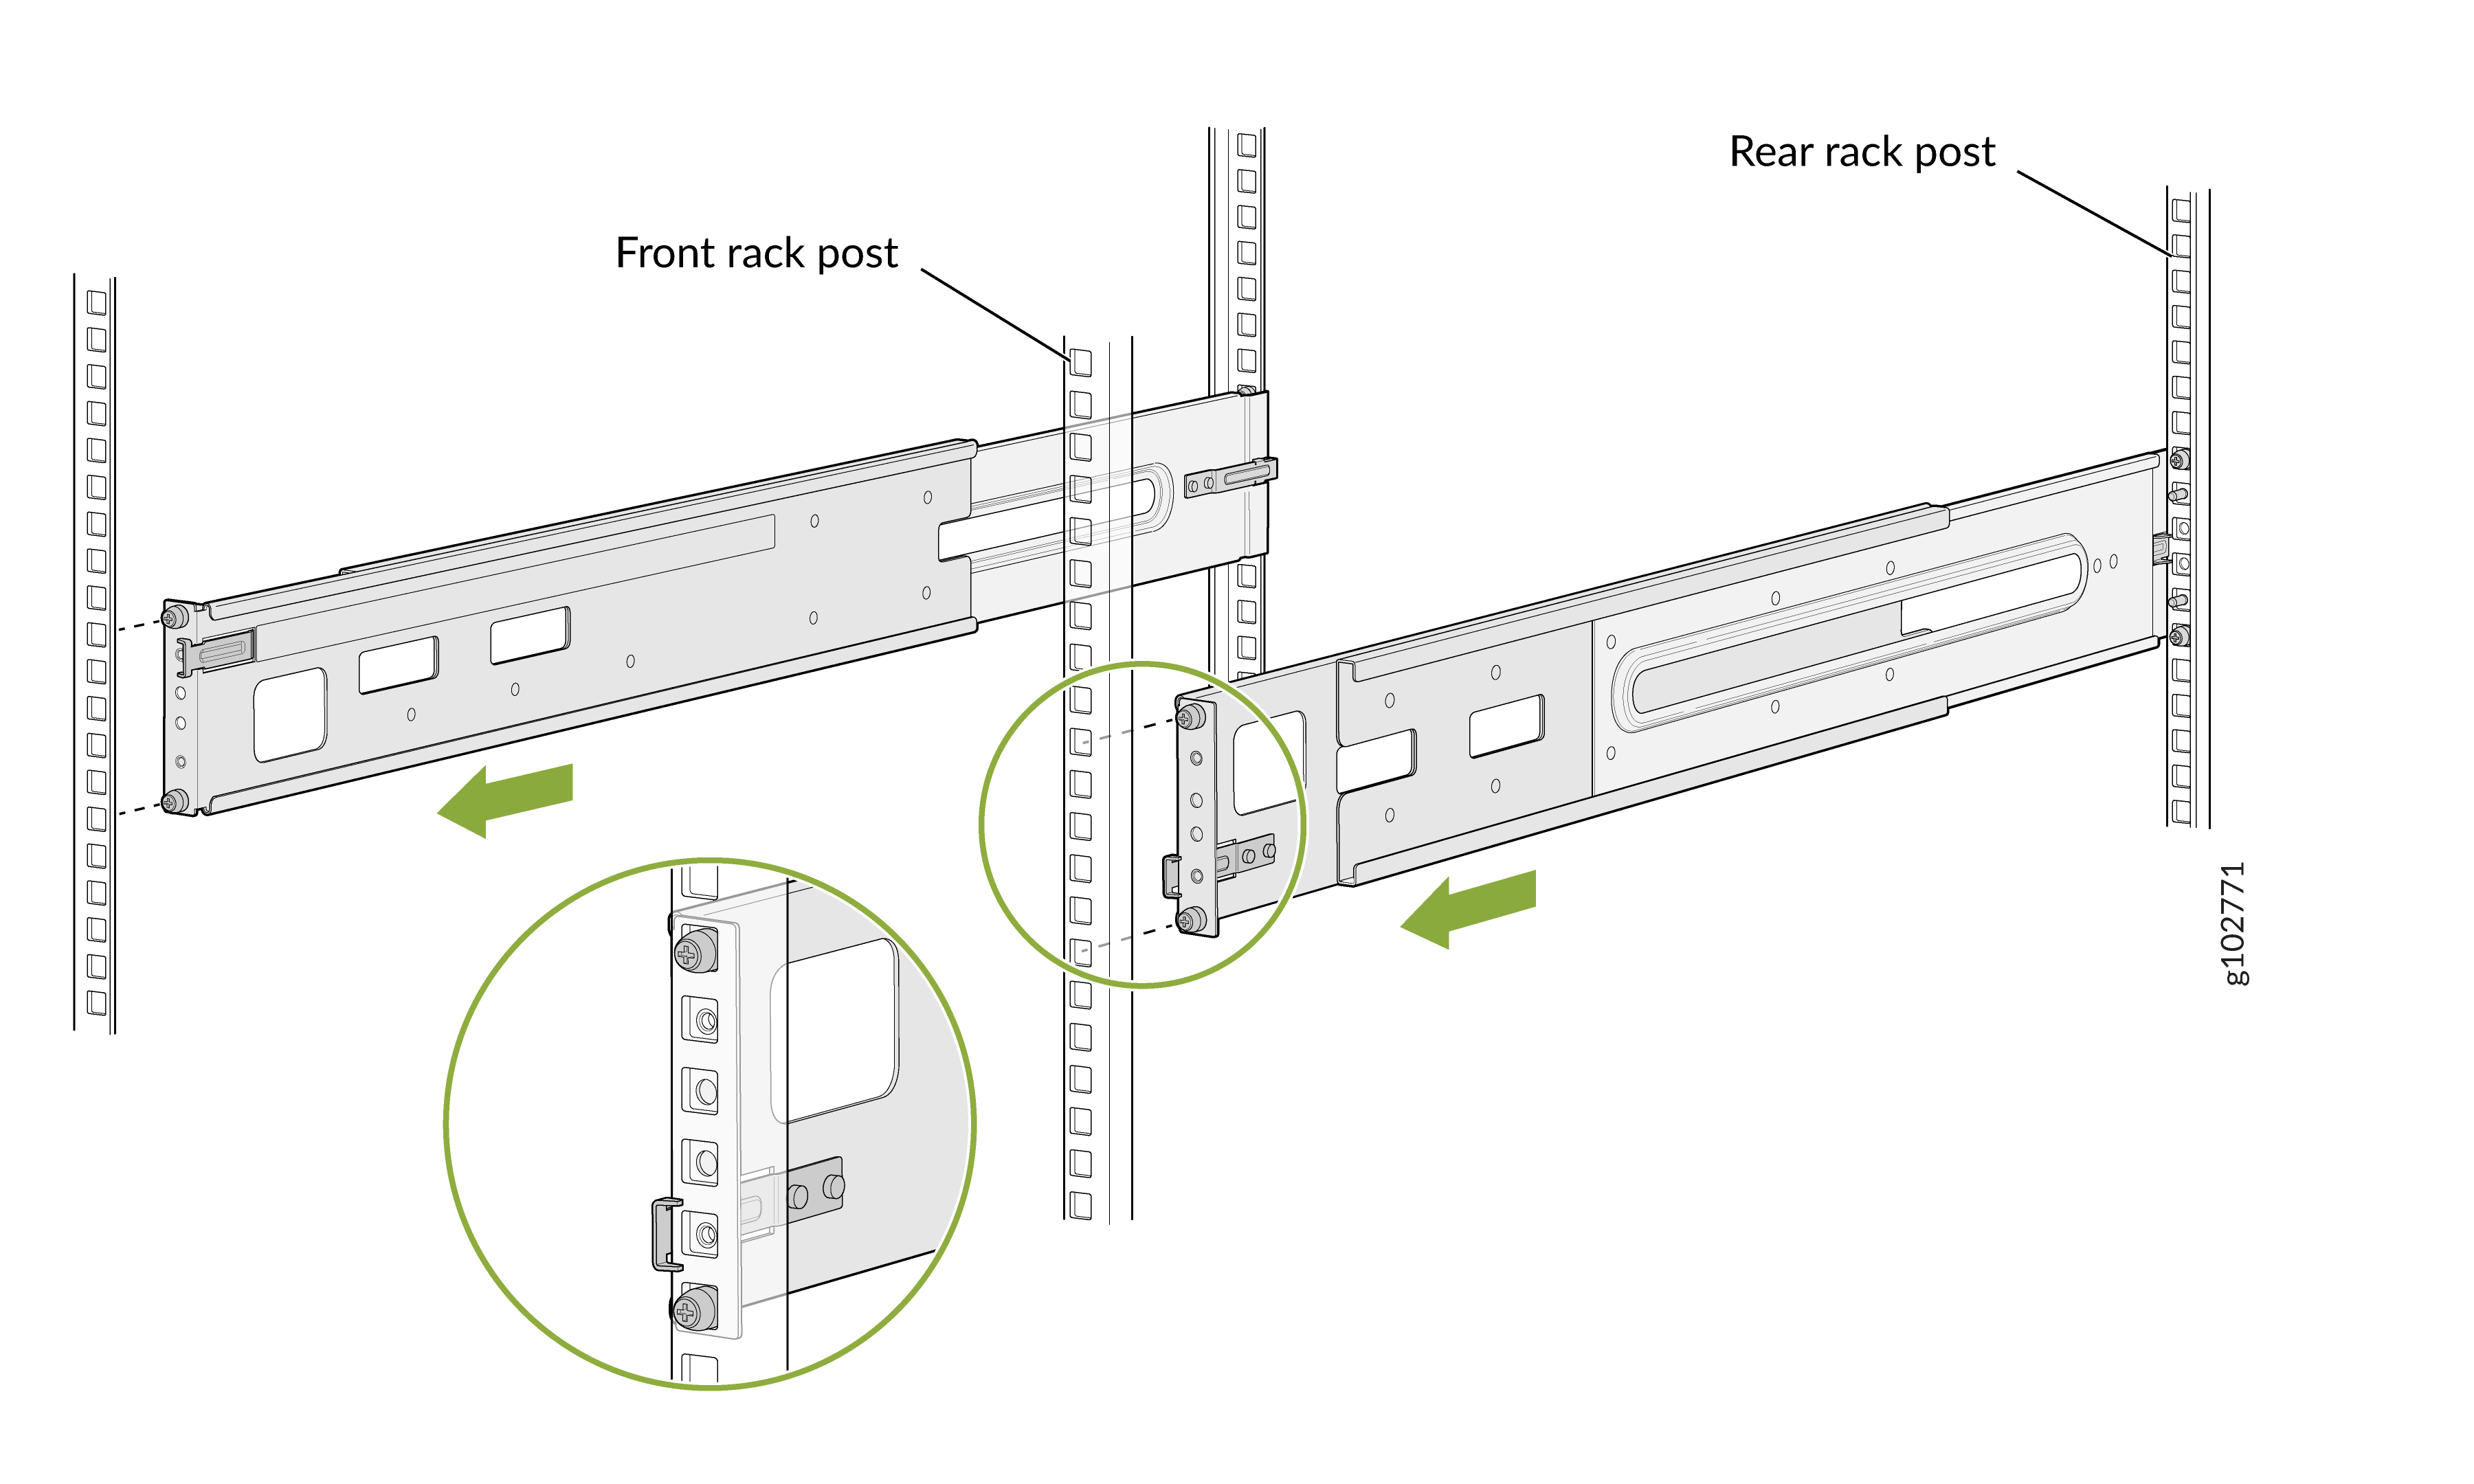
Attach the front-mounting rails to the rack posts—tighten the captive thumb
screws by using the screwdriver.
Figure 3: Attach the Front-Mounting Rails to the Rack Posts
-
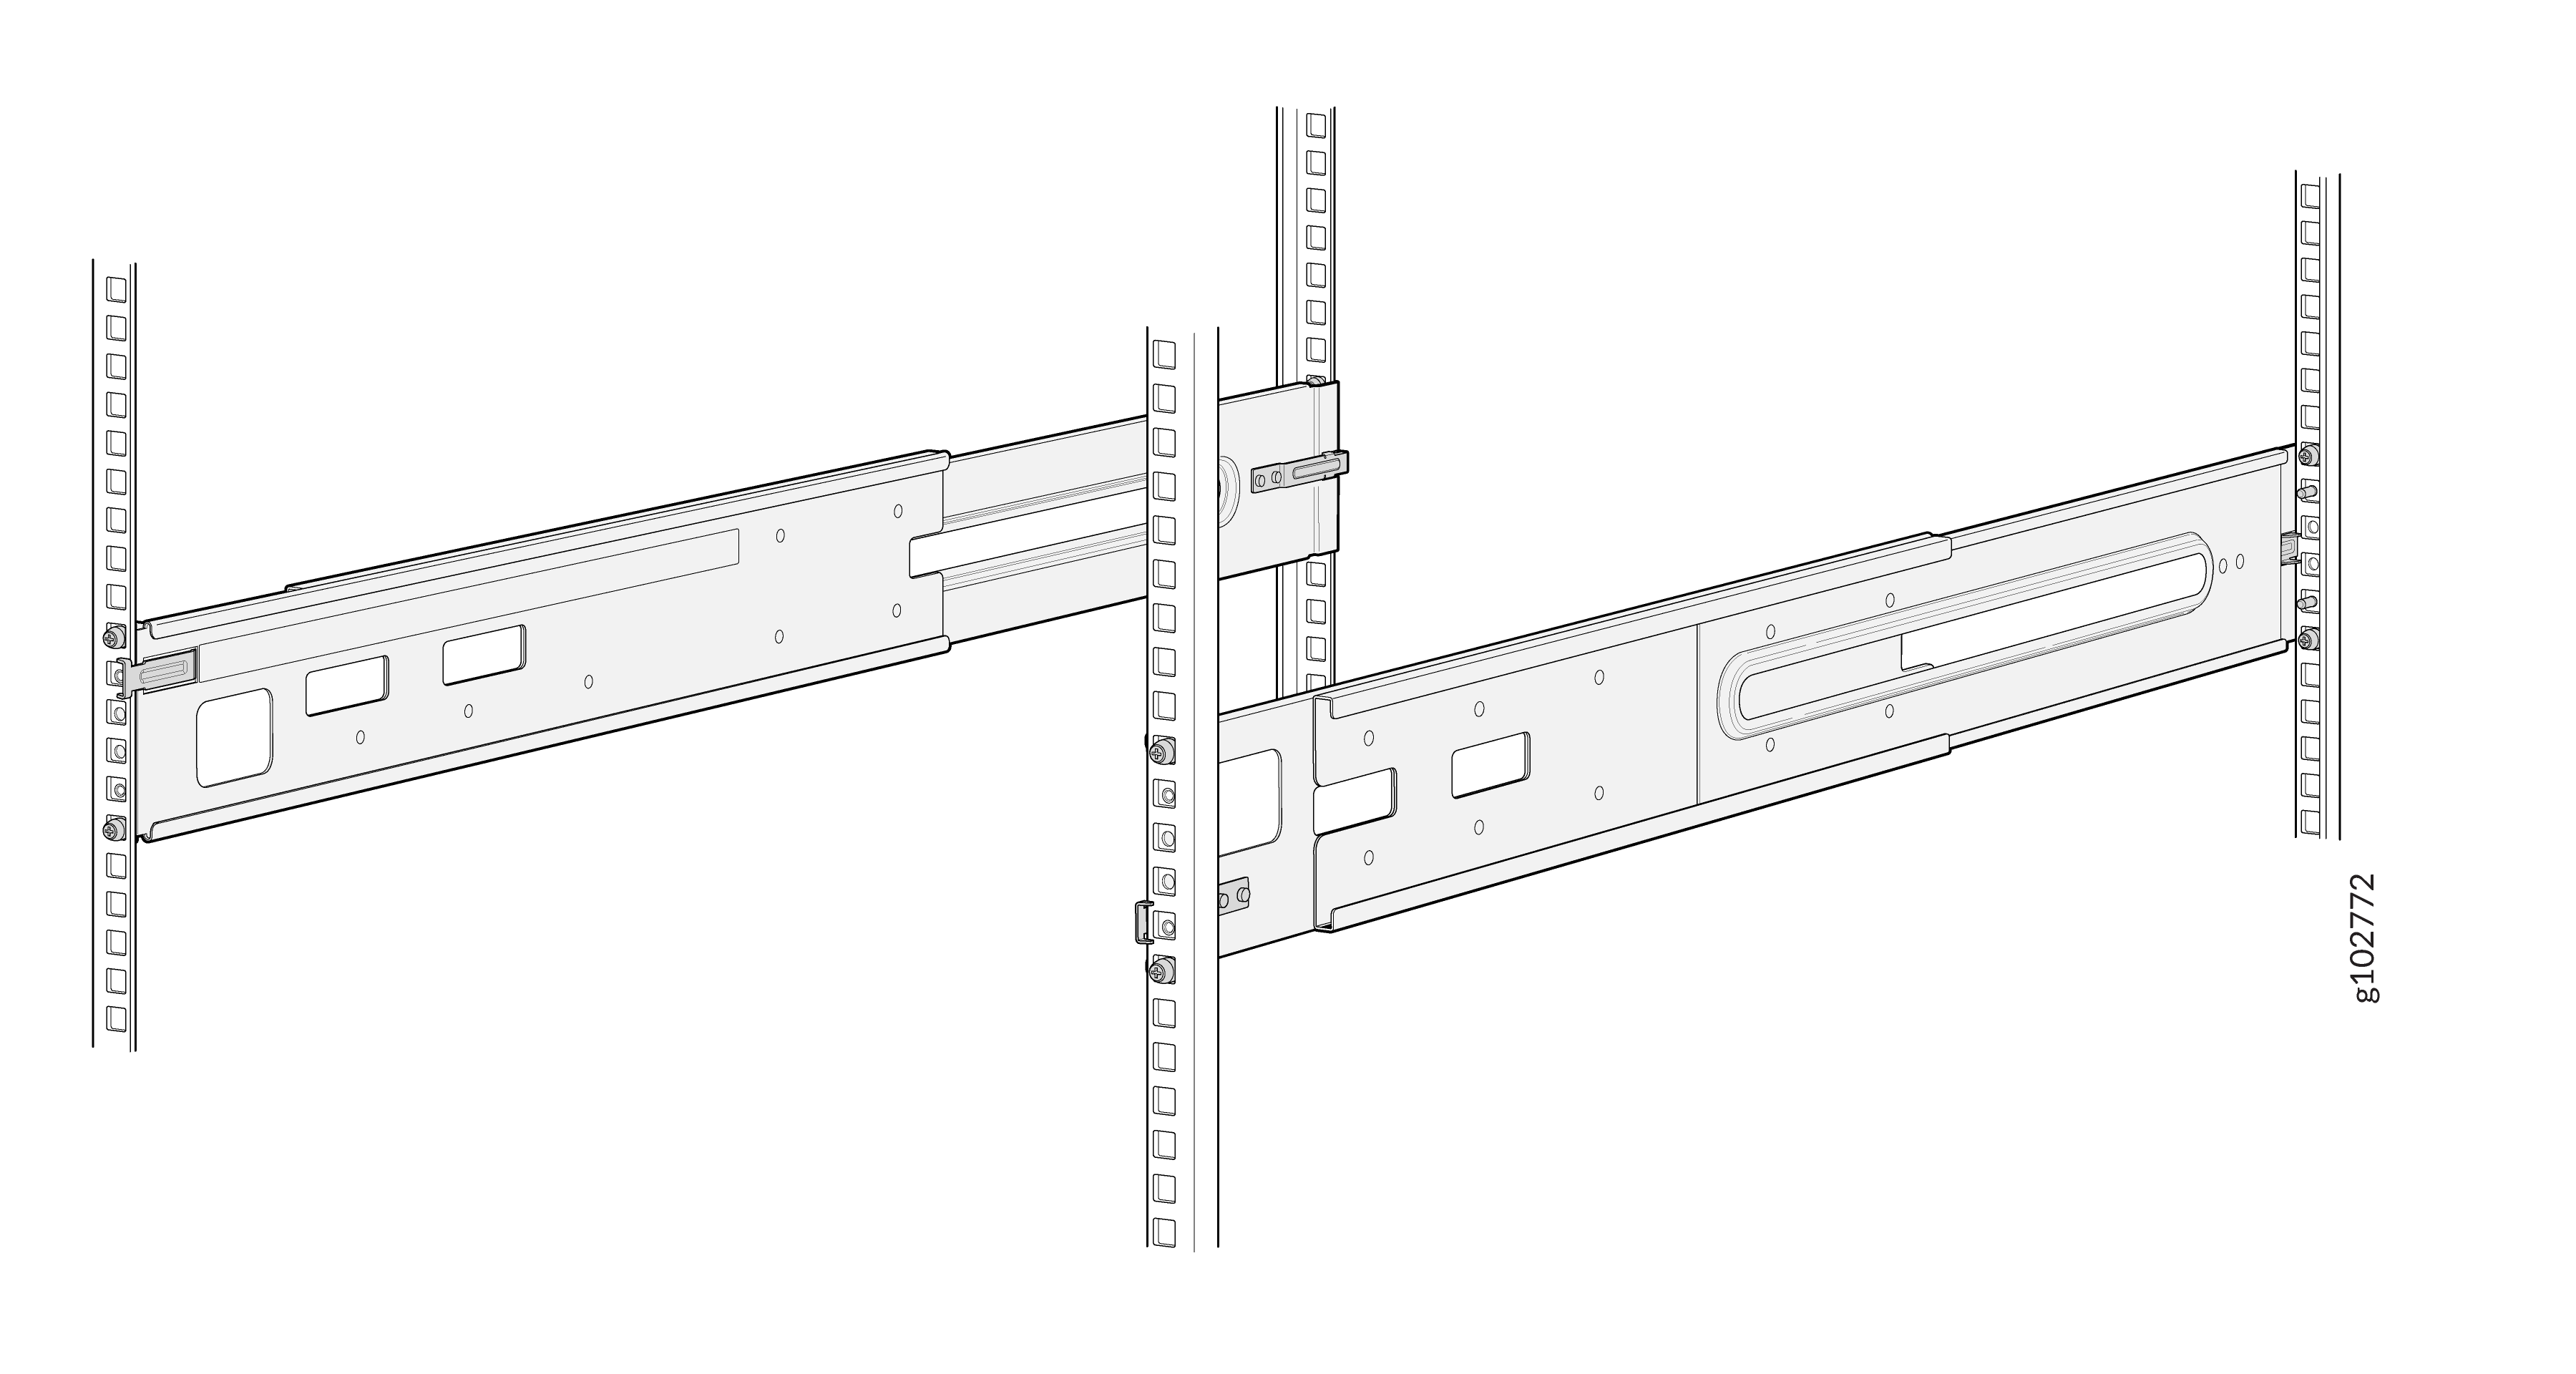
Ensure that the mounting rails are level by verifying that all screws on
one side of the rack align with the screws on the other side.
Figure 4: Ensure That the Mounting Rails Are Level
-
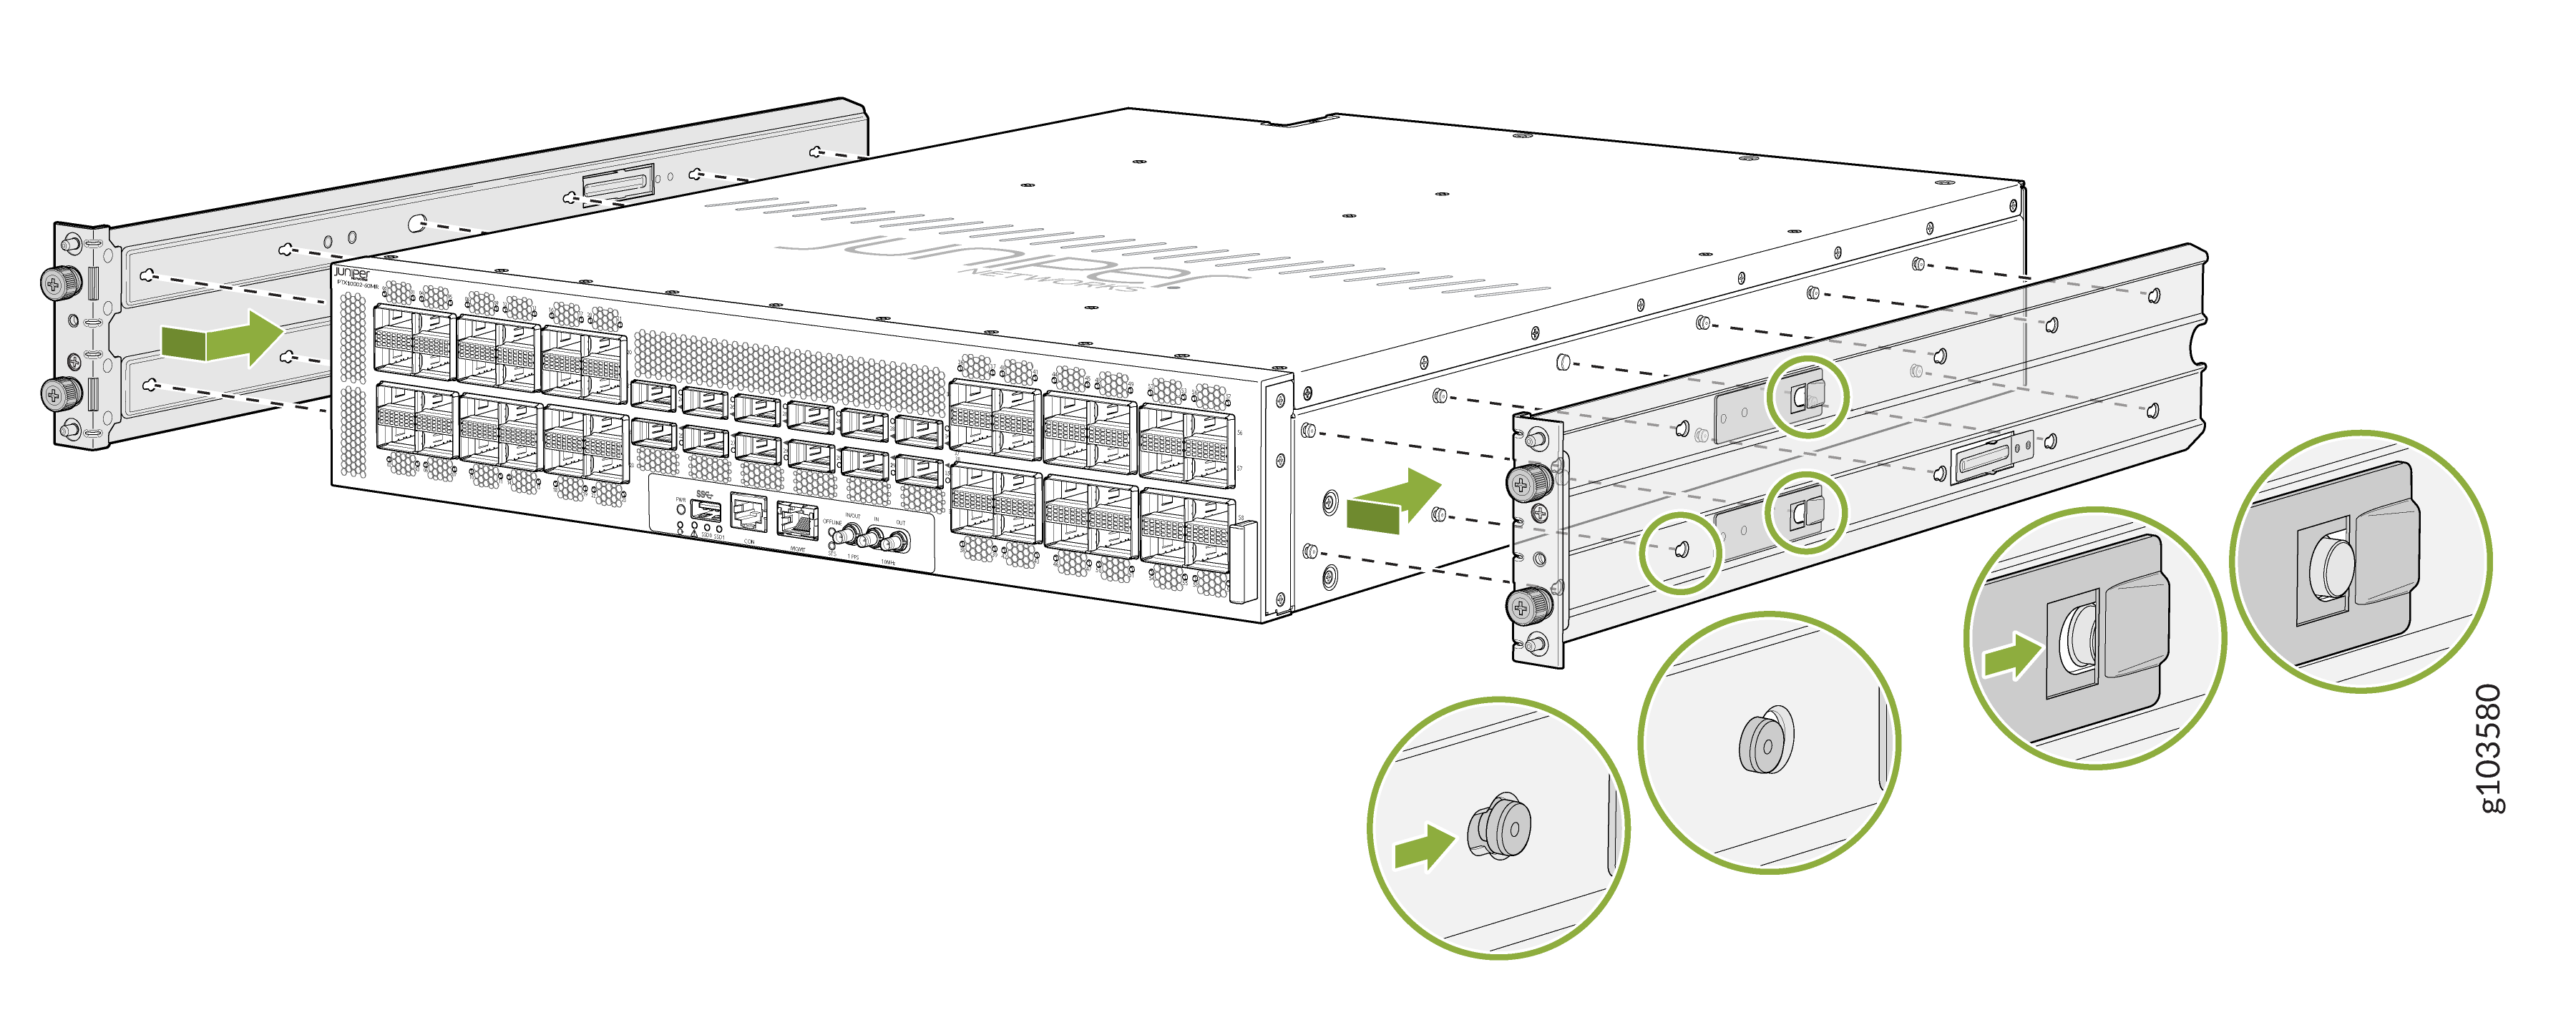
Attach the mounting brackets to the router chassis.
Figure 5: Attach the Mounting Brackets to the Router Chassis
-
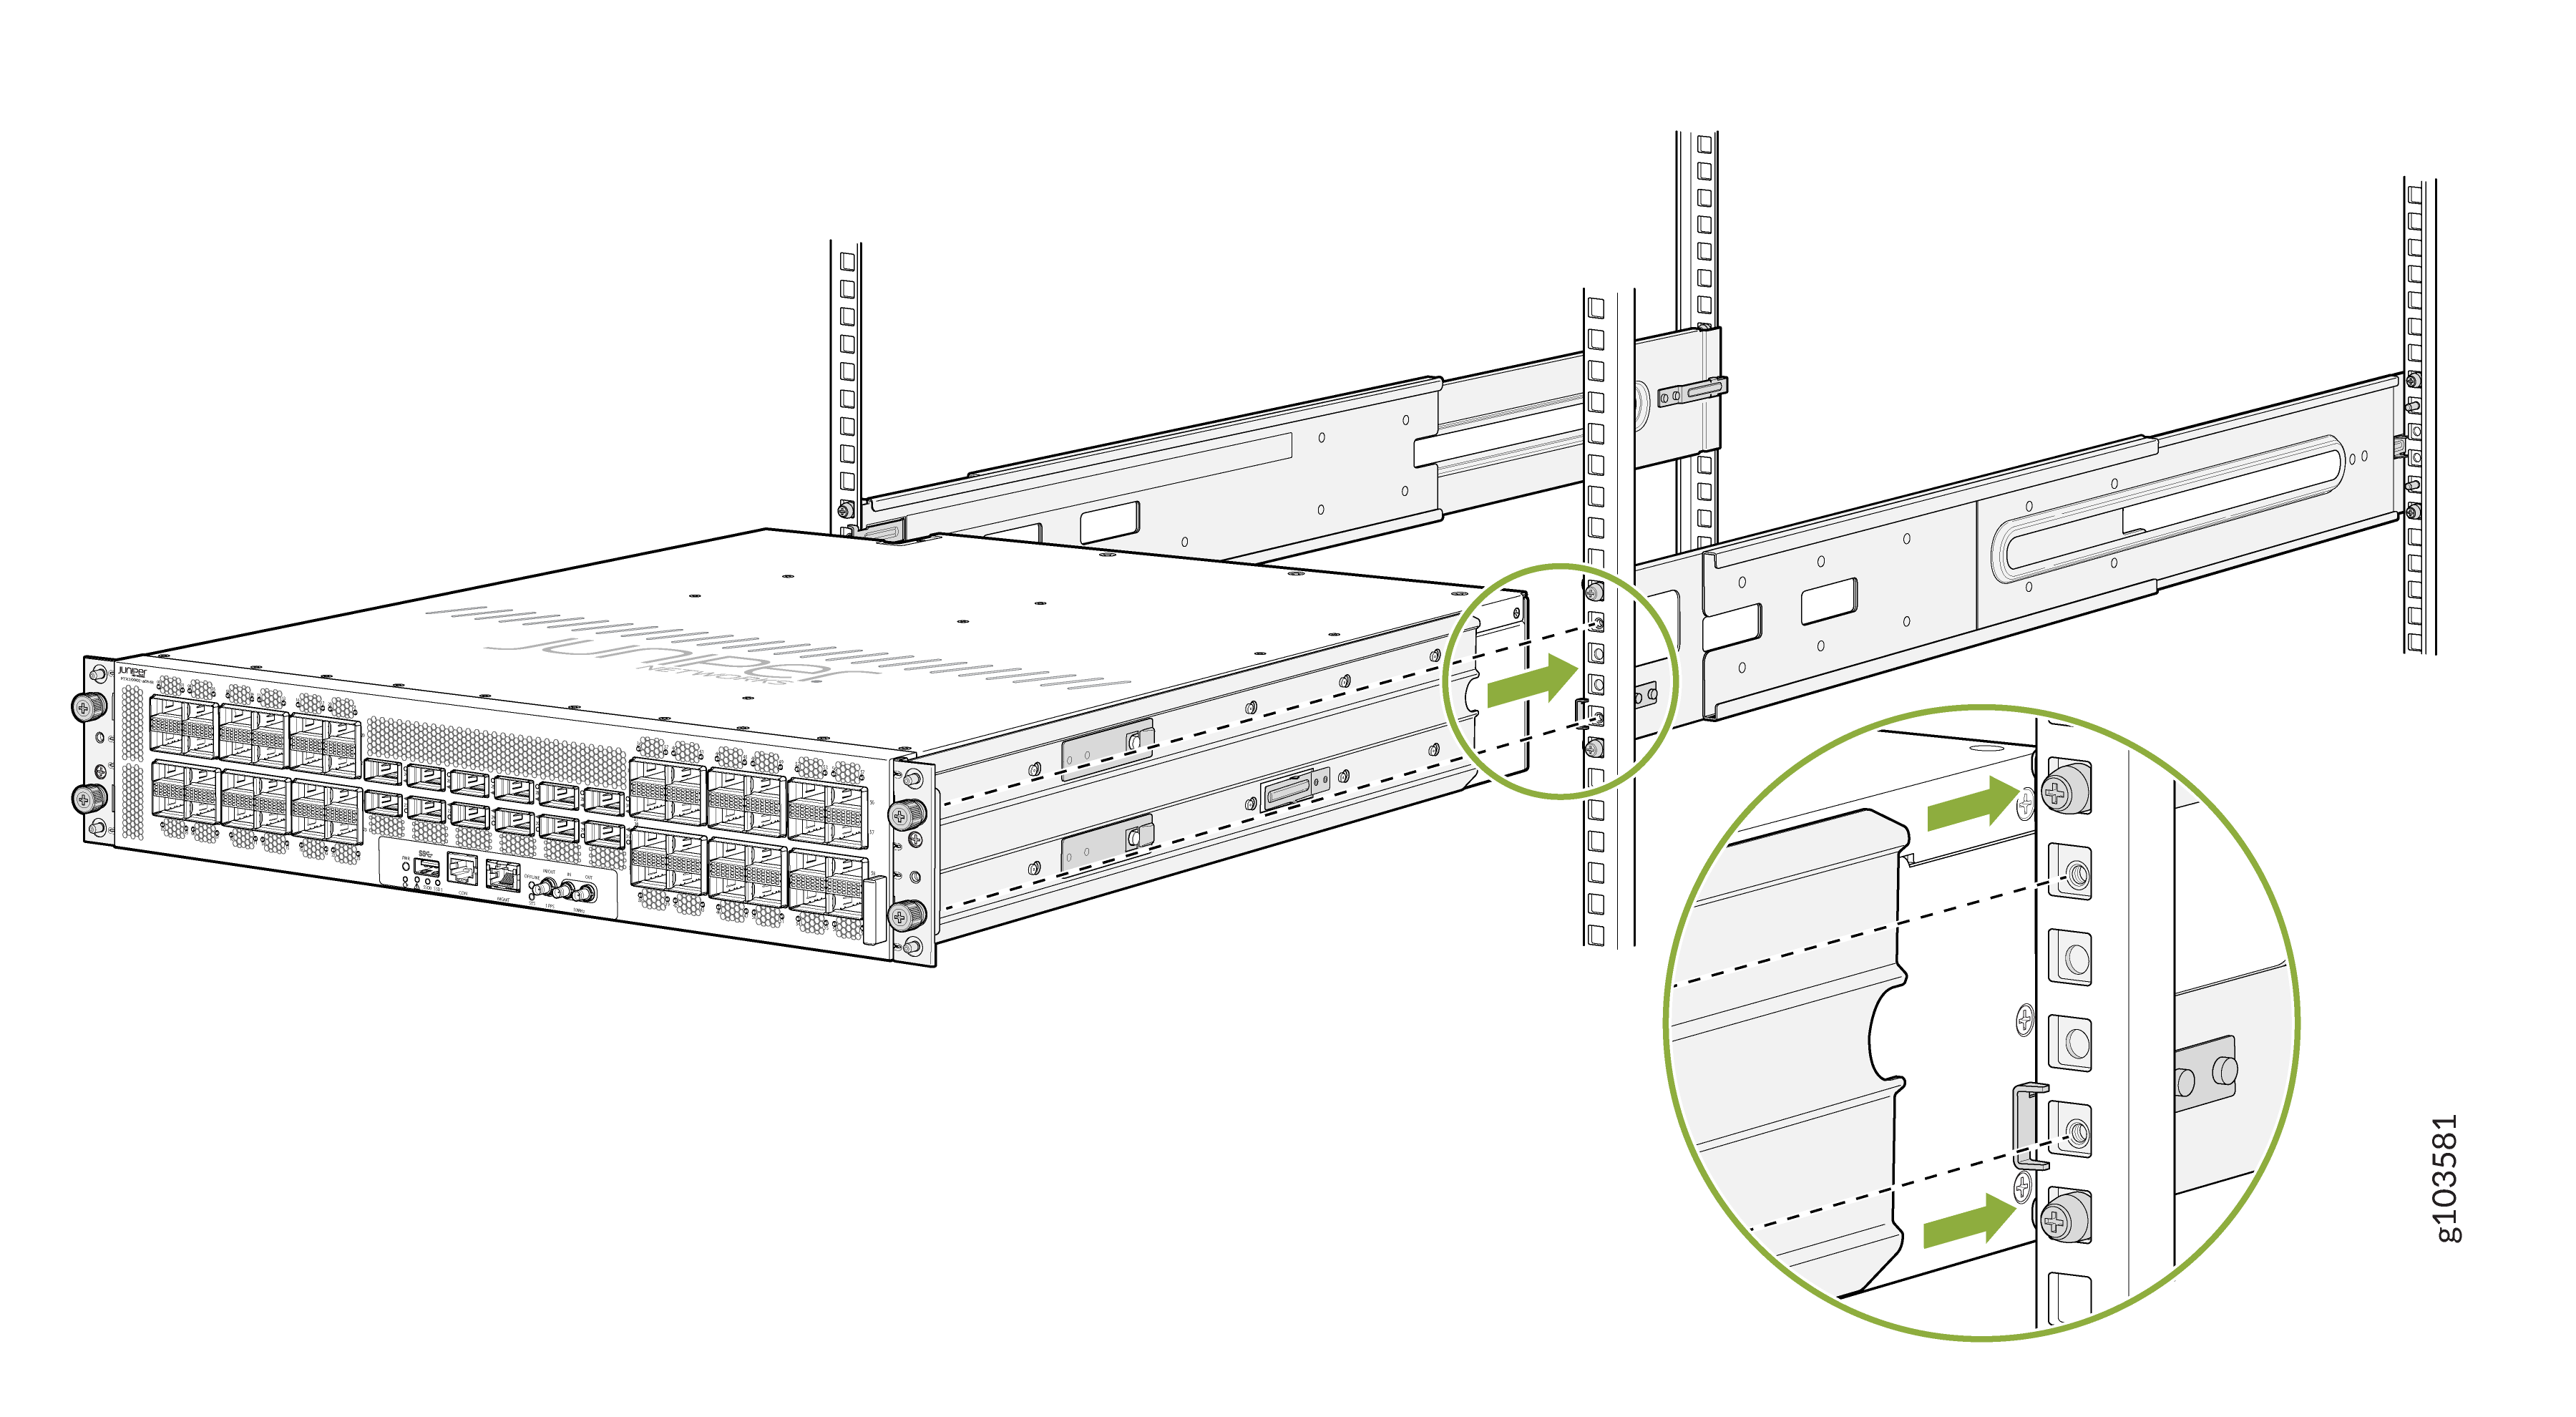
Align the mounting brackets with the guides on the mounting rails and
gently slide the chassis on to the mounting rails until the chassis locks in
place.
Figure 6: Slide the Chassis on to the Mounting Rails
-
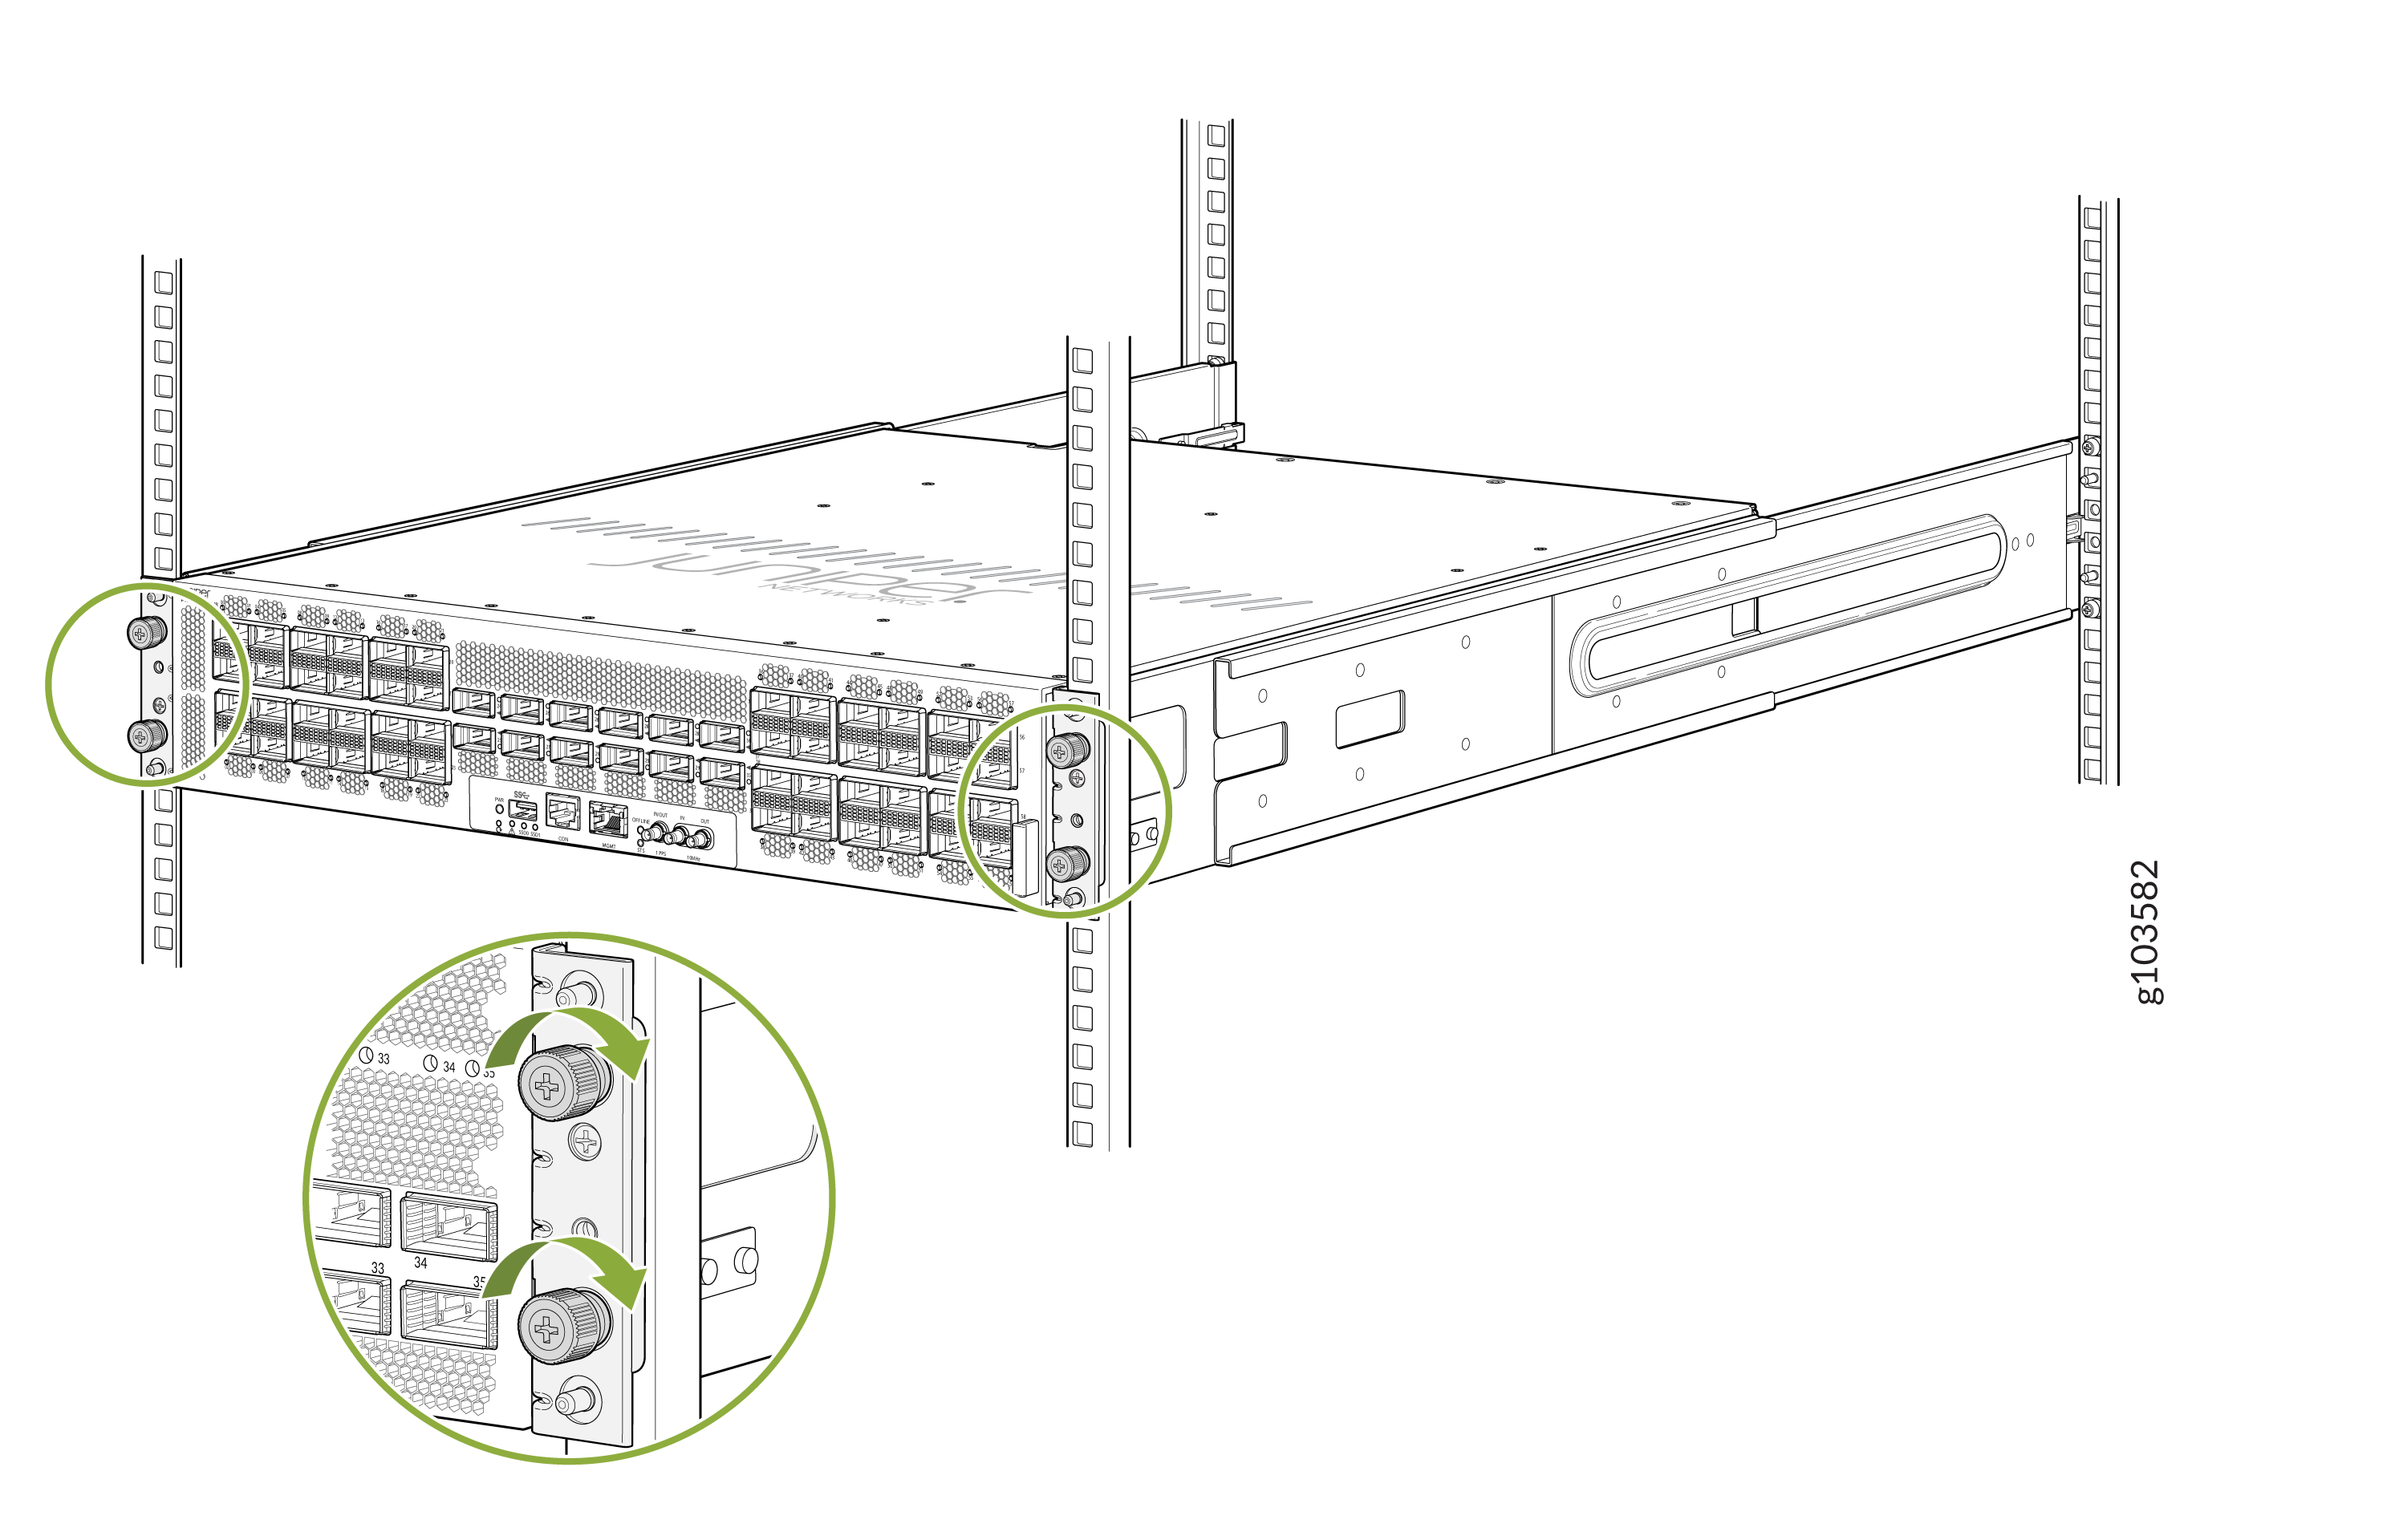
Secure the router to the rack—tighten the thumb screws by using the
screwdriver.
Figure 7: Secure the Router to the Rack
Mount the PTX10002-60MR on a Threaded-Hole Four-Post Rack
Before you mount the router on a threaded-hole four-post rack:
-
Verify that the site meets the requirements described in General Site Guidelines.
-
Place the rack in its permanent location, allowing adequate clearance for airflow and maintenance, and secure the rack to the building structure.
-
Read Safety Information, with particular attention to Chassis and Component LIfting Guidelines.
-
Ensure that you have taken the necessary precautions to prevent electrostatic discharge (ESD) damage (see Prevention of Electrostatic Discharge Damage).
-
Unpack the router from the shipping carton (see Unpack the PTX10002-60MR).
Ensure that you have the following parts and tools available:
-
A Phillips (+) screwdriver, number 2—not provided
-
An ESD grounding strap—not provided
-
An antistatic bag—not provided
-
The four-post mounting kit provided with the router that includes the following:
-
Front-mounting rails—2
-
Rear-mounting rails—2
-
Mounting brackets—2
-
Have one person to support the weight of the router while another person secures the router to the rack posts.
To mount the router on a threaded-hole four-post rack:
-
Remove the guide blocks from the mounting rails by using the screwdriver.
Keep them in an antistatic bag. See Figure 8 and Figure 9.
Figure 8: Remove the Guide Blocks from the Front-Mounting Rails
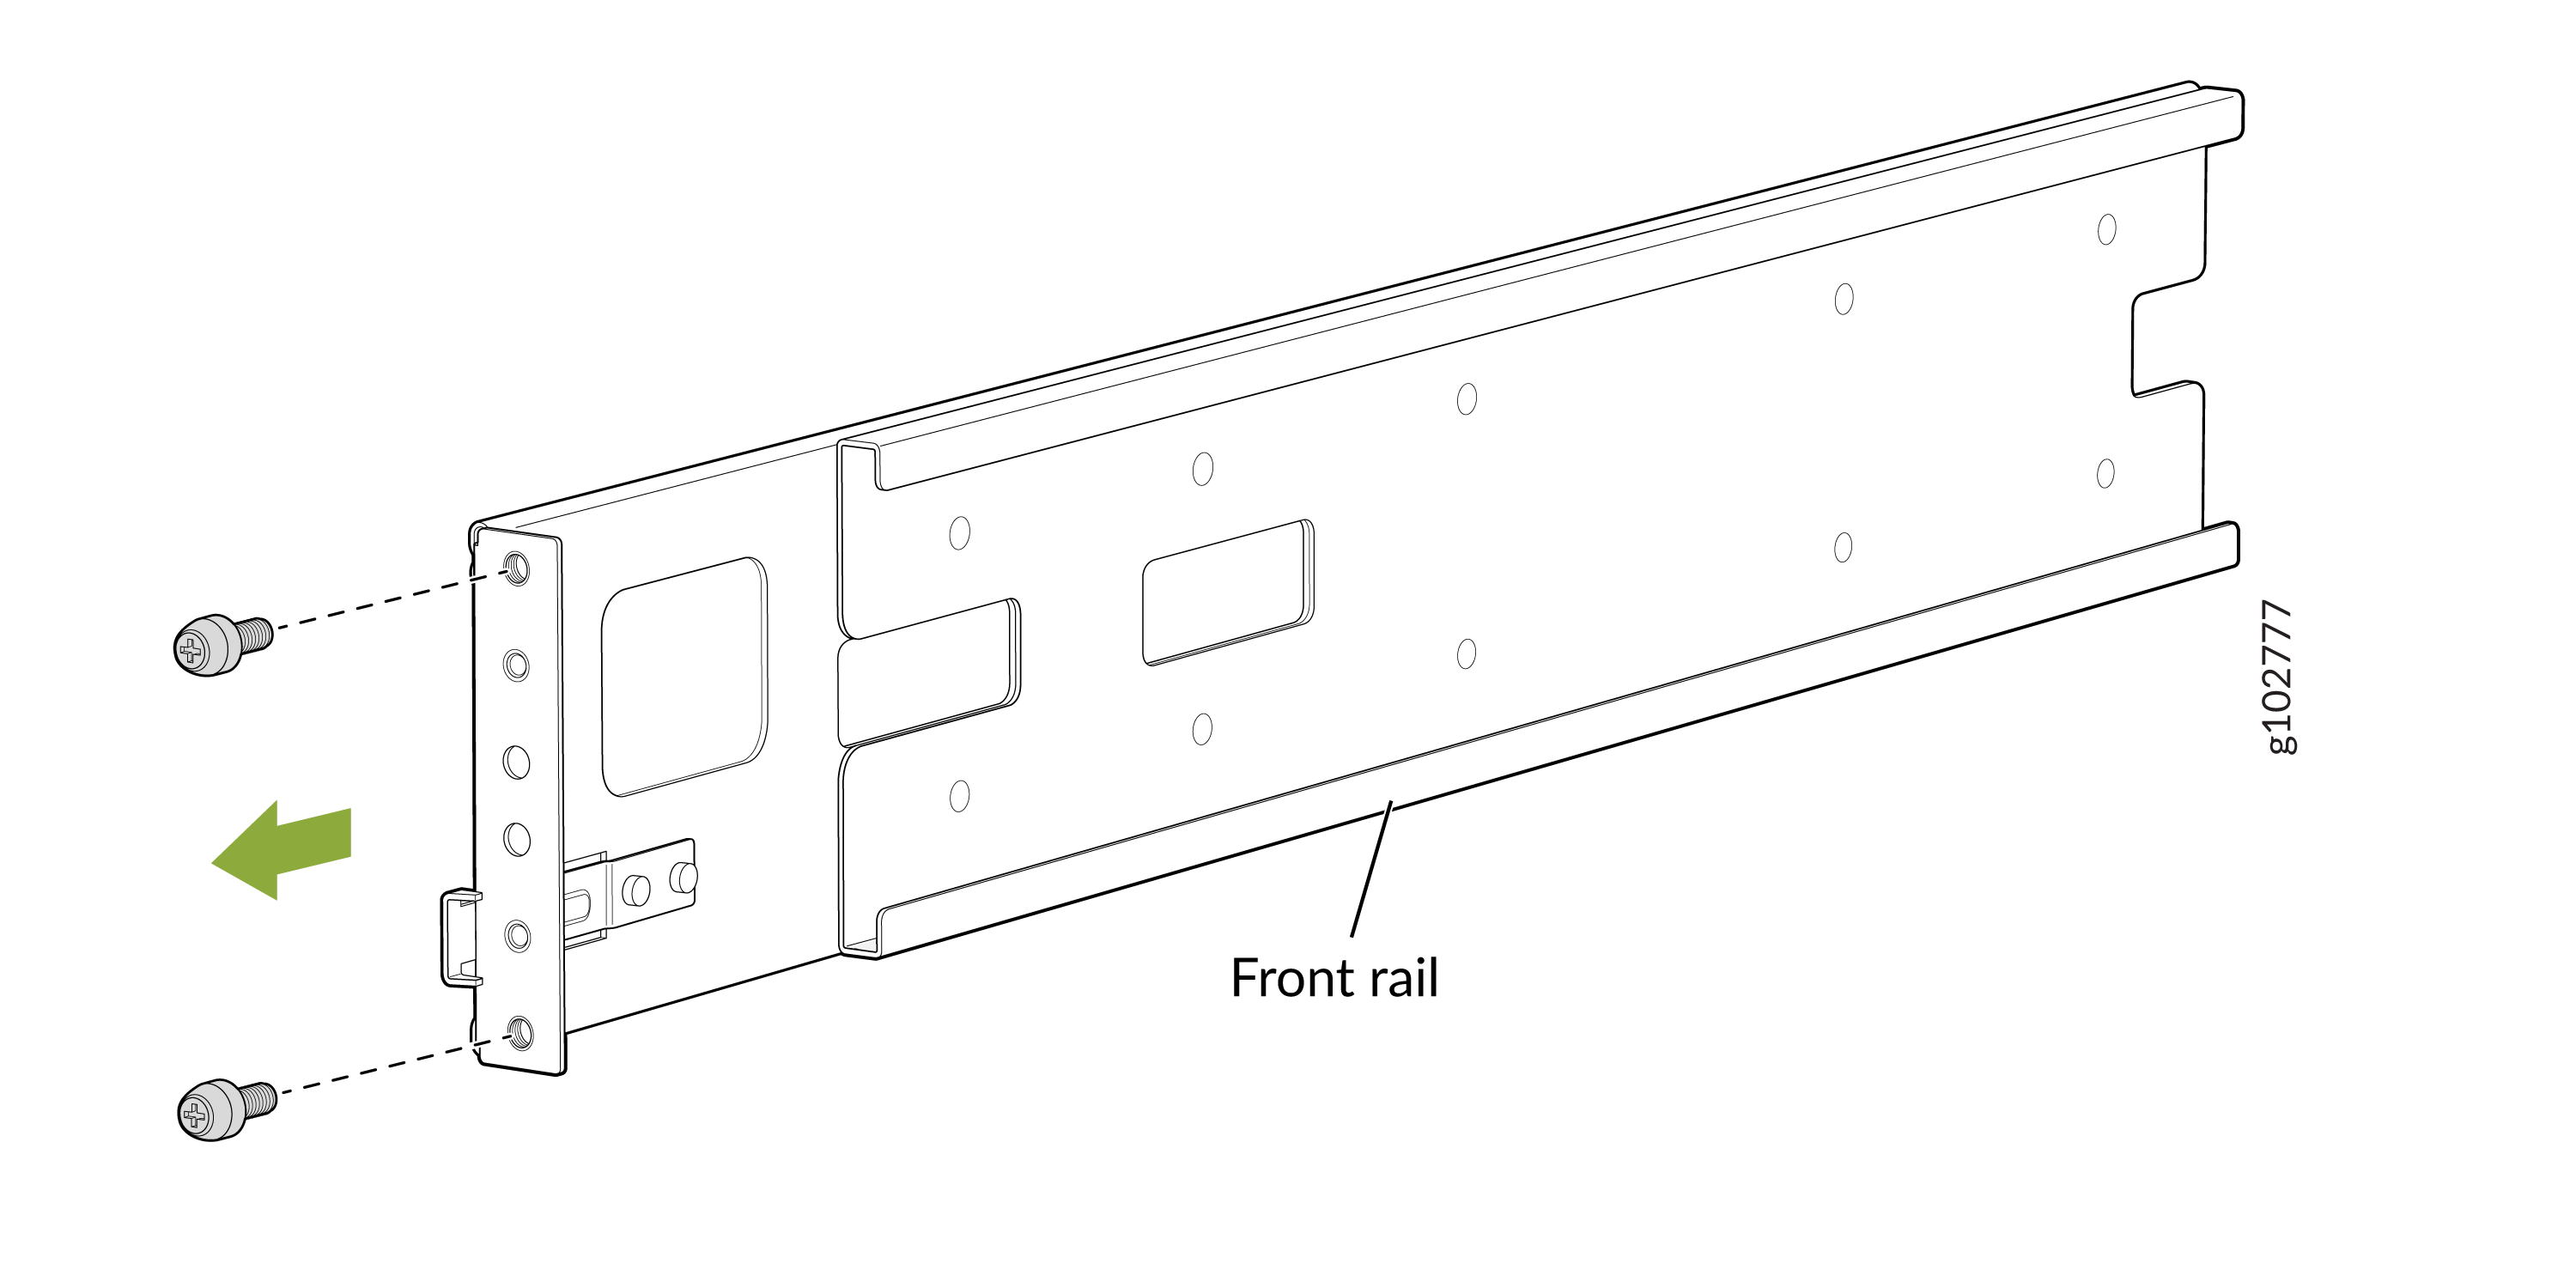 Figure 9: Remove the Guide Blocks from the Rear-Mounting Rails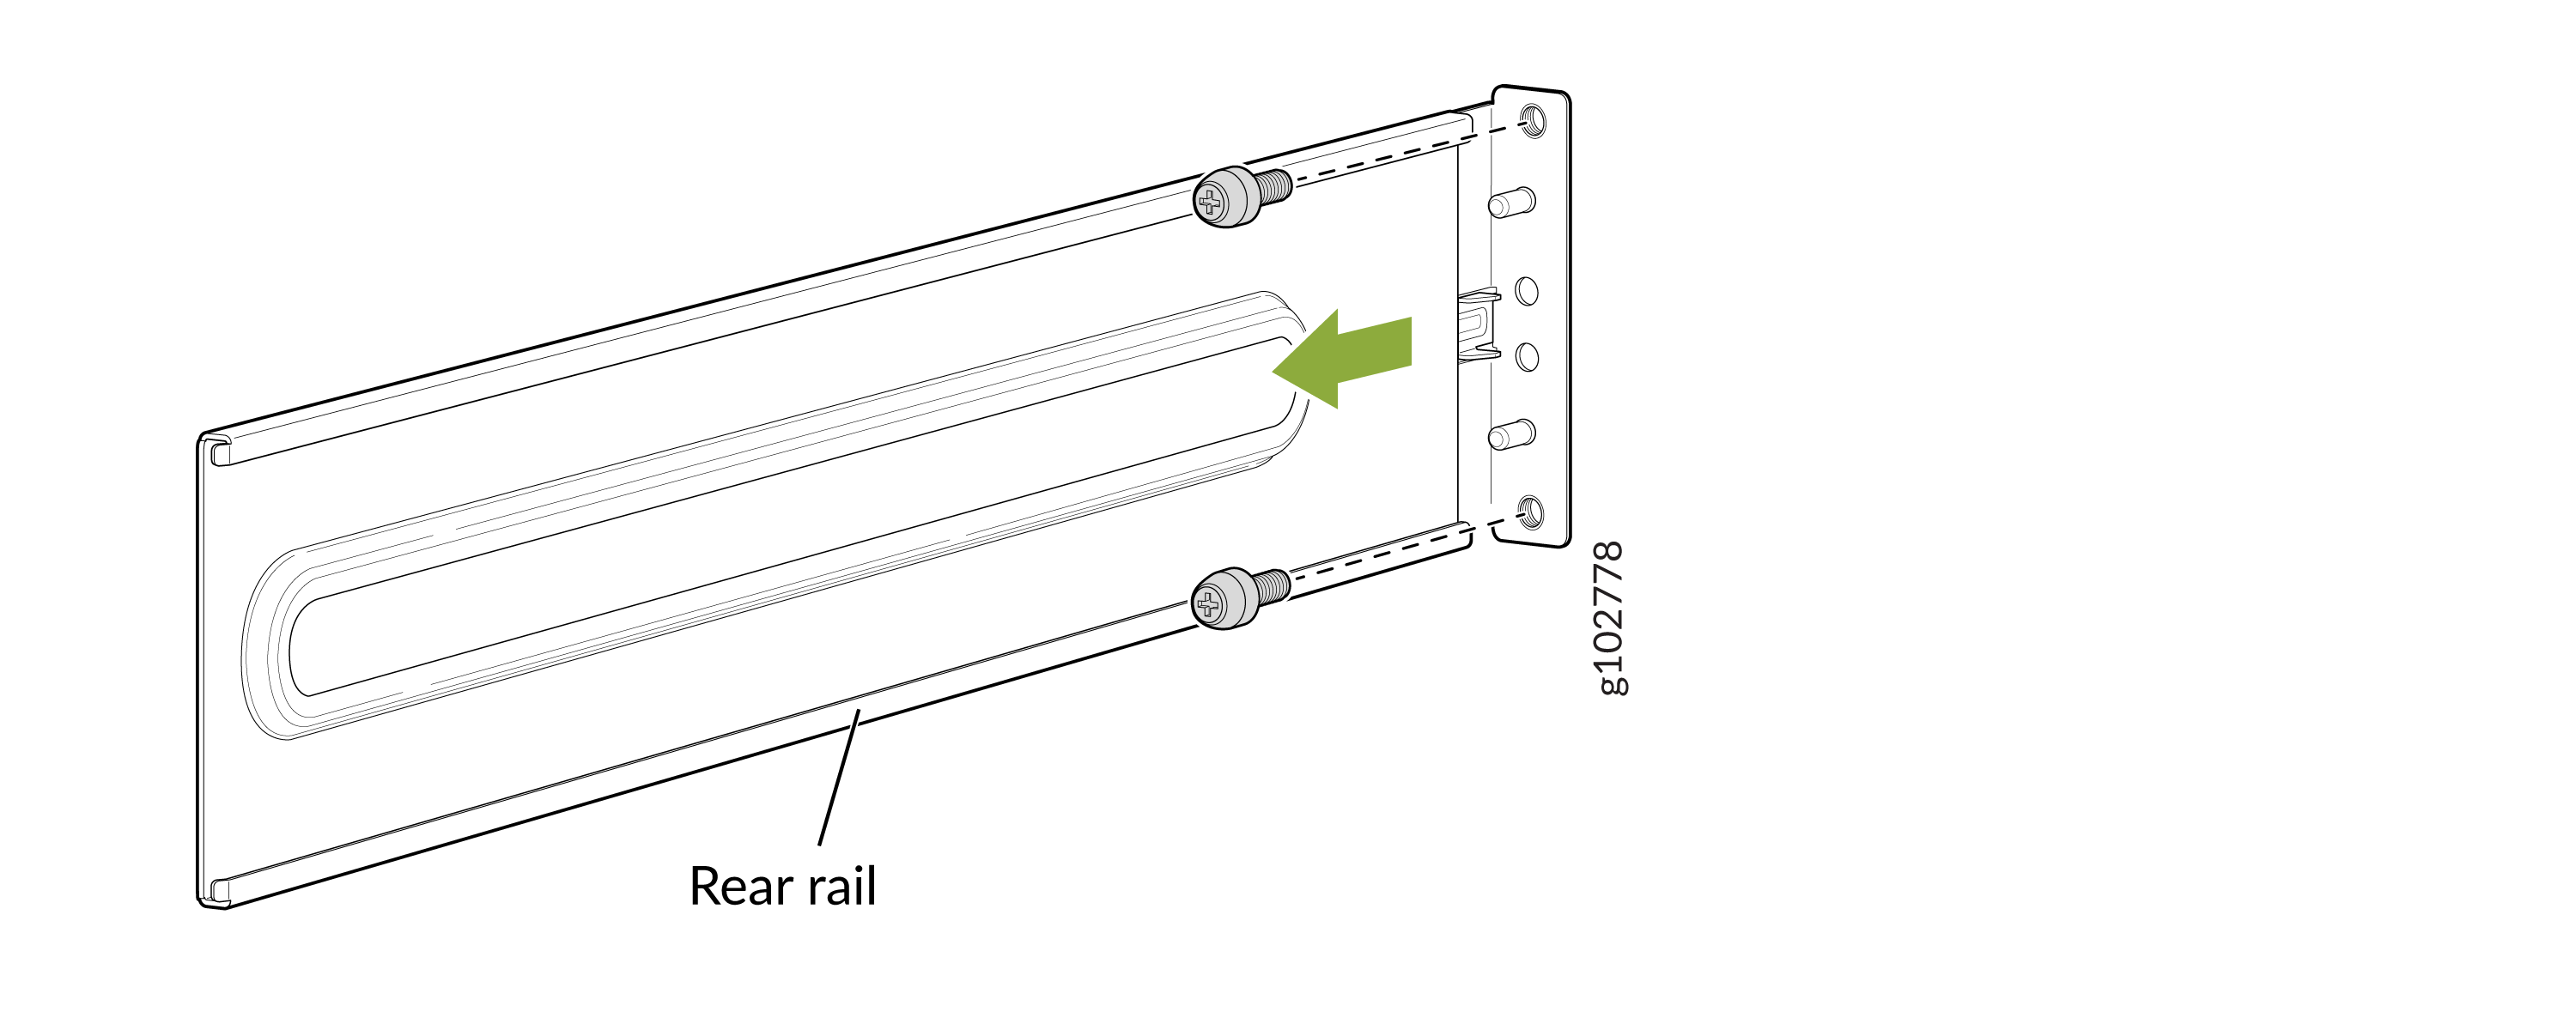
-
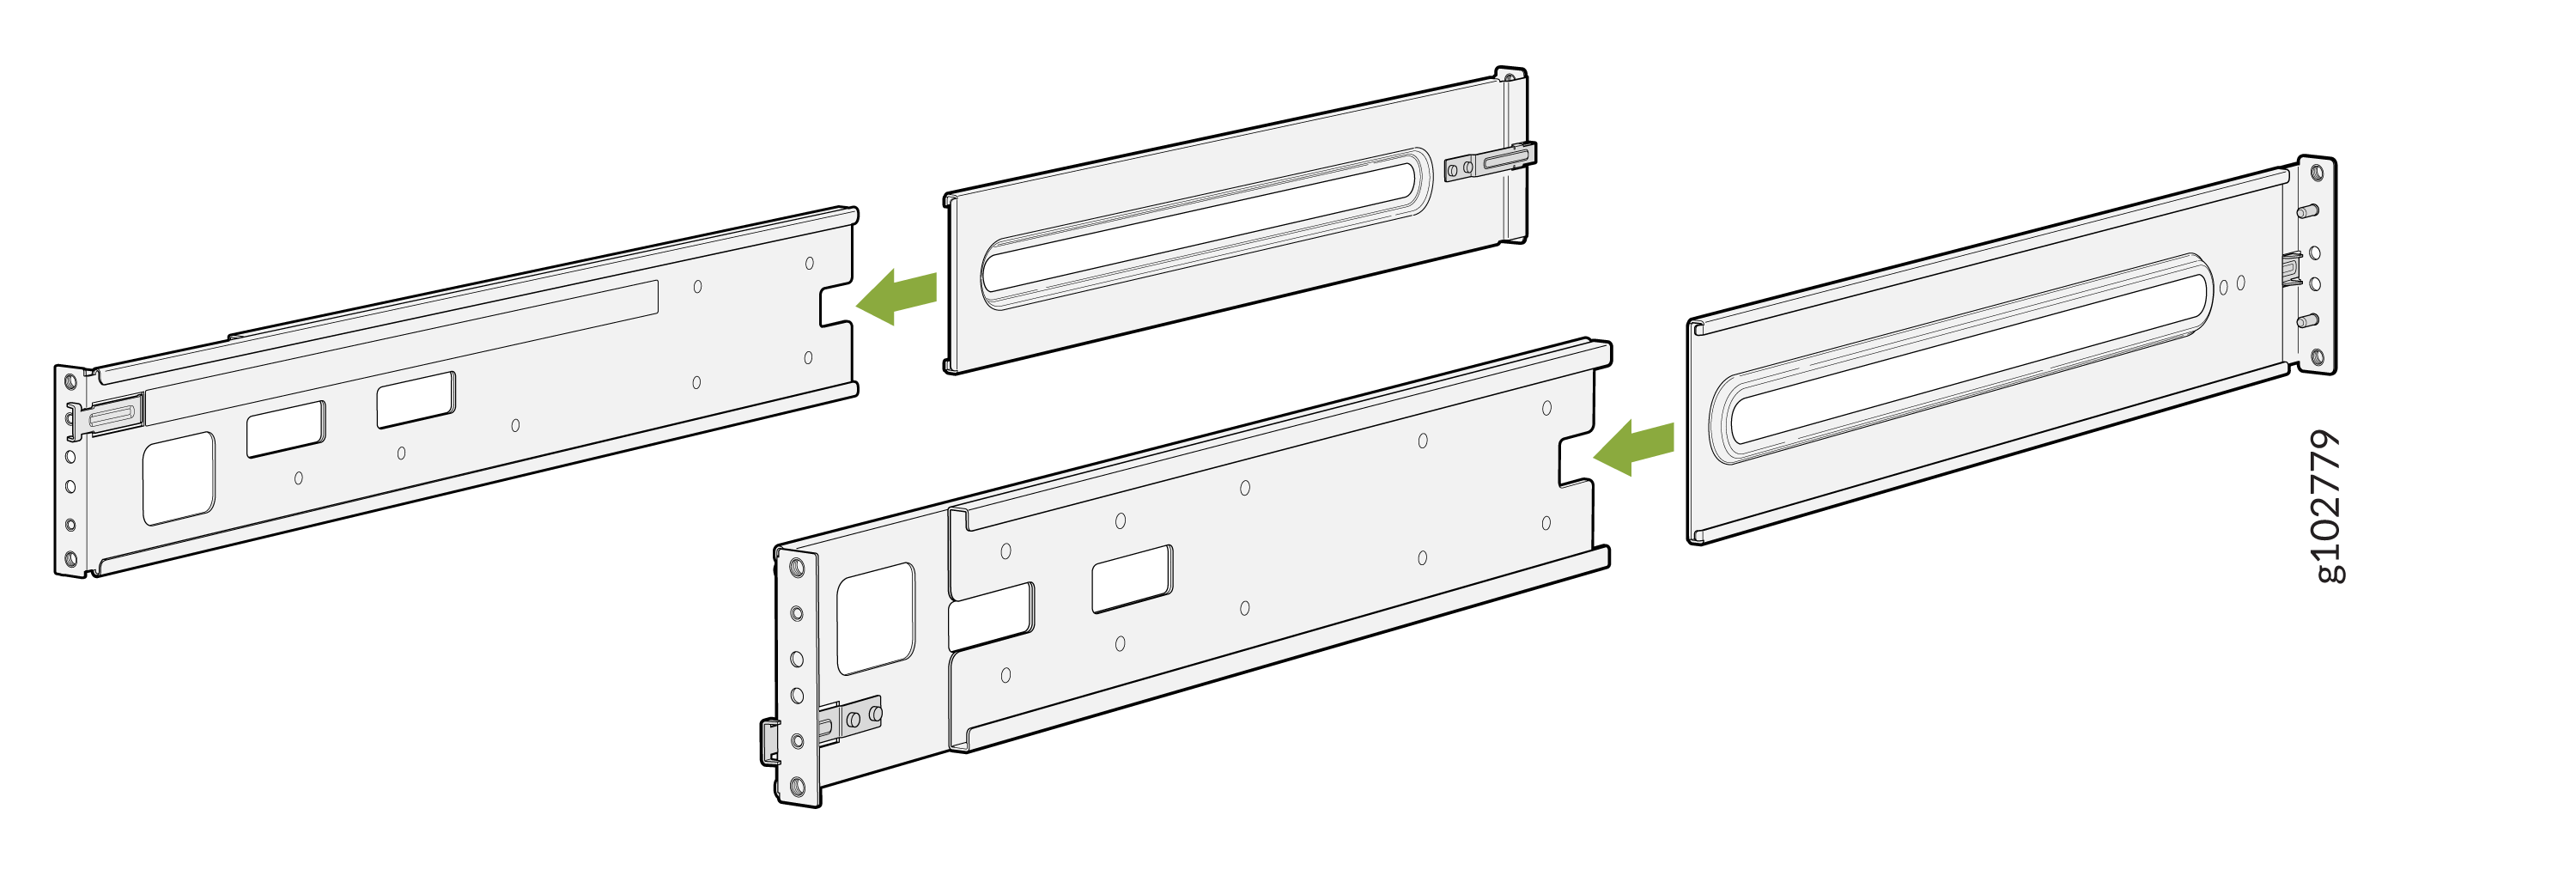
Assemble both the right and left mounting rails. Align the rear-mounting
rails with the guides on the front-mounting rails and gently slide the
rear-mounting rails into the front-mounting rails.
Figure 10: Assemble the Mounting Rails
-
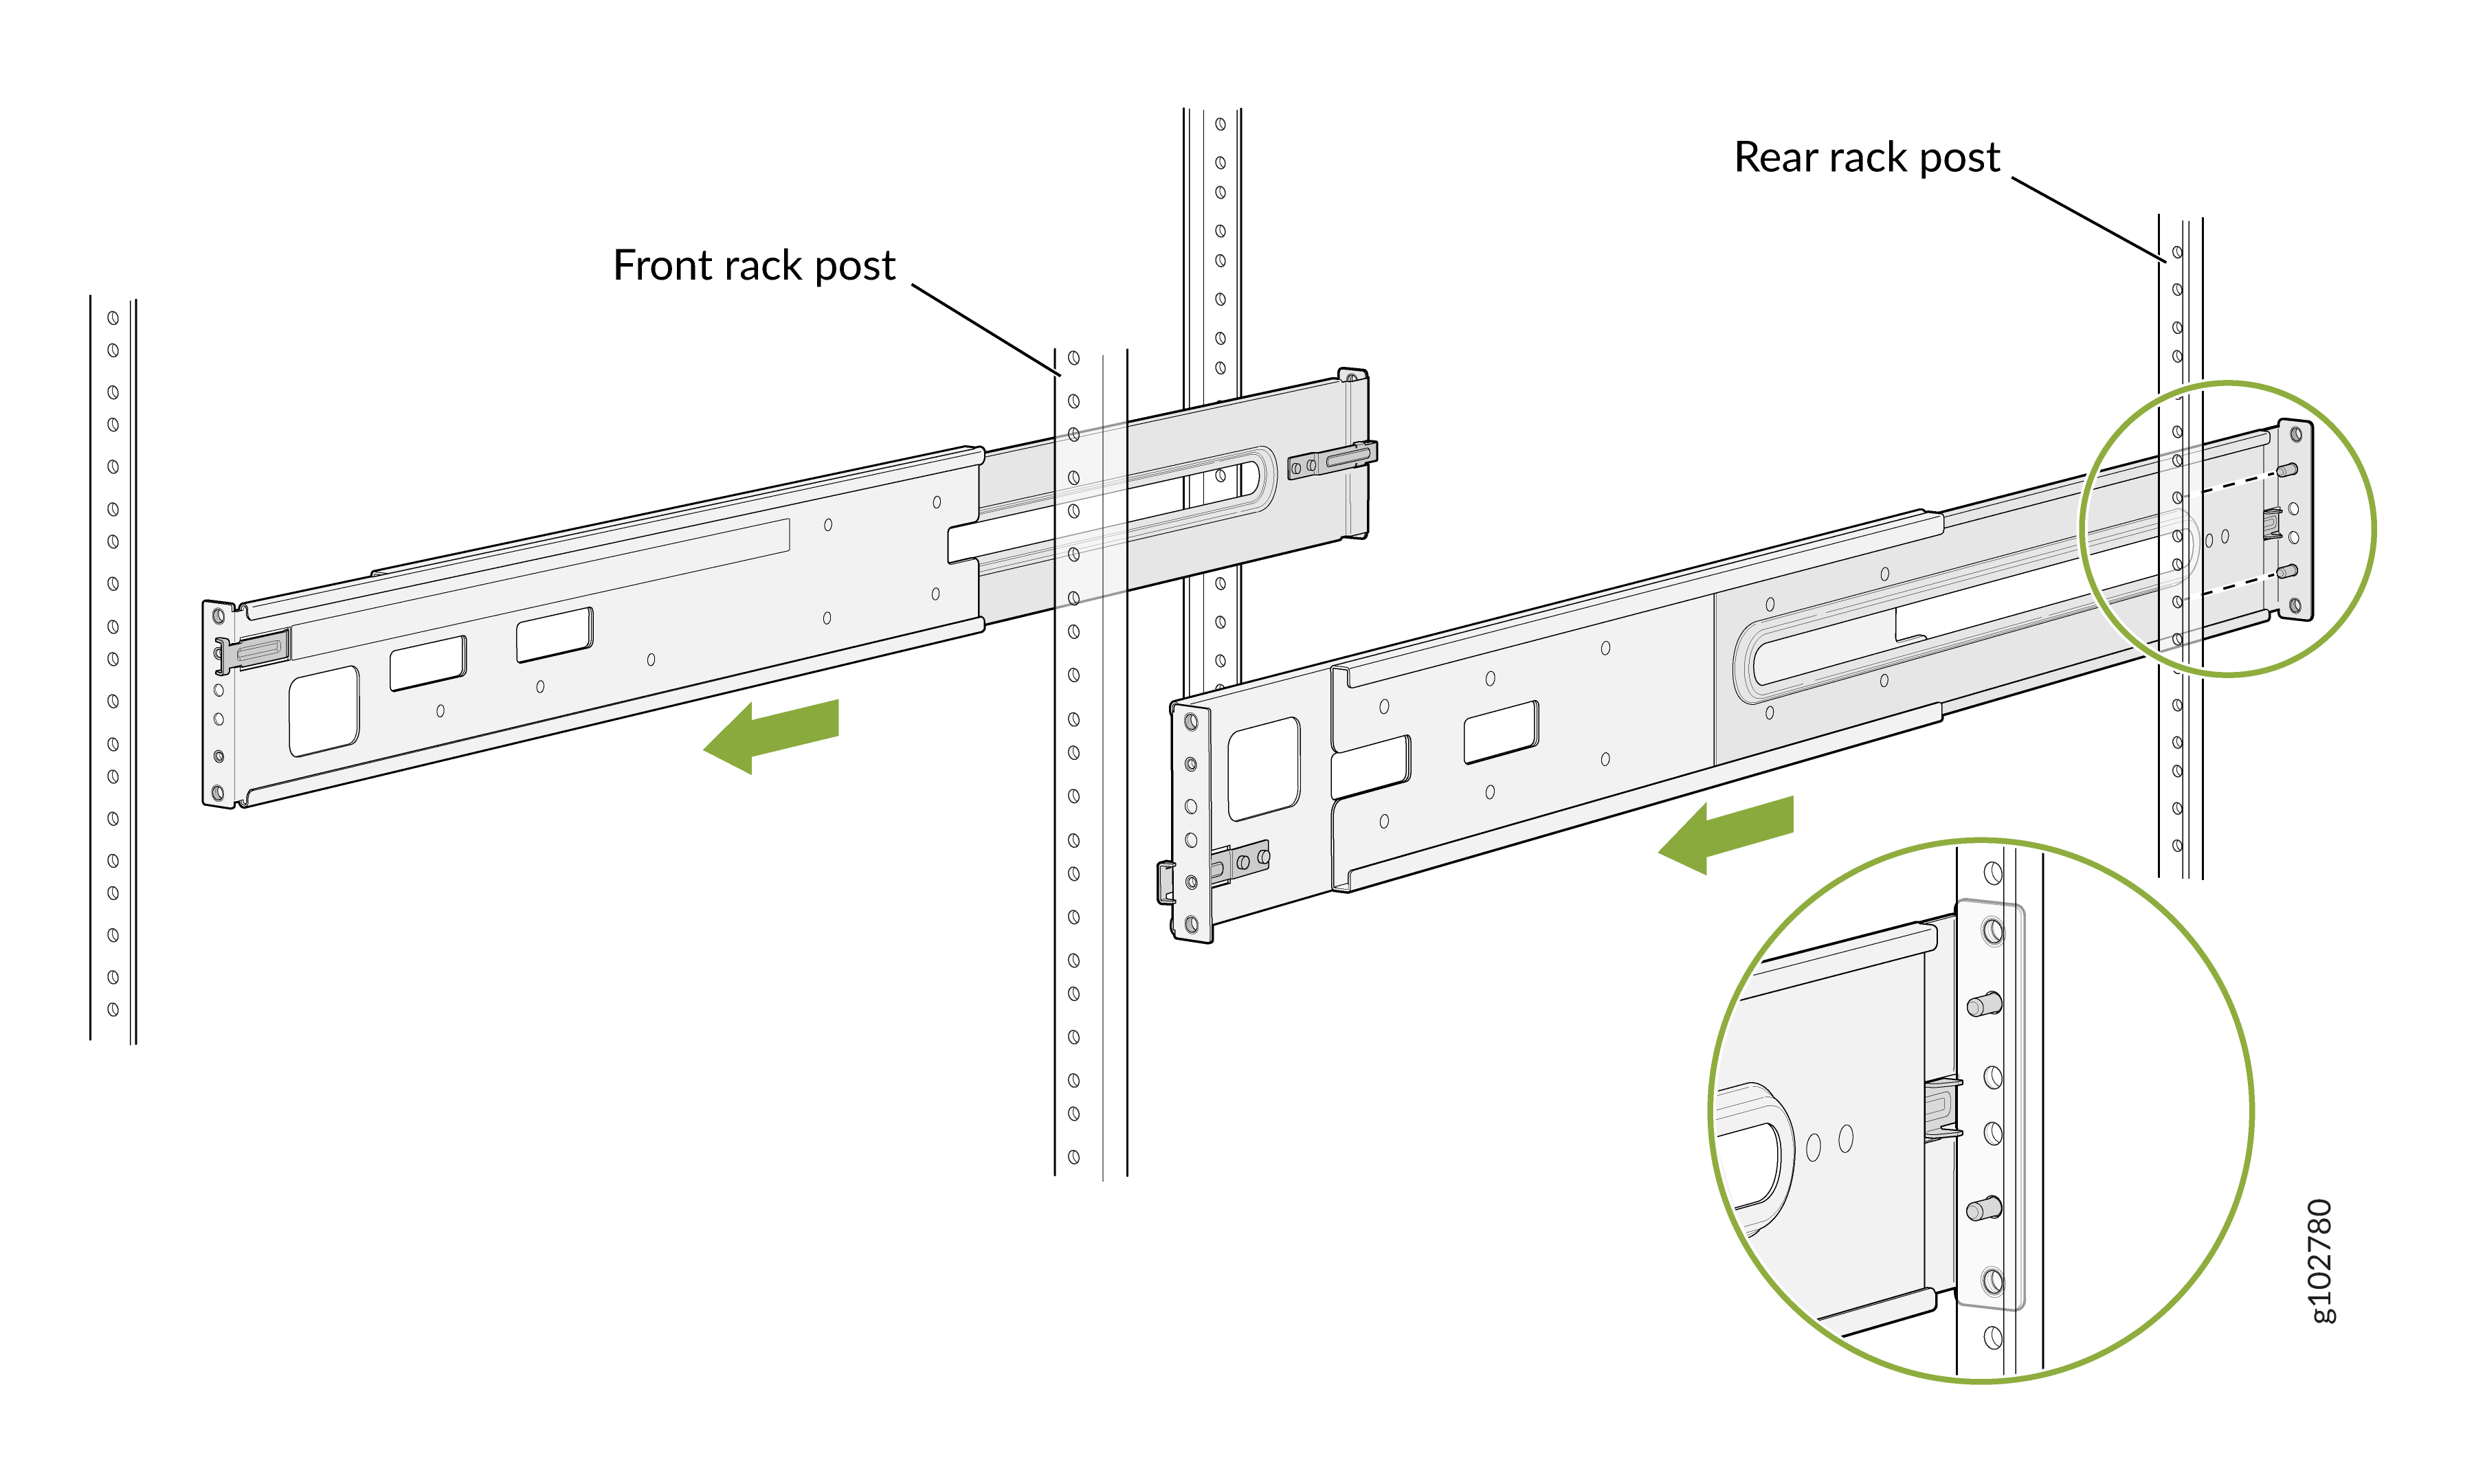
Insert the studs on the rear mounting rails in the holes on the rack posts.
Figure 11: Insert the Studs on the Rear-Mounting Rails in the Holes on the Rack Posts
-
Attach the rear-mounting rails to the rack posts—tighten the captive thumb
screws by using the screwdriver.
Figure 12: Attach the Rear-Mounting Rails to the Rack Posts
-
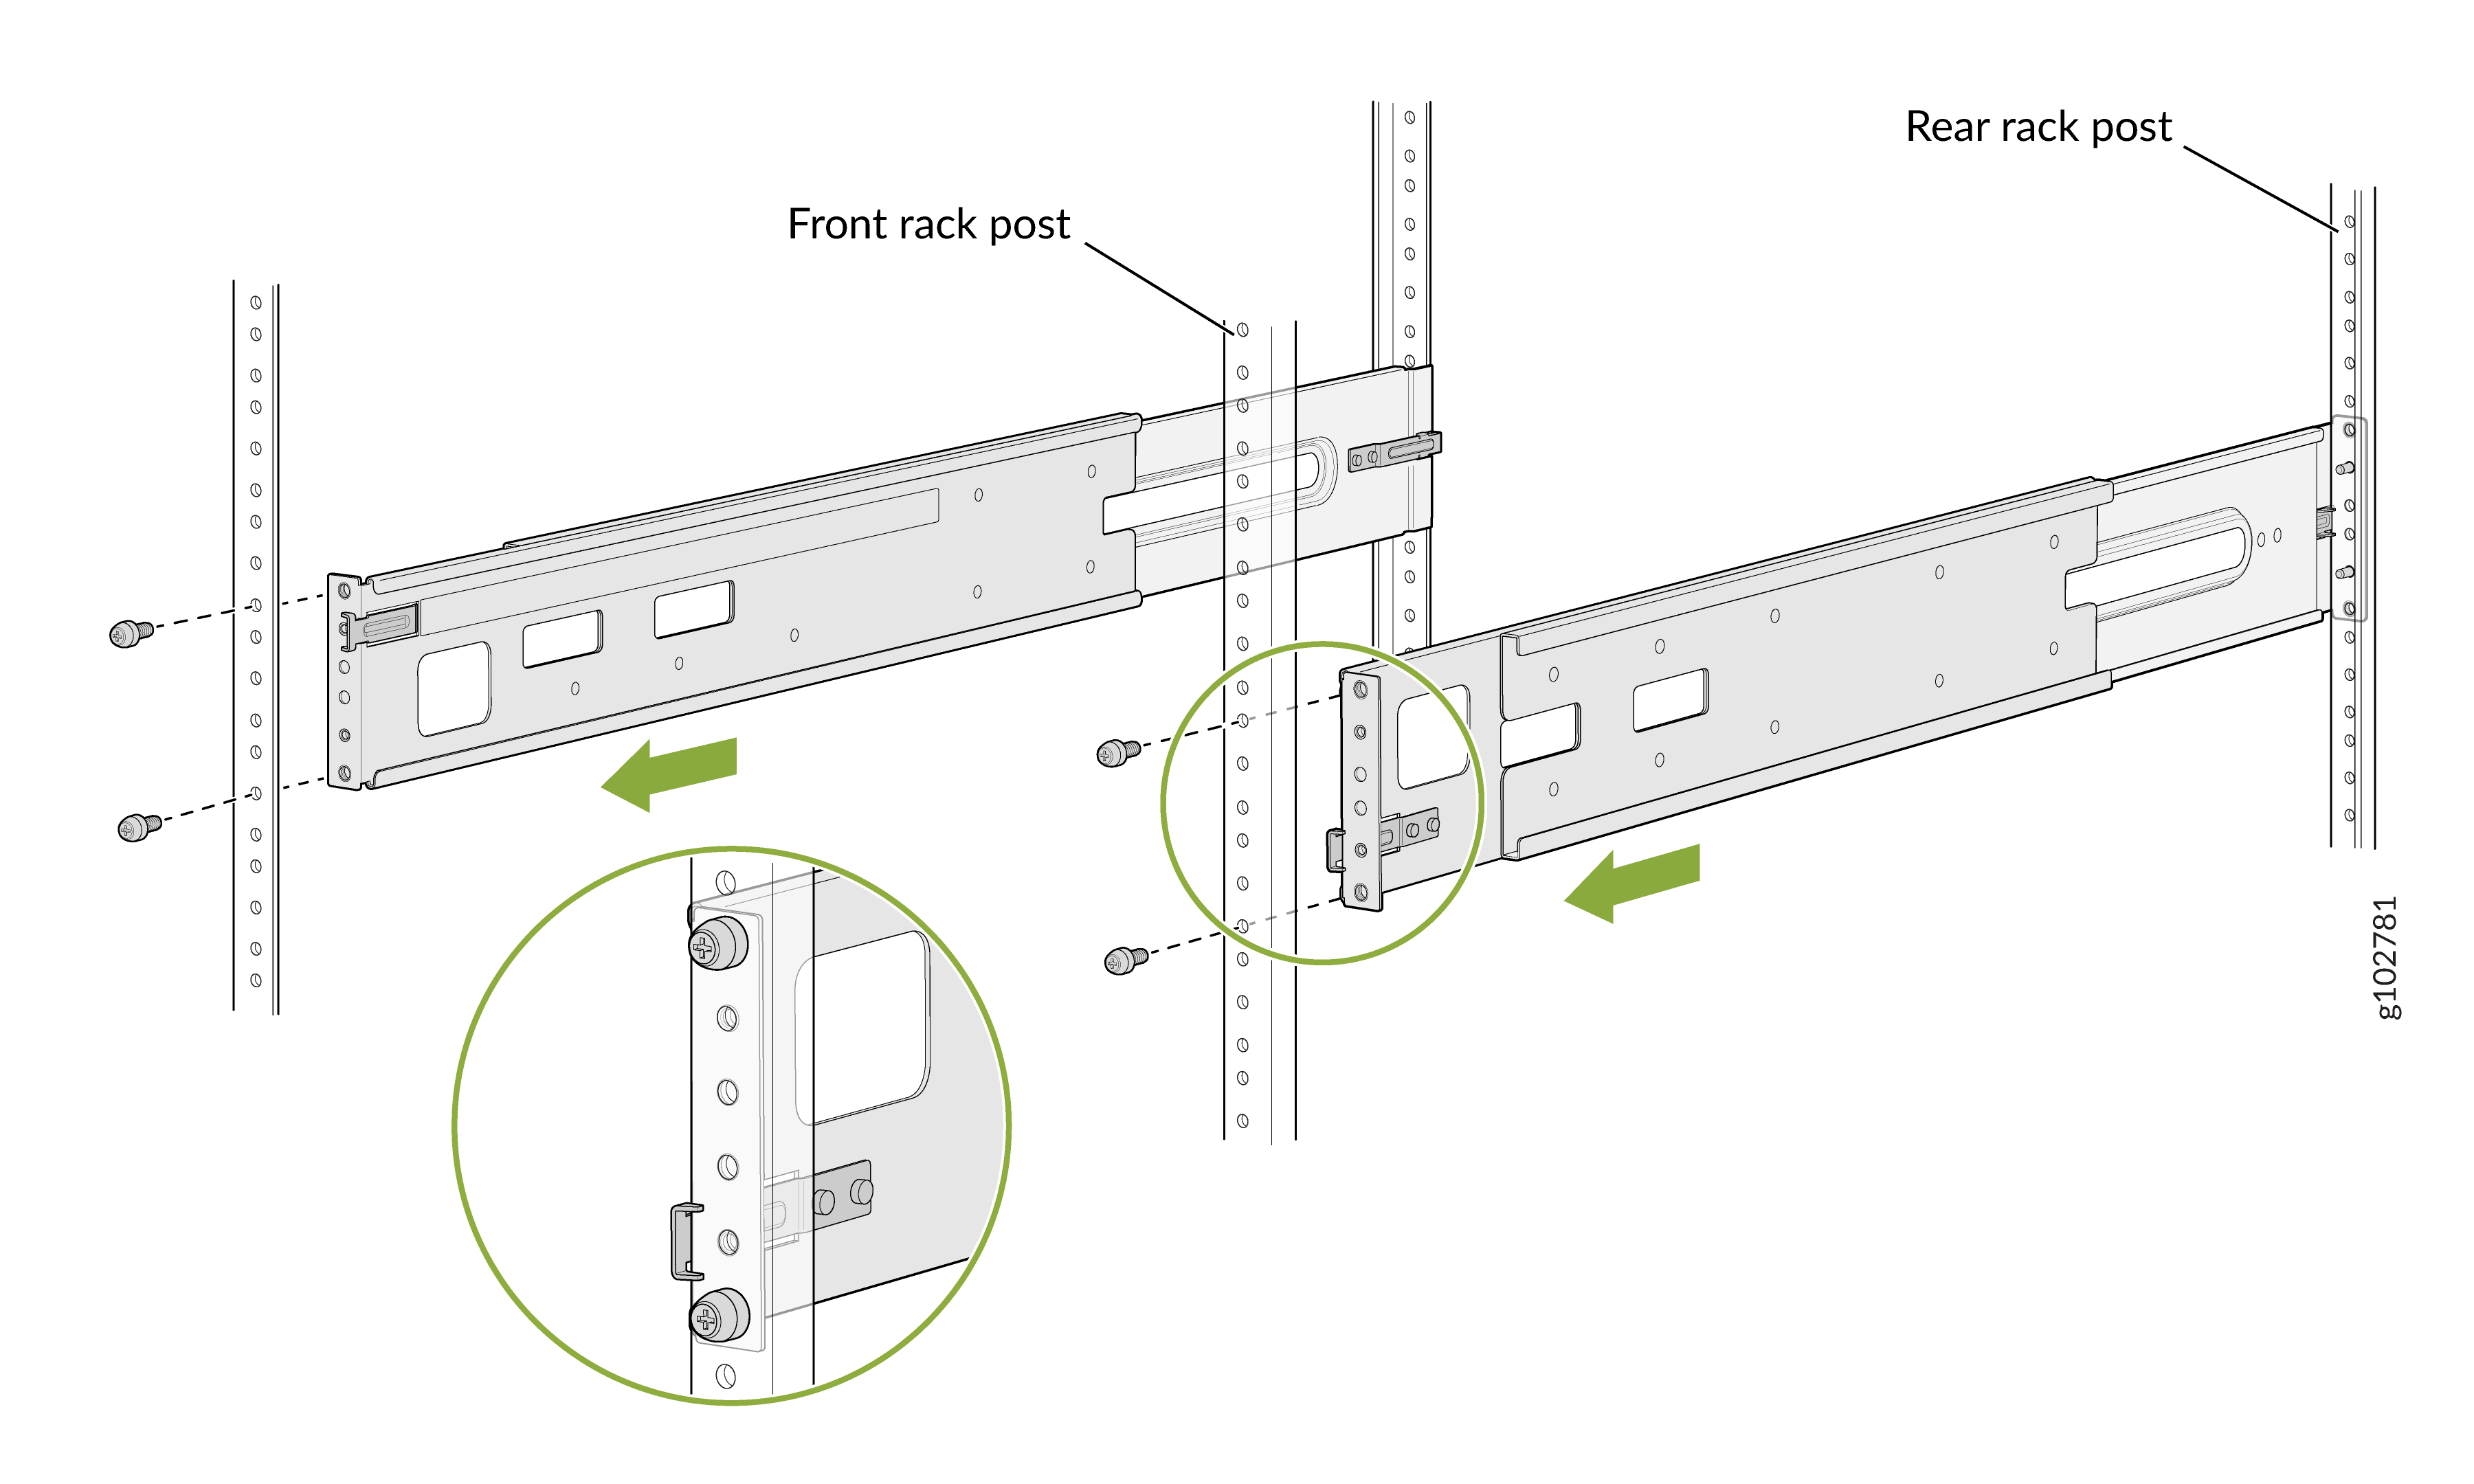
Attach the front-mounting rails to the rack posts—tighten the thumb screws
by using the screwdriver.
Figure 13: Attach the Front-Mounting Rails to the Rack Posts
-
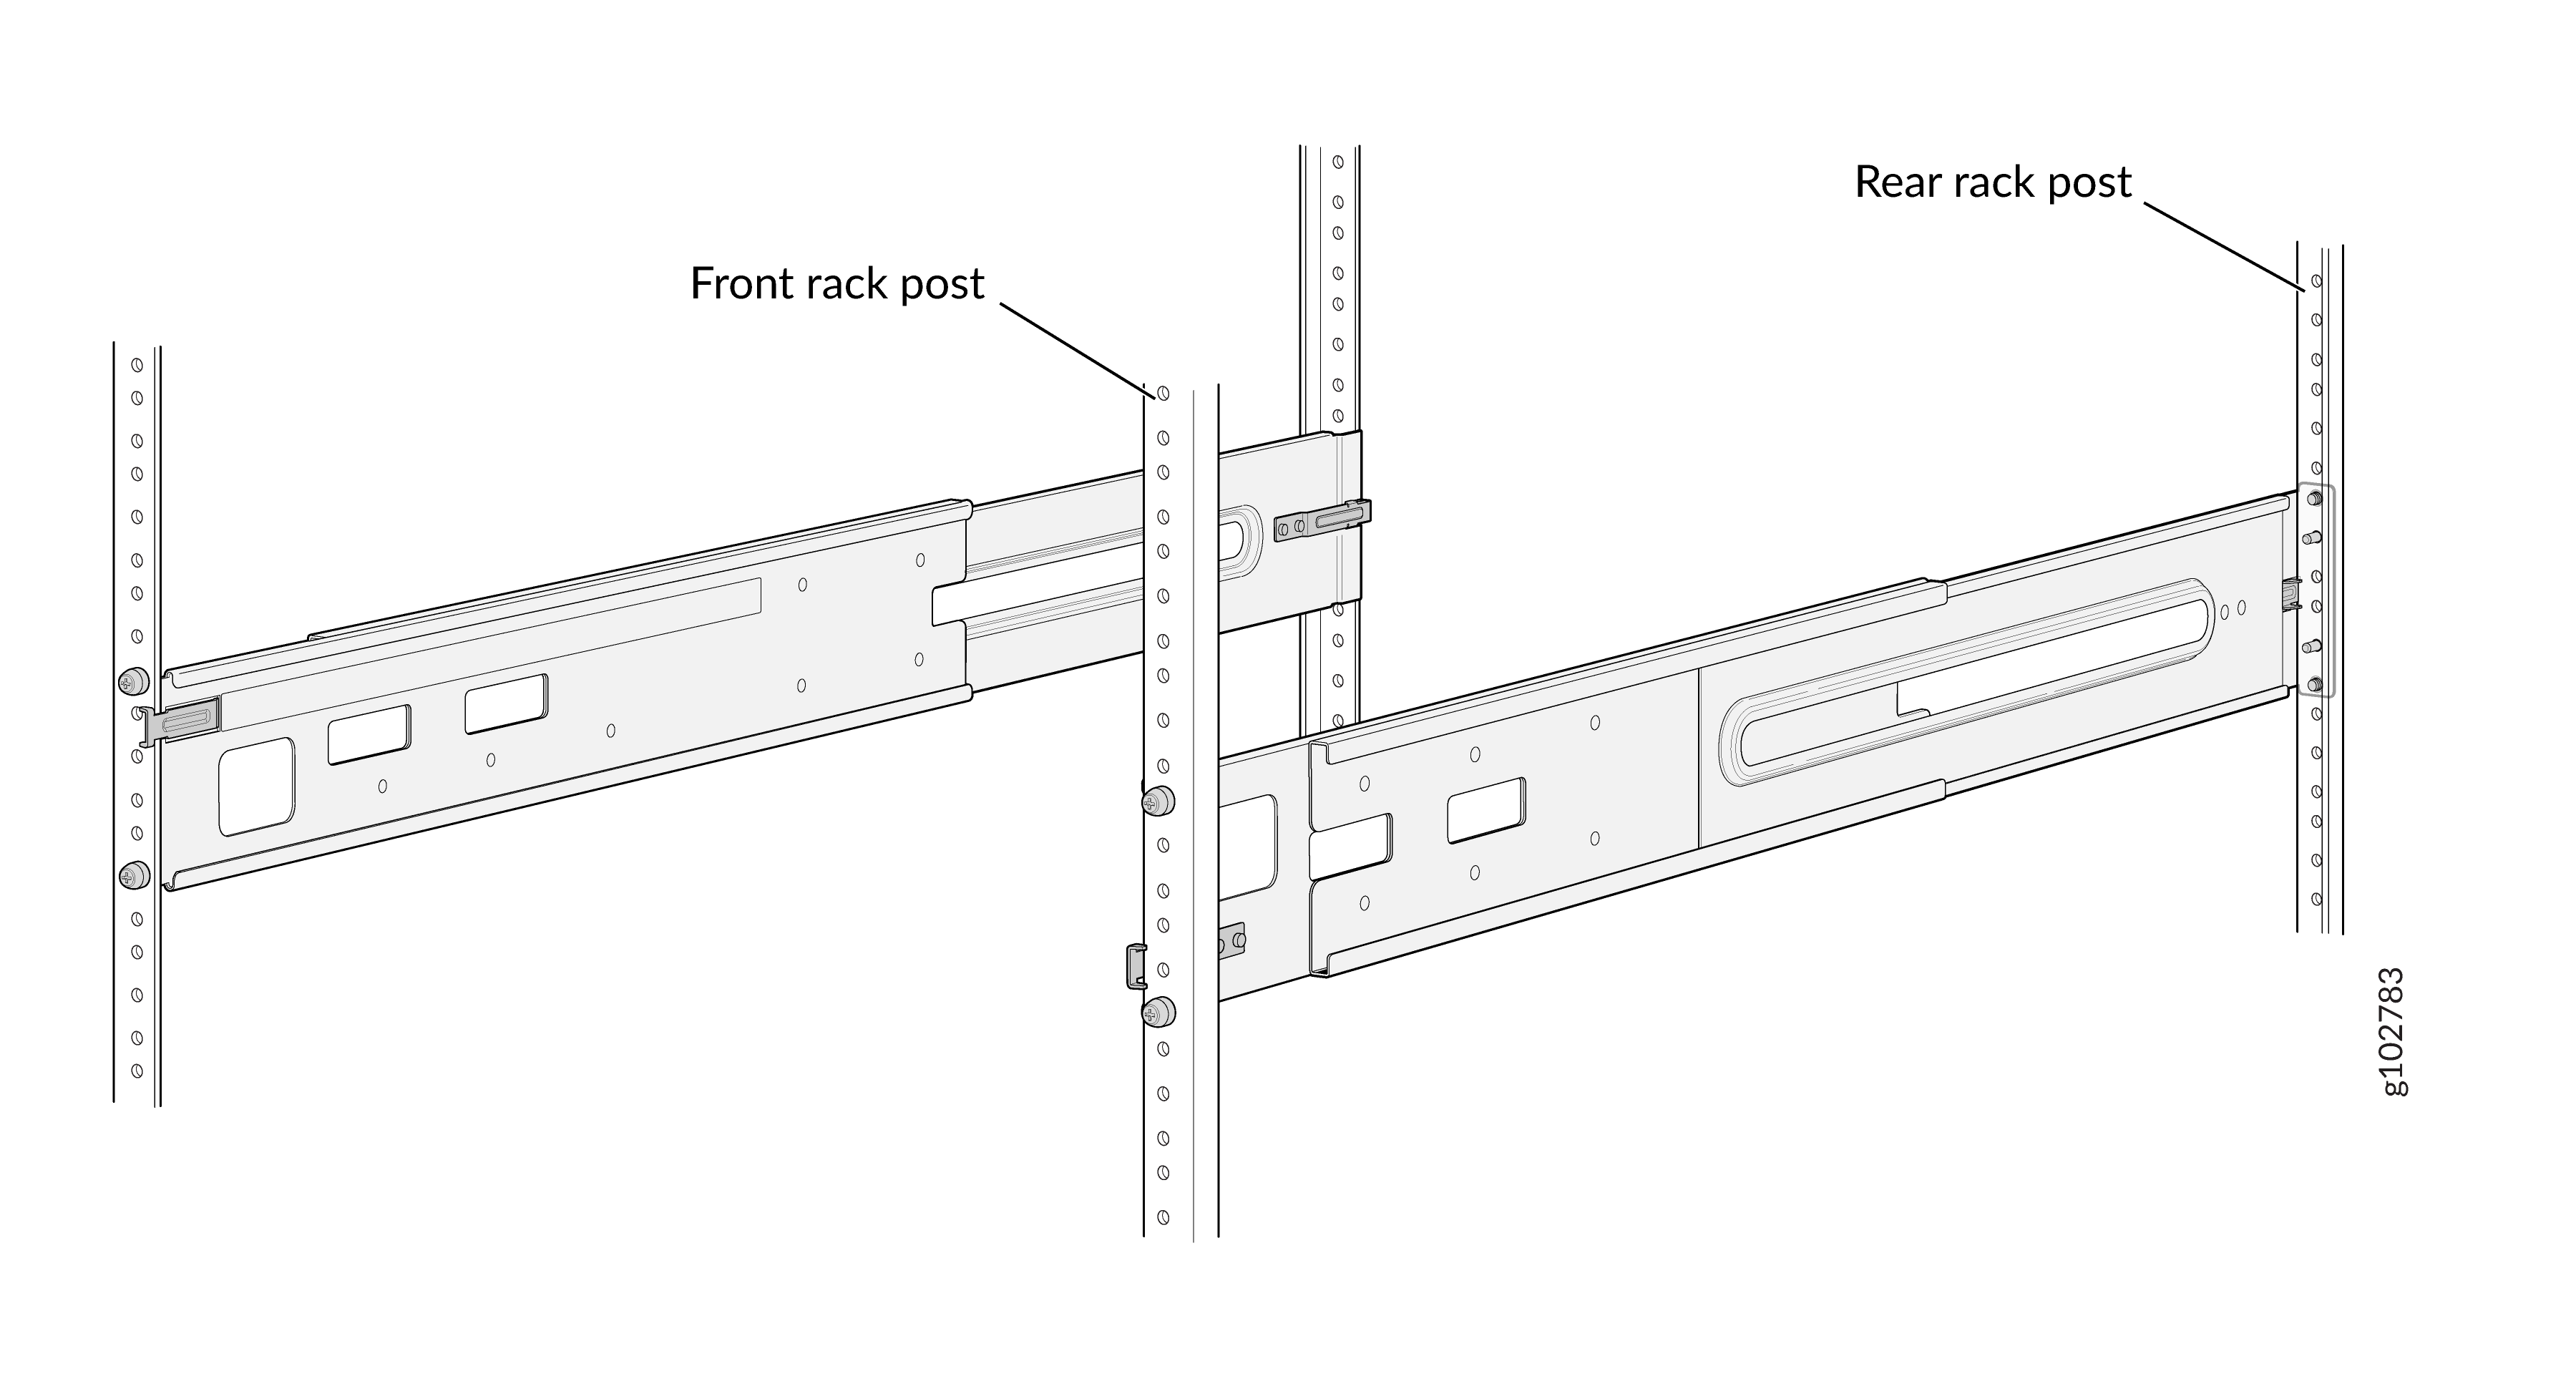
Ensure that the mounting rails are level by verifying that all screws on
one side of the rack align with the screws on the other side.
Figure 14: Attach the Front-Mounting Rails to the Rack Posts
-
Attach the mounting brackets to the router chassis.
Figure 15: Attach the Mounting Brackets to the Router Chassis
-
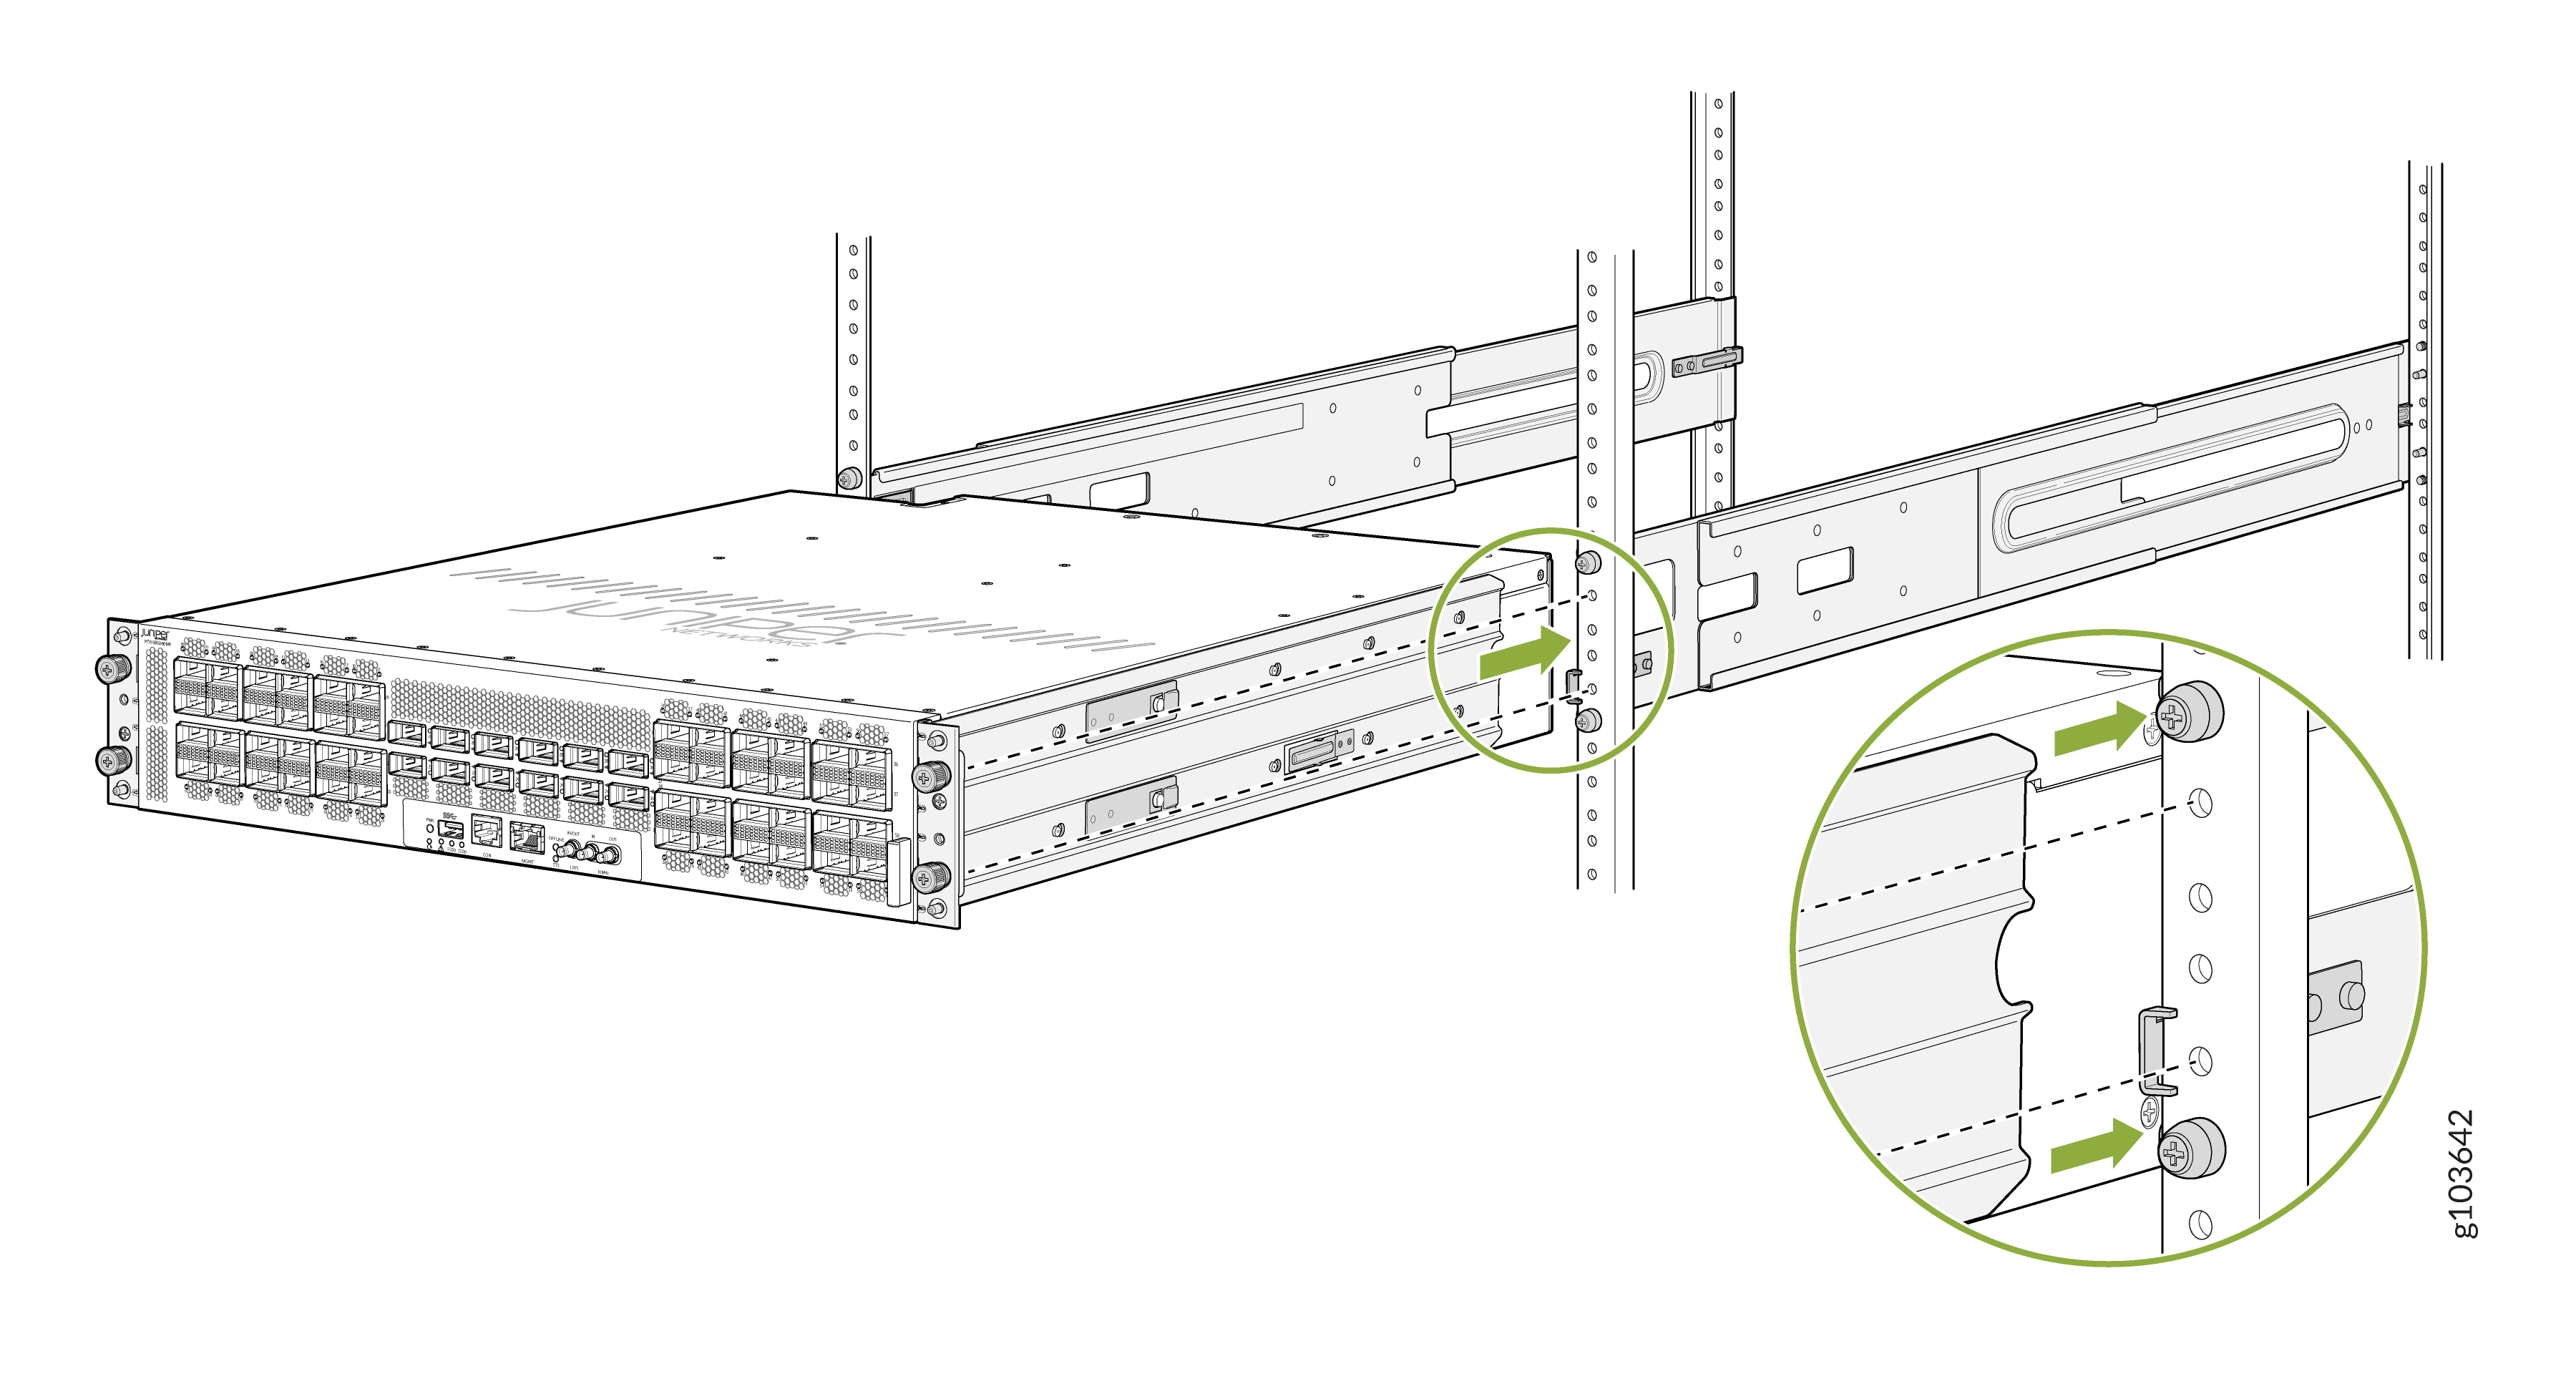
Align the mounting brackets with the guides on the mounting rails and
gently slide the chassis on to the mounting rails until the chassis locks in
place.
Figure 16: Slide the Chassis on to the Mounting Rails
-
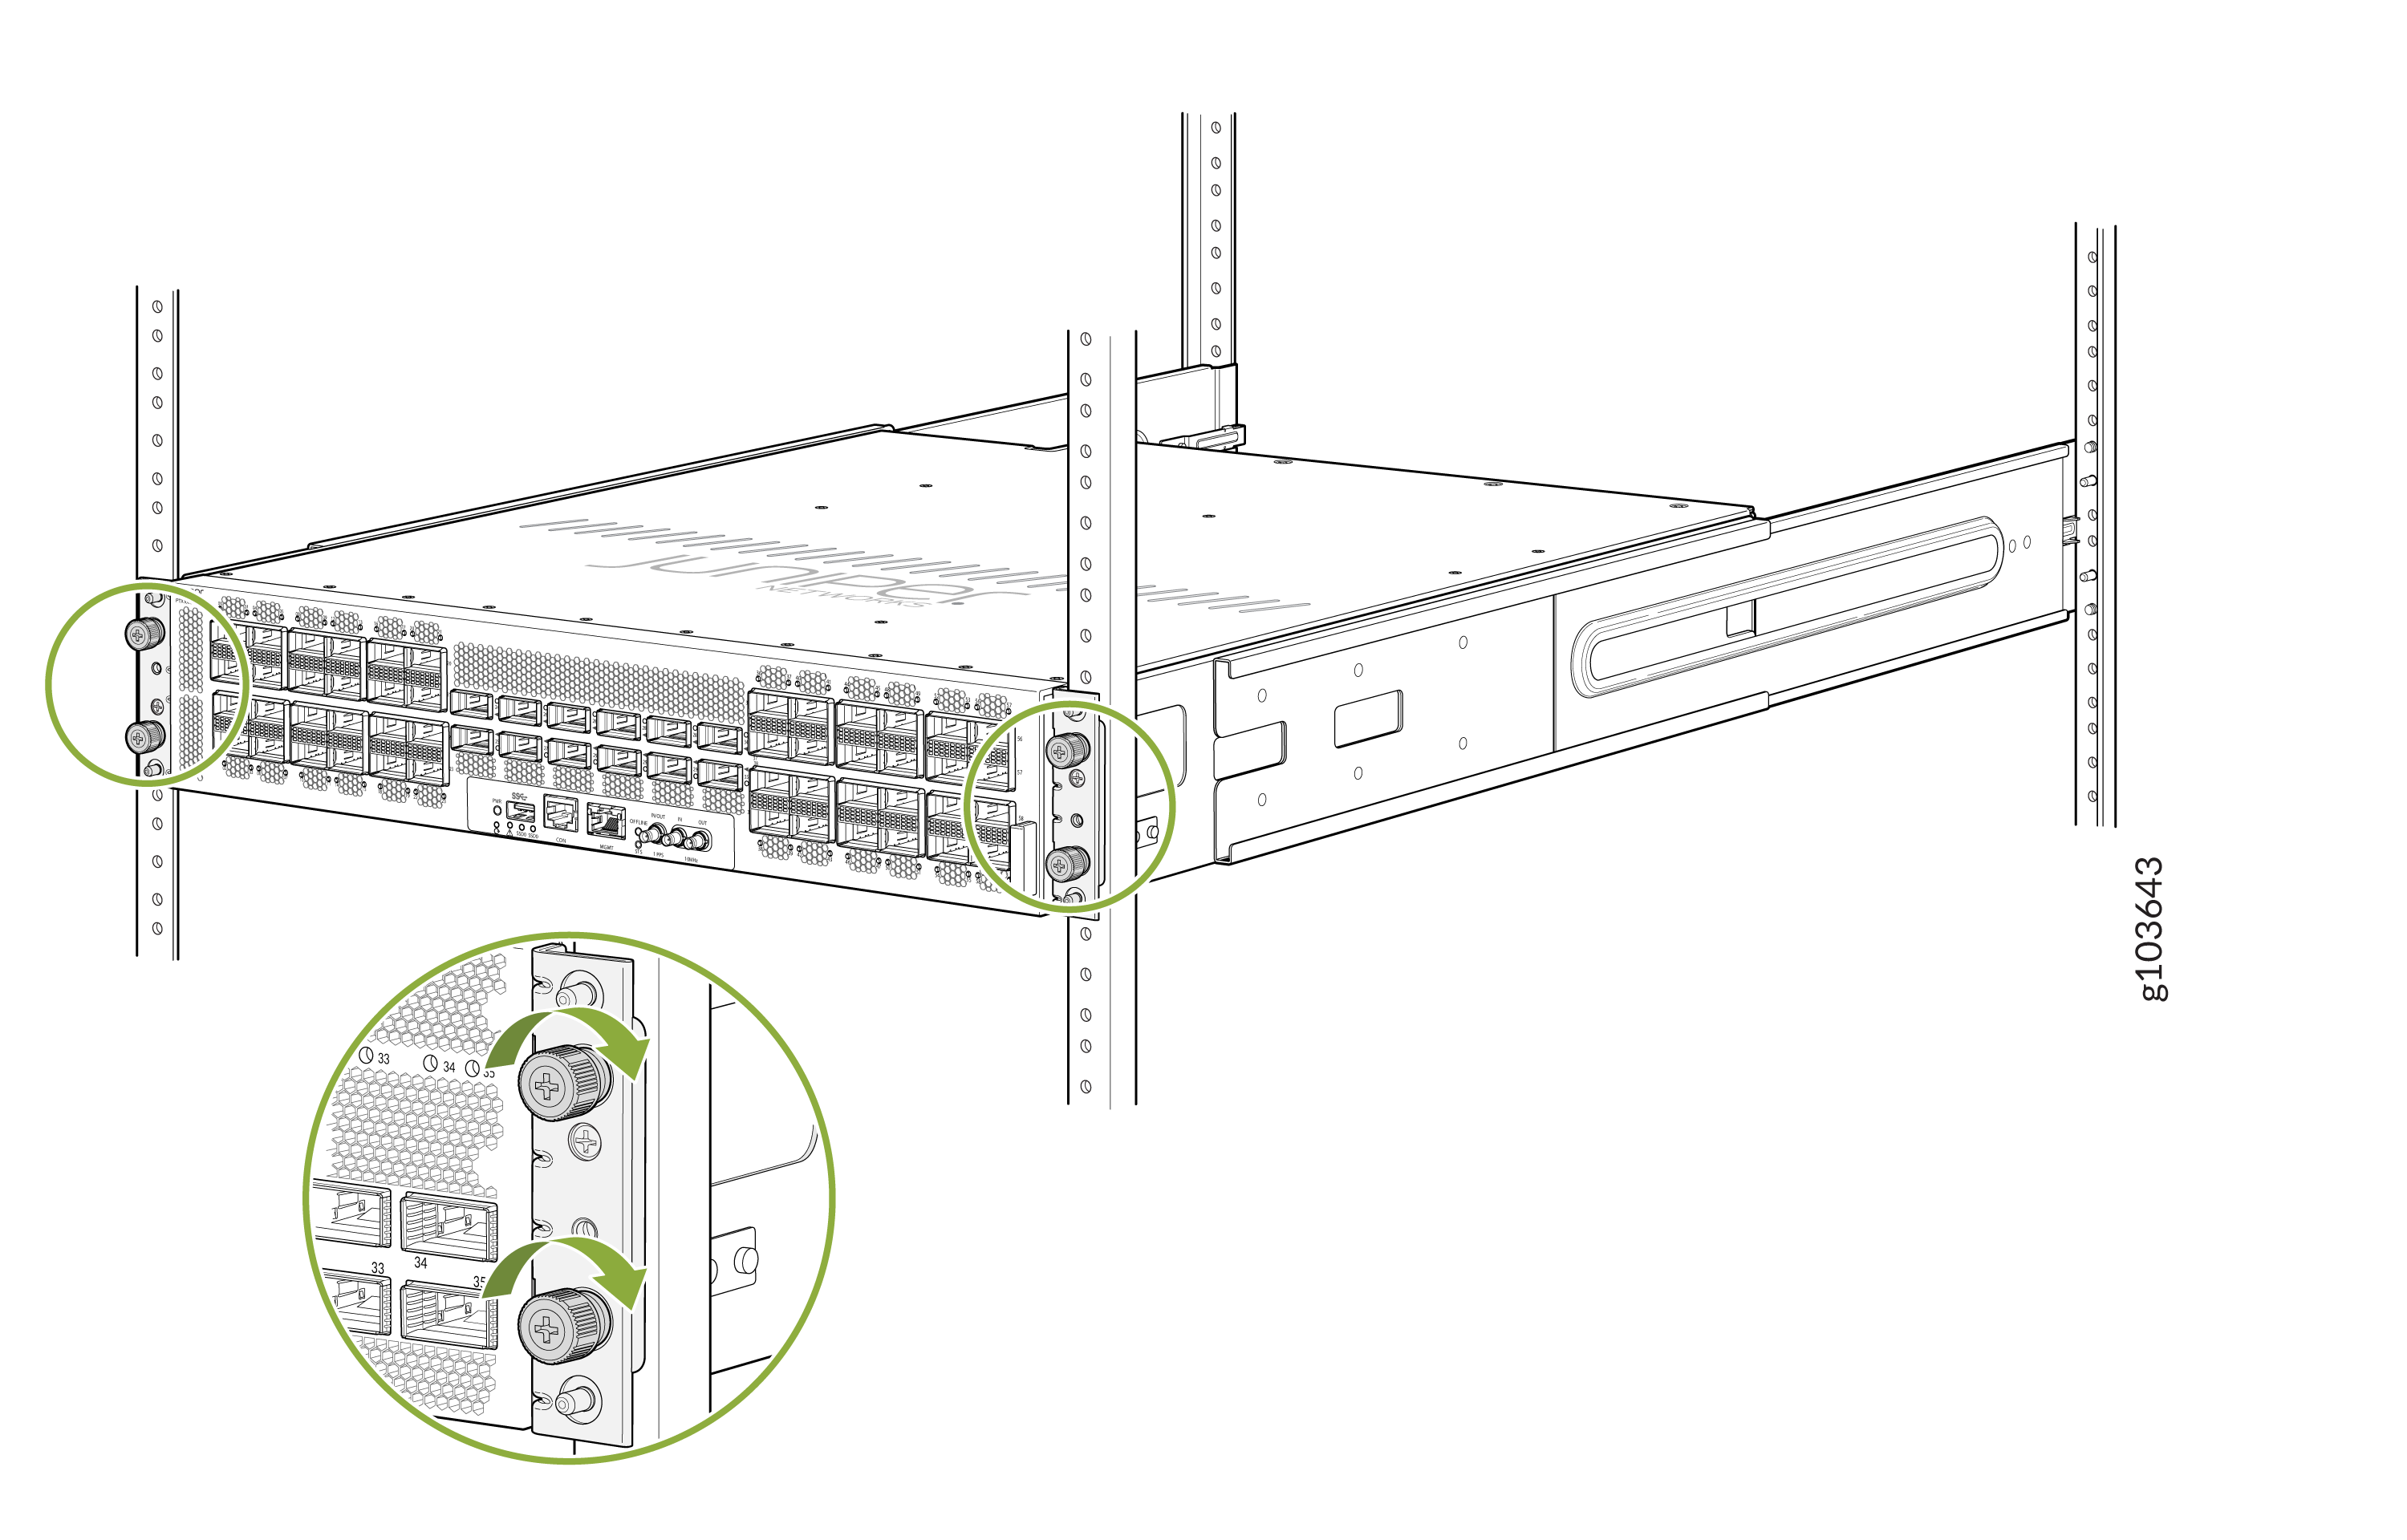
Secure the router to the rack—tighten the thumb screws by using the
screwdriver.
Figure 17: Secure the Router to the Rack
Mount the PTX10002-60MR on Two Posts of a Rack or Cabinet
Before you mount the router on a two-post rack:
-
Verify that the site meets the requirements described in General Site Guidelines.
-
Place the rack in its permanent location, allowing adequate clearance for airflow and maintenance, and secure the rack to the building structure.
-
Read Safety Information, with particular attention to Chassis and Component LIfting Guidelines.
-
Ensure that you have taken the necessary precautions to prevent electrostatic discharge (ESD) damage (see Prevention of Electrostatic Discharge Damage).
-
Unpack the router from the shipping carton (see Unpack the PTX10002-60MR).
Ensure that you have the following parts and tools available:
-
A Phillips (+) screwdriver, number 2—not provided
-
An ESD grounding strap—not provided
-
Eight screws to secure the router to the posts of the pack—not provided
-
A two-post mounting kit that includes:
-
C-shaped two-post mounting brackets—2
-
L-shaped two-post mounting brackets—2
-
Screws to attach the two-post mounting brackets to the chassis—24
-
Have one person to support the weight of the router while another person secures the router to the rack posts.
To mount the router on a two-post rack:
-
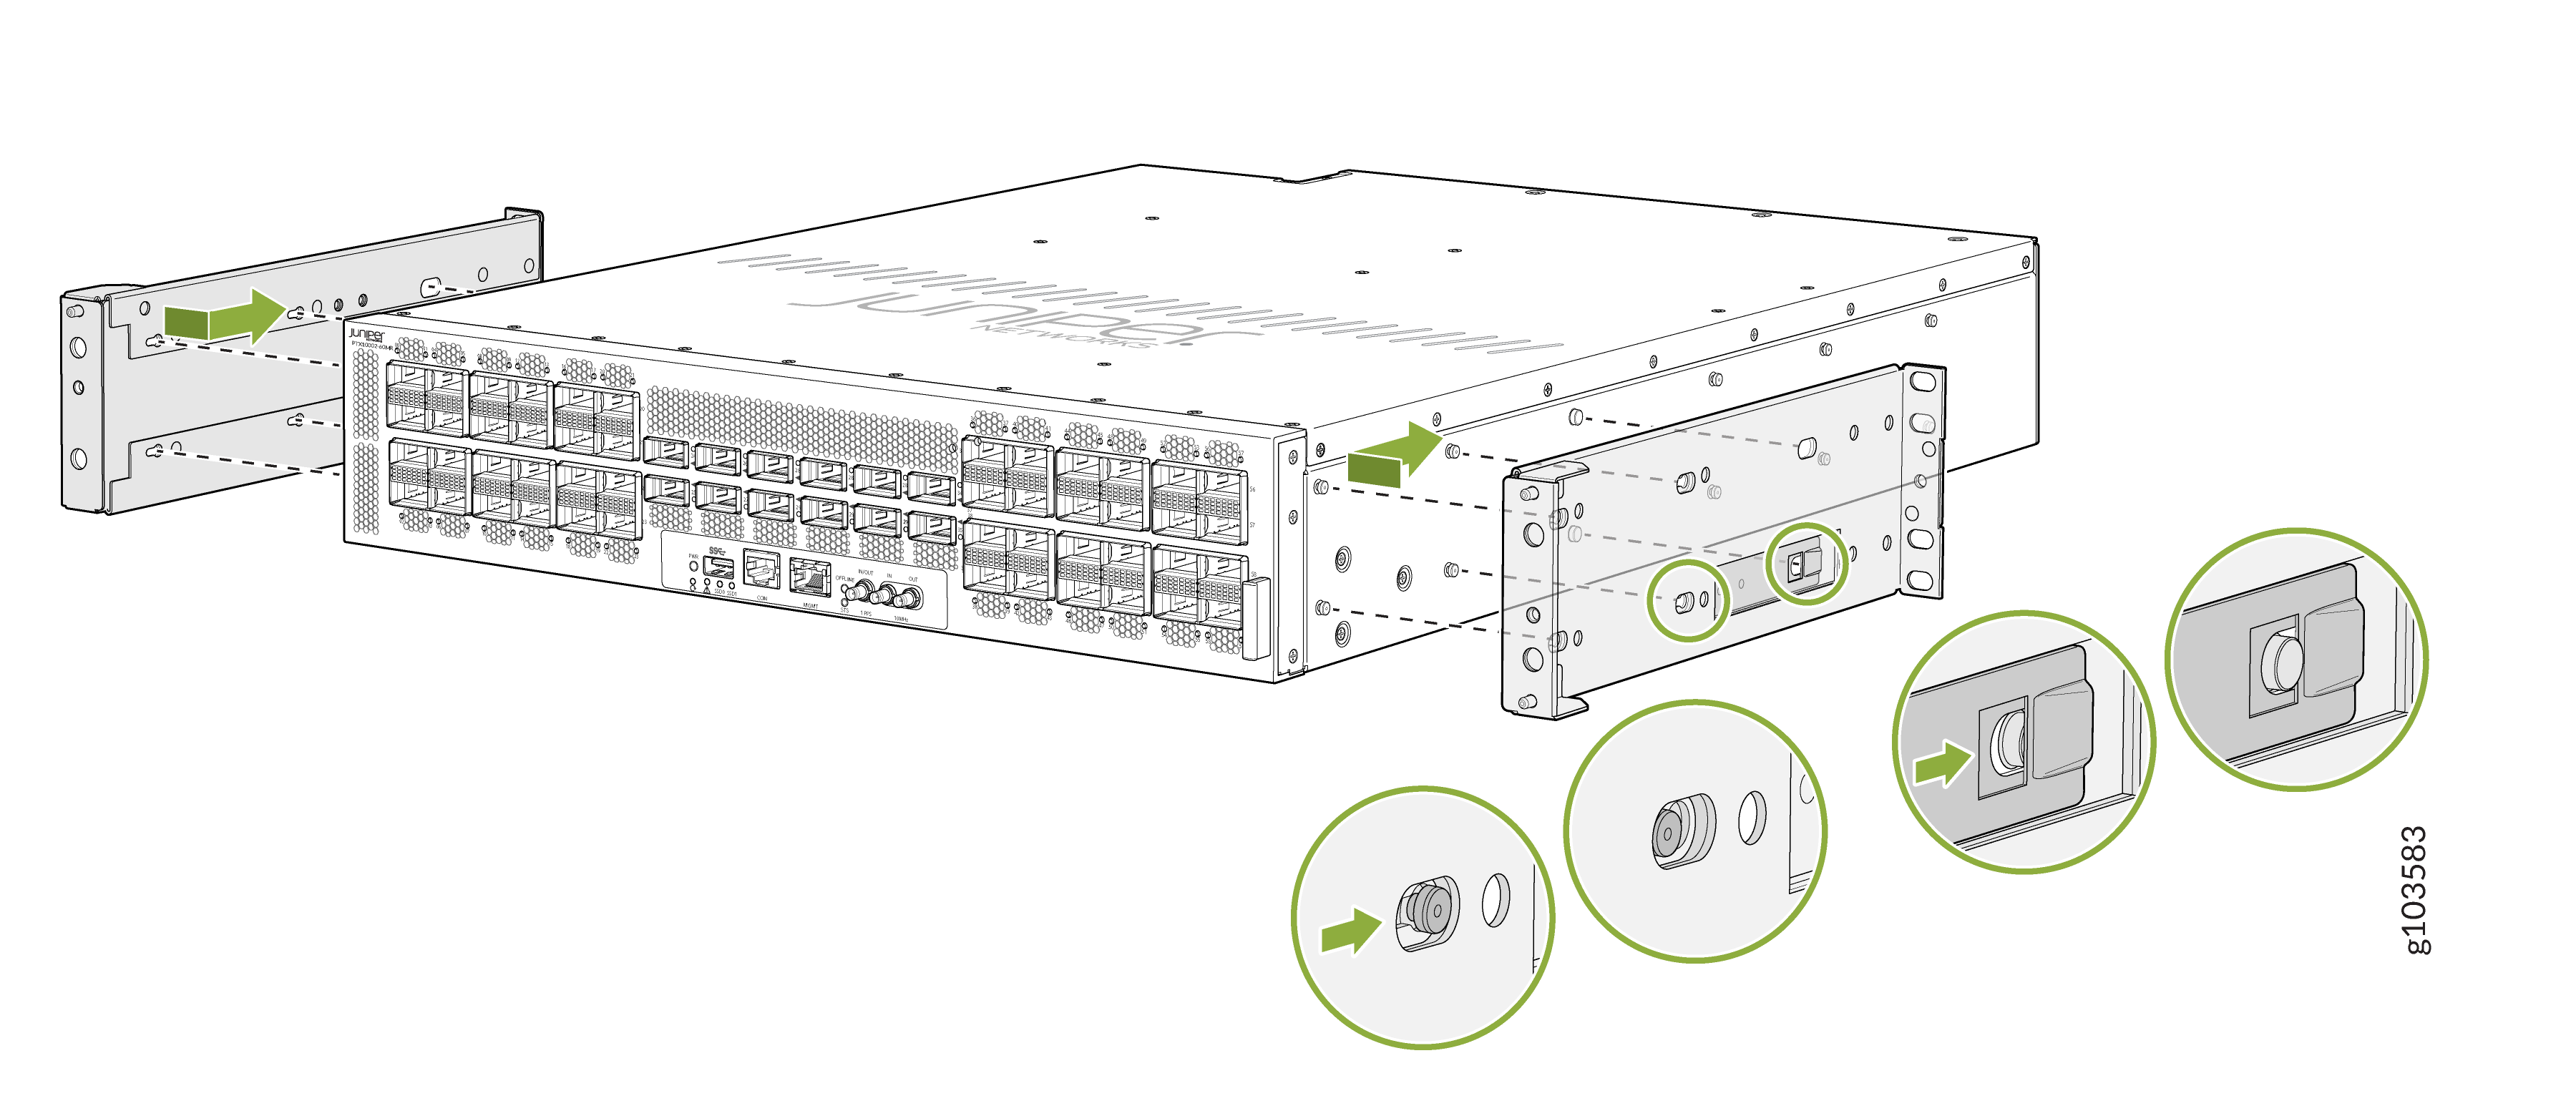
Attach the two-post mounting brackets to the side panels of the router
chassis by using the screws to attach the brackets.
-
Align the front end of one of the C-shaped mounting brackets flush
with the front panel of the router chassis.
Figure 18: Attach the C-Shaped Two-Post Mounting Brackets Flush with the Front Panel of the Router
-
Align the front end of one of the L-shaped mounting brackets behind
the C-shaped mounting brackets.
Figure 19: Attach the L-Shaped Two-Post Mounting Brackets Behind the C-Shaped Two-Post Mounting Brackets
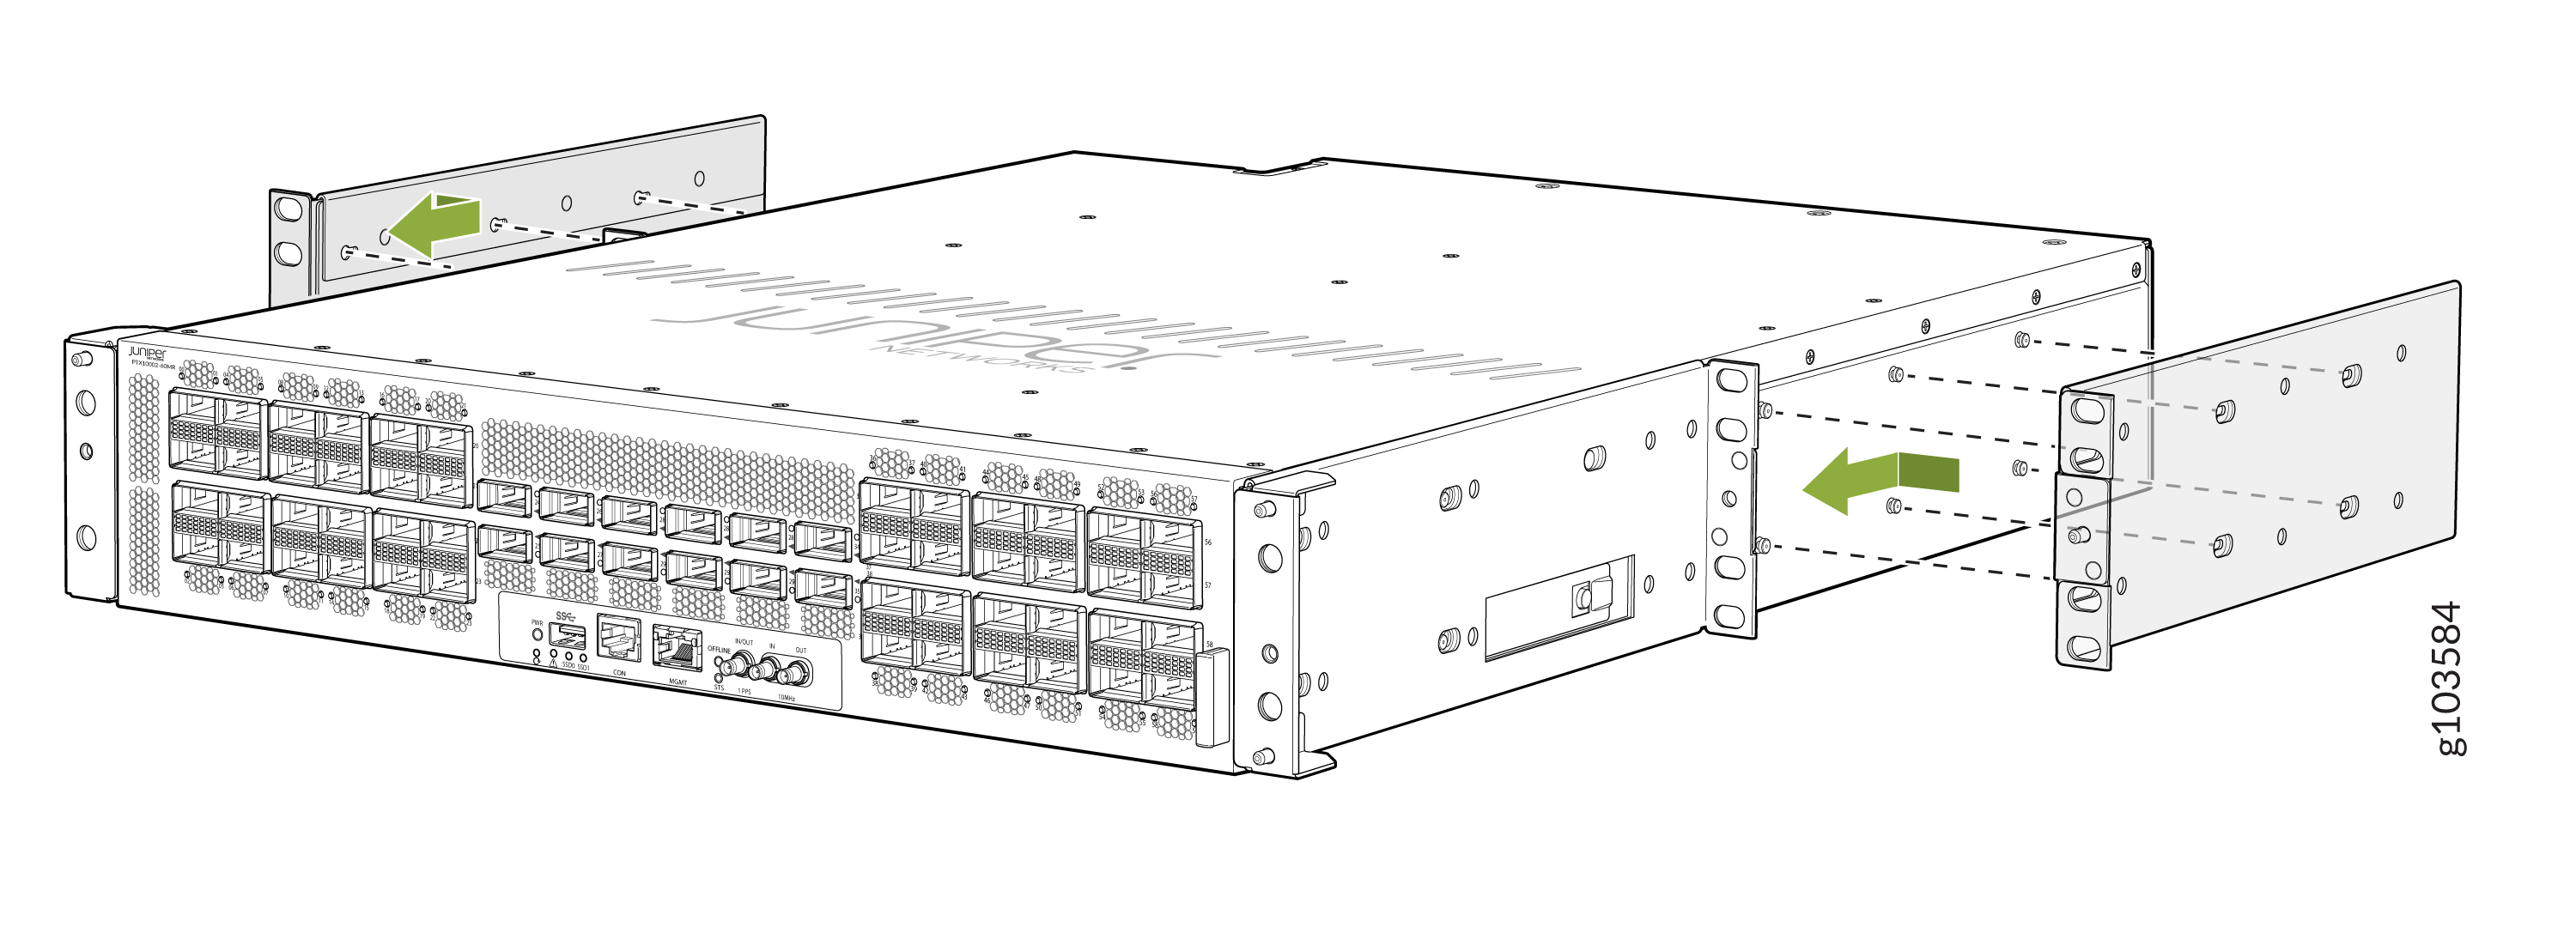 Figure 20: Router with the Brackets Attached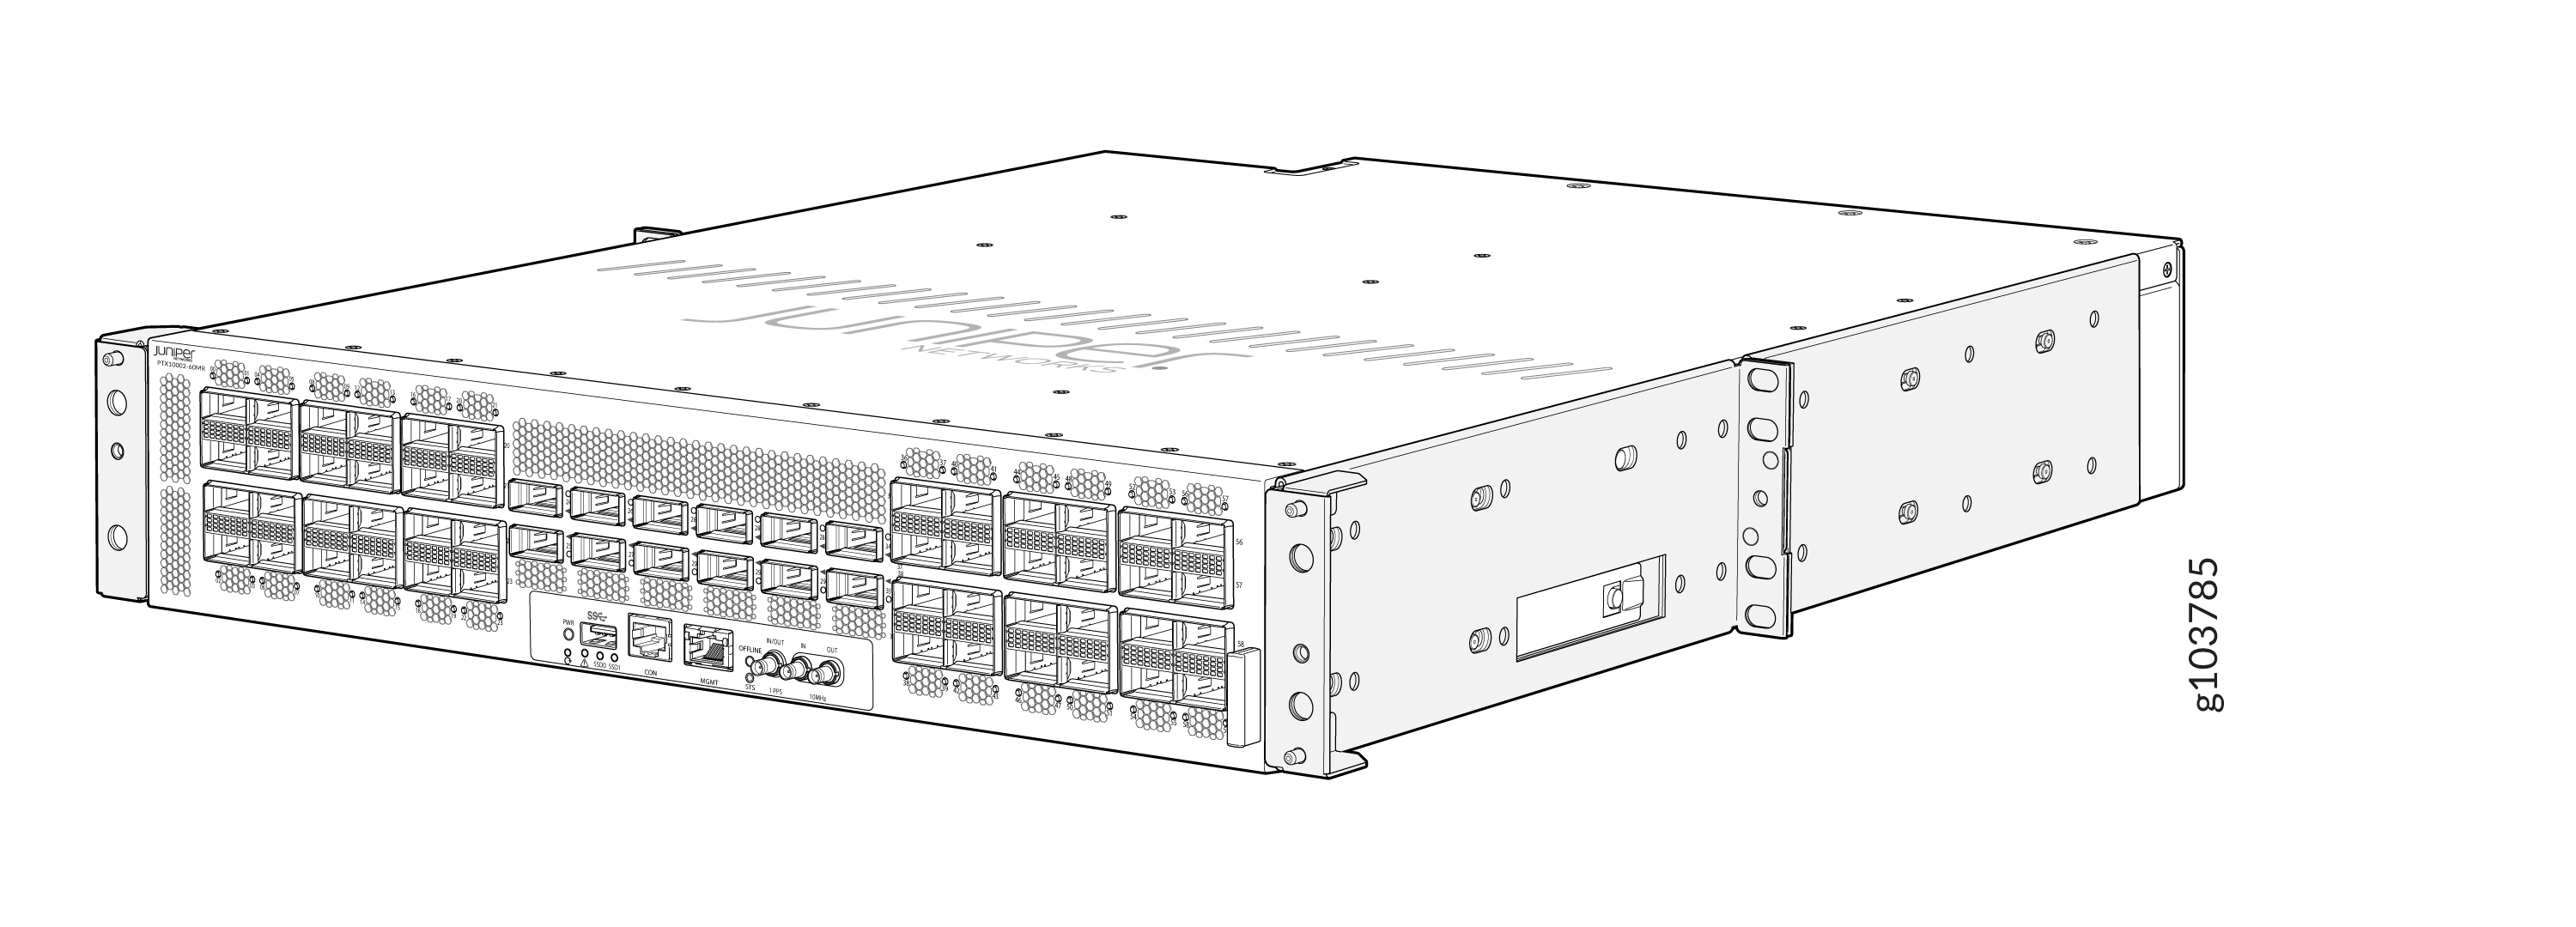
-
Align the front end of one of the C-shaped mounting brackets flush
with the front panel of the router chassis.
-
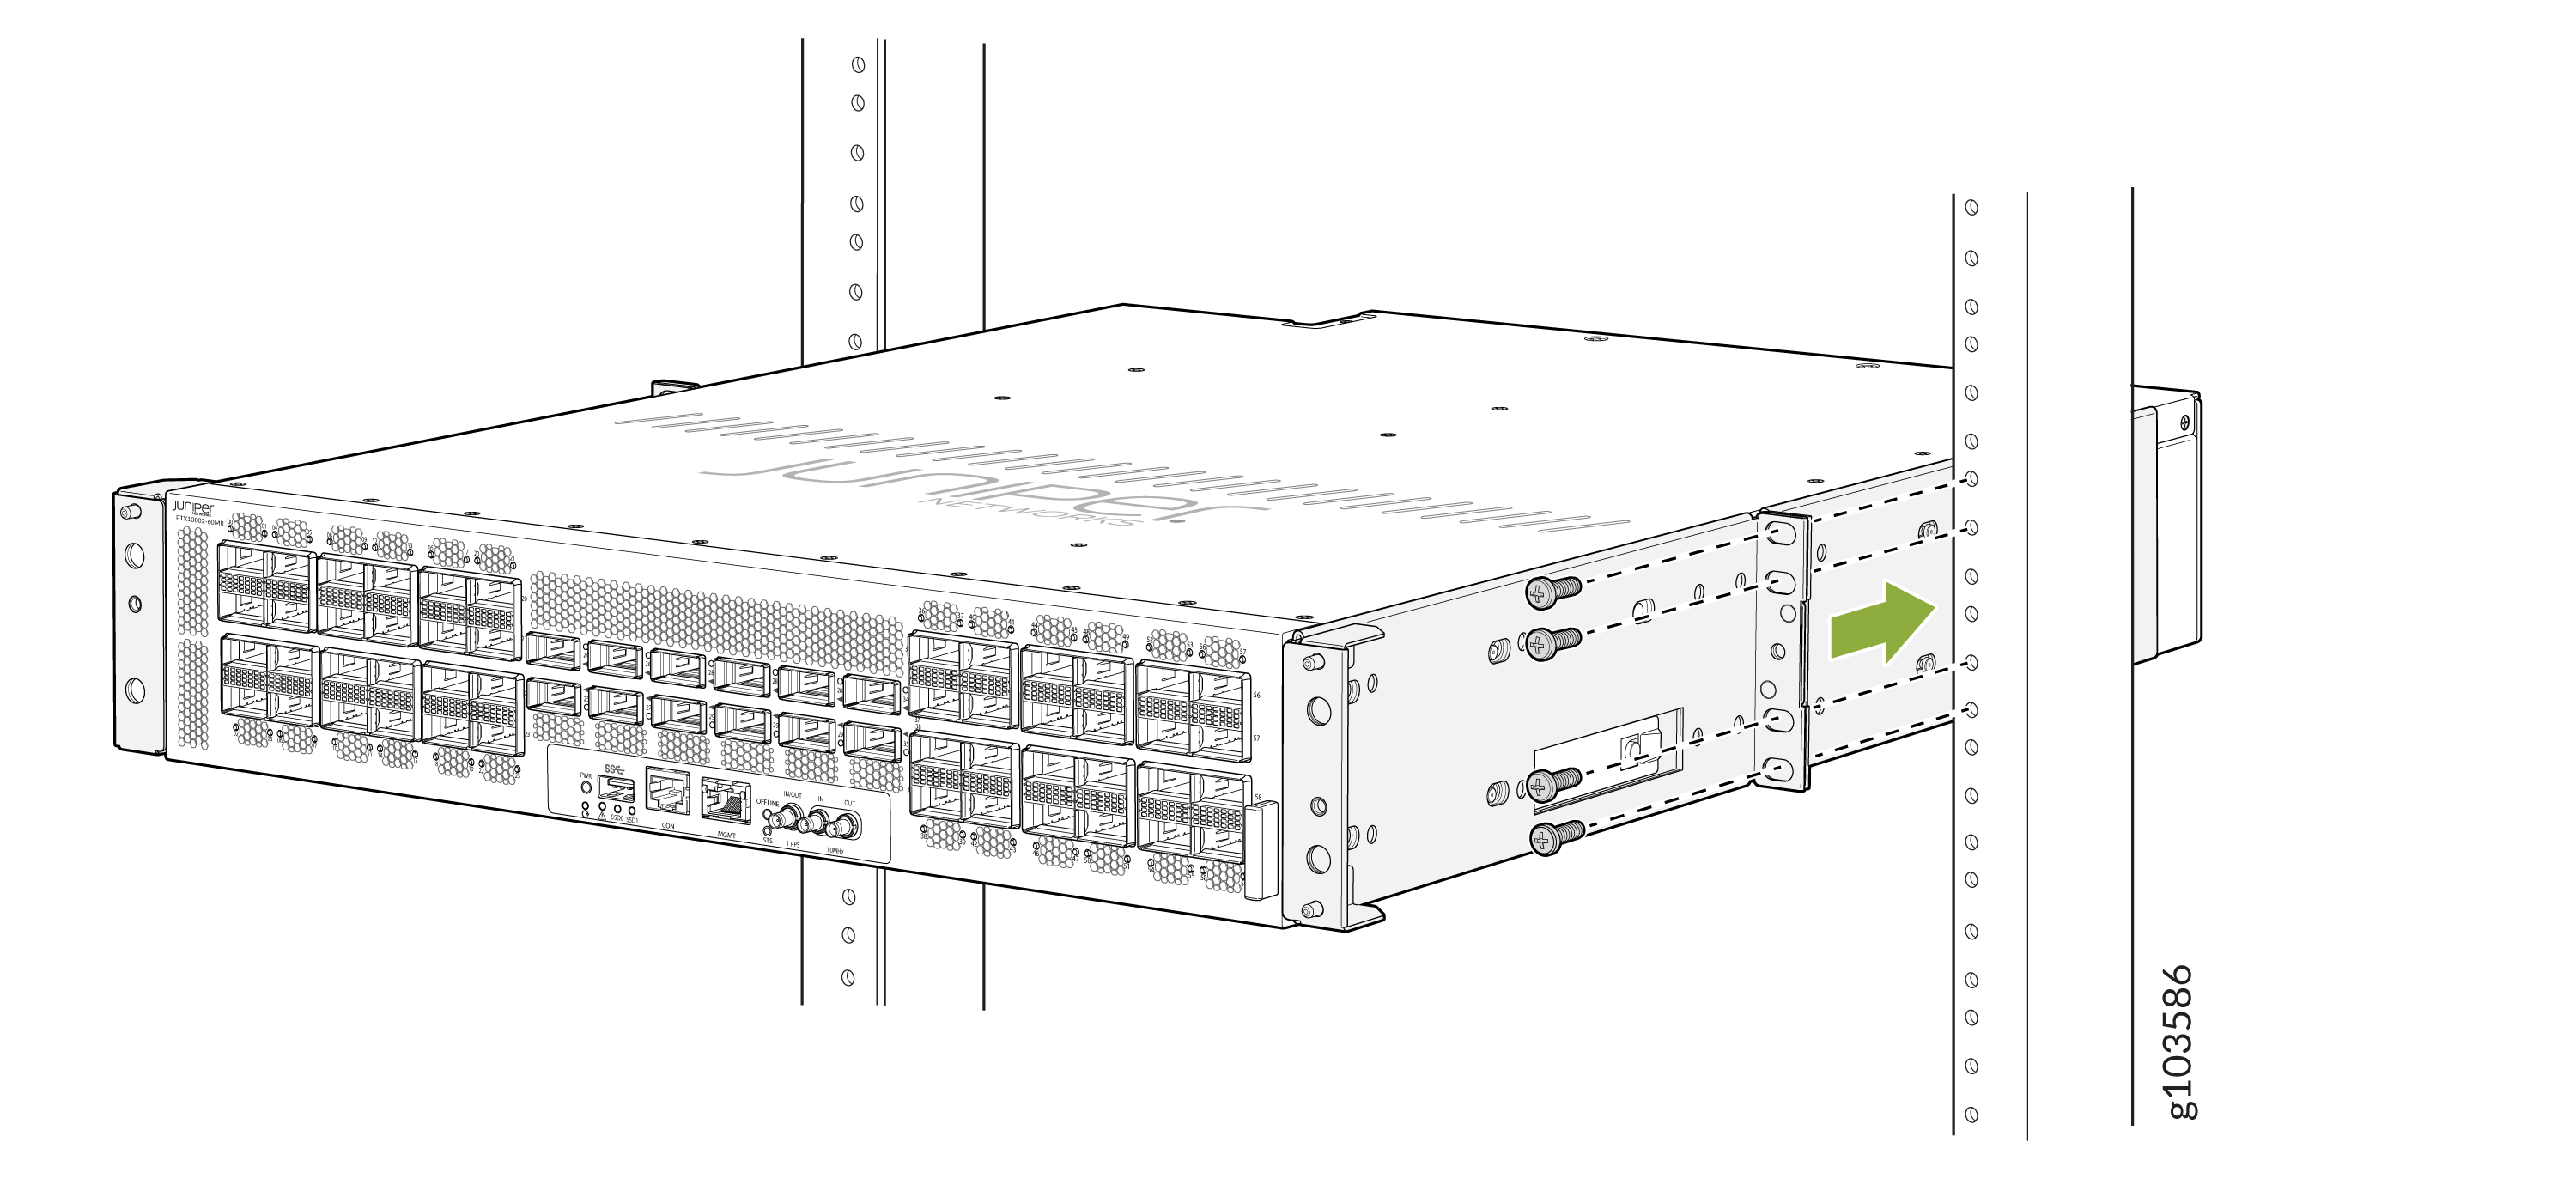
Have one person grasp both sides of the router, lift the router, and
position it in the rack, aligning the holes of the C-shaped and L-shaped
mounting brackets with the threaded holes in the posts of the rack. Align
the bottom hole in both the mounting brackets with a hole in each rack post,
making sure that the chassis is level.
Figure 21: Secure the Router to the Posts of the Rack
-
Secure the router to the posts of the rack. Have a second person attach the
mounting brackets to the rack by using the screws appropriate for your rack.
Tighten the screws by using a screwdriver.
Figure 22: Router Secured to the Rack