Replacing an SSD Drive on an RE-S-1800
Each RE-S-1800 Routing Engine supports two solid-state drives (SSD) specified by Juniper Networks. The RE-S-1800 ships with one SSD installed in the slot labeled SATA SSD 1. The spare SSD is Juniper part number SSD-32G-RE-S. Figure 1 shows the arrangement of storage drive slots on a RE-S-1800 Routing Engine.
Figure 1: RE-S-1800 Storage Drive Slots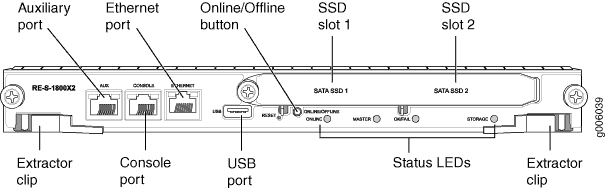
The following drive has been verified to work in the RE-S-1800 Routing Engine:
SSD-32G-RE-S
To replace a storage drive:
- Disable and deactivate the storage drive—press and hold the Online/Offline button till the LED starts blinking; wait till the RE LEDs are off.
- Remove the storage drive.
- Reinstall a storage drive.
- Carefully align the sides of the drive with the guides in the slot.
- Slide the drive into the slot until you feel resistance, carefully ensuring that it is correctly aligned.
- Close the access door and tighten the thumbscrew to secure the door.