Replacing an SSD Drive on an RE-S-X6-64G
Replace the SSD Drives on an RE-S-X6-64G
Each RE-S-X6-64G Routing Engine supports two solid-state drives (SSD) specified by Juniper Networks. The RE-S-X6-64G ships with two SSDs installed in the slot labeled SSD1 and SSD2. Figure 1 shows the arrangement of storage drive slots on a RE-S-X6-64G Routing Engine.
Make sure that the Routing Engine does not contain a mix of 50 GB and 200 GB SSDs. The SSDs on the Routing Engine must be from the same vendor. Both SSDs in the routing engine must be of the same type and must contain the same disk capacity. You must upgrade the two 50 GB SSDs to two 200 GB SSDs at the same time as mixed-mode operation is not supported.
Replacing an SSD drive in a RE-S-X6-64G Routing Engine consists of the following two stages:
-
Replacing the SSD drives in the Routing Engine
-
Copy the Junos OS to the newly replaced SSD
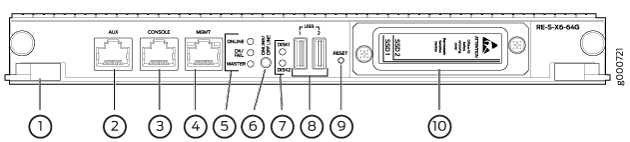
1 — Extractor clips | 6 — ONLINE/OFFLINE Button |
2 — Auxiliary port (AUX) | 7 — SSD LEDs—DISK1 and DISK2 |
3 — Console port (Con) | 8 — Ports—USB1 and USB2 |
4 — Management port (MGMT) | 9 — RESET Button |
5 — LEDs—ONLINE, OK/FAIL, and MASTER | 10 — SSD card slot cover |
Replacing Both the SSDs in the Routing Engine:
Make sure that the Routing Engine does not contain a mix of 50 GB and 200 GB SSDs. The SSDs on the Routing Engine must be from the same vendor. Both SSDs in the routing engine must be of the same type and must contain the same disk capacity. You must upgrade the two 50 GB SSDs to two 200 GB SSDs at the same time as mixed-mode operation is not supported.
Ensure that you keep a bootable USB disk ready if installing vmhost and Junos OS using an USB disk. To prepare a bootable USB disk, see Creating an Emergency Boot Device for Routing Engines with VM Host Support.
-
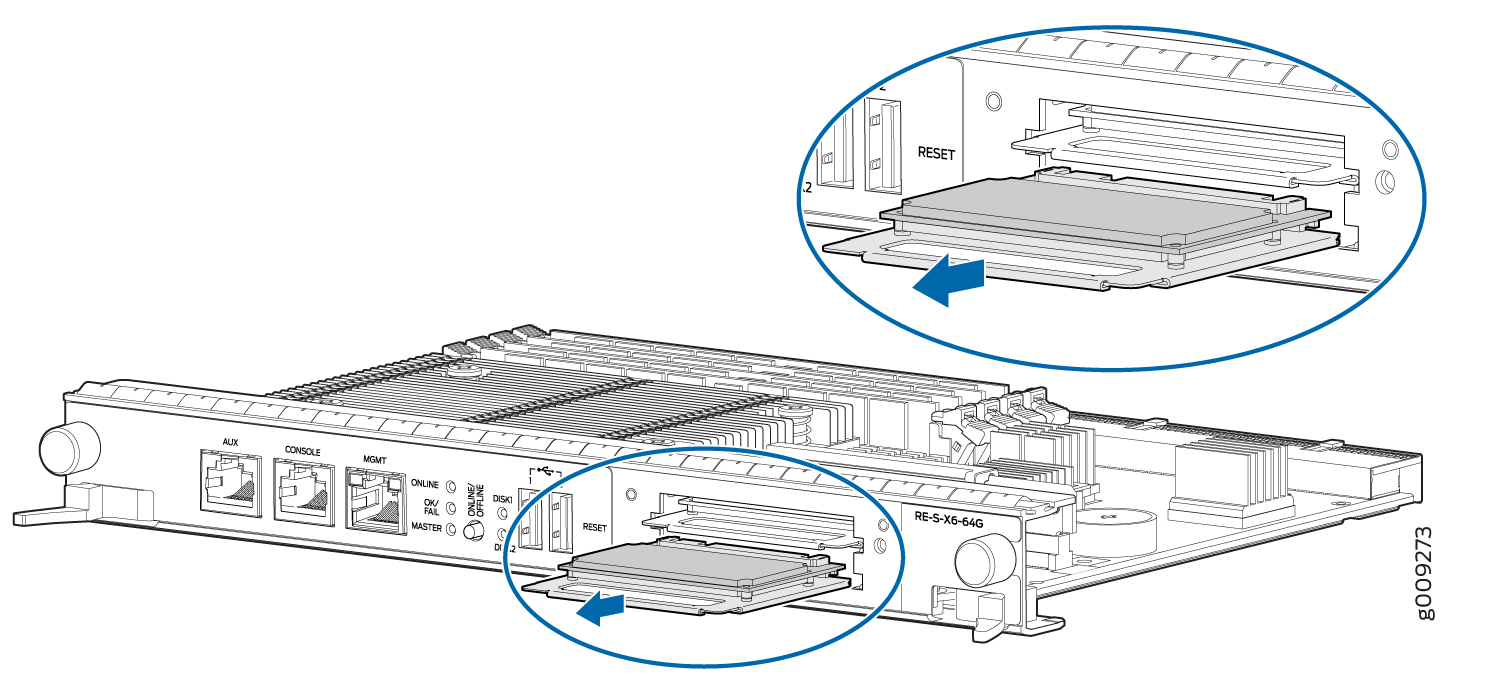
From the backup Routing Engine (RE1), remove the SSDs from slot SSD1 and slot
SSD2.
Figure 2: Removing an SSD in the Routing Engine RE-S-X6-64G
-
Insert the new SSDs in slot SSD1 and slot SSD2. See Figure 3.
Figure 3: Installing an SSD in the Routing Engine RE-S-X6-64G
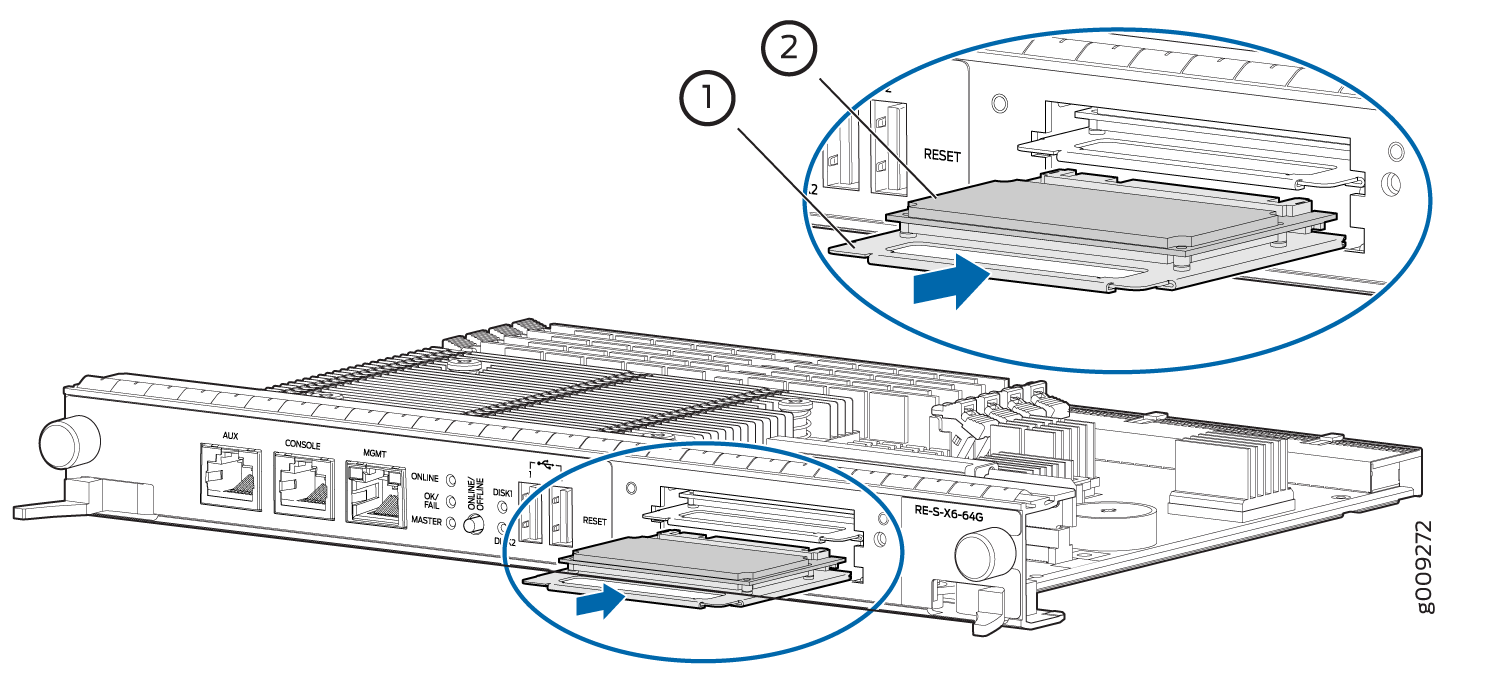 1—
1—Carrier
2—SSD card
- Carefully align the sides of the drive with the guides in the slot.
- Slide the drive into the slot until you feel resistance, carefully ensuring that it is correctly aligned.
- Close the access door and tighten the thumbscrew to secure the door.
Replacing Disk2 (SSD2) Only in the Routing Engine:
Make sure that the Routing Engine does not contain a mix of 50 GB and 200 GB SSDs. The SSDs on the Routing Engine must be from the same vendor. Both SSDs in the routing engine must be of the same type and must contain the same disk capacity. You must upgrade the two 50 GB SSDs to two 200 GB SSDs at the same time as mixed-mode operation is not supported.
Make sure the router is booted up and running from an image from disk1 (execute the
request vmhost reboot disk1command to boot from disk1).Remove disk2 and replace with a new disk (refer step 3 to step 4).
Reboot the Routing Engine by executing the
request vmhost rebootcommand.The router boots from disk1 when disk2 is replaced. To be able to boot from disk2, execute the
request vmhost snapshot partitioncommand.
Replacing Disk1 (SSD1) Only:
Make sure that the Routing Engine does not contain a mix of 50 GB and 200 GB SSDs. The SSDs on the Routing Engine must be from the same vendor. Both SSDs in the routing engine must be of the same type and must contain the same disk capacity. You must upgrade the two 50 GB SSDs to two 200 GB SSDs at the same time as mixed-mode operation is not supported.
Make sure the router is booted up and running from an image from disk2 (execute the
request vmhost reboot disk2command to boot from disk2).Remove disk1 and replace with a new disk (refer step 3 to step 4).
Reboot the Routing Engine by executing the
request vmhost rebootcommand.The router boots from disk2 when disk1 is replaced. To be able to boot from disk1, execute the
request vmhost snapshot recovery partitioncommand.Boot from disk1 by executing the
request vmhost reboot disk1command.
See Also
Copy the Junos OS to the Newly Replaced SSD Using a USB disk (Minimum 16-GB)
In addition to installing Junos OS from the USB device, you can also install the VM Host and Junos OS using a Preboot Execution Environment (PXE) boot server. For more information, see Installing, Upgrading, Backing Up, and Recovery of VM Host.