Contacting Customer Support and Returning the Chassis or Components
Displaying MX480 Router Components and Serial Numbers
Before contacting Juniper Networks, Inc. to request a Return Materials Authorization (RMA), you must find the serial number on the router or component. To display all of the router components and their serial numbers, enter the following command-line interface (CLI) command:
user@host> show chassis hardware
Hardware inventory:
Item             Version  Part number  Serial number     Description
Chassis                                JN10B6596AFB      MX480
Midplane         REV 01   710-017414                     MX480
FPM Board
PEM 0            Rev 1E   740-017330   000083            PS 2.0kW; 90-264V AC
PEM 1            Rev 1E   740-017330   000089            PS 2.0kW; 90-264V AC
PEM 2            Rev 1E   740-017330   000109            PS 2.0kW; 90-264V AC
Routing Engine 0 REV 06   740-015113   1000694968        RE-S-1300
Routing Engine 1 REV 06   740-015113   1000694976        RE-S-1300
CB 0             REV 07   710-013385   KA5867            MX SCB
CB 1             REV 07   710-013385   KA5863            MX SCB
FPC 0            REV 01   750-018124   KA5710            DPCE 4x 10GE R
  CPU            REV 06   710-013713   KB4077            DPC PMB
  PIC 0                   BUILTIN      BUILTIN           1x 10GE(LAN/WAN)
    Xcvr 0       REV 01   740-014289   C712XU01J         XFP-10G-SR
  PIC 1                   BUILTIN      BUILTIN           1x 10GE(LAN/WAN)
    Xcvr 0       REV 01   740-014289   C712XU01E         XFP-10G-SR
  PIC 2                   BUILTIN      BUILTIN           1x 10GE(LAN/WAN)
  PIC 3                   BUILTIN      BUILTIN           1x 10GE(LAN/WAN)
FPC 1            REV 01   750-018122   JZ8183            DPCE 40x 1GE R
  CPU            REV 06   710-013713   KA0454            DPC PMB
  PIC 0                   BUILTIN      BUILTIN           10x 1GE(LAN)
    Xcvr 0       REV 01   740-011613   PAJ4SNB           SFP-SX
    Xcvr 9       REV 01   740-011782   P9M0TYY           SFP-SX
  PIC 1                   BUILTIN      BUILTIN           10x 1GE(LAN)
    Xcvr 3       REV 01   740-011613   PAJ4SQ9           SFP-SX
    Xcvr 4       REV 01   740-011613   PAJ4SQR           SFP-SX
    Xcvr 9       REV 01   740-011782   PAR1L2P           SFP-SX
  PIC 2                   BUILTIN      BUILTIN           10x 1GE(LAN)
    Xcvr 0                NON-JNPR     MTC009778         SFP-T
    Xcvr 9       REV 01   740-011782   PAR1L2N           SFP-SX
  PIC 3                   BUILTIN      BUILTIN           10x 1GE(LAN)
    Xcvr 3       REV 01   740-011613   PAJ4SQD           SFP-SX
    Xcvr 9       REV 01   740-011782   PAR1L27           SFP-SX
FPC 2            REV 01   750-018122   KA5576            DPCE 40x 1GE R
  CPU            REV 06   710-013713   KB3961            DPC PMB
  PIC 0                   BUILTIN      BUILTIN           10x 1GE(LAN)
    Xcvr 0       REV 01   740-011782   PB83DK1           SFP-SX
    Xcvr 1       REV 01   740-011782   PB82174           SFP-SX
    Xcvr 2       REV 01   740-011782   PB81U9C           SFP-SX
    Xcvr 3       REV 01   740-011782   PB8329N           SFP-SX
    Xcvr 4       REV 01   740-011782   PB832A0           SFP-SX
    Xcvr 5       REV 01   740-011782   PB82A3T           SFP-SX
    Xcvr 6       REV 01   740-011782   PB835F7           SFP-SX
    Xcvr 7       REV 01   740-011782   PB81NBR           SFP-SX
    Xcvr 8       REV 01   740-011782   PB82CGR           SFP-SX
    Xcvr 9       REV 01   740-011782   PB81NC4           SFP-SX
  PIC 1                   BUILTIN      BUILTIN           10x 1GE(LAN)
    Xcvr 0       REV 01   740-011782   PB81NBS           SFP-SX
    Xcvr 1       REV 01   740-011782   PB8390V           SFP-SX
    Xcvr 2       REV 01   740-011782   PB75EFU           SFP-SX
    Xcvr 3       REV 01   740-011782   PB82VHH           SFP-SX
    Xcvr 4       REV 01   740-011782   PB832DA           SFP-SX
    Xcvr 5       REV 01   740-011782   P9M0U35           SFP-SX
    Xcvr 6       REV 01   740-011782   P9M0U37           SFP-SX
    Xcvr 7       REV 01   740-011782   P9M0U74           SFP-SX
    Xcvr 8       REV 01   740-011782   P9M0U3C           SFP-SX
    Xcvr 9       REV 01   740-011782   P9M0U3B           SFP-SX
  PIC 2                   BUILTIN      BUILTIN           10x 1GE(LAN)
    Xcvr 0       REV 01   740-011782   PAR1YWF           SFP-SX
    Xcvr 1       REV 01   740-011782   PAR1Z55           SFP-SX
    Xcvr 2       REV 01   740-011782   PAR1YXD           SFP-SX
    Xcvr 3       REV 01   740-011785   P6N0TQ1           SFP-LX
    Xcvr 4       REV 01   740-011782   PAR1Z4Q           SFP-SX
    Xcvr 5       REV 01   740-011782   PAR1XDZ           SFP-SX
    Xcvr 6       REV 01   740-011613   PAJ4SQQ           SFP-SX
    Xcvr 7       REV 01   740-011782   P8N1Y6L           SFP-SX
    Xcvr 8       REV 01   740-011613   PAJ4SYW           SFP-SX
    Xcvr 9       0        NON-JNPR     AM06211TK7        SFP-SX
  PIC 3                   BUILTIN      BUILTIN           10x 1GE(LAN)
    Xcvr 0       REV 01   740-011782   PAR1XB3           SFP-SX
    Xcvr 1       REV 01   740-011782   PAR1YHY           SFP-SX
    Xcvr 2       REV 01   740-011782   PAR1XDV           SFP-SX
    Xcvr 3       REV 01   740-011782   PAR1Z7B           SFP-SX
    Xcvr 4       REV 01   740-011782   PAR1YWE           SFP-SX
    Xcvr 5       REV 01   740-011782   PAR1X5W           SFP-SX
    Xcvr 6       REV 01   740-011782   PAR1Z5E           SFP-SX
    Xcvr 7       REV 01   740-011782   PAR1XB6           SFP-SX
    Xcvr 8       REV 01   740-011785   PAQ0ZAS           SFP-LX
    Xcvr 9       REV 01   740-011785   PAQ0ZA8           SFP-LX
FPC 5            REV 08   710-014219   KB0710            DPC 4x 10GE R
  CPU            REV 06   710-013713   KB1015            DPC PMB
  PIC 0                   BUILTIN      BUILTIN           1x 10GE(LAN/WAN)
    Xcvr 0       REV 01   740-014279   733019A00156      XFP-10G-LR
  PIC 1                   BUILTIN      BUILTIN           1x 10GE(LAN/WAN)
    Xcvr 0       REV 01   740-014279   733019A00192      XFP-10G-LR
  PIC 2                   BUILTIN      BUILTIN           1x 10GE(LAN/WAN)
  PIC 3                   BUILTIN      BUILTIN           1x 10GE(LAN/WAN)
Fan Tray                                                 Left Fan Tray
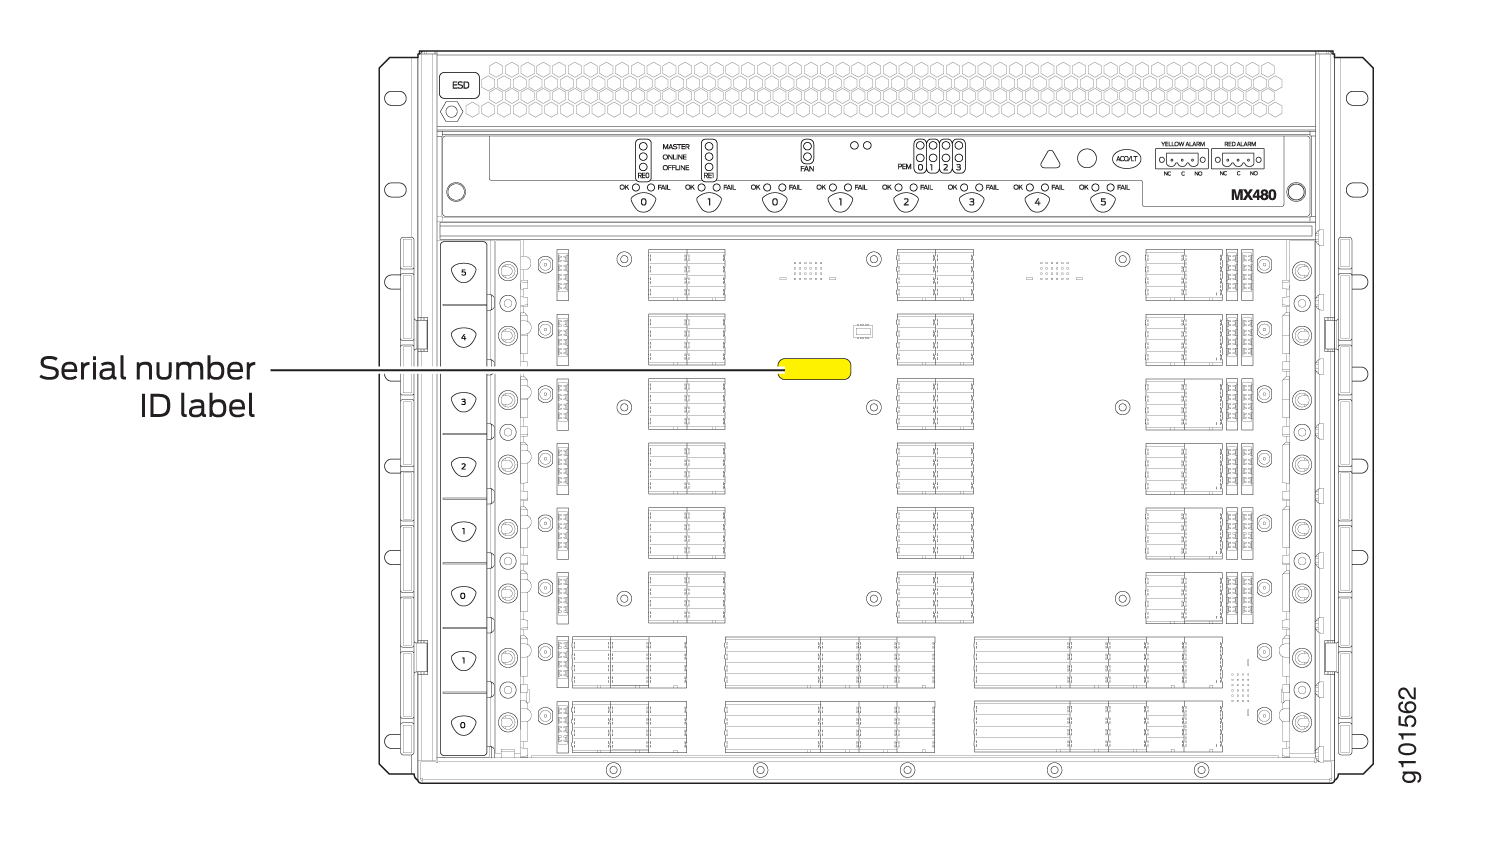
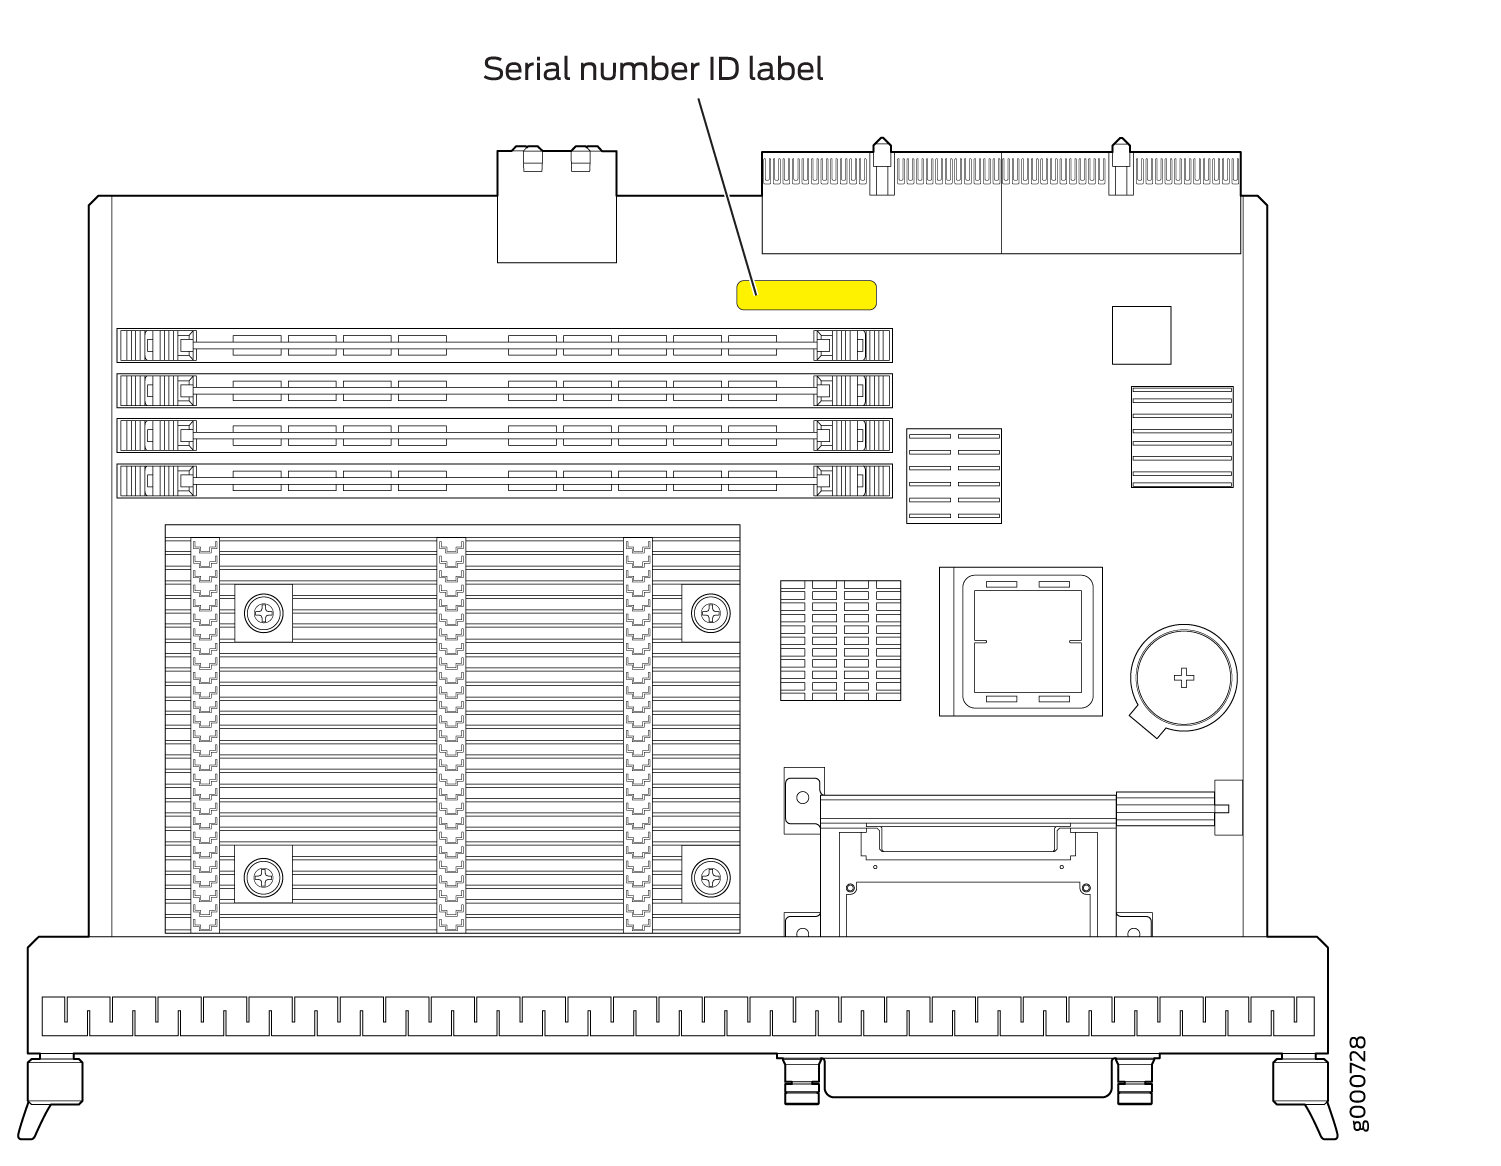
Most components also have a small rectangular serial number ID label (see Figure 1) attached to the component body.

MX480 Chassis Serial Number Label
The chassis serial number is located on the side of the chassis (see Figure 2).

MX480 Midplane Serial Number Label
The midplane is located toward the rear of the chassis and forms the rear of the card cage.
The serial number label is located on the left side of the midplane (see Figure 3). You need to remove DPC/FPCs in slot 4 and 5 to view the label. You can also remove DPC/FPCs in slot 2 and 3 to view the label more clearly.
MX480 SCB Serial Number Label
The serial number is located on the right side of the top of the SCB (see Figure 4).
See Also
MX480 DPC Serial Number Label
The serial number label is located on the center of the right side of the DPC (see Figure 5).
MX480 FPC Serial Number Label
The serial number label is located on the center of the right side of the FPC (see Figure 6).
See Also
MX480 MIC Serial Number Label
The serial number label location varies per MIC. The exact location may be different on different MICs, depending on the placement of components on the MIC board (see Figure 7, Figure 8, Figure 9, Figure 10, and Figure 11).
|
Figure 7: 2-Port MIC Serial Number Label
|
Figure 8: 4-Port MIC Serial Number Label
|
|
Figure 9: 10-Port MIC Serial Number Label
|
Figure 10: 20-Port MIC Serial Number Label
|
|
Figure 11: 40-Port MIC Serial Number Label
|
See Also
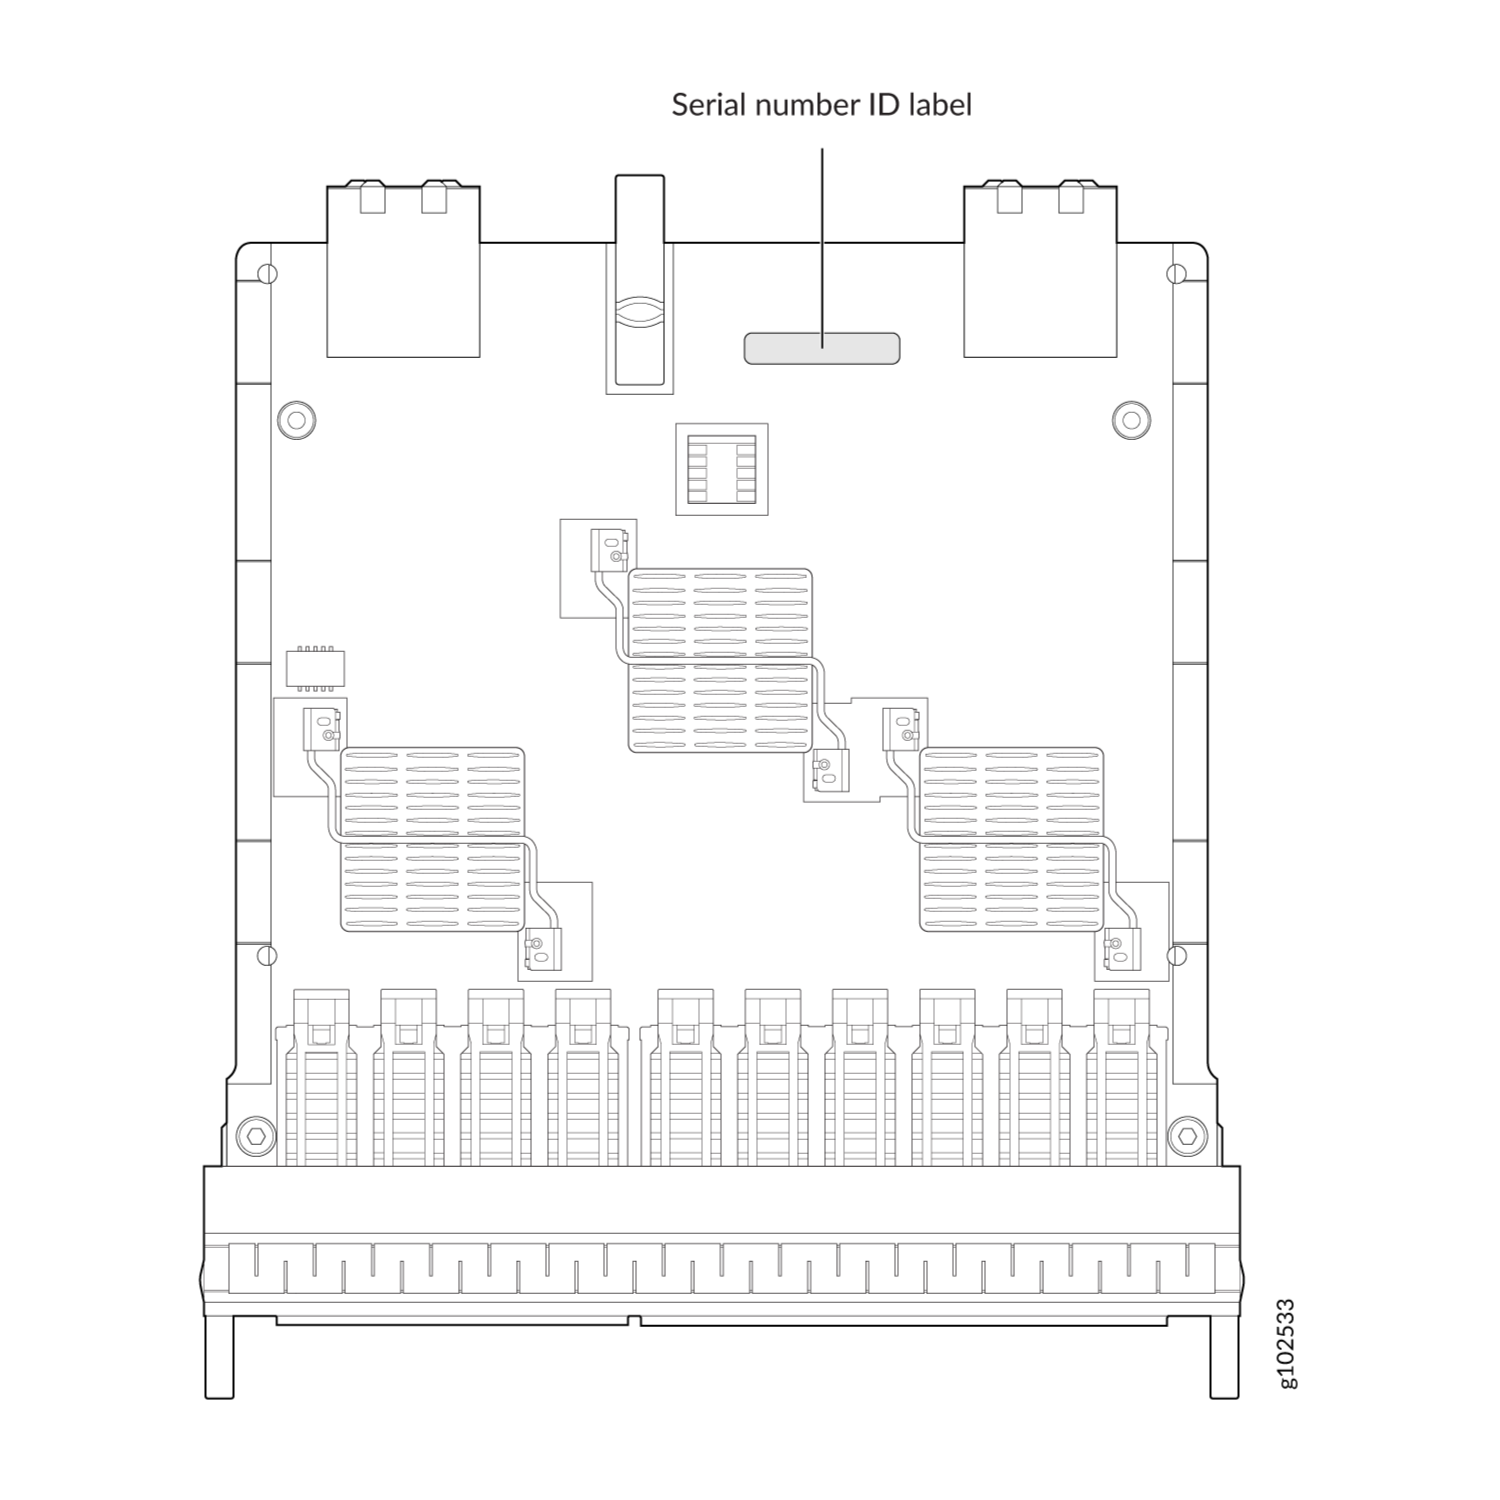
MX480 MPC Serial Number Label
The serial number label is near the connectors located on the left side of the MPC when it is oriented vertically (see Figure 12).
See Also
MX480 PIC Serial Number Label
The serial number label is located on the right side of the PIC (see Figure 13), when the PIC is vertically oriented (as it would be installed in the router). The exact location may be slightly different on different PICs, depending on the placement of components on the PIC board.

See Also
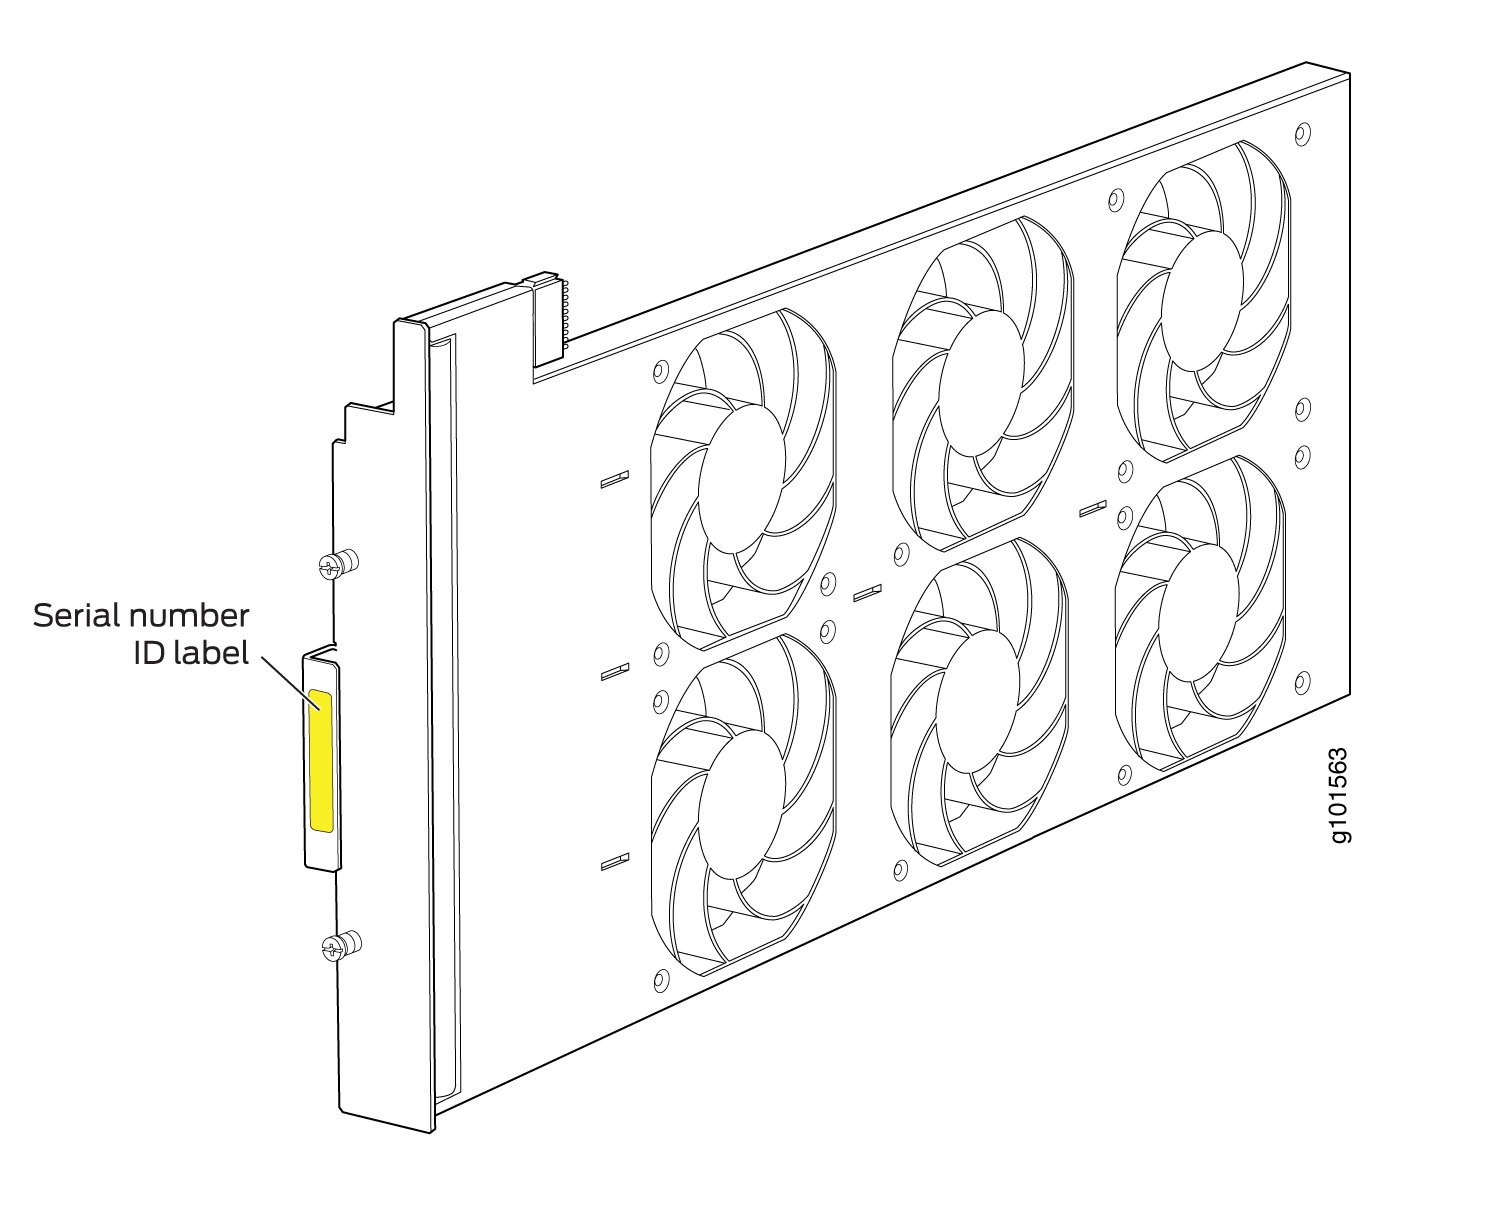
MX480 Fan Serial Number Label
The serial number label is located on the front side of the fan (see Figure 14).
See Also
MX480 Power Supply Serial Number Label
The serial number label is located on the top of the AC power supply (see Figure 15).
The serial number label is located on the top of the DC power supply faceplate (see Figure 16).

See Also
MX480 Routing Engine Serial Number Label
The serial number label is located on the left side of the top of the Routing Engine (see Figure 17 and Figure 18).
See Also
Contact Customer Support to Obtain a Return Material Authorization
If you need to return a device or hardware component to Juniper Networks for repair or replacement, obtain an RMA number from JTAC. You must obtain an RMA number before you attempt to return the component.
After locating the serial number of the device or hardware component you want to return, open a service request with the JTAC on the Web or by telephone.
Before you request an RMA number from JTAC, be prepared to provide the following information:
-
Your existing service request number, if you have one
-
Serial number of the component
-
Your name, organization name, telephone number, fax number, and shipping address
-
Details of the failure or problem
-
Type of activity being performed on the device when the problem occurred
-
Configuration data displayed by one or more
showcommands
You can contact JTAC 24 hours a day, seven days a week, on the Web or by telephone:
-
Service Request Manager: https://support.juniper.net/support
-
Telephone: +1-888-314-JTAC (+1-888-314-5822), toll free in U.S., Canada, and Mexico
For international or direct-dial options in countries without toll free numbers, see https://support.juniper.net/support.
If you are contacting JTAC by telephone, enter your 12-digit service request number followed by the pound (#) key for an existing case, or press the star (*) key to be routed to the next available support engineer.
The support representative validates your request and issues an RMA number for return of the component.
Guidelines for Packing Hardware Components for Shipment
To pack and ship individual components:
When you return components, make sure that they are adequately protected with packing materials and packed so that the pieces are prevented from moving around inside the carton.
Use the original shipping materials if they are available.
Place individual components in antistatic bags.
Write the RMA number on the exterior of the box to ensure proper tracking.
Do not stack any of the hardware components.
How to Return a Hardware Component to Juniper Networks, Inc.
If a hardware component fails, you need to contact Juniper Networks, Inc. to obtain a Return Material Authorization (RMA) number. This number is used to track the returned material at the factory and to return repaired or new components to the customer as needed.
Do not return any component to Juniper Networks, Inc. unless you have first obtained an RMA number. Juniper Networks, Inc. reserves the right to refuse shipments that do not have an RMA. Refused shipments are returned to the customer by collect freight.
For more information about return and repair policies, see the customer support webpage at https://support.juniper.net/support/.
For product problems or technical support issues, contact the Juniper Networks Technical Assistance Center (JTAC) by using the Service Request Manager link at https://support.juniper.net/support/ or at 1-888-314-JTAC (within the United States) or 1-408-745-9500 (from outside the United States).
To return a defective hardware component:
Packing the MX480 Router for Shipment
To pack the router for shipment: