Maintaining MX204 Cooling System Components
Maintaining the MX204 Fan Module
Purpose
For optimum cooling, verify the condition of the fans.
Action
Monitor the status of the fans. A fan module contains multiple fans that work in unison to cool the router components. If one fan fails, the router adjusts the speed of the remaining fans to maintain proper cooling. A red alarm is triggered when a fan fails, and when a fan module is removed.
To display the status of the cooling system, issue the
show chassis environmentcommand. The output is similar to the following:user@host> show chassis environment Class Item Status Measurement Temp CB 0 Top Right Inlet Sensor OK 35 degrees C / 95 degrees F CB 0 Top Left Inlet Sensor OK 38 degrees C / 100 degrees F CB 0 Top Right Exhaust Sensor OK 45 degrees C / 113 degrees F CB 0 Top Left Exhaust Sensor OK 64 degrees C / 147 degrees F CB 0 CPU Core-0 Temp OK 49 degrees C / 120 degrees F CB 0 CPU Core-1 Temp OK 49 degrees C / 120 degrees F CB 0 CPU Core-2 Temp OK 48 degrees C / 118 degrees F CB 0 CPU Core-3 Temp OK 49 degrees C / 120 degrees F CB 0 CPU Core-4 Temp OK 49 degrees C / 120 degrees F CB 0 CPU Core-5 Temp OK 48 degrees C / 118 degrees F CB 0 CPU Core-6 Temp OK 48 degrees C / 118 degrees F CB 0 CPU Core-7 Temp OK 48 degrees C / 118 degrees F FPC 0 EA0_HMC0 Logic die OK 81 degrees C / 177 degrees F FPC 0 EA0_HMC0 DRAM botm OK 78 degrees C / 172 degrees F FPC 0 EA0_HMC1 Logic die OK 85 degrees C / 185 degrees F FPC 0 EA0_HMC1 DRAM botm OK 82 degrees C / 179 degrees F FPC 0 EA0 Chip OK 93 degrees C / 199 degrees F FPC 0 EA0-XR0 Chip OK 69 degrees C / 156 degrees F FPC 0 EA0-XR1 Chip OK 73 degrees C / 163 degrees F Power PEM 0 ok PEM 1 OK 49 degrees C / 120 degrees F Fans Fan Tray 0 Fan 0 OK Spinning at normal speed Fan Tray 0 Fan 1 OK Spinning at normal speed Fan Tray 1 Fan 0 OK Spinning at normal speed Fan Tray 1 Fan 1 OK Spinning at normal speed Fan Tray 2 Fan 0 OK Spinning at normal speed Fan Tray 2 Fan 1 OK Spinning at normal speed
See Also
Replacing an MX204 Fan Module
Removing an MX204 Fan Module
Note:
To prevent overheating, install the replacement fan module immediately after removing the existing fan module.
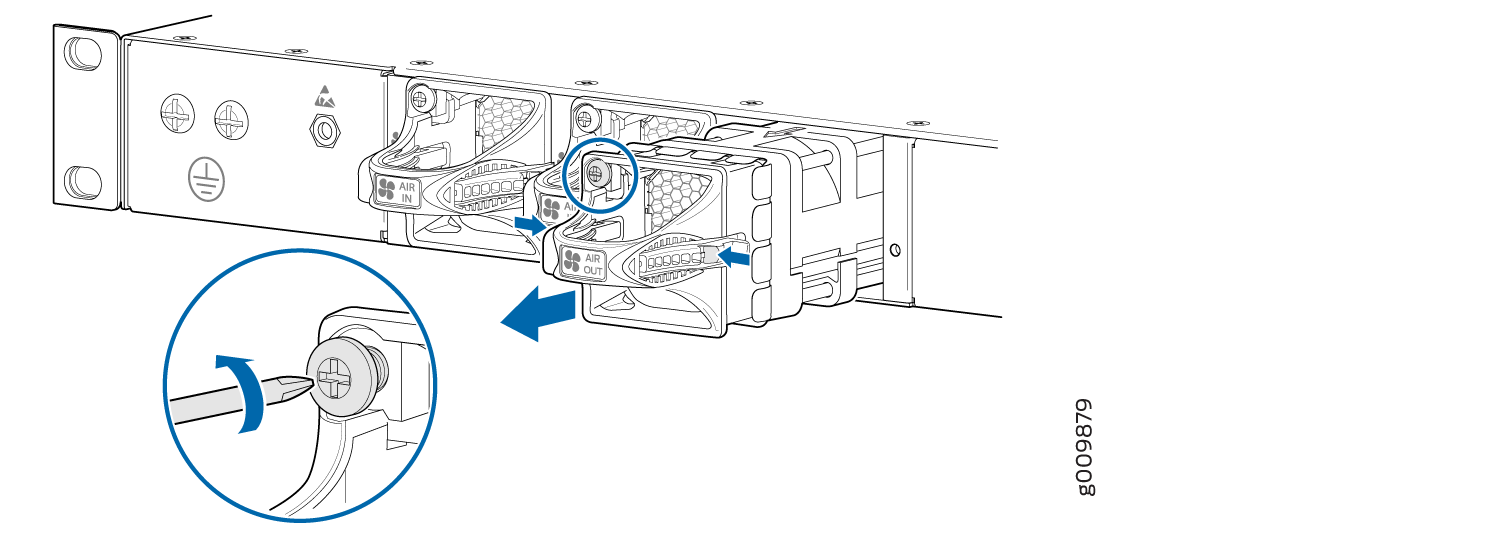
To remove the fan module (see Figure 1):
Figure 1: Removing the Fan Module
Installing an MX204 Fan Module
To install the fan module (see Figure 2):
- Attach an ESD grounding strap to your bare wrist and connect the strap to one of the ESD points on the chassis.
- Grasp the fan module by the handle, and place one hand under the fan module for support.
- Place the fan module on the respective slot, and carefully push the fan module into the chassis until the socket lock snaps into place and holds it.
- Using a number-2 Phillips screwdriver, turn the locking screw on the fan module faceplate until it is tight and secured.
Figure 2: Installing the Fan
Module
