ON THIS PAGE
Replacing an MX2000 SFB
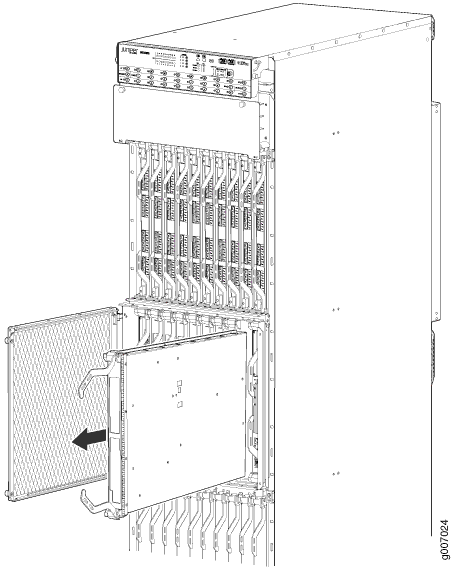
Removing an MX2000 SFB
To remove an SFB (see Figure 1 and Figure 2):
You can remove the SFB as a unit.
Before removing an SFB, ensure that you know how to operate the ejector handles properly to avoid damage to the equipment.
- Place an electrostatic bag or antistatic mat on a flat, stable surface.
- Attach an electrostatic discharge (ESD) grounding strap to your bare wrist, and connect the strap to one of the ESD grounding points on the chassis.
- Open the ejector handles outward simultaneously to unseat the SFB.
- Grasp the ejector handles, and slide the SFB about halfway
out of the chassis.CAUTION:
The weight of the SFB is concentrated in the back end. Be prepared to accept the full weight—up to 12 lb (5.45 kg)—as you slide the SFB out of the chassis.
- Place one hand underneath the SFB to support it, and slide it completely out of the chassis.
- Place the SFB on the antistatic mat or into an antistatic
bag.CAUTION:
Do not stack hardware components on one another after you remove them. Place each component on an antistatic mat resting on a stable, flat surface.
- If you are not replacing the SFB immediately, install a blank panel over the empty slot.

Installing an MX2000 SFB
To install an SFB (see Figure 3):
Before removing or replacing an SFB, ensure that the ejector handles are stored horizontally and pressed toward the center of the SFB.
If one of the SFBs fails, do not remove the failed SFB until you have a replacement or blank panel to install.
- Attach an electrostatic discharge (ESD) grounding strap to your bare wrist, and connect the strap to one of the ESD points on the chassis.
- Take each SFB to be installed out of its electrostatic bag, and identify the slot on the SFB where it will be connected.
- Carefully align the sides of the SFB with the guides inside the chassis.
- Slide the SFB into the chassis until you feel resistance, carefully ensuring that it is correctly aligned.
- Place the ejector handles in their proper position, vertically
and toward the center of the board.Figure 3: Installing an SFB

- Check the LEDs on the SFB faceplate to verify that it
is functioning normally.
The green OK/FAIL LED should light steadily a few minutes after the SFB is installed.
If the OK/FAIL LED is red, remove and install the SFB again. If the OK/FAIL LED still lights steadily, the SFB is not functioning properly. Contact your customer support representative. See Contact Customer Support.
- Check the status of the SFB by using the
show chassis environment sfbcommand:user@host> show chassis environment sfb SFB 0 status: State Online Intake-Zone0 Temperature 32 degrees C / 89 degrees F Exhaust-Zone1 Temperature 38 degrees C / 100 degrees F IntakeA-Zone0 Temperature 28 degrees C / 82 degrees F IntakeB-Zone1 Temperature 29 degrees C / 84 degrees F Exhaust-Zone0 Temperature 31 degrees C / 87 degrees F SFB-XF2-Zone1 Temperature 55 degrees C / 131 degrees F SFB-XF1-Zone0 Temperature 48 degrees C / 118 degrees F SFB-XF0-Zone0 Temperature 47 degrees C / 116 degrees F Power LTC3880-XF2-1.5v-RAIL 1500 mV LTC3880-XF2-1.5v-CH0 1500 mV LTC3880-XF2-1.5v-CH1 1500 mV LTC3880-XF2-1.0v-RAIL 1029 mV LTC3880-XF2-1.0v-CH0 1029 mV LTC3880-XF2-1.0v-CH1 1032 mV LTC3880-XF1-1.5v-RAIL 1499 mV LTC3880-XF1-1.5v-CH0 1499 mV LTC3880-XF1-1.5v-CH1 1500 mV LTC3880-XF1-1.0v-RAIL 1029 mV LTC3880-XF1-1.0v-CH0 1029 mV LTC3880-XF1-1.0v-CH1 1032 mV LTC3880-XF0-1.5v-RAIL 1499 mV LTC3880-XF0-1.5v-CH0 1499 mV LTC3880-XF0-1.5v-CH1 1501 mV LTC3880-XF0-1.0v-RAIL 1029 mV LTC3880-XF0-1.0v-CH0 1029 mV LTC3880-XF0-1.0v-CH1 1032 mV LTC3880-3.3v-RAIL 3299 mV LTC3880-3.3v-CH0 3299 mV LTC3880-3.3v-CH1 3299 mV SFB 1 status: State Online Intake-Zone0 Temperature 32 degrees C / 89 degrees F Exhaust-Zone1 Temperature 37 degrees C / 98 degrees F IntakeA-Zone0 Temperature 27 degrees C / 80 degrees F IntakeB-Zone1 Temperature 29 degrees C / 84 degrees F Exhaust-Zone0 Temperature 31 degrees C / 87 degrees F SFB-XF2-Zone1 Temperature 56 degrees C / 132 degrees F SFB-XF1-Zone0 Temperature 47 degrees C / 116 degrees F SFB-XF0-Zone0 Temperature 47 degrees C / 116 degrees F Power LTC3880-XF2-1.5v-RAIL 1499 mV LTC3880-XF2-1.5v-CH0 1499 mV LTC3880-XF2-1.5v-CH1 1500 mV LTC3880-XF2-1.0v-RAIL 1029 mV LTC3880-XF2-1.0v-CH0 1029 mV LTC3880-XF2-1.0v-CH1 1032 mV LTC3880-XF1-1.5v-RAIL 1499 mV LTC3880-XF1-1.5v-CH0 1499 mV LTC3880-XF1-1.5v-CH1 1501 mV LTC3880-XF1-1.0v-RAIL 1030 mV LTC3880-XF1-1.0v-CH0 1030 mV LTC3880-XF1-1.0v-CH1 1033 mV LTC3880-XF0-1.5v-RAIL 1500 mV LTC3880-XF0-1.5v-CH0 1500 mV LTC3880-XF0-1.5v-CH1 1501 mV LTC3880-XF0-1.0v-RAIL 1029 mV LTC3880-XF0-1.0v-CH0 1029 mV LTC3880-XF0-1.0v-CH1 1032 mV LTC3880-3.3v-RAIL 3300 mV LTC3880-3.3v-CH0 3300 mV LTC3880-3.3v-CH1 3300 mV SFB 2 status: State Online Intake-Zone0 Temperature 33 degrees C / 91 degrees F Exhaust-Zone1 Temperature 38 degrees C / 100 degrees F IntakeA-Zone0 Temperature 29 degrees C / 84 degrees F IntakeB-Zone1 Temperature 29 degrees C / 84 degrees F Exhaust-Zone0 Temperature 33 degrees C / 91 degrees F SFB-XF2-Zone1 Temperature 58 degrees C / 136 degrees F SFB-XF1-Zone0 Temperature 49 degrees C / 120 degrees F SFB-XF0-Zone0 Temperature 49 degrees C / 120 degrees F Power LTC3880-XF2-1.5v-RAIL 1500 mV LTC3880-XF2-1.5v-CH0 1500 mV LTC3880-XF2-1.5v-CH1 1500 mV LTC3880-XF2-1.0v-RAIL 1029 mV LTC3880-XF2-1.0v-CH0 1029 mV LTC3880-XF2-1.0v-CH1 1032 mV LTC3880-XF1-1.5v-RAIL 1499 mV LTC3880-XF1-1.5v-CH0 1499 mV LTC3880-XF1-1.5v-CH1 1501 mV LTC3880-XF1-1.0v-RAIL 1029 mV LTC3880-XF1-1.0v-CH0 1029 mV LTC3880-XF1-1.0v-CH1 1032 mV LTC3880-XF0-1.5v-RAIL 1499 mV LTC3880-XF0-1.5v-CH0 1499 mV LTC3880-XF0-1.5v-CH1 1500 mV LTC3880-XF0-1.0v-RAIL 1029 mV LTC3880-XF0-1.0v-CH0 1029 mV LTC3880-XF0-1.0v-CH1 1032 mV LTC3880-3.3v-RAIL 3299 mV LTC3880-3.3v-CH0 3299 mV LTC3880-3.3v-CH1 3299 mV SFB 3 status: State Online Intake-Zone0 Temperature 44 degrees C / 111 degrees F Exhaust-Zone1 Temperature 40 degrees C / 104 degrees F IntakeA-Zone0 Temperature 36 degrees C / 96 degrees F IntakeB-Zone1 Temperature 31 degrees C / 87 degrees F Exhaust-Zone0 Temperature 38 degrees C / 100 degrees F SFB-XF2-Zone1 Temperature 59 degrees C / 138 degrees F SFB-XF1-Zone0 Temperature 52 degrees C / 125 degrees F SFB-XF0-Zone0 Temperature 59 degrees C / 138 degrees F Power LTC3880-XF2-1.5v-RAIL 1500 mV LTC3880-XF2-1.5v-CH0 1500 mV LTC3880-XF2-1.5v-CH1 1500 mV LTC3880-XF2-1.0v-RAIL 1029 mV LTC3880-XF2-1.0v-CH0 1029 mV LTC3880-XF2-1.0v-CH1 1032 mV LTC3880-XF1-1.5v-RAIL 1499 mV LTC3880-XF1-1.5v-CH0 1499 mV LTC3880-XF1-1.5v-CH1 1501 mV LTC3880-XF1-1.0v-RAIL 1029 mV LTC3880-XF1-1.0v-CH0 1029 mV LTC3880-XF1-1.0v-CH1 1032 mV LTC3880-XF0-1.5v-RAIL 1499 mV LTC3880-XF0-1.5v-CH0 1499 mV LTC3880-XF0-1.5v-CH1 1501 mV LTC3880-XF0-1.0v-RAIL 1029 mV LTC3880-XF0-1.0v-CH0 1029 mV LTC3880-XF0-1.0v-CH1 1032 mV LTC3880-3.3v-RAIL 3300 mV LTC3880-3.3v-CH0 3300 mV LTC3880-3.3v-CH1 3300 mV SFB 4 status: State Online Intake-Zone0 Temperature 32 degrees C / 89 degrees F Exhaust-Zone1 Temperature 37 degrees C / 98 degrees F IntakeA-Zone0 Temperature 27 degrees C / 80 degrees F IntakeB-Zone1 Temperature 28 degrees C / 82 degrees F Exhaust-Zone0 Temperature 31 degrees C / 87 degrees F SFB-XF2-Zone1 Temperature 54 degrees C / 129 degrees F SFB-XF1-Zone0 Temperature 46 degrees C / 114 degrees F SFB-XF0-Zone0 Temperature 45 degrees C / 113 degrees F Power LTC3880-XF2-1.5v-RAIL 1499 mV LTC3880-XF2-1.5v-CH0 1499 mV LTC3880-XF2-1.5v-CH1 1500 mV LTC3880-XF2-1.0v-RAIL 1029 mV LTC3880-XF2-1.0v-CH0 1029 mV LTC3880-XF2-1.0v-CH1 1032 mV LTC3880-XF1-1.5v-RAIL 1500 mV LTC3880-XF1-1.5v-CH0 1500 mV LTC3880-XF1-1.5v-CH1 1500 mV LTC3880-XF1-1.0v-RAIL 1029 mV LTC3880-XF1-1.0v-CH0 1029 mV LTC3880-XF1-1.0v-CH1 1032 mV LTC3880-XF0-1.5v-RAIL 1499 mV LTC3880-XF0-1.5v-CH0 1499 mV LTC3880-XF0-1.5v-CH1 1500 mV LTC3880-XF0-1.0v-RAIL 949 mV LTC3880-XF0-1.0v-CH0 949 mV LTC3880-XF0-1.0v-CH1 952 mV LTC3880-3.3v-RAIL 3300 mV LTC3880-3.3v-CH0 3300 mV LTC3880-3.3v-CH1 3300 mV SFB 5 status: State Online Intake-Zone0 Temperature 33 degrees C / 91 degrees F Exhaust-Zone1 Temperature 36 degrees C / 96 degrees F IntakeA-Zone0 Temperature 28 degrees C / 82 degrees F IntakeB-Zone1 Temperature 28 degrees C / 82 degrees F Exhaust-Zone0 Temperature 32 degrees C / 89 degrees F SFB-XF2-Zone1 Temperature 54 degrees C / 129 degrees F SFB-XF1-Zone0 Temperature 50 degrees C / 122 degrees F SFB-XF0-Zone0 Temperature 50 degrees C / 122 degrees F Power LTC3880-XF2-1.5v-RAIL 1500 mV LTC3880-XF2-1.5v-CH0 1500 mV LTC3880-XF2-1.5v-CH1 1500 mV LTC3880-XF2-1.0v-RAIL 1029 mV LTC3880-XF2-1.0v-CH0 1029 mV LTC3880-XF2-1.0v-CH1 1032 mV LTC3880-XF1-1.5v-RAIL 1499 mV LTC3880-XF1-1.5v-CH0 1499 mV LTC3880-XF1-1.5v-CH1 1500 mV LTC3880-XF1-1.0v-RAIL 1029 mV LTC3880-XF1-1.0v-CH0 1029 mV LTC3880-XF1-1.0v-CH1 1032 mV LTC3880-XF0-1.5v-RAIL 1499 mV LTC3880-XF0-1.5v-CH0 1499 mV LTC3880-XF0-1.5v-CH1 1501 mV LTC3880-XF0-1.0v-RAIL 1029 mV LTC3880-XF0-1.0v-CH0 1029 mV LTC3880-XF0-1.0v-CH1 1033 mV LTC3880-3.3v-RAIL 3300 mV LTC3880-3.3v-CH0 3300 mV LTC3880-3.3v-CH1 3300 mV SFB 6 status: State Online Intake-Zone0 Temperature 41 degrees C / 105 degrees F Exhaust-Zone1 Temperature 37 degrees C / 98 degrees F IntakeA-Zone0 Temperature 32 degrees C / 89 degrees F IntakeB-Zone1 Temperature 29 degrees C / 84 degrees F Exhaust-Zone0 Temperature 37 degrees C / 98 degrees F SFB-XF2-Zone1 Temperature 54 degrees C / 129 degrees F SFB-XF1-Zone0 Temperature 60 degrees C / 140 degrees F SFB-XF0-Zone0 Temperature 60 degrees C / 140 degrees F Power LTC3880-XF2-1.5v-RAIL 1500 mV LTC3880-XF2-1.5v-CH0 1500 mV LTC3880-XF2-1.5v-CH1 1500 mV LTC3880-XF2-1.0v-RAIL 1029 mV LTC3880-XF2-1.0v-CH0 1029 mV LTC3880-XF2-1.0v-CH1 1032 mV LTC3880-XF1-1.5v-RAIL 1499 mV LTC3880-XF1-1.5v-CH0 1499 mV LTC3880-XF1-1.5v-CH1 1500 mV LTC3880-XF1-1.0v-RAIL 1029 mV LTC3880-XF1-1.0v-CH0 1029 mV LTC3880-XF1-1.0v-CH1 1033 mV LTC3880-XF0-1.5v-RAIL 1500 mV LTC3880-XF0-1.5v-CH0 1500 mV LTC3880-XF0-1.5v-CH1 1501 mV LTC3880-XF0-1.0v-RAIL 1029 mV LTC3880-XF0-1.0v-CH0 1029 mV LTC3880-XF0-1.0v-CH1 1033 mV LTC3880-3.3v-RAIL 3300 mV LTC3880-3.3v-CH0 3300 mV LTC3880-3.3v-CH1 3299 mV SFB 7 status: State Online Intake-Zone0 Temperature 41 degrees C / 105 degrees F Exhaust-Zone1 Temperature 37 degrees C / 98 degrees F IntakeA-Zone0 Temperature 33 degrees C / 91 degrees F IntakeB-Zone1 Temperature 29 degrees C / 84 degrees F Exhaust-Zone0 Temperature 37 degrees C / 98 degrees F SFB-XF2-Zone1 Temperature 55 degrees C / 131 degrees F SFB-XF1-Zone0 Temperature 50 degrees C / 122 degrees F SFB-XF0-Zone0 Temperature 57 degrees C / 134 degrees F Power LTC3880-XF2-1.5v-RAIL 1500 mV LTC3880-XF2-1.5v-CH0 1500 mV LTC3880-XF2-1.5v-CH1 1501 mV LTC3880-XF2-1.0v-RAIL 1029 mV LTC3880-XF2-1.0v-CH0 1029 mV LTC3880-XF2-1.0v-CH1 1032 mV LTC3880-XF1-1.5v-RAIL 1499 mV LTC3880-XF1-1.5v-CH0 1499 mV LTC3880-XF1-1.5v-CH1 1500 mV LTC3880-XF1-1.0v-RAIL 1029 mV LTC3880-XF1-1.0v-CH0 1029 mV LTC3880-XF1-1.0v-CH1 1032 mV LTC3880-XF0-1.5v-RAIL 1499 mV LTC3880-XF0-1.5v-CH0 1499 mV LTC3880-XF0-1.5v-CH1 1501 mV LTC3880-XF0-1.0v-RAIL 1029 mV LTC3880-XF0-1.0v-CH0 1029 mV LTC3880-XF0-1.0v-CH1 1033 mV LTC3880-3.3v-RAIL 3300 mV LTC3880-3.3v-CH0 3300 mV LTC3880-3.3v-CH1 3300 mV