Connecting the MX2008 to Earth Ground
Tools and Parts Required for Connecting the MX2008 Router to Power
To provide power to the router, you need the following tools and parts:
Phillips (+) screwdrivers, numbers 1 and 2
2.5 mm flat-blade (–) screwdriver
7/16-in. (11 mm) hexagonal-head external drive socket wrench, or nut driver, with a torque range between 23 lb-in. (2.6 Nm) and 25 lb-in. (2.8 Nm), for tightening nuts to terminal studs on each power distribution module (PDM).
The terminal block connections on the AC delta and wye PDM use a 1/4-in. slotted screwdriver for the slotted screws. Use a 5/32-in. (4 mm) Allen wrench for the 5/16-in. hex screws.
Wire cutters
Electrostatic discharge (ESD) grounding wrist strap
The maximum torque rating of the terminal studs on the DC PDM is 25 lb-in. (33.89 Nm). The terminal studs might be damaged if excessive torque is applied. Use only a torque-controlled driver or socket wrench to tighten nuts on the DC PDM terminal studs. Use an appropriately sized driver or socket wrench. Ensure that the driver is undamaged and properly calibrated and that you have been trained in its use. You might want to use a driver that is designed to prevent overtorque when the preset torque level is achieved.
See Also
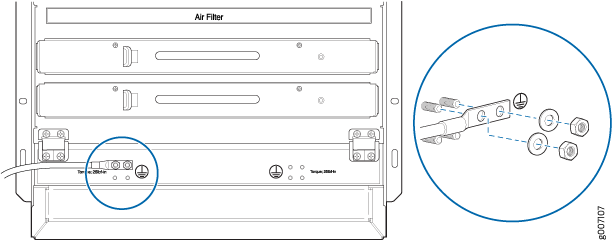
Connect the Grounding Cable
You ground the router by connecting a grounding cable to earth ground and then attaching it to the chassis grounding points by using two screws. To connect the grounding cable (see Figure 1):
- Attach an electrostatic discharge (ESD) grounding strap to your bare wrist, and connect the strap to an approved site ESD grounding point. See the instructions for your site.
- Ensure that all grounding surfaces are clean and brought to a bright finish before you make grounding connections.
- Connect the grounding cable to a proper earth ground.
- Verify that a licensed electrician has attached the cable lug provided with the router to the grounding cable.
- Attach an electrostatic discharge (ESD) grounding strap to your bare wrist, and connect the strap to one of the ESD points on the chassis.
- Place the grounding cable lug over one of the grounding points on the rear of the chassis. The upper pair is sized for UNC 1/4-20 nuts, and the lower pair is sized for M6 nuts.
- Secure the grounding cable lug to the grounding points, first with the washers, and then with the nuts.
- Verify that the grounding cabling is correct, that the grounding cable does not touch or block access to router components, and that it does not drape where people could trip on it.