Configure the LWC Device
The Lightweight Collector (LWC) is preconfigured to support IPv4 and Dynamic Host Configuration Protocol (DHCP) on both the internal and external network ports. When you power on the LWC device after completing the required cabling, a zero touch experience (ZTE) process to provision the device is initiated. Successful completion of the ZTE process results in the device establishing IP connectivity on both the ports. It also results in the external port establishing connectivity to Juniper Cloud via. discoverable reachability to the Internet. If the device fails to automatically establish the IP connectivity and reachability to the Internet, you must configure the LWC manually as described in Configure the Network Ports and Active Proxy.
Before configuring the network ports, review the Internal and External Network Requirements.
Internal and External Network Requirements
The LWC device requires:
- An internal network port (interface xe-0/0/12) that connects the LWC to the Juniper devices on the network.
- An external network port (interface xe-0/0/13) that connects the LWC to the Juniper Virtual Private Cloud.
Before connecting the LWC to the internal network, ensure that you have:
- A DHCP or static IP address.
- IP connectivity to the Domain Name Server (DNS), all the direct devices on the
network, and bastion hosts used (if applicable) to access the
devices.Note:
Bastion hosts utilize a SOCKS5 proxy server to reach target devices in the customer's network. Bastion hosts also support connection hopping, where an SSH session is first established with a customer's Linux-based device, which then initiates a subsequent SSH session to the target device.
- Enabled NETCONF in the Junos OS configuration of all target Juniper devices. The LWC uses SSH credentials to connect to the devices on the network and, if used, bastion hosts.
Before connecting the LWC to the external network, ensure that you have the following ready:
- A DHCP or static IP address.
- A DNS server in case you have selected a static address. In case of any
subsequent change to the DNS, you must inform Juniper about it and get it
updated. Otherwise, the LWC might lose connectivity to the external
endpoints.
The LWC supports real static, private static, or DHCP addresses. It prefers Network Address Translation (NAT).
- Accessibility to the DNS and IP addresses specified in Table 1 through the IP addresses assigned to xe-0/0/13 on the LWC.
The LWC establishes and must maintain a persistent HTTPS connection to Juniper Cloud. If the connection is lost, the LWC will disconnect and attempt to re-establish the connection.
| Description | DNS Name | IP Address | Port |
|---|---|---|---|
| Juniper Cloud | AWSProxy-prod.jssprod.junipercloud.net | 52.223.32.79, 35.71.174.221, 35.164.173.102, 52.26.8.178, 54.149.201.209 | 443 |
The subnet of the IP address assigned to the internal network port must be different from the subnet of the IP address assigned to the external network port. See Table 2.
| Network Type | LWC Interface | LWC Port Identification | IP Address | Subnet |
|---|---|---|---|---|
| Network access (internal) | xe-0/0/12 | 0 | Internal Static 1 | Subnet 1 |
| Juniper cloud access (external) | xe-0/0/13 | 1 |
External Static 1 |
Subnet 2 |
Configure the Network Ports and Active Proxy
The Lightweight Collector (LWC) is preconfigured to support IPv4 and DHCP. However, if your deployment requires a static IP address and an active proxy to connect the LWC to the Internet, you must configure your LWC device manually, by using the LWC captive portal.
On the captive portal, you can configure the following elements:
-
External Network—Connects the LWC to Juniper Cloud. The External Network configuration is also used to perform device provisioning.
-
Internal Networks—Connects the LWC to the Juniper devices on the network.
-
Active Proxy—Used if your network infrastructure controls access to the Internet though an active proxy. You can skip this element if you are not using an active proxy.
To configure the LWC:
-
Connect the computer to the port ge-0/0/0 on the LWC (labeled as
1) by using an Ethernet cable (RJ-45). The LWC assigns an IP
address to the Ethernet interface of your computer through DHCP.

-
Enter the LWC serial number in the Serial Number field and then
click Submit to log in.
On successful login, the JSI Data Collector page appears.
Figure 1: JSI Data Collector page when the LWC is not connected (releases earlier than version 1.0.43)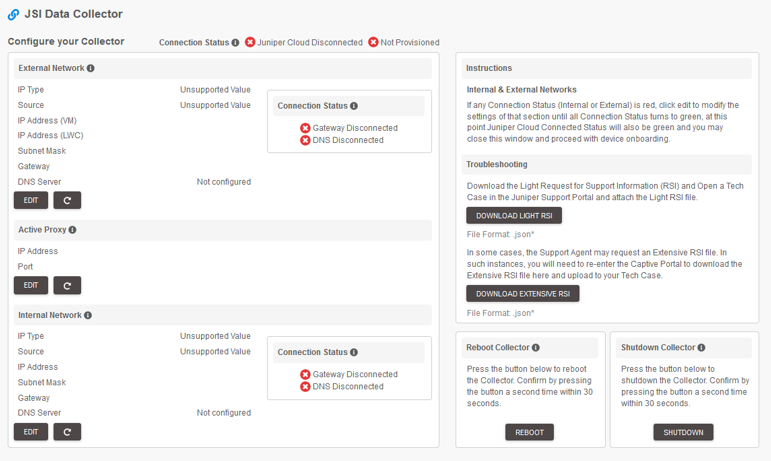 Figure 2: JSI Data Collector page when the LWC is not connected (version 1.0.43 and later releases)
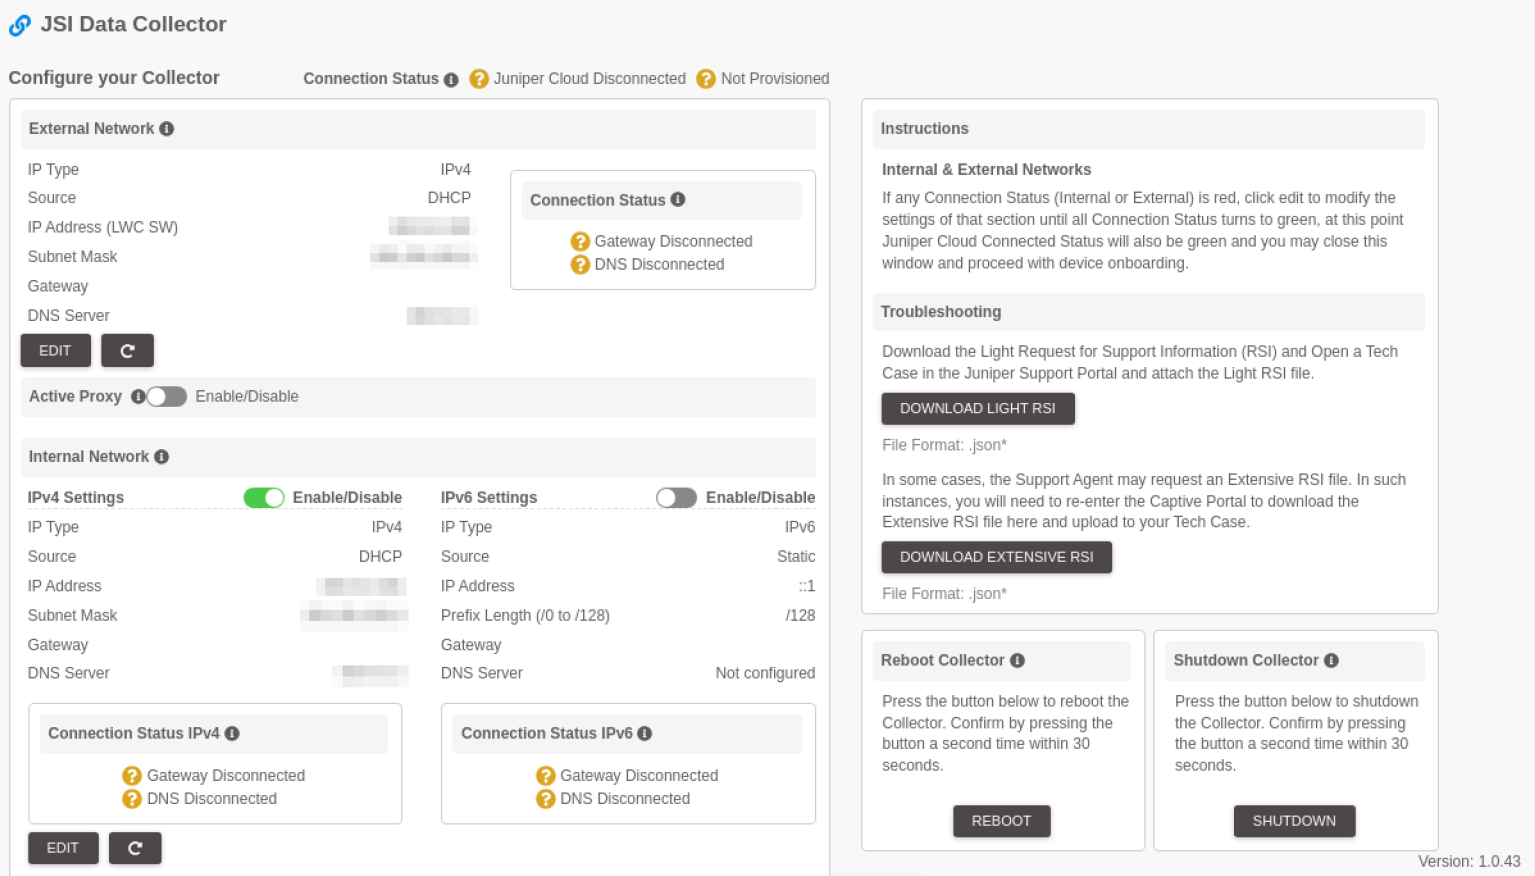 Note:
Note:If the default DHCP configuration on the LWC is successful, the captive portal shows the LWC's connection status as connected, and populates the fields in all the configurations sections appropriately.
Click Refresh to refresh the current connection states.
-
After updating the fields, click Update to apply the changes and
return to the JSI Data Collector homepage.
If you want to discard your changes, click Cancel.
If the LWC connects to the gateway and DNS successfully, the respective configuration element (internal or external network section) on the JSI Data Collector homepage shows the connection status as Gateway Connected and DNS Connected with green tick marks against them.
The JSI Data Collector homepage shows the Connection Status as:
-
Juniper Cloud Connected if the external connectivity to Juniper Cloud is established and active proxy (if applicable) settings are correctly configured.
-
Cloud Provisioned if the device is connected to Juniper Cloud and has completed the Zero Touch Experience (ZTE) process. After the Cloud connection status becomes Juniper Cloud Connected, it takes about 10 minutes for the provision status to become Cloud Provisioned.
Note: Once the LWC is connected to Juniper Cloud and maintains a stable connection for over 24 hours, automatic upgrade will be enabled for the device.Figure 3: JSI Data Collector page when the LWC is connected successfully (releases earlier than version 1.0.43)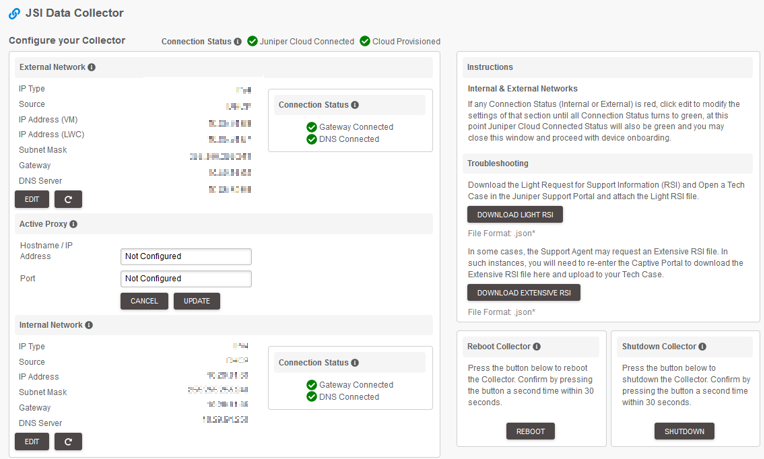 Figure 4: JSI Data Collector page when the LWC is connected successfully (version 1.0.43 and later releases)
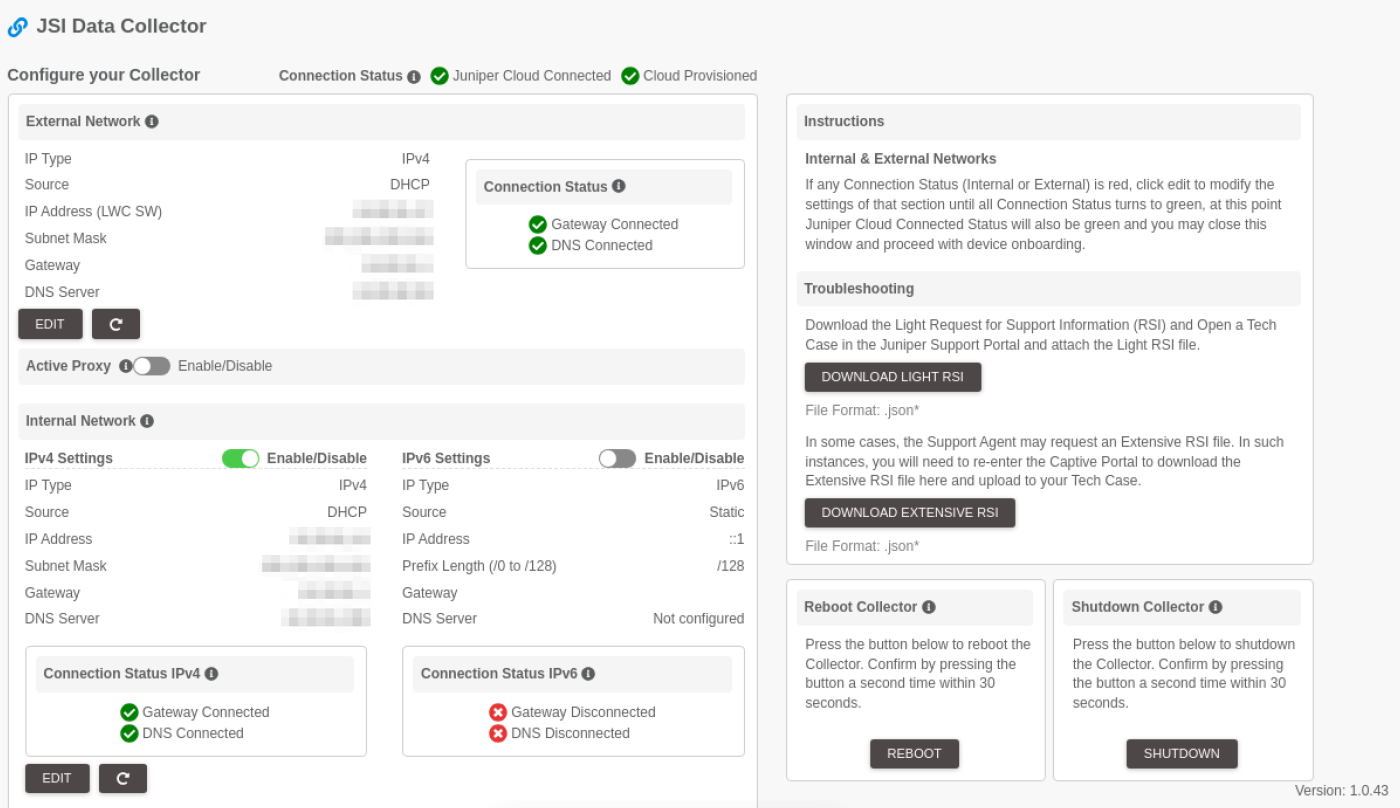
If the LWC does not connect to the cloud, click Download Light RSI to download the light RSI file, create a Tech Case in the Juniper Support Portal, and attach the downloaded RSI file to the case.
In some cases, the Juniper support engineer might ask you to attach the Extensive RSI file to the case. To download it, click the Download Extensive RSI.
The Juniper support engineer might ask you to reboot the LWC for troubleshooting. To reboot the LWC, click REBOOT.
If you want to shut down the LWC, click SHUTDOWN.
Table 3: Fields in the Configure Your Collector section on the JSI Data Collector page Field Description External Network IP Type Select an IP address version: - IPv4
- IPv6
Source Select an IP address assignment type. - DHCP—This option is enabled by default.
- Static—If you select this option, you must enter the IP addresses manually.
IP Address (LWC) Applicable only if you selected Static as Source.
Enter the IP Address of the LWC device.Subnet Mask Applicable only if you selected Static as Source.
Enter the subnet mask address.The subnet of the IP address assigned to the internal network port must be different from the subnet of the IP address assigned to the external network port. This applies to both DHCP and static configurations.
Gateway Applicable only if you selected Static as Source.
Enter the IP address of the default gateway connected to the LWC.DNS Server Enter the DNS server IP address. Active Proxy IP Address If you want to add an active proxy, enter the IP address of the proxy.
Port Enter the port number used for the active proxy. Internal Network IP Type Select an IP address version: - IPv4
- IPv6
Source Select an IP address assignment type. - DHCP—This option is enabled by default.
- Static—If you select this, you must enter the IP addresses manually.
IP Address Applicable only if you selected Static as Source.
Enter the IP Address of the LWC device.Subnet Mask Applicable only if you selected Static as Source.
Enter the subnet mask address.The subnet of the IP address assigned to the internal network port must be different from the subnet of the IP address assigned to the external network port. This applies to both DHCP and static configurations.
Gateway Applicable only if you selected Static as Source.
Enter the IP address of the default gateway connected to the LWC.DNS Server Enter the DNS server IP address. -