
Contact Customer Support and Return the Chassis or Components
If you need to return a hardware component to Juniper Networks, Inc., you need a Return Material Authorization (RMA) number and the equipment serial number. Contact the Juniper Networks Technical Assistance Center (JTAC) to generate an RMA number. You may also need to locate the chassis or component details using the CLI or by referring to equipment labels. You then pack and ship the component.
Contact Customer Support
You can contact JTAC 24 hours a day, seven days a week.
| Chat |
Use the Ask me icon at the bottom right of the Support page. Don't see the Chat icon? Read this. |
| Web | |
| Telephone |
U.S. and Canada (Toll-free): 1-888-314-JTAC (5822) Outside the US or Canada, use the relevant country number listed on the regional tabs listed on the Contact Support page. Federal Government Support: 1-833-900-1454 |
We do not support opening new cases through e-mail. Please use one of the above options to contact JTAC.
Return a Hardware Component to Juniper Networks
If a hardware component fails, contact Juniper Networks to obtain an RMA number. We use this number to track the returned material at the factory and to return the repaired or new components to you, as needed.
Do not return any component to Juniper Networks unless you have first obtained an RMA number. Juniper Networks reserves the right to refuse shipments that do not have an RMA number. Refused shipments are returned to you by collect freight.
To return a defective hardware component:
- Determine the part number and the serial number of the defective component. See Locate the Serial Number of the EX4100-H-12T or its Components.
- Obtain an RMA number from JTAC as described in Request a Return Material Authorization.
- Pack the component for shipment. See Pack an EX4100-H-12T Switch or Component for Shipping.
For more information about return and repair policies, see the Support page at https://support.juniper.net/support/.
Locate the Serial Number of the EX4100-H-12T or its Components
If the device is operational and you can access the CLI, you can list serial numbers for the device and for some components with a CLI command. If you don’t have access to the CLI, or if the serial number for the component doesn’t appear in the command output, you can locate the serial number ID label on the device or component.
If you want to find the serial number ID label on a component, you need to remove the component from the device chassis.
List the Chassis and Component Details Using the CLI
To list the device and device components and their serial numbers, enter the
show chassis hardware command on the CLI.
user@host> show chassis hardware
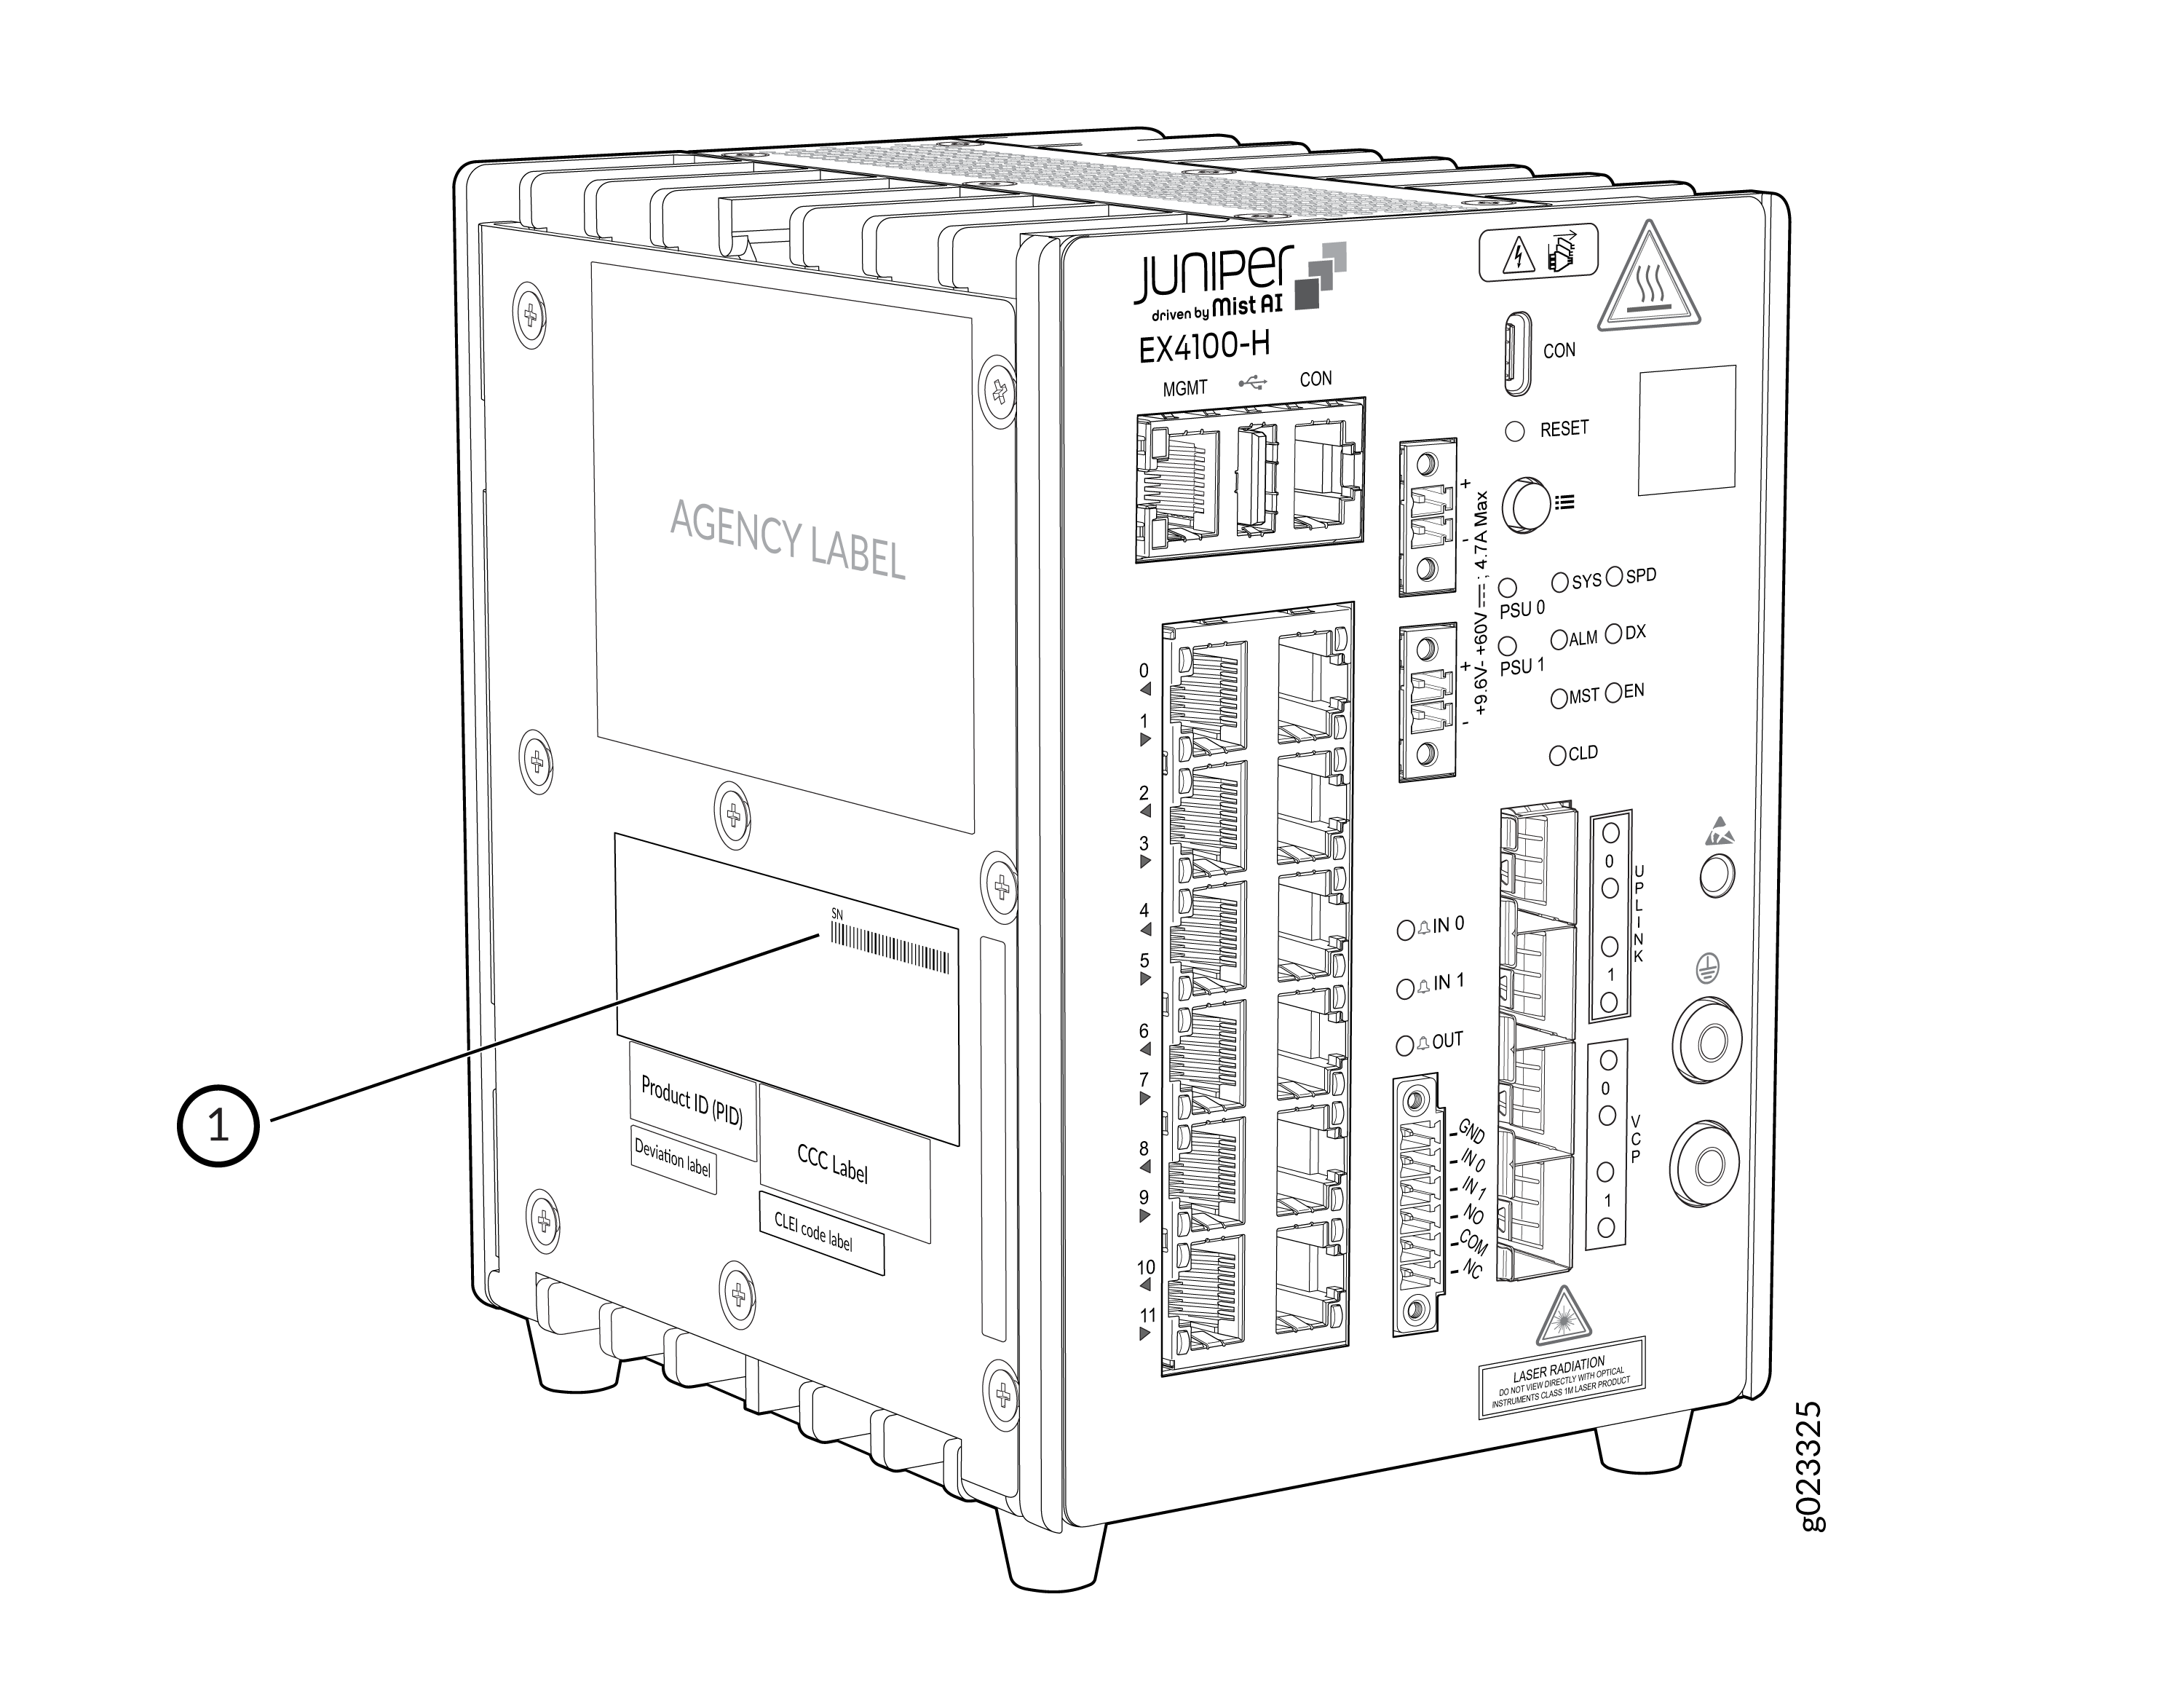
Locate the Chassis Serial Number ID Label
As indicated by the following figure, locate the serial number ID label of an EX4100-H-12T switch.
Request a Return Material Authorization
If you are returning a device or hardware component to Juniper Networks for repair or replacement, obtain an RMA number from JTAC.
Before you request an RMA from JTAC, be prepared to provide the following information:
-
Your existing service request number, if you have one
-
Serial number of the device or component
-
Your name, organization name, telephone number, fax number, and shipping address
-
Details of the failure or problem
-
Type of activity you were performing on the device when the problem occurred
-
Configuration data displayed by one or more
showcommands
If you're contacting JTAC by telephone:
-
To report a new incident, press the star (*) key to be routed to the next available support engineer.
-
To enquire about an existing case, enter your 12-digit service request number followed by the pound (#) key.
The support representative validates your request and issues an RMA number for return of the device or component.
Pack an EX4100-H-12T Switch or Component for Shipping
If you are returning the switch or component to Juniper Networks for repair or replacement, pack the item as described in this topic.
Before you pack the switch or component, ensure that you have:
-
Followed all the steps listed in Request a Return Material Authorization.
-
Retrieved the original shipping carton and packing materials. Contact your JTAC representative if you do not have these materials, to learn about approved packing materials.
-
Ensure that you understand how to prevent electrostatic discharge (ESD) damage (see Prevention of Electrostatic Discharge).
Pack an EX4100-H-12T Switch for Shipping
Before you pack the switch:
-
On the console or other management device connected to the switch, enter the CLI operational mode and issue the following command to shut down the switch software:
user@switch> request system halt
Wait until a message appears on the console confirming that the operating system has halted.
-
Disconnect power from the switch.
-
Remove the cables that connect the switch to external devices.
-
Remove all optical transceivers installed in the switch (see Remove a Transceiver).
If you need to transport the switch to another location or return the switch to Juniper Networks, you need to pack the switch securely in its original packaging to prevent damage during shipping.
Ensure that you have the following parts and tools:
-
Number 2 Phillips (+) screwdriver—not provided
-
The original switch packing material (cardboard box, accessory box and its contents, and foam padding)
-
An ESD grounding strap—not provided
-
Antistatic bag—not provided
Do not pack the switch in anything except its original container, or the switch might be damaged in transit.
To pack the switch:
- If the switch is installed in a rack or cabinet, have one person support the weight of the switch while another person unscrews and removes the mounting screws.
- Remove the switch from the rack or cabinet and place the switch on a flat, stable surface.
- Use the screwdriver to remove the rack mounting brackets from the switch chassis.
- Place the switch in an antistatic bag.
- Place the bottom portion of the packaging foam in the shipping carton.
- Place the switch inside the cavity in the bottom packaging foam.
- Place the top portion of the packaging foam on top of the switch.
- If you are returning accessories or field-replaceable units (FRUs) with the switch, pack them as instructed in Pack EX4100-H-12T Switch Components for Shipping.
- Place the accessory box by the rear end of the chassis in the shipping carton.
- Close the top of the cardboard shipping box and seal it with packing tape.
- Write the RMA number on the exterior of the box to ensure proper tracking.
Pack EX4100-H-12T Switch Components for Shipping
Ensure that you have the following parts and tools available:
-
Antistatic bag, one for each component—not provided
-
An ESD grounding strap—not provided
To pack the switch components:
Do not stack switch components. Return individual components in separate boxes if they do not fit together on one level in the shipping box.
-
Place individual components in antistatic bags.
-
Use the original packing materials if they are available. If the original packing materials are not available, ensure the component is adequately packed to prevent damage during transit. The packing material you use must be able to support the weight of the component.
-
Ensure that the components are adequately protected by wrapping them well with packing materials. Pack the component in an oversized box (if the original box is not available) with extra packing material around the unit so that the component is prevented from moving around inside the box.
-
Securely tape the box closed.
-
Write the RMA number on the exterior of the box to ensure proper tracking.
Guidelines for Packing and Shipping Hardware Components
When you return the chassis or components:
- Make sure to adequately protect them with packing materials. Pack them properly to prevent the pieces from moving around the carton.
- Use the original shipping materials, if they are available.
- Place the individual components in antistatic bags.
- Write the RMA number on the exterior of the box to ensure proper tracking.