Step 2: Up and Running
Now that the SRX380 is powered on, let’s do some initial configuration to get the switch up and running on the network.
Be sure to check out our Guided Setup: SRX300 Line Firewalls. Our Guided Setup picks up where this Day One+ leaves off, providing step-by-step instructions on how to easily secure and validate your branch location.
SRX380 Provisioning Options
It’s simple to provision and manage the SRX380 and other devices on your network. You can choose the configuration tool that’s right for you:
Junos CLI commands. In this guide we show you how to configure the SRX380 with CLI commands that leverage the plug and play factory defaults.
J-Web, Juniper Networks Setup wizard that is preinstalled on the SRX380. For information on performing initial configuration using the J-Web setup wizard see Configure SRX Devices Using the J-Web Setup Wizard in the J-Web User Guide for SRX Series Devices.
Juniper Sky™ Enterprise, Juniper Networks-hosted public cloud-based Software as a Service (SaaS) solution.
Note You’ll need to have a Juniper Sky Enterprise subscription service before you can use it to configure the SRX380. For more information, check out the Juniper Sky Enterprise Getting Started Guide.
Juniper Networks Contrail Service Orchestration (CSO). To use CSO, you’ll need an authentication code. See the Contrail Service Orchestration (CSO ) Deployment Guide.
Initial Configuration Using the CLI
You can use the console port on the SRX to do the initial configuration. This section assumes you start from a factory default configuration. See SRX380 Firewall Hardware Guide for details on the SRX380 factory default configuration.
After you configure the SRX380, you can log in on a local LAN port, or remotely over the WAN interface, to manage and configure the SRX using the CLI or J-Web.
We recommend that you use the ge-0/0/0 interface for WAN connectivity on the SRX380. By default, this interface is set to receive its Internet access configuration from the service provider.
This examples assumes you are using DHCP to configure the WAN interface. If the WAN provider does not support DHCP, you’ll need to manually configure the WAN interface and related static routing. See Junos Initial Configuration.
Have this information handy before you begin the initial configuration:
Root password
Hostname
Connect to the Serial Console Port
- Plug one end of the Ethernet cable into the RJ-45 to DB-9
serial port adapter for your SRX345.
Note We no longer include a DB-9 to RJ-45 cable or a DB-9 to RJ-45 adapter with a CAT5E copper cable as part of the device package. If you require a console cable, you can order it separately with the part number JNP-CBL-RJ45-DB9 (DB-9 to RJ-45 adapter with a CAT5E copper cable).
- Plug the RJ-45 to DB-9 serial port adapter into the serial port on the management device.
- Connect the other end of the Ethernet cable to the serial console port on the SRX380.
- Start your asynchronous terminal emulation application (such as Microsoft Windows HyperTerminal) and select the appropriate COM port to use (for example, COM1).
- Verify that the serial port settings are set to the default:
Baud rate—9600
Parity—N
Data bits—8
Stop bits—1
Flow control—none
You can also connect to the SRX380 using a mini-USB console port. See the SRX380 Hardware Guide.
Perform Initial Configuration
- Login as the root user and start the CLI. You don't need
a password if you're running the factory default.login: rootroot@%cliroot>
Note You can view the factory-default settings with the show configuration operational mode command.
- Enter configuration mode.root> configure[edit]root#
- Since you're doing the initial configuration manually,
you'll need to remove ZTP from the configuration. This stops the periodic
log messages that report on ZTP status.
Set the root authentication password and commit the change to deactivate ZTP.
[edit]root# delete chassis auto-image-upgraderoot# delete system phone-homeroot# set system root-authentication plain-text-passwordNew password: passwordRetype new password: passwordIssue the
commitcommand to activate the candidate configuration that disables ZTP:[edit]root# commit - Enable root login over SSH, and allow SSH access over
the WAN interface (ge-0/0/0).[edit]root# set system services ssh root-login allowroot# set security zones security-zone untrust interfaces ge-0/0/0.0 host-inbound-traffic system-services ssh
- Configure the hostname.[edit]root# set system host-name host_name
- That’s it! The initial
configuration is complete. Commit the configuration to activate the
changes on the SRX.[edit]root# commit
Congratulations! Your SRX is Up and Running
Your SRX380 is now online and providing secure Internet access to devices attached to the LAN ports. You can manage the device locally and remotely, using the Junos CLI, J-Web, or a cloud based provisioning service. Here's what your network looks like:
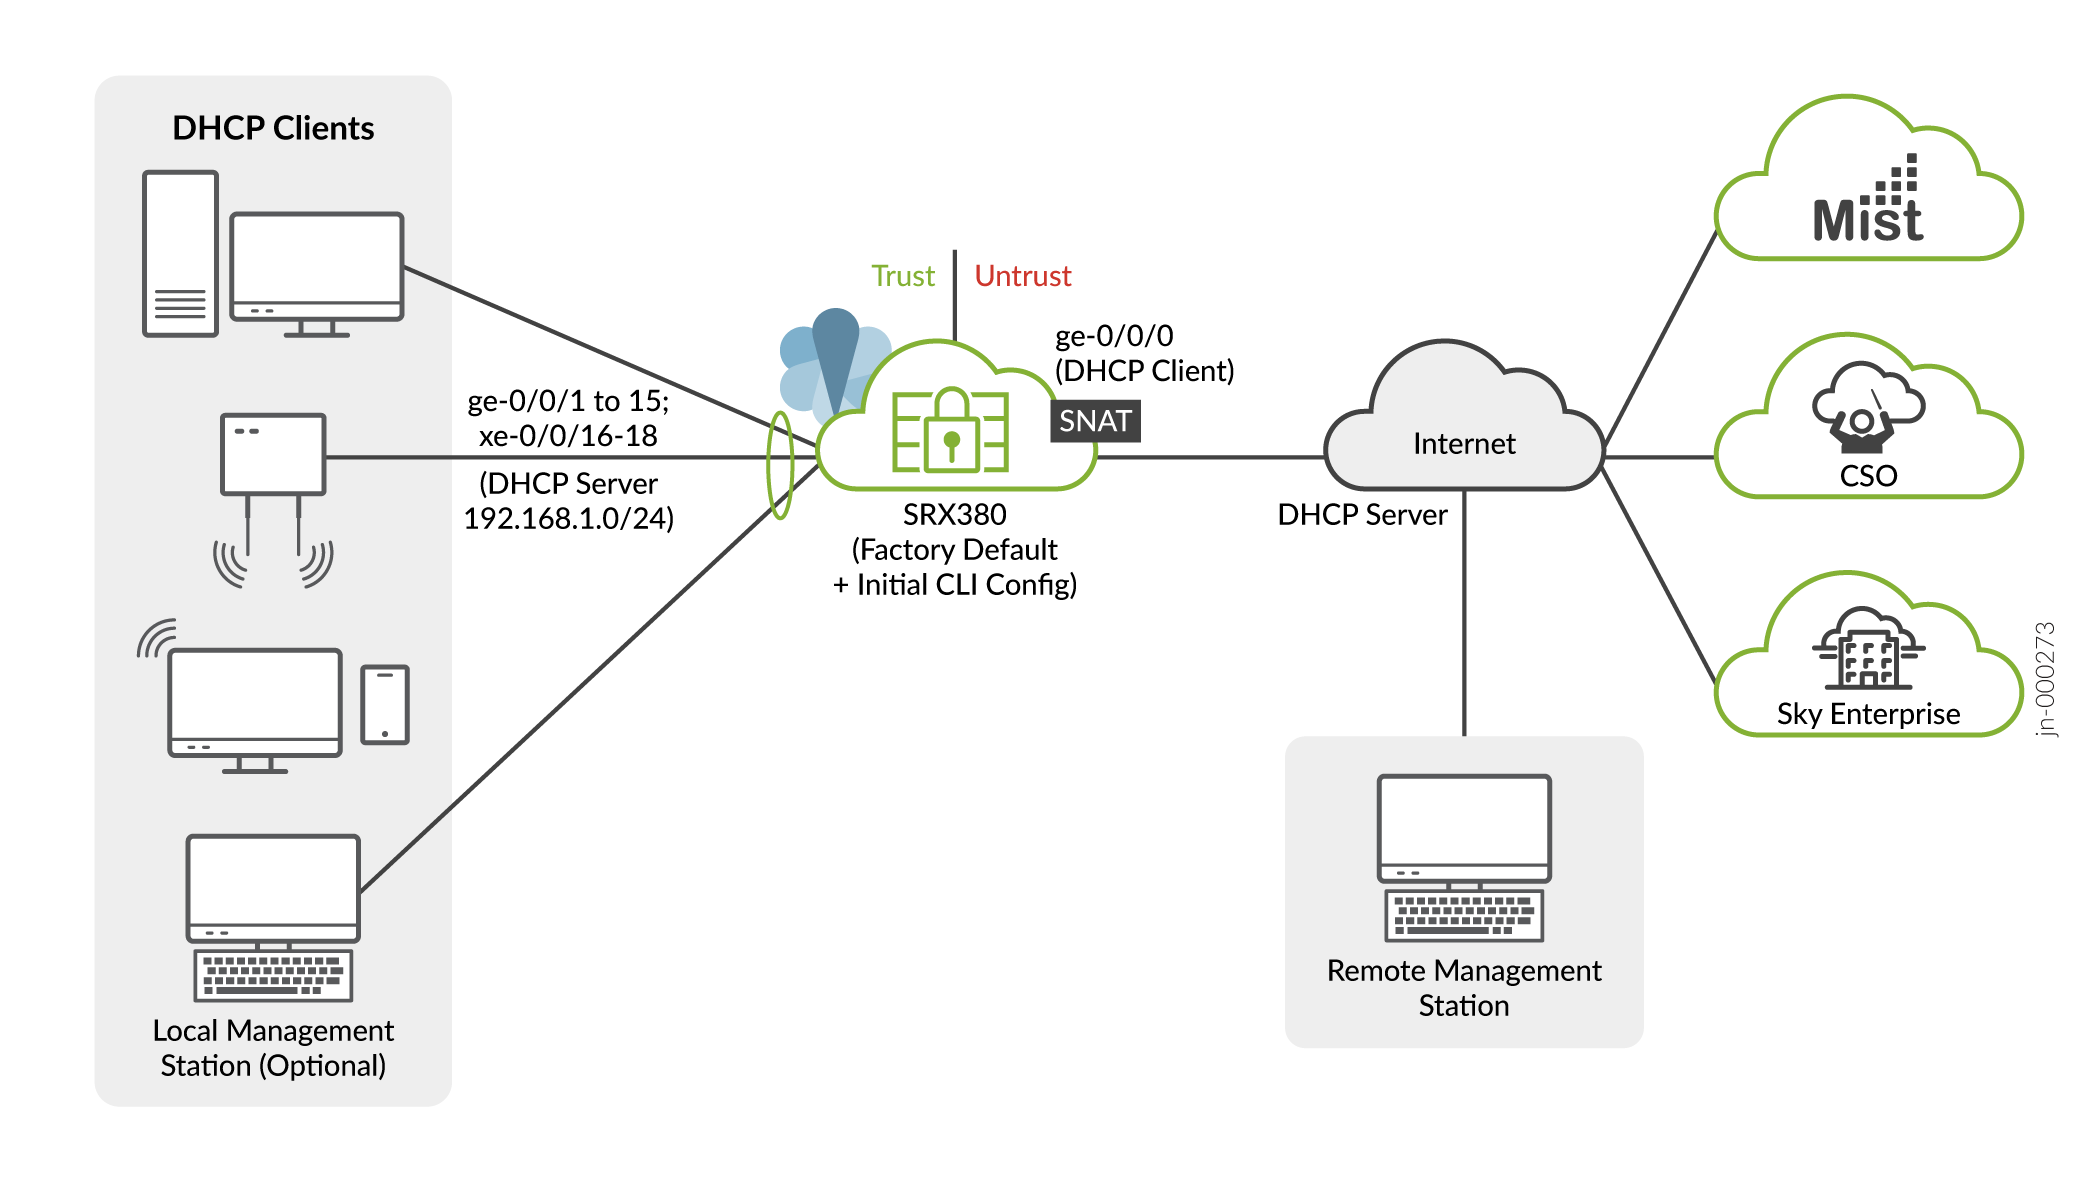
A few things to keep in mind about your new SRX380 branch network:
You access the SRX CLI or J-Web user interface locally using the 192.168.1.1 address. To access the SRX remotely, specify the IP address assigned by the WAN provider. Simply issue a
show interfaces ge-0/0/0 terseCLI command to confirm the address in use by the WAN interface.The management interface is configured as a DHCP server for the 192.168.1.0/24 subnet.
Devices attached to the LAN ports are configured to use DHCP. They receive their network configuration from the SRX. These devices obtain an IP address from the 192.168.2.0/24 address pool and use the SRX as their default gateway.
All LAN ports are in the same subnet with Layer 2 connectivity. All traffic is permitted between trust zone interfaces.
All traffic originating in the trust zone is permitted in the untrust zone. Matching response traffic is allowed back from the untrust to the trust zone. Traffic that originates from the untrust zone is blocked from the trust zone.
The SRX performs source NAT (S-NAT) using the WAN interface’s IP for traffic sent to the WAN that originated from the trust zone.
Traffic associated with specific system services (HTTPS, DHCP, TFTP, and SSH) is permitted from the untrust zone to the local host. All local host services and protocols are allowed for traffic that originates from the trust zone.