Step 2: Up and Running
Now that the SRX1500 is powered on, let’s do some initial configuration to get the device up and running on the network. It’s simple to provision and manage the SRX1500 and other devices on your network. You can choose the configuration tool that’s right for you:
J-Web, Juniper Networks Setup wizard that is preinstalled on the SRX1500. We show you how to do the initial configuration using J-Web.
Juniper Sky™ Enterprise, Juniper Networks-hosted public cloud-based Software as a Service (SaaS) solution. You’ll need to have a Juniper Sky Enterprise subscription service before you can use it to configure the SRX1500. For more information, check out the Juniper Sky Enterprise Getting Started Guide.
Juniper Networks Contrail Service Orchestration (CSO). To use CSO, you’ll need an authentication code. See the Contrail Service Orchestration (CSO ) Deployment Guide.
CLI commands. See Configuring the SRX1500 Firewall Using the CLI.
Configure Root Authentication
- Connect the management port (
MGMT) on the SRX1500 front panel to the Ethernet port on your laptop or PC.Note We no longer include a DB-9 to RJ-45 cable or a DB-9 to RJ-45 adapter with a CAT5E copper cable as part of the device package. If you require a console cable, you can order it separately with the part number JNP-CBL-RJ45-DB9 (DB-9 to RJ-45 adapter with a CAT5E copper cable).
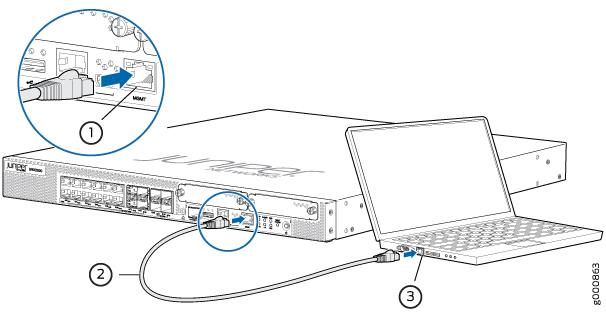
- Manually configure an IP address in the 192.168.1.0/24
network.
Be sure you don’t assign the IP address 192.168.1.1 to the laptop or PC, because this is the IP address assigned to the SRX1500.
- Set the root authentication password:
- Open a browser and type https://192.168.1.1. You don’t need to log in.
The J-Web Setup wizard opens on your screen.
- Click Skip in the upper-right corner of the
Setup wizard. The Device Password page displays.
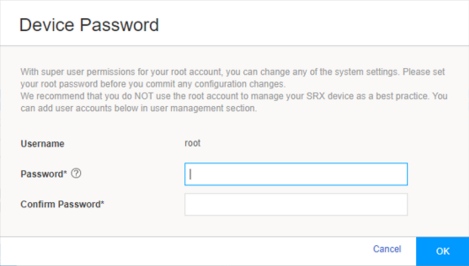
- Type a root authentication password and click OK. The J-Web login page appears.
- Open a browser and type https://192.168.1.1. You don’t need to log in.
Plug and Play
The SRX1500 already has factory-default settings configured right out of the box to make it a plug-and-play device. So all you have to do to get the SRX1500 up and running is connect it to your LAN and WAN networks. Here’s how:
- Connect the WAN network to port 0/0.
- Connect the LAN network to port 0/1.
- Check to see if the SRX1500 is connected to the Internet. Go to http://www.juniper.net. If the page doesn’t load, check the Internet connection.
After you complete these steps, you can start using the SRX1500 on your network right away. You can go back and customize settings anytime. The J-Web Setup wizard is always available to you.
Customize the Basic Configuration
Have this information handy before you begin customizing the settings for your network:
Hostname
Root authentication password
IP address for the NTP server
IP address for the DNS server
IP address for the management interface
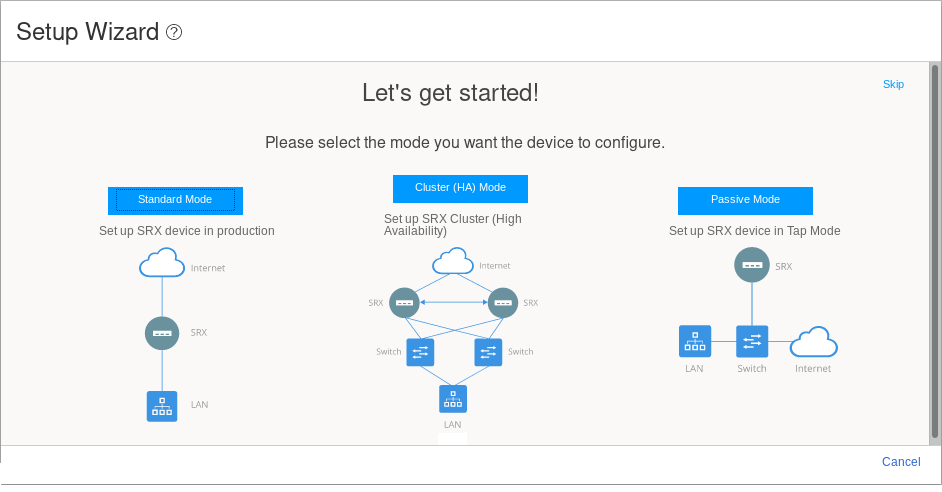
Log in to J-Web and select Configure > Setup Wizard to launch the Setup wizard. Select the configuration mode that’s right for you. You can then follow the screens as they appear in the Setup wizard.
Standard—Configure basic security settings for the SRX1500.
Cluster (HA)—Set up the SRX1500 in chassis cluster mode.
Passive—Set up the SRX1500 in Tap mode. Tap mode enables the SRX1500 to passively monitor traffic flows across a network.