Step 1: Begin
In this guide, we provide a simple, three-step path, to quickly get you up and running with Juniper Networks® Contrail Networking. First, we’ll show you how to install Contrail Command and set up a Contrail Networking cluster for Release 2005.1. Then, we’ll show you how to set up the underlay network on a greenfield fabric, and create the overlay networks that interconnect the compute endpoints. The compute endpoints are the bare-metal servers or virtual machine (VM) workloads that the compute administrator configures and attaches to the leaf or top-of-rack switches.
Meet Contrail Networking
Contrail Networking is a full-featured software-defined networking (SDN) solution that helps you manage and configure your underlay and overlay networks all from a single user interface, Contrail Command. Contrail Command provides a central dashboard that makes it easy to configure networks, administer network policies, and create service chains for services such as load balancing, firewall, and NAT.
Installation Workflow
To install Contrail Command, first you download and run the Contrail Command deployer. This deploys Contrail Command as a set of Docker containers. Then, you use Contrail Command to set up your Contrail Networking cluster. A Contrail Networking cluster is the set of controllers and supporting applications that manage the underlay and overlay networks.
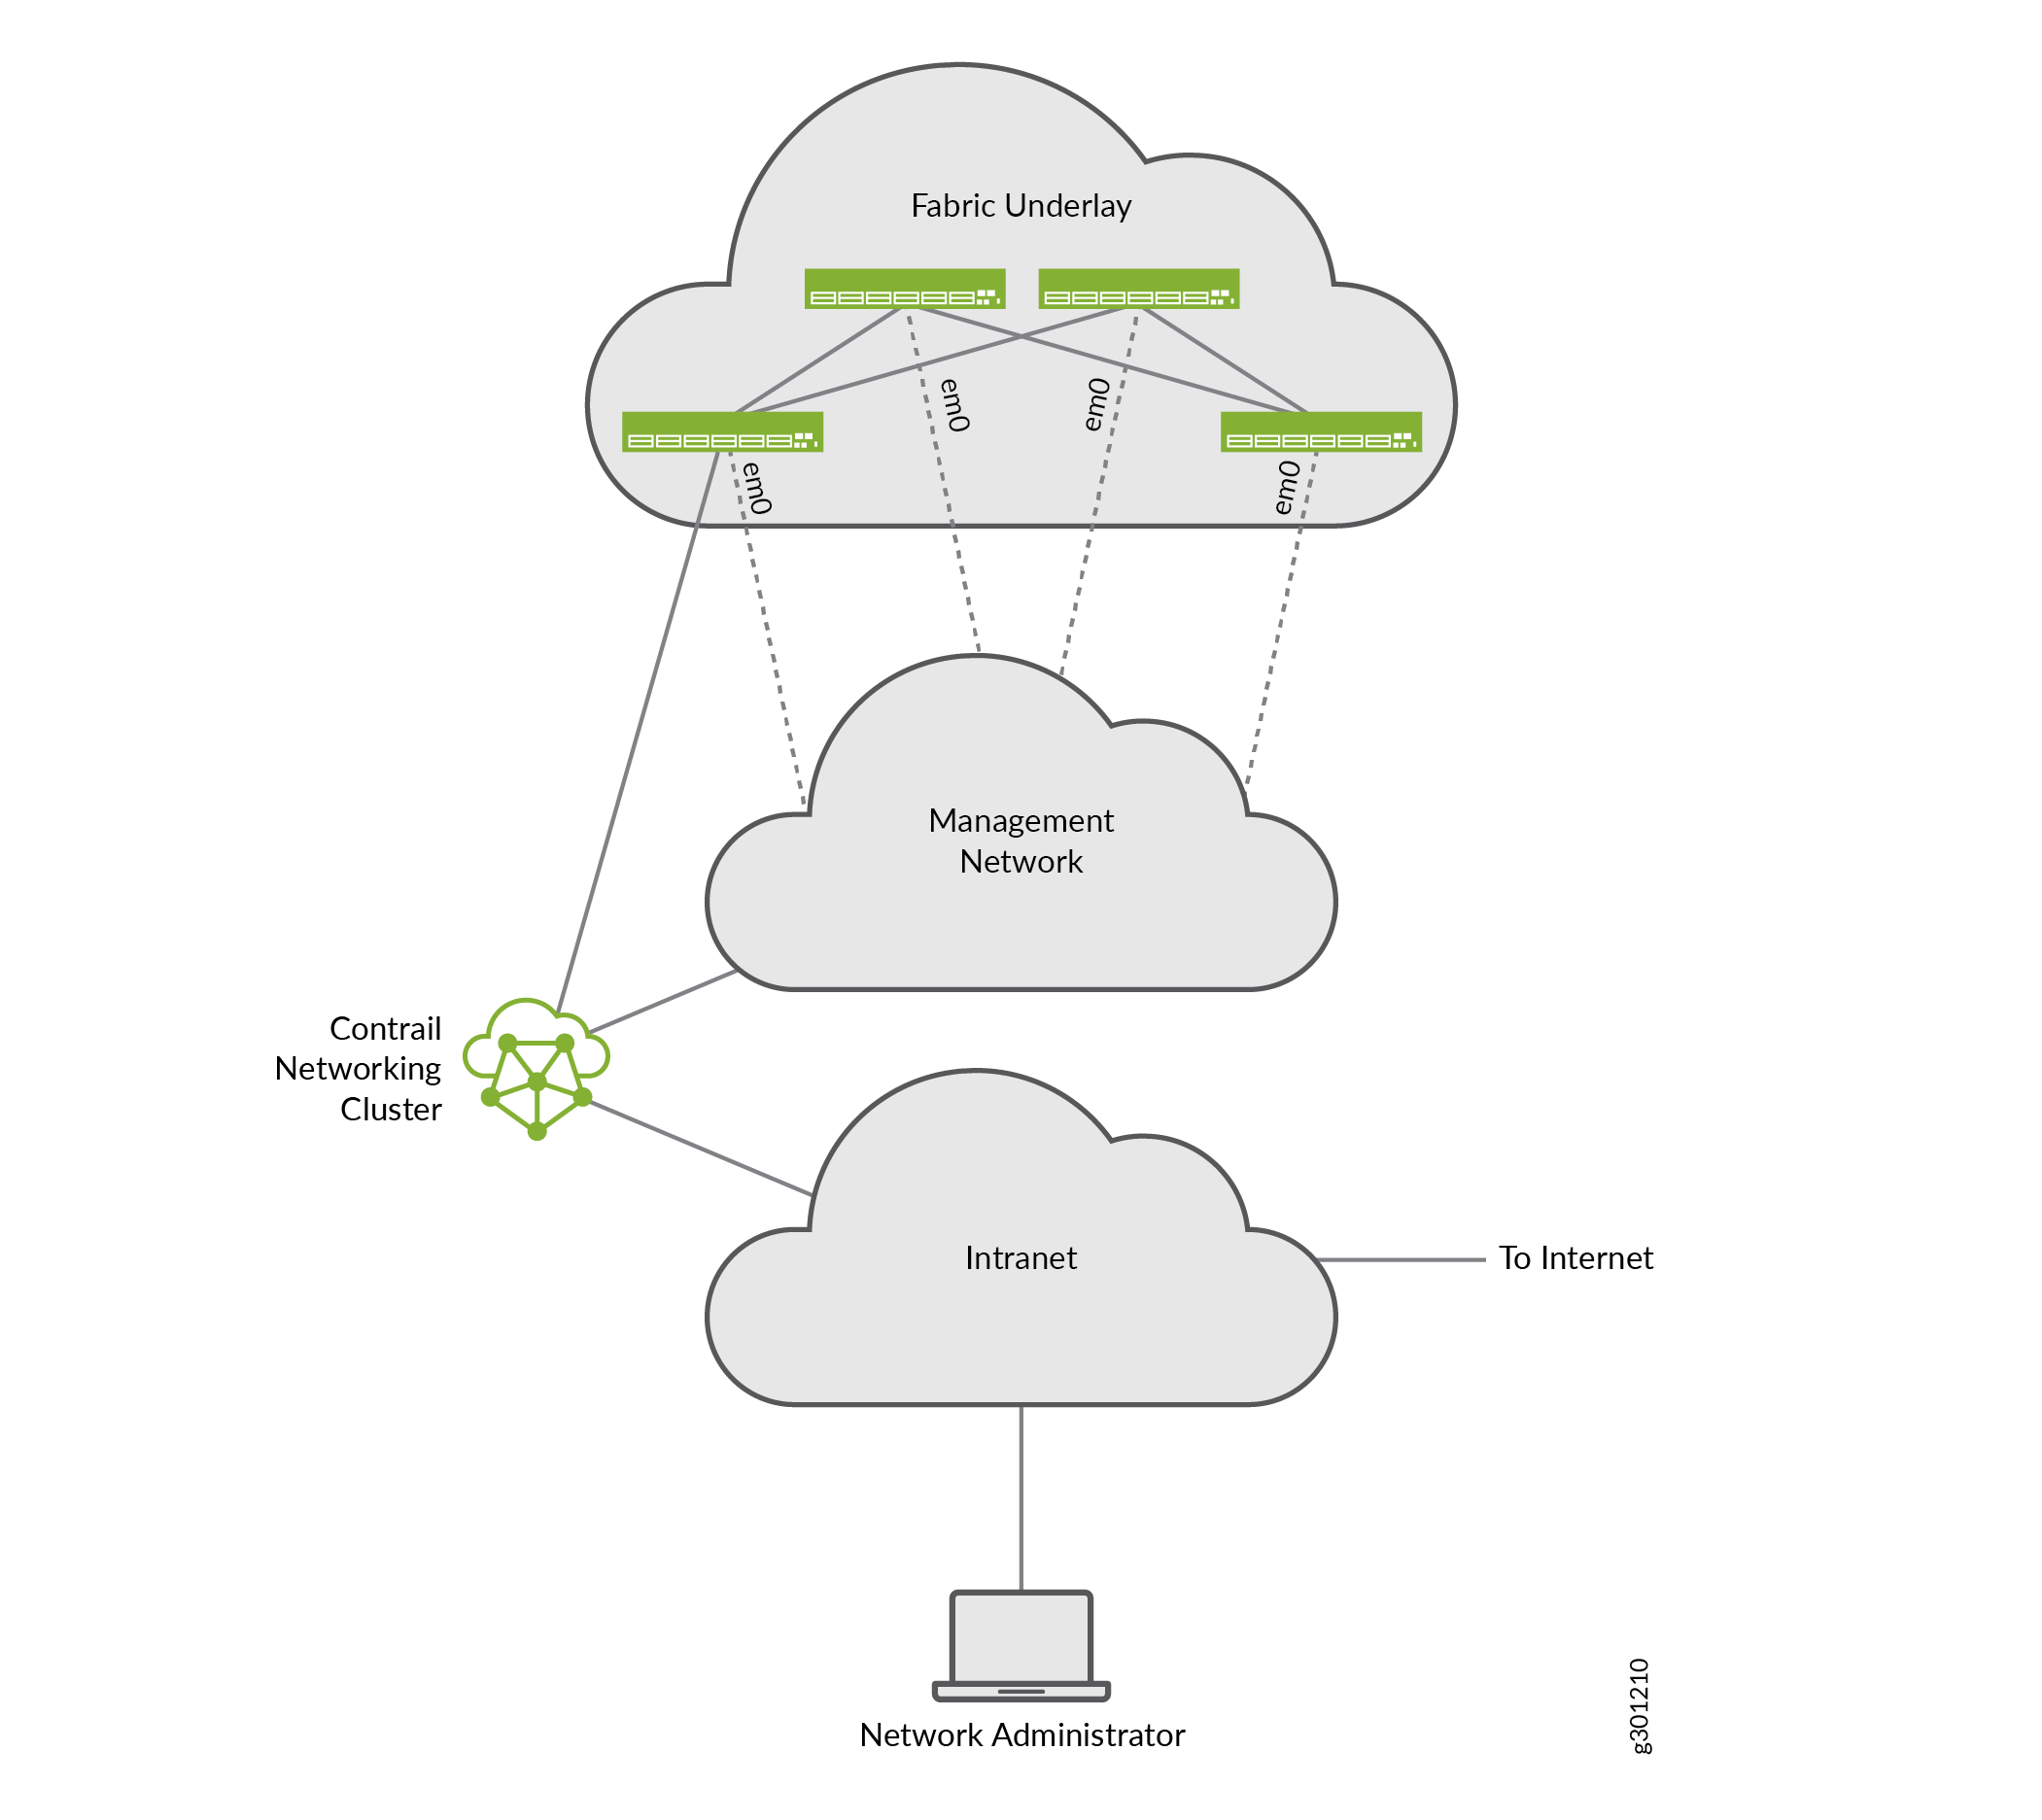
Here's the example Contrail Networking cluster you'll be setting up:
The installation instructions that we provide assume that you’re sitting at the network administrator’s station. We refer to this station as your local machine.
To minimize the number of servers used in this example, you’ll set up a cluster of collocated servers, which is different from a typical deployment. In a typical deployment, the cluster components are implemented as discrete nodes that can be distributed over multiple leaf switches to provide higher performance and availability.
Here’s a description of the network’s shown:
Network | Description |
|---|---|
Fabric underlay | The regular IP spine-and-leaf network made up of switches and routers. |
Management | The out-of-band management network that the Contrail Networking controller uses to discover and configure the switches in the fabric underlay network. |
Intranet | A general network that provides access for the network administrator to the Contrail Networking cluster, and for the cluster to the Internet. This can be the corporate intranet, or a lab network connected to the corporate intranet, or any other scheme that provides external management connectivity to the cluster. |
The Contrail Networking cluster consists of a number of servers or VMs providing the Contrail Networking and Contrail Insights functionality. You can create a cluster with any number of servers or VMs, depending on your needs.
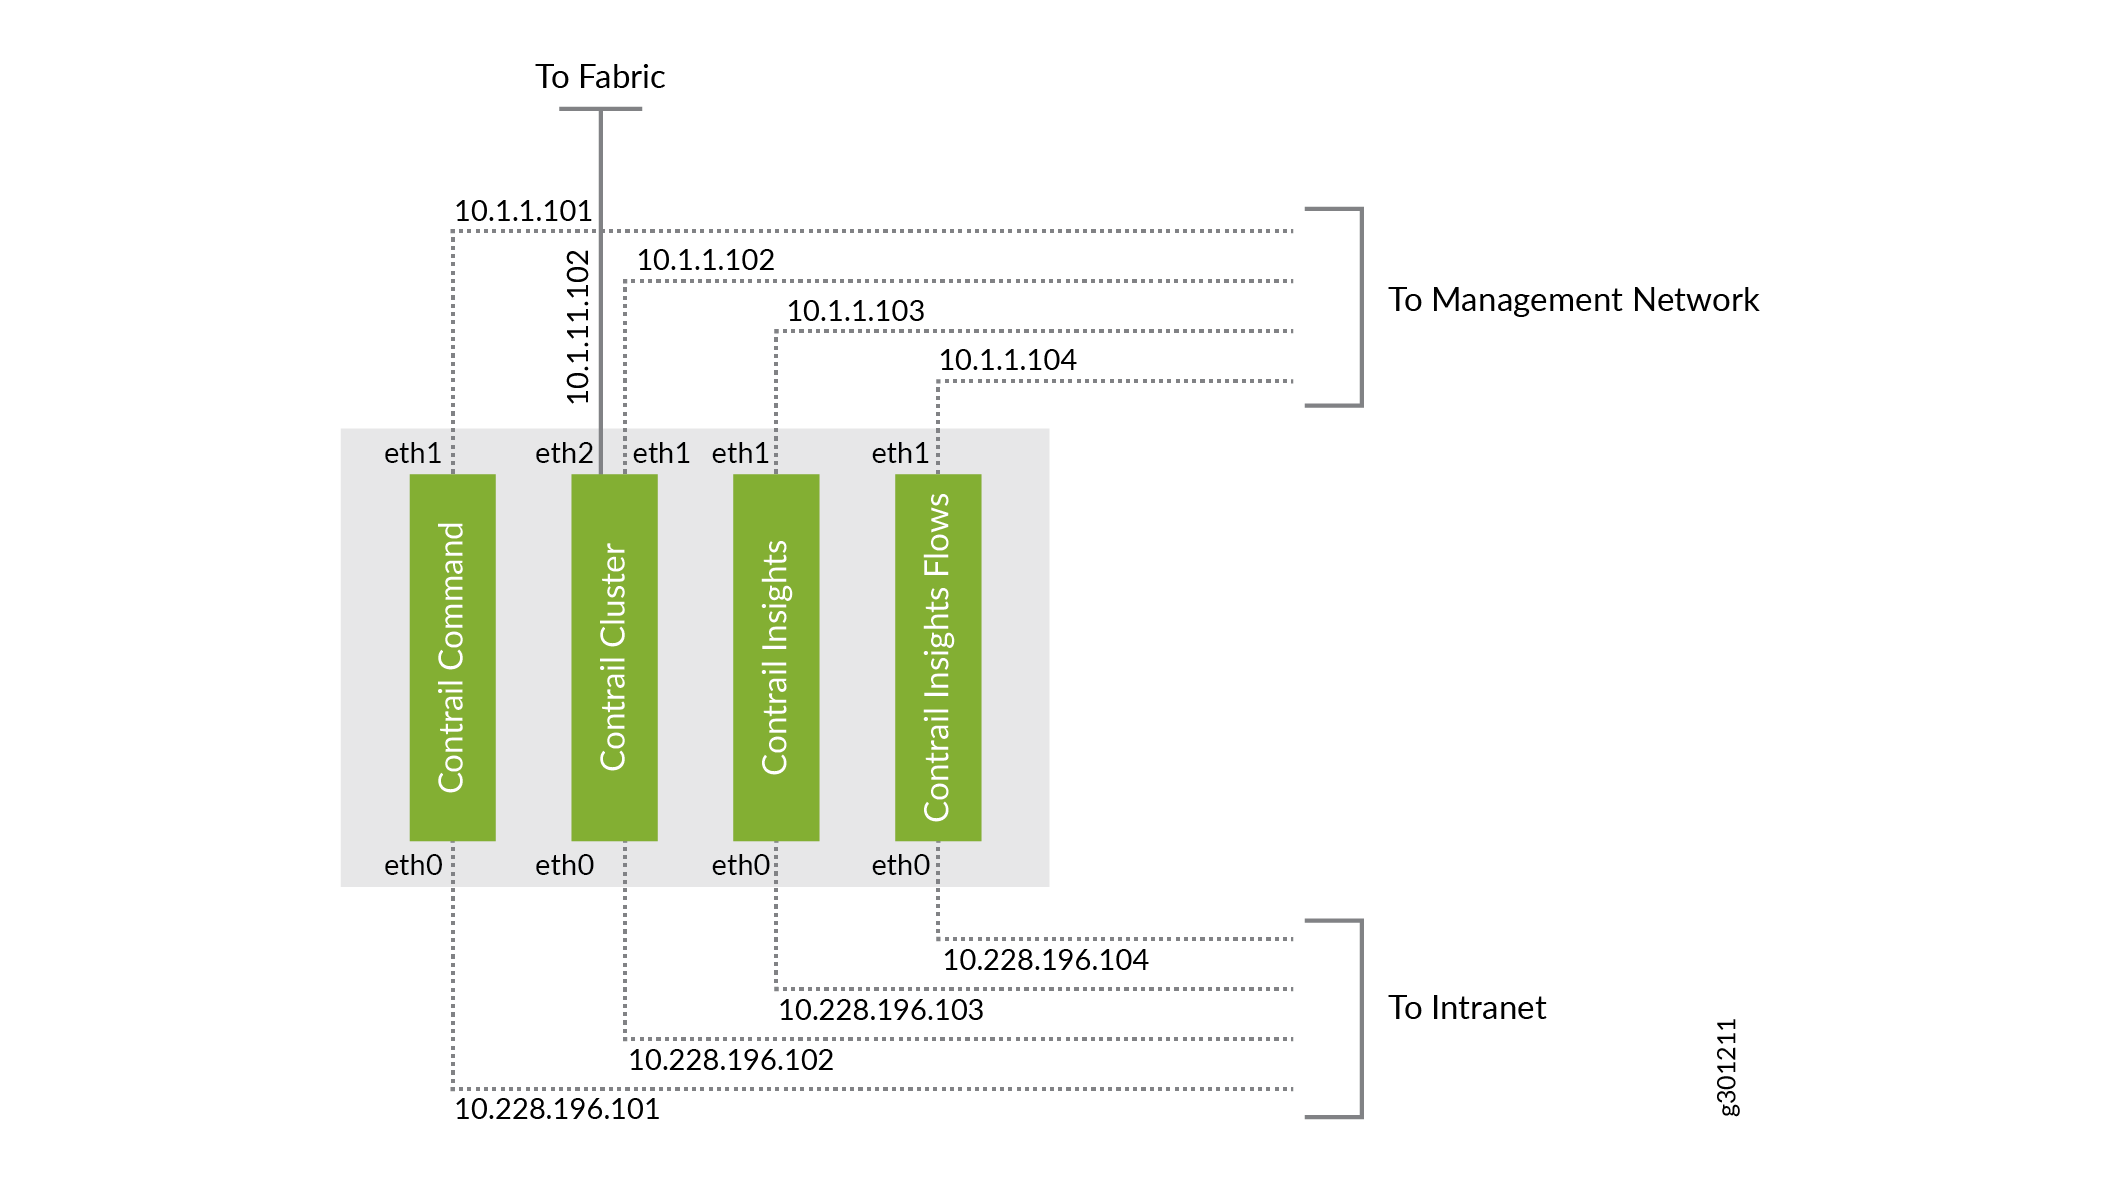
Here’s an example of a cluster made up of four servers followed by a description of the components running on the servers.
Servers | Description | Connectivity |
|---|---|---|
Contrail Command | Contains the Contrail Command application, which provides the UI that translates user intents to internal API calls to the other components. | Connects to the external network on eth0, reachable from the network administrator’s browser. |
Connects to the fabric management network on eth1 to configure the other Contrail Networking components. | ||
Contrail Cluster | Contains the collection of containers that provide the main Contrail Networking functionality, including the control, orchestration, service, and compute node roles. In this example, we’re placing most of the functionality into one server to reduce the number of servers you require. | Connects to the external network on eth0. |
Connects to the fabric management network on eth1 to configure the switches in the fabric. | ||
Connects to the fabric underlay on eth2. This is the main interface to the fabric to exchange routes and to provide and receive services. | ||
Contrail Insights | Contains the Contrail Insights application, formerly called AppFormix, which is an optional software application that allows you to monitor and troubleshoot VMs, containers, and physical switches and routers. | Connects to the external network on eth0. |
Connects to the fabric management network on eth1 to communicate with the other Contrail Networking components. | ||
Contrail Insights Flows | Contains the Contrail Insights Flows application, an optional software application that enables you to view sFlow-derived telemetry for devices in the fabric. | Connects to the external network on eth0. |
Connects to the fabric management network on eth1 for out-of-band flow monitoring. Note: If you want to support in-band flow monitoring, then connect the server directly to the fabric underlay. | ||
Note:
All servers in this example have at least four cores,
64-GB memory, 300-GB hard drive with at least 100 GB in the “ | ||
This component breakdown represents just one possible example. You can create a cluster that has a different number of servers and a different distribution of components and roles.
We refer to this network configuration and this component breakdown in various examples later. All IP addresses shown are /24.
Before You Begin
In preparation for installation, look through the Contrail Networking Supported Platforms List
Here are the software versions and container tag that we use in this example:
Software | Version |
|---|---|
Contrail Networking | 2005.1 |
Container tag | 2005.1.66 |
OpenStack | Queens |
OS | CentOS 7.8 with Linux kernel version 3.10.0-1127 |
Docker | Docker Community Edition 18.03.1 |
Additionally, you’ll need access to the Juniper Networks container registry (hub.juniper.net). If you don’t have access to the registry, send an email to contrail-registry@juniper.net to get your username and password.
Finally:
- Make all the physical connections:
- Connect the leaf and spine switches together in the fabric underlay.
- Connect the management interface of each switch to the management network.
- Connect the Contrail Networking servers to the management network and to the intranet.
- Connect the Contrail Cluster server to a leaf switch in the fabric underlay.
- Prepare
the servers:
- Install a fresh OS on each server. If you’re installing CentOS, you can select the minimal CentOS install, which installs much faster than the full CentOS install.
- Assign static IP addresses to each interface, ensuring that the IP addresses are within the proper subnets. You can assign the IP addresses during OS installation (easiest), or after. If you assign IP addresses after the OS installation, you’ll need to make the changes directly in /etc/sysconfig/network-scripts/ifcfg-xxx.
- Assign meaningful non-FQDN hostnames to each server (for
example, contrail-command, contrail-cluster, contrail-insights, contrail-insights-flows).
You can assign the hostnames during OS installation (easiest), or
you can assign hostnames after. If you assign hostnames after the
OS installation, you’ll need to make the changes directly in
/etc/hostsand use the hostnamectl set-hostname command. If you add an entry into the/etc/hostsfile, use the IP address of the management interface (that is, the IP address for eth1 in this example). - Create a root user and set a root password as part of OS installation.
For more details on how to prepare the servers, see How to Install Contrail Command and Provision Your Contrail Cluster.
- Prepare the switches:
- Attach a terminal or laptop to the serial console port of the switch and log in to the CLI. You’ll need console access in this phase because the next step resets the switches, resulting in loss of management port configuration. Most laptops no longer have serial ports so if you’re using a laptop, you’ll likely need an RJ-45 to DB-9 adapter and a USB to DB-9 adapter.
- Reset the switch to zero (request system zeroize).
- Repeat Step a and Step b for all switches in the fabric underlay.
Install Contrail Command
To install Contrail Command, first you'll install the prerequisite software packages on the Contrail Command server. Next, you'll create a YAML file containing the Contrail Command server information. Finally, you'll download and run the Contrail Command deployer image.
The server or VM where you run the Contrail Command deployer image can be different from the server or VM where you install Contrail Command. This example runs the Contrail Command deployer on the same server that later runs Contrail Command.
- From your local machine, log in to the Contrail Command server or VM using SSH.
- Install and start Docker.
- Install the prerequisite software used by YUM and Docker.
yum install -y yum-utils device-mapper-persistent-data lvm2
- Add the Docker Community Edition repository to the list
of YUM repositories for this machine.
yum-config-manager --add-repo https://download.docker.com/linux/centos/docker-ce.repo
- Install the version of Docker supported by the release
of Contrail you are installing. We install Docker Community Edition
18.03.1 here as an example.
yum install -y docker-ce-18.03.1.ce
- Start Docker.
systemctl start docker
- Enable Docker so that it automatically restarts when the
server or VM reboots.
systemctl enable docker
- Install the prerequisite software used by YUM and Docker.
- Retrieve the Contrail Command deployer image from the
Juniper Networks container registry.
- Log in to the registry.
docker login hub.juniper.net
Enter your hub.juniper.net credentials when prompted.
- Pull the Contrail Command deployer image for the release
you are installing. For example:
docker pull hub.juniper.net/contrail/contrail-command-deployer:2005.1.66
- Log in to the registry.
- Create the command_servers.yml configuration file on the Contrail Command server. This file provides
the following information to the Contrail Command deployer:
The IP address and login credentials of the server where you want to install Contrail Command. This is the Contrail Command server that you just set up.
The URL and login credentials of the Juniper Networks container registry and the container tag to use.
The passwords that you want to set for Contrail Command, including the main (keystone admin) password to log in to the UI.
Here’s a basic but fully functional example:
--- command_servers: server1: ip: 10.228.196.101 connection: ssh ssh_user: root ssh_pass: <password> sudo_pass: <password> ntpserver: <ntp-server> registry_insecure: false container_registry: hub.juniper.net/contrail container_tag: 2005.1.66 container_registry_username: <registry-username> container_registry_password: <registry-password> config_dir: /etc/contrail contrail_config: database: type: postgres dialect: postgres password: <password> keystone: assignment: data: users: admin: password: <password> insecure: true client: password: <password> - Run the contrail-command-deployer container to deploy the Contrail Command containers. In this example,
the
command_servers.ymlfile is located in the/rootdirectory.docker run -td --net host -v /root/command_servers.yml:/command_servers.yml --privileged --name contrail_command_deployer hub.juniper.net/contrail/contrail-command-deployer:2005.1.66
This command runs in the background (detached mode) and returns right away. To track the progress of the command:
docker logs -f contrail_command_deployer
- Verify that the Contrail Command containers are running.
[root@contrail-command ~]# docker ps -a
CONTAINER ID  IMAGE    <trimmed>   STATUS  <trimmed>  NAMES
2e62e778aa91  hub.juniper.net/...  Up      <trimmed>  contrail_command
c8442860e462  circleci/postgre...  Up      <trimmed>  contrail_psql
57a666e93d1a  hub.juniper.net/...  Exited  <trimmed>  contrail_command_deployer
The contrail_command container is the GUI and the contrail_psql container is the database. Both containers should have a status of Up.
The contrail_command_deployer container should have a status of Exited because it exits when the installation is complete.
Create the Contrail Networking Cluster
Now that you’ve installed Contrail Command, let’s use it to create the Contrail Networking cluster.
- Open a browser on your local machine and navigate to Contrail
Command on port 9091 (for example,
https://10.228.196.101:9091). Use the Contrail Command server IP address that is reachable from your local machine, which in this example is the eth0 IP address.Leave the Select Cluster field blank and log in using the
admincredentials you specified in thekeystonesection of thecommand_servers.ymlfile.When you log in to Contrail Command and there is no preexisting cluster, which is the case for a fresh install, you start in the Inventory step of the Setup wizard that guides you through cluster creation. The left-nav bar tracks your progress through these steps.
- Let Contrail Command know about the login credentials
you use for the Contrail Cluster, Contrail Insights, and Contrail
Insights Flows servers or VMs. You will reference these credentials
in Step 3 when you add those servers.
- Click the Credentials tab and click Add to bring up the Add dialog box. You are adding the usernames and passwords for the Contrail Cluster, Contrail Insights, and Contrail Insights Flows servers or VMs that you set up earlier. You need to add unique credentials only. For example, if you set up two servers with the same username and password, you need to add them only once.
- Specify a name for these credentials and the username and password. Click Add to add the credentials.
- If you use the same username and password to log in to all servers, then proceed to Step 3. Otherwise, repeat Step a and Step b until you’ve finished adding all unique credentials.
- Let
Contrail Command know about the Contrail Cluster, Contrail Insights,
and Contrail Insights Flows servers.
- Click the Server tab and click Add to bring up the Create Server dialog box.
- Select Detailed mode.
- Fill
in the remaining fields and then click Create. Here are
the settings used for each server in this example:
Field
Contrail Cluster
Contrail Insights
Contrail Insights Flows
Workload Type
Physical/Virtual Node
Physical/Virtual Node
Physical/Virtual Node
Hostname
contrail-cluster
contrail-insights
contrail-insights-flows
Management IP
10.1.1.102
10.1.1.103
10.1.1.104
Management Interface
eth1
eth1
eth1
Credentials
<select from drop-down list>
<select from drop-down list>
<select from drop-down list>
Network Interfaces (click Add)
Name: eth0
IP Address: 10.228.196.102
Name: eth0
IP Address: 10.228.196.103
Name: eth0
IP Address: 10.228.196.104
Name: eth1
IP Address: 10.1.1.102
Name: eth1
IP Address: 10.1.1.103
Name: eth1
IP Address: 10.1.1.104
Name: eth2
IP Address: 10.1.11.102
–
–
- Repeat Step a through Step c until you’ve added information about all servers.
- Click Next to move to the Provisioning Options step of the Setup wizard.
- Fill in the provisioning
options fields. When you are done, click Next to move to
the Control Nodes step of the Setup wizard.
Here are the values used in this example:
Field
Value
Notes
Provisioning Manager
Contrail Enterprise Multicloud
The only supported selection.
Cluster Name
my-cluster
–
Container Registry
hub.juniper.net/contrail
Juniper Networks main Contrail registry.
Insecure
Unchecked
–
Container Registry Username
<registry-username>
–
Container Registry Password
<registry-password>
–
Contrail Version
2005.1.66
Container tag.
Domain Suffix
local
Contrail Networking adds this suffix to the server non-FQDN hostname.
NTP Server
<ntp-server>
–
Default Vrouter Gateway
10.1.11.2
The IP address of the interface on the leaf switch that connects to the Contrail Cluster server’s fabric underlay interface. Because this switch has been reset to zero, you’ll need to configure the switch interface with this IP address later.
Encapsulation Priority
VXLAN,MPLSoUDP,MPLSoGRE
The only supported encapsulation.
Fabric Management
Checked
–
Contrail Configuration (click Add)
Key: CONTROL_NODES
Value: 10.1.11.102
Specifies the fabric underlay interface IP address of the Contrail Control node. In this example, you’ll be installing the control node on the Contrail Cluster server. This IP address is therefore the IP address that connects the Contrail Cluster server to the fabric underlay.
Key: PHYSICAL_INTERFACE
Value: eth2
Name of the interface that connects to the fabric underlay.
Key: TSN_NODES
Value: 10.1.11.102
Specifies the fabric underlay interface IP address of the Contrail Service node. In this example, you will be installing the service node on the Contrail Cluster server. This IP address is therefore the IP address that connects the Contrail Cluster server to the fabric underlay.
- Assign a server for the Contrail Control node. In this
example, the Contrail Cluster server contains the control node.
- Select contrail-cluster from the Available servers list and move it to the Assigned Control nodes list.
- Click Next to move to the Orchestrator Nodes step of the Setup wizard.
- Assign a server for the OpenStack orchestrator node and
configure the OpenStack Kolla parameters. In this example, the Contrail
Cluster server contains the orchestrator node.
You’re required to assign an OpenStack orchestrator node even if you’re using a different orchestrator for instantiating compute endpoints. The OpenStack orchestrator node is used by the cluster.
- Select contrail-cluster from the Available servers list and move it to the Assigned Openstack nodes list.
- Select Show Advanced to view additional provisioning parameters.
- Scroll down to Kolla Globals and click Add.
- Add the following key/value pairs to disable ironic bare-metal
server provisioning and to enable swift storage.
Key
Value
enable_haproxy
no
enable_ironic
no
enable_swift
yes
swift_disk_partition_size
20GB
Note We won’t be changing any of the default Kolla passwords. By default, the Contrail Networking cluster username is admin and the password is contrail123.
- Click Next to move to the Compute Nodes step of the Setup wizard.
- Assign a server for the compute node. The compute node
is used by the cluster. In this example, the Contrail Networking cluster
contains a single compute node that resides on the Contrail Cluster
server.
- Select contrail-cluster from the Available servers list and move it to the Assigned Compute nodes list.
- Specify the Default Vrouter Gateway. In this example, the gateway is 10.1.11.2 as explained in Step 4.
- Click Next to move to the Contrail Service Nodes step of the Setup wizard.
- Assign a server for the service node. In this example,
the Contrail Cluster server contains the service node.
- Select contrail-cluster from the Available servers list and move it to the Assigned Service nodes list.
- Specify the Default Vrouter Gateway. In this example, the gateway is 10.1.11.2 as explained in Step 4.
- Click Next to move to the AppFormix Nodes step of the Setup wizard.
- Assign your AppFormix node servers.
Note Appformix was renamed Contrail Insights. The Appformix name is still used in the UI.
The AppFormix node consists of the Contrail Insights server and the Contrail Insights Flows server.
- Select contrail-insights from the Available servers list and move it to the Assigned AppFormix nodes list.
- Select contrail-insights-flows from the Available servers list and move it to the Assigned AppFormix nodes list.
- Scroll down to the Roles field for the contrail-insights-flows server and use the drop-down list to change the role to appformix_bare_host_node.
- Click Next to move to the AppFormix Flows step of the Setup wizard.
- Assign your AppFormix Flows node servers. In this example,
the AppFormix Flows node is the Contrail Insights Flows server.
- Select contrail-insights-flows from the Available servers list and move it to the Assigned AppFormix Flows nodes list.
- Select Out of Band as the provisioning type.
- Specify the Virtual IP Address. This is the virtual IP address that devices use to reach the Contrail Insights Flows node from the fabric management network. This must be an unused IP address in the fabric management subnet (for example, 10.1.1.105).
- Click Next to move to the Summary step of the Setup wizard.
- Review your settings. Click Provision after
verifying your settings.
The cluster provisioning process begins. The provisioning process time varies by environment and deployment, and can take 90 minutes or more.
- (Optional) Monitor the provisioning process by logging in to the Contrail Command server and entering the docker exec contrail-command tail /var/log/contrail/deploy.log command at the Linux prompt.
- When the provisioning process finishes, click Proceed
to Login from Contrail Command.
You are redirected to the Contrail Command login screen.
- Log in to the cluster:
Select Cluster: Select the Contrail Networking cluster you just created from the drop-down list. The cluster is shown by the cluster name followed by a random string.
Username: Enter the username for the cluster. The default username is admin.
Password: Enter the password for the cluster. The default password is contrail123.