Loading Configuration Files
Loading configuration files on the device are helpful for loading parts of configuration files that might be common across many devices within a network.
Examples for Loading a Configuration from a File or the Terminal
You can create a file containing configuration data for a Juniper Networks device, copy the file to the local device, and then load the file into the CLI. After you have loaded the file, you can commit it to activate the configuration on the device, or you can edit the configuration interactively using the CLI and commit the configuration at a later time.
You can also create a configuration while typing at the terminal and then load the configuration. Loading a configuration from the terminal is useful when you are cutting existing portions of the configuration and pasting them elsewhere in the configuration.
To load an existing configuration file that is located on the device, you use the
load configuration mode command:
[edit]
user@host# load (factory-default | merge | override | patch | replace | set | update) filename <relative> <json>
To load a configuration from the terminal, you use the following version of the
load configuration mode command. Press Ctrl-d to end the
input.
[edit]
user@host# load (factory-default | merge | override | patch | replace | set | update) terminal <relative> <json>
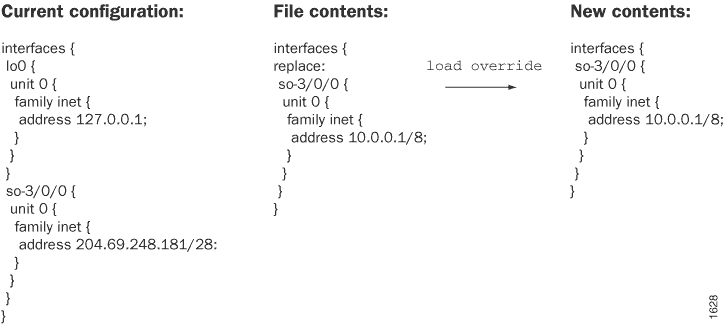
To replace an entire configuration, you specify the override option
at any level of the hierarchy. A load override operation completely
replaces the current candidate configuration with the file you are loading. Thus, if
you saved a complete configuration, you use this option.
An override operation discards the current candidate configuration
and loads the configuration in filename or
the configuration that you type at the terminal. When you use the
override option and commit the configuration, all system
processes reparse the configuration.
To replace portions of a configuration, you specify the replace
option. The load replace operation looks for
replace: tags that you added to the loaded file. The operation
then replaces those parts of the candidate configuration with whatever is specified
after the tag. This is useful when you want more control over exactly what is being
changed. For this operation to work, you must include replace: tags
in the file or configuration that you type at the terminal. The software searches
for the replace: tags, deletes the existing statements of the same
name, if any, and replaces them with the incoming configuration. If no statement of
the same name exists, the replace operation adds to the
configuration the statements marked with the replace: tag.
If, in an override or merge operation, you specify
a file or type text that contains replace: tags, the
replace: tags are ignored. In this scenario, the
override or merge operation takes precedence
and is performed.
If you are performing a replace operation, and if the file that you
specify lacks replace: tags, the replace operation
runs as a merge operation. The replace operation
also runs as a merge operation if the text you type lacks
replace: tags. This information might be useful if you are
running automated scripts and cannot know in advance whether the scripts need to
perform a replace operation or a merge operation.
The scripts can use the replace operation to cover either case.
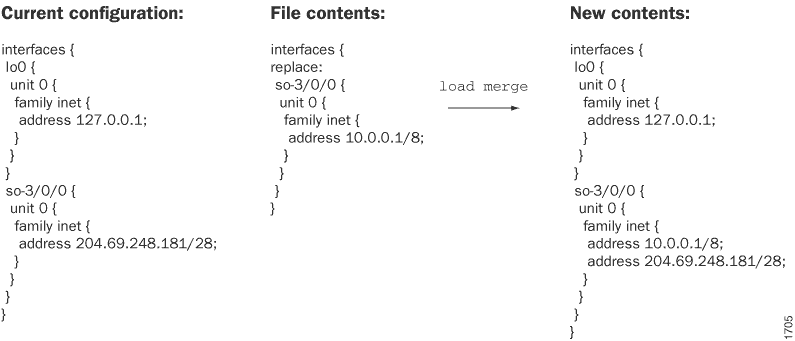
The load merge operation merges the configuration from the saved
file or terminal with the existing candidate configuration. This information is
useful if you are adding new configuration sections. For example, suppose that you
are adding a BGP configuration to the [edit protocols] hierarchy
level, where there was no BGP configuration before. You can use the load
merge operation to combine the incoming configuration with the existing
candidate configuration. If the existing configuration and the incoming
configuration contain conflicting statements, the statements in the incoming
configuration override those in the existing configuration.
To replace only those parts of the configuration that have changed, you specify the
update option at any level of the hierarchy. The load
update operation compares the candidate configuration and the new
configuration data. This operation changes only those parts of the candidate
configuration that are different from the new configuration. You would use this
operation, for example, if there is an existing BGP configuration and the file you
are loading changes it in some way.
The merge, override, and update
options support loading configuration data in JavaScript Object Notation (JSON)
format. When loading configuration data that uses JSON format, you must specify the
json option in the command. To load JSON configuration data
that contains unordered list entries, that is, list entries where the list key is
not necessarily the first element in the list entry, see Load JSON Configuration Data With Unordered List Entries.
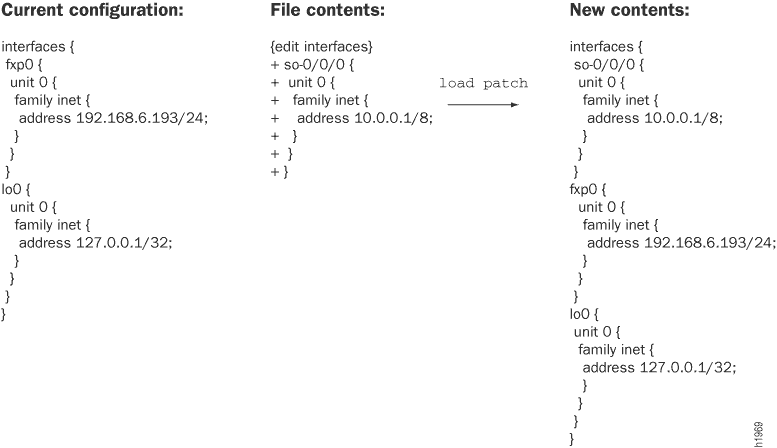
To change part of the configuration with a patch file, you specify the
patch option. The load patch operation loads a
file or terminal input that contains configuration changes. First, on a device that
already has the configuration changes, you type the show | compare
command to output the differences between two configurations. Then you can load the
differences on another device. The advantage of the load patch
command is that it saves you from having to copy snippets from different hierarchy
levels into a text file before loading them into the target device. This might be a
useful time saver if you are configuring several devices with the same options. For
example, suppose that you configure a routing policy on router1 and you want to
replicate the policy configuration on router2, router3, and router4. You can use the
load patch operation.
In this example, you first run the show | compare command.
Example:
user@router1# show | compare rollback 3
[edit protocols ospf]
+ export default-static;
- export static-default
[edit policy-options]
+ policy-statement default-static {
+ from protocol static;
+ then accept;
+ }Continuing this example, you copy the output of the show | compare
command to the clipboard, making sure to include the hierarchy levels. On router2,
router3, and router4, you type load patch terminal and paste the
output. You then press Enter and press Ctrl-d to end the operation. If the patch
input specifies different values for an existing statement, the patch input
overrides the existing statement.
To use the merge, replace, set, or
update option without specifying the full hierarchy level, you
specify the relative option. This option loads the incoming
configuration relative to your current edit point in the configuration hierarchy.
Example:
[edit system]
user@host# show static-host-mapping
bob sysid 987.654.321ab
[edit system]
user@host# load replace terminal relative
[Type ^D at a new line to end input]
replace: static-host-mapping {
bob sysid 0123.456.789bc;
}
load complete
[edit system]
user@host# show static-host-mapping
bob sysid 0123.456.789bc;
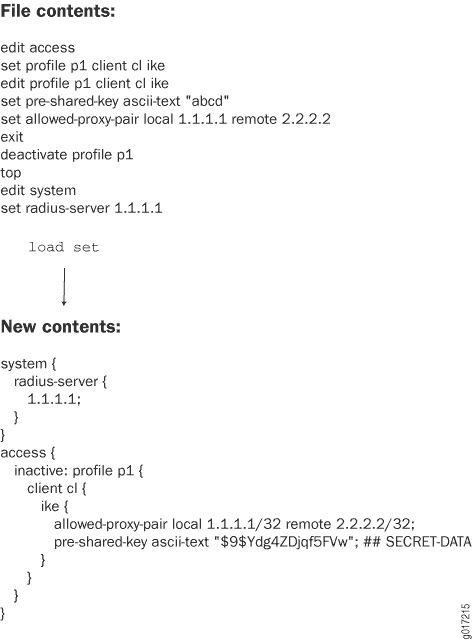
To load a configuration that contains set configuration mode
commands, specify the set option. This option executes the
configuration instructions line by line as they are stored in a file or from a
terminal. The instructions can contain any configuration mode command, such as
set, edit, exit, and
top.
To copy a configuration file from another network system to the local router, you can use the SSH and Telnet utilities, as described in the CLI Explorer.
If you are working in a Common Criteria environment, system log messages are
created whenever a secret attribute is changed (for example,
password changes or changes to the RADIUS shared secret). These changes are
logged during the following configuration load operations:
load merge load replace load override load update
How Character Encoding Works on Juniper Networks Devices
Junos OS configuration data and operational command output might contain non-ASCII characters, which are outside of the 7-bit ASCII character set. When displaying operational or configuration data in certain formats or within a certain type of session, the software escapes and encodes these characters. The software escapes or encodes the characters using the equivalent UTF-8 decimal character reference.
The CLI attempts to display any non-ASCII characters in configuration data that is produced in text, set, or JSON format. The CLI also attempts to display these characters in command output that is produced in text format. In the exception cases, the CLI displays the UTF-8 decimal character reference instead. (Exception cases include configuration data in XML format and command output in XML or JSON format,) In NETCONF and Junos XML protocol sessions, you see a similar result if you request configuration data or command output that contains non-ASCII characters. In this case, the server returns the equivalent UTF-8 decimal character reference for those characters for all formats.
For example, suppose the following user account, which contains the Latin small letter n with a tilde (ñ), is configured on the device.
[edit]
user@host# set system login user mariap class super-user uid 2007 full-name "Maria Peña"
When you display the resulting configuration in text format, the CLI prints the corresponding character.
[edit]
user@host# show system login user mariap
full-name "Maria Peña";
uid 2007;
class super-user;
When you display the resulting configuration in XML format in the CLI, the ñ character
maps to its equivalent UTF-8 decimal character reference
ñ. The same result occurs if you display the
configuration in any format in a NETCONF or Junos XML protocol session.
[edit]
user@host# show system login user mariap | display xml
<rpc-reply xmlns:junos="http://xml.juniper.net/junos/17.2R1/junos">
<configuration junos:changed-seconds="1494033077" junos:changed-localtime="2017-05-05 18:11:17 PDT">
<system>
<login>
<user>
<name>mariap</name>
<full-name>Maria Peña</full-name>
<uid>2007</uid>
<class>super-user</class>
</user>
</login>
</system>
</configuration>
<cli>
<banner>[edit]</banner>
</cli>
</rpc-reply>
When you load configuration data onto a device, you can load non-ASCII characters using their equivalent UTF-8 decimal character references.
About Specifying Statements and Identifiers
This topic provides details about CLI container statements and leaf statements so that you know how to must specify them when creating ASCII configuration files. This topic also describes how the CLI performs type checking to verify that the data you entered is in the correct format.
Specifying Statements
Statements are shown one of two ways, either with braces ({ }) or without:
-
Statement name and identifier, with one or more lower-level statements enclosed in braces:
statement-name1 identifier-name { statement-name2; additional-statements; } -
Statement name, identifier, and a single identifier:
statement-name identifier-name1 identifier-name2;
The statement-name is the name of the statement. The identifier-name is a name or other string that uniquely identifies an instance of a statement. You use an identifier when a statement can be specified more than once in a configuration.
When specifying a statement, you must specify a statement name, an identifier name, or both, depending on the statement hierarchy.
You specify identifiers in one of the following ways:
-
identifier-name—The identifier-name is a keyword used to uniquely identify a statement when a statement can be specified more than once in a statement.
-
identifier-name value—The identifier-name is a keyword, and the value is a required option variable.
-
identifier-name [value1 value2 value3
...]—The identifier-name is a keyword that accepts multiple values. The brackets are required when you specify a set of values; however, they are optional when you specify only one value.
The following examples illustrate how statements and identifiers are specified in the configuration:
protocol {						# Top-level statement (statement-name).
	ospf {										# Statement under "protocol" (statement-name).
		area 0.0.0.0 {					# OSPF area "0.0.0.0" (statement-name identifier-name),
			interface so-0/0/0 {	# which contains an interface named "so-0/0/0."
				hello-interval 25;	# Identifier and value (identifier-name value).
				priority 2;					# Identifier and value (identifier-name value).
				disable;						# Flag identifier (identifier-name).
			}
			interface so-0/0/1;	  # Another instance of "interface," named so-0/0/1,
		}									    # this instance contains no data, so no braces
	}										     # are displayed.
}
policy-options {				# Top-level statement (statement-name).
	term term1 {					# Statement under "policy-options"
											# (statement-name value).
		from {							# Statement under "term" (statement-name).
			route-filter 10.0.0.0/8 orlonger reject;			# One identifier ("route-filter") with
			route-filter 127.0.0.0/8 orlonger reject;			# multiple values.
			route-filter 128.0.0.0/16 orlonger reject;
			route-filter 149.20.64.0/24 orlonger reject;
			route-filter 172.16.0.0/12 orlonger reject;
			route-filter 191.255.0.0/16 orlonger reject;
		}
		then {							# Statement under "term" (statement-name).
			next term;				# Identifier (identifier-name).
		}
	}
}
When you create an ASCII configuration file, you specify statements and identifiers.
Each statement has a preferred style, and the CLI uses that style when displaying
the configuration in response to a configuration mode show command.
You can specify statements and identifiers in one of the following ways:
-
Statement followed by identifiers:
statement-name identifier-name [...] identifier-name value [...];
-
Statement followed by identifiers enclosed in braces:
statement-name { identifier-name; [...] identifier-name value; [...] } -
For some repeating identifiers, you can use one set of braces for all the statements:
statement-name {
    identifier-name value1;
    identifier-name value2;
}
Performing CLI Type Checking
When you specify identifiers and values, the CLI performs type checking to verify that the data you entered is in the correct format. For example, for a statement in which you must specify an IP address, the CLI requires that you enter an address in a valid format. Otherwise, an error message indicates what you need to type. lists the data types the CLI checks. The following are CLI configuration input types:
|
Data Type |
Format |
Examples |
|---|---|---|
|
Physical interface name (used in the [ |
|
Correct:
Incorrect:
|
|
Full interface name |
|
Correct:
Incorrect:
|
|
Full or abbreviated interface name (used in places other than the
[ |
|
Correct: |
|
IP address |
|
Correct:
Sample translations:
|
|
IP address (destination prefix) and prefix length |
|
Correct:
Sample translations:
|
|
International Organization for Standardization (ISO) address |
|
Correct:
Sample translations:
|
|
OSPF area identifier (ID) |
|
Correct:
Sample translations:
|
About Loading a Configuration from a File
The following examples demonstrate the process of loading a configuration from a file.

Upload a Configuration File
You can create a configuration file on your local system, copy the file to the device, and then load the file into the CLI. After you have loaded the configuration file, you can commit it to activate the configuration on the device. You can also edit the configuration interactively using the CLI and commit it at a later time.
To upload a configuration file from your local system:
To view results of the configuration steps before committing the configuration, type the
show command at the user prompt.
To commit these changes to the active configuration, type the commit
command at the user prompt. You can also edit the configuration interactively using the CLI
and commit it at a later time.
Load JSON Configuration Data With Unordered List Entries
The Junos schema defines certain configuration objects as lists. In JSON configuration data, a list instance is encoded as a name/array pair, and the array elements are JSON objects. Generally, the order of members in a JSON-encoded list entry is arbitrary because JSON objects are fundamentally unordered collections of members. However, the Junos schema requires that list keys precede any other siblings within a list entry and appear in the order specified by the schema.
For example, the user object at the [edit system
login] hierarchy level is a list where
name is the list key that uniquely
identifies each user.
list user {
  key name;
  description "Username";
  uses login-user-object;
}
In the following sample configuration data, the list key
(name) is the first element for each user.
By default, when you load JSON configuration data, Junos devices
require that the list keys precede any other siblings within a list
entry and appear in the order specified by the schema.
{
    "configuration" : {
        "system" : {
            "login" : {
                "user" : [
                {
                    "name" : "operator",
                    "class" : "operator",
                    "uid" : 3001
                },
                {
                    "name" : "security-admin",
                    "class" : "super-user",
                    "uid" : 3002
                }
                ]
            }
        }
    }
}
Junos devices provide two options to load JSON configuration data that contains unordered list entries, that is, list entries where the list key is not necessarily the first element.
-
Use the
request system
                                                  convert-json-configuration
operational mode command to produce JSON configuration data with ordered list entries before loading the data on the device. -
Configure the
reorder-list-keysstatement at the[edit system configuration input format json]hierarchy level. After you configure the statement, you can load JSON configuration data with unordered list entries, and the device reorders the list keys as required by the Junos schema during the load operation.
When you configure the reorder-list-keys
statement, the load operation can take significantly longer
to parse the configuration, depending on the size of the
configuration and the number of lists. Thus, for large
configurations or configurations with many lists, we
recommend using the request system
convert-json-configuration command instead
of the reorder-list-keys statement.
For example, suppose the user-data.json file contains
the following JSON configuration. If you tried to load the
configuration, the device would emit a load error for
admin2 because the list key
name is not the first element in that list
entry.
user@host> file show /var/tmp/user-data.json
{
    "configuration" : {
        "system" : {
            "login" : {
                "user" : [
                {
                    "name" : "admin1",
                    "class" : "super-user",
                    "uid" : 3003
                },
                {
                    "class" : "super-user",
                    "name" : "admin2",
                    "uid" : 3004
                }
                ]
            }
        }
    }
}
If you use the request system convert-json-configuration
command with the previous file as input, the command generates the
specified output file with JSON configuration data that the Junos
device can parse during the load operation.
user@host> request system convert-json-configuration /var/tmp/user-data.json output-filename user-data-ordered.json

user@host> file show user-data-ordered.json
{
  "configuration":{
    "system":{
      "login":{
        "user":[
          {
            "name":"admin1",
            "class":"super-user",
            "uid":3003
          },
          {
            "name":"admin2",
            "class":"super-user",
            "uid":3004
          }
        ]
      }
    }
  }
}
Alternatively, you can configure the reorder-list-keys
configuration statement.
user@host# set system configuration input format json reorder-list-keys
user@host# commit
After you configure the statement, you can load the original JSON configuration file with unordered list entries, and the device handles the list entries when it parses the configuration.
user@host# load merge json /var/tmp/user-data.json
load complete